Assigning resources to a trip
The Trip Folder allows you to assign resources to a trip in three different ways:
-
Using the Trip Info tab
-
Using the Stops tab
-
Using the Assign Driver/Equipment window
Using the Trip Info tab
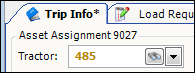
You can use the fields in the top section of the Trip Folder’s Trip Info tab to assign a tractor, drivers, trailers, and/or a carrier to a trip. The system automatically changes the status of the trip to Planned. It displays the assigned resources on the Stops tab.

You cannot use the Trip Info tab to change the status of a trip to Dispatched, Started or Completed. You must use the Assign Driver/Equipment window instead.
|


Using the Stops tab
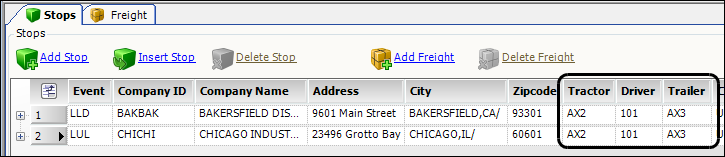
You can use the resource fields on the Trip Folder’s Stops tab to assign resources.
-
With the trip opened in the Trip Folder, go to the Stops tab.
-
For the first stop on the trip, make entries in these fields as needed:
Tractor
ID of the tractor being used for the trip.
Driver 1
ID of the lead driver who is to execute the trip.
Driver 2
Enter the ID of the co-driver.
Trailer 1
Enter the ID of the primary trailer being used for the trip.
Trailer 2
Enter the ID of the secondary trailer.
Carrier
Enter the carrier ID.
The system copies the resource IDs from the first stop line to the other stops on the trip segment.
-
Click
 Save.
Save.The system automatically:
-
Displays the IDs of the assigned resources at the top of the Trip Info tab.
-
Changes the status of the trip segment from Available to Planned.

-
|
Using the Assign Driver/Equipment window
To make resource assignments, you also can use the Assign Driver/Equipment window, which is accessed by going to Edit > Asset Assignment. The window can be used to:
-
Assign resources
-
Start or complete a trip
-
Specify whether the trip should begin and/or end with an empty move
The Assign Driver/Equipment window is shown here with sample data.
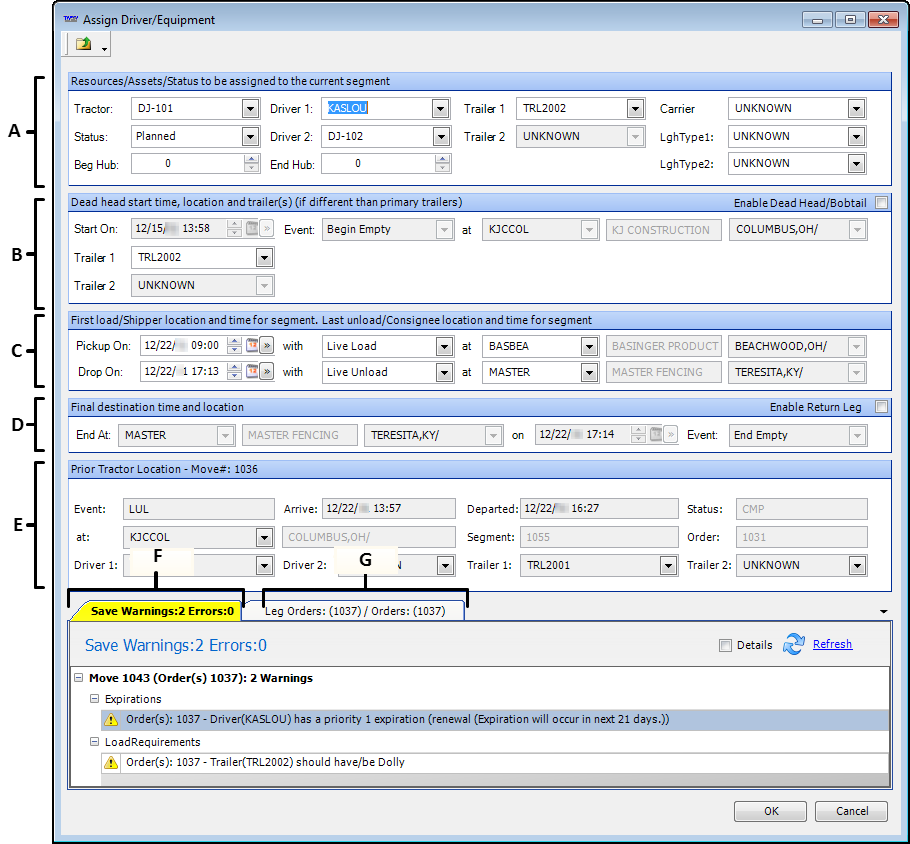
The letters shown below correspond with the callouts in the illustration.
A |
These fields allow you to assign the resources that are to haul the load. |
B |
Initially, the system displays read-only information about the first pickup. However, if the tractor currently is not located at the start location of the trip, you can select the Enable Dead Head/Bobtail checkbox to indicate that the trip is to start with a bobtail or deadhead. You then can record the location where the tractor will begin empty, as well as the date/time. |
C |
Identifies the locations and dates/times of the first pickup and final drop. |
D |
Initially, the system displays read-only information about the last drop. If needed, you can select the Enable Return Leg checkbox to indicate that the trip is to end with a bobtail or deadhead. You can then record the location where the tractor will end empty, as well as the date/time. |
E |
The Prior Tractor Location section displays information about the last event of the assigned tractor’s most recent trip when the trip has a status of Planned, Dispatched, Started, or Completed. All fields are read-only. |
F |
Lists any warnings or errors that will prevent dispatch |
G |
Displays information about the trip’s stops. All fields are read-only. |
For details on using the window, see Assigning resources in the Assign Driver/Equipment window.