Creating equipment configurations
When you use the Autoloading method, the assets that you assign to an order must match an equipment configuration. An equipment configuration defines the loading characteristics for a group of assets. Typically, an equipment configuration will include a tractor and lead trailer, or tractor, lead trailer, and pup trailer.
You create equipment configurations in TMW Operations. Instead of assigning specific assets to an equipment configuration, you define the loading characteristics for each asset type (tractor, lead trailer, and pup trailer).
For a tractor, you specify:
-
Loading class
-
Front axle type
-
Rear axle type
For a lead trailer and pup trailer (if applicable), you specify:
-
Loading class
-
Front axle type
-
Rear axle type
-
Number of compartments
After you set up this information for each asset type, you define the weight distribution for each axle group in the configuration. Jurisdiction restrictions will vary for each equipment configuration based on weight by axle group and total gross weight.
Before you can create equipment configurations, you must set up each asset to be used within those equipment configurations.
| For details about creating jurisdiction restrictions, see Recording jurisdictional restrictions. |
Understanding how equipment configurations work
Equipment configurations go into effect when you assign resources on an order. Each asset that you assign must belong to the same equipment configuration. This means that the loading class in the asset profile matches the loading class specified for the asset type in the equipment configuration.
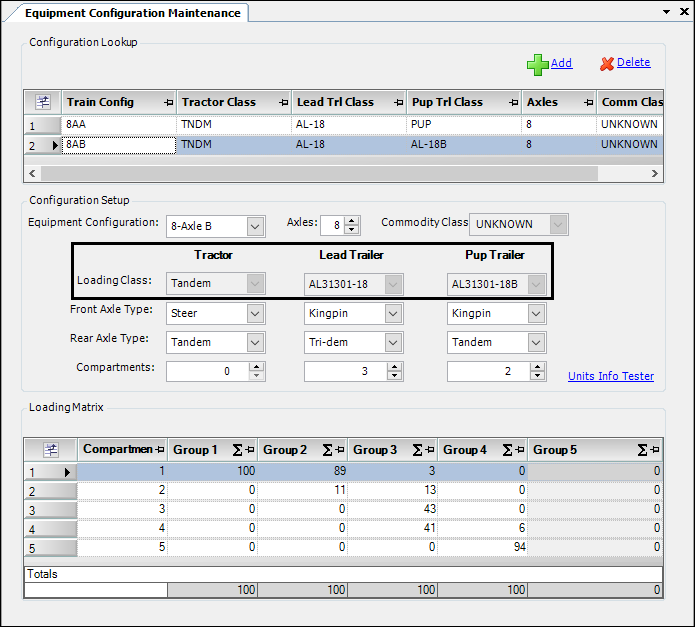
In this example, the equipment configuration includes a tractor, lead trailer, and pup trailer. The loading classes are Tandem, AL31301-18, and AL313018-18B, respectively.
To use this equipment configuration for an order, any assets that you assign to the order must match these loading classes.
-
The tractor must have the Tandem loading class in its profile
-
The lead trailer must have the AL31301-18 loading class in its profile
-
The pup trailer must have the AL313018-18B loading class in its profile
After you assign these assets to an order, the system calculates axle loading capacities based on the compartment weights and percentages recorded in the equipment configuration.
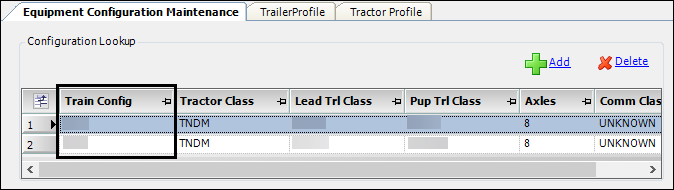
You create equipment configurations in the Equipment Configuration Maintenance window in TMW Operations. To access the window, go to Tools > Tools Maintenance > Equipment Configuration Maintenance.
The Equipment Configuration Maintenance window consists of the following sections.
Configuration Lookup |
Identifies the loading class for each asset type assigned to the equipment configuration (tractor, lead trailer, pup trailer) Note: An asset can be used with multiple equipment configurations, as long as its loading class matches the loading class for the asset type in the configuration. |
Configuration Setup |
Identifies the following:
Notes:
|
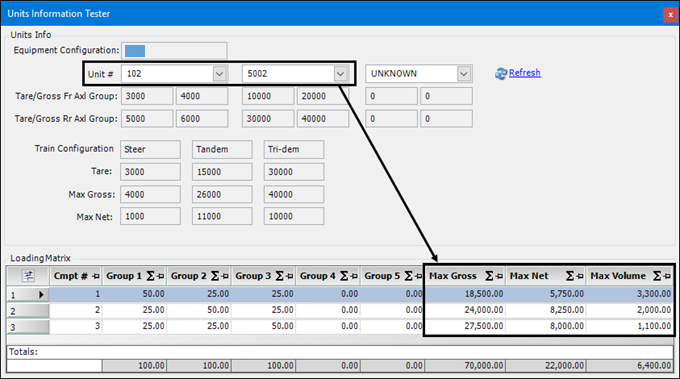
Units Info Tester |
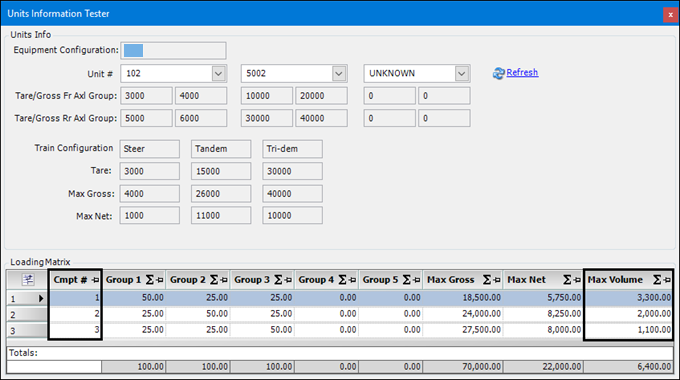
Allows you to see how specific assets will work with the equipment configuration. When you specify the assets and click Refresh, the volume and weight axle-loading information for each asset is displayed in the Max Gross, Max Net, and Max Volume fields of the Loading Matrix grid. Notes:
|
Loading Matrix |
Specifies the percentage of each axle group’s weight capacity that is dedicated to supporting each compartment These percentages refer to the unloaded train and its various axle weight capacities.
Note: You can load an existing equipment configuration, modify the axle loading percentages, and resave it. |
Adding fields to the Trailer Profile window
When you set up equipment configurations, you must provide information in trailer profiles that is not there by default. Use Quick Designer to add these fields:
-
trl_axlgrp1_tarewgt
-
trl_axlgrp1_grosswgt
-
trl_axlgrp2_tarewgt
-
trl_axlgrp2_grosswgt
-
TrlLoadingClass
To add these fields:
-
Go to Tools > Profiles > Trailer.
The Trailer Profile window opens. -
Right-click in the window and select Toggle Quick Designer.
-
Right-click in the window where you want to add the fields and select Add New Item.
The Add New Item window opens.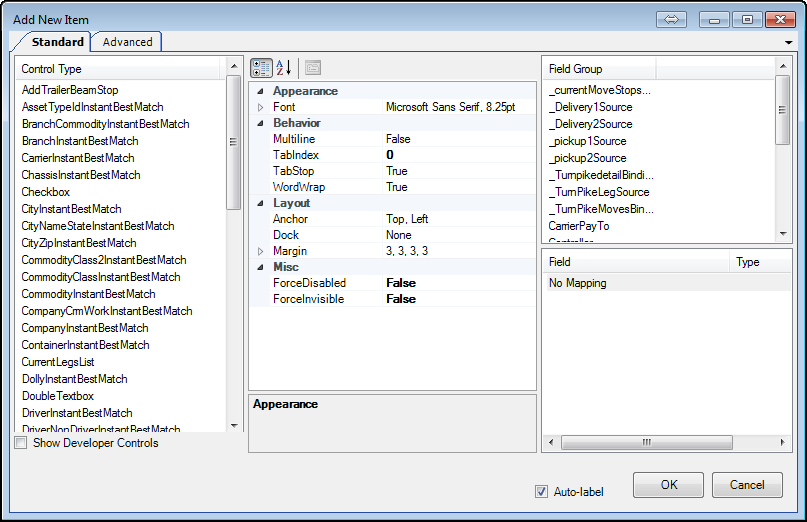
-
In the Control Type section, select Textbox.
-
In the Field Group section, select bindingSource.
The Field section shows applicable fields. -
In the Field section, select trl_axlgrp1_tarewgt.
-
Click OK.
-
Repeat steps 2-5.
-
In the Field section, select trl_axlgrp2_tarewgt.
-
Click OK.
-
Repeat steps 2-5.
-
In the Field section, select trl_axlgrp1_grosswgt.
-
Click OK.
-
Repeat steps 2-5.
-
In the Field section, select trl_axlgrp2_grosswgt.
-
Click OK.
-
Right-click in the area you want to edit and select Add New Item.
The Add New Item window opens. -
In the Control Type section, select LabelFileDropdown.
-
In the center pane under TMW Required Properties:
-
Click the LabelDefinition field
-
Select TrlLoadingClass from the drop-down list
-
-
In the Field Group section, select bindingSource.
-
In the Field section, select trl_loading_class.
-
Click OK.
-
Toggle out of Quick Designer.
-
Save the layout.
For more information, see Adding fields to a window.
Setting up labels for equipment configurations
To enable you to retain the categorizations and terms your company uses, TMW Operations allows you to use the label file to define the options for many fields. You use labels to define options for the following:
-
Tractor loading classes
You set up trailer loading classes in the TrcLoadingClass label -
Trailer loading classes
You set up trailer loading classes in the TrlLoadingClass label -
Axle group types
You set up Axle group types in the AxleGroupType label -
Fleet licensing category
You set up Axle group types in the Fleet label -
Equipment configuration names
You set up equipment configuration names in the EquipmConfiguration label. You will use these names to create equipment configurations in the Equipment Configuration Maintenance window.
|
Setting up tractor loading classes
You use tractor loading classes to divide tractors into groups, based on how they will be loaded. You must assign a tractor loading class in the TrcLoadingClass field in the tractor’s profile. When you create equipment configurations, you specify the tractor loading class for the configuration. Loading classes are also used for jurisdiction restrictions.
|
Setting up trailer loading classes
You use trailer-loading classes to divide trailers (primary and pups) into groups, based on how they will be loaded. You must assign a trailer loading class in the trl_loading_class field in the trailer’s profile. When you create equipment configurations, you specify the trailer loading class for the configuration. Loading classes are also used for jurisdiction restrictions.
|
Setting up equipment configuration names
When you create an equipment configuration, you must select the configuration name in the Equipment Configuration Maintenance window. The names must exist before you create the configuration. You set up equipment configuration names in the EquipmConfiguration label.
The options you define are used in the Equipment Configuration Maintenance window to:
-
Identify new equipment configurations created
Note: You should use each option in the EquipmConfiguration label once to define a specific equipment configuration.
-
Retrieve an existing equipment configuration.
Setting up axle group types
When you create an equipment configuration, you must indicate an axle group type for each tractor and trailer axle. By default, the AxleGroupType label contains system code options that include common axle types for tractors and trailers. If needed, you can add options to this label.
Many jurisdictions restrict load weight by axle type. In Auto-fill Autoloading, you Use axle group types when creating jurisdiction restrictions in the Jurisdiction Road Restrictions window.
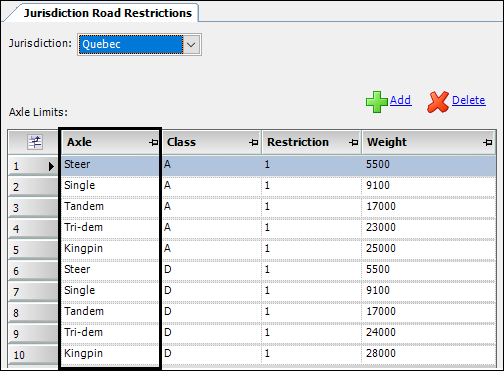
You set up equipment configuration names in the AxleGroupType label.
| System code options can be hidden, but cannot be edited or deleted. |
For additional setup information on jurisdictions, see Setting up labels for jurisdictions.
Setting up asset profiles for equipment configurations
When the Equipment Configuration Maintenance window calculates load weight, these calculations require:
-
Tare weight of the tractor
-
Tare weight of the trailer(s)
-
Maximum commodity weight permitted for the trailer(s)
You enter these weights in each asset profile in TMW Operations. You must also specify the loading class and fleet license for each asset.
Setting up tractor profiles for equipment configurations
You must specify certain information for each tractor to be used with equipment configurations. Each tractor profile must include:
-
Tractor’s total gross and tare weight capacities
-
Gross and tare weight capacities of the tractor’s axle groups
-
Loading class for the tractor
-
Fleet license
Follow these steps to set up a tractor profile for equipment configuration.
-
In TMW Operations, go to Tools > Profiles > Tractor Profile.
The Tractor Profile window opens. -
Open the profile of a tractor that will be used with equipment configurations.
-
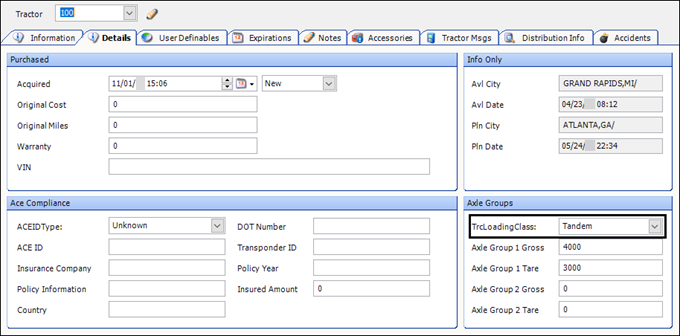
Make the following entries in the tractor profile.
Note: The units of measure for weights you enter in these fields should be consistent with those used elsewhere in TMW Operations. Do not mix metric and United States Customary units.
Field Definition Axles
Enter the number of axles for the tractor.
TrcLoadingClass
The system uses the loading class to match the tractor with an equipment configuration.
Select the tractor loading class.
Notes:
-
You can assign the same loading class to multiple tractors.
-
Your company defines tractor loading classes in the TrcLoadingClass label.
Axle Group 1 Tare
Enter the tare weight capacity of the tractor’s front axle.
Axle Group 1 Gross
Enter the gross weight capacity of the tractor’s front axle.
Axle Group 2 Tare
Enter the tare weight capacity of the tractor’s rear axle.
Axle Group 2 Gross
Enter the gross weight capacity of the tractor’s rear axle.
Fleet
Select the tractor’s fleet license.
Notes:
-
In TMW Operations, a Fleet License identifies the conditions under which a tractor can be assigned to haul freight. These conditions must comply with the jurisdictional, load restrictions, and road restrictions set by legal licensing authorities.
-
Your company defines fleet licenses in the Fleet label.
-
-
Click Save.
Setting up trailer profiles
You must specify certain information for each trailer that will be used with equipment configurations. Each trailer profile must include:
-
Trailer’s total gross and tare weight capacities
-
Gross and tare weight capacities of the trailer’s axle groups
-
Loading class for the trailer
-
Jurisdictional licensing
Follow these steps to set up a trailer profile for equipment configuration.
-
In TMW Operations, go to Tools > Profiles > Trailer Profile.
The Trailer Profile window opens. -
Open the profile of a trailer you want to use for equipment configuration.
-
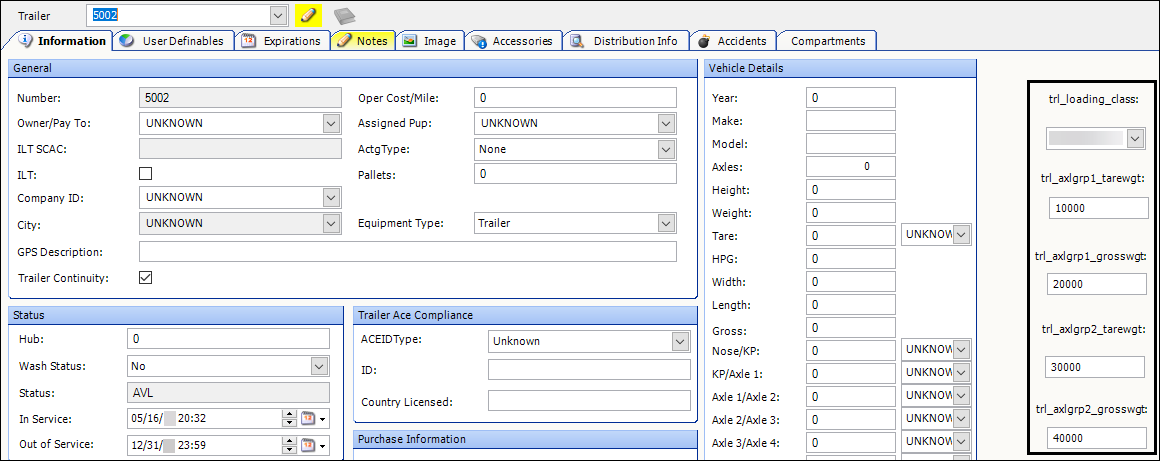
Make the following entries in the trailer profile.
Note: The units of measure for weights you enter in these fields should be consistent with those used elsewhere in TMW Operations. Do not mix metric and United States Customary units.
Field Definition Axles
Enter the number of axles for the trailer.
trl_loading_class
The system uses the loading class to match the trailer with an equipment configuration.
Select the trailer loading class.
Notes:
-
You can assign the same loading class to multiple tractors.
-
Your company defines tractor loading classes in the TrlLoadingClass label.
trl_axlgrp1_tarewgt
Enter the tare weight capacity of the trailer’s front axle or kingpin.
trl_axlgrp1_grosswgt
Enter the gross weight capacity of the trailer’s front axle or kingpin.
trl_axlgrp2_tarewgt
Enter the tare weight capacity of the trailer’s rear axle.
trl_axlgrp1_grosswgt
Enter the gross weight capacity of the trailer’s rear axle.
Fleet
In the User Definables tab, select the trailer’s fleet license.
Notes:
-
In TMW Operations, a Fleet License identifies the conditions under which the trailer can be assigned to haul freight. These conditions must comply with the jurisdictional, load restrictions, and road restrictions set by legal licensing authorities.
-
Your company defines fleet licenses in the Fleet label.
-
-
Click Save.
Adding a trailer’s compartment detail record
The trailer’s Compartments tab lists the number of compartments available along with each compartment’s size. The system shares this information with the Units Information Tester feature in the Equipment Configuration Maintenance window. See Setting up trailer compartments for details.
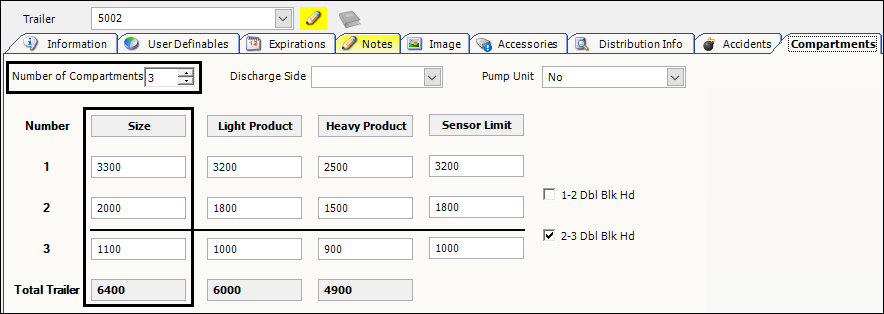
The Units Information Tester lists the number of compartments and maximum volume for each compartment in the Loading Matrix.
Creating an equipment configuration
After you set up your labels and asset profiles, you are ready to create an equipment configuration.
To create a new equipment configuration, follow these steps:
-
In TMW Operations, go to Tools > Tools Maintenance > Equipment Configuration Maintenance.
The Equipment Configuration Maintenance window opens.
-
Click Add.
-
In the Configuration Lookup section, specify the loading classes of the tractor and trailer(s) that can be used with the equipment configuration.
Typically, an equipment configuration will include tractor and lead trailer, or tractor, lead trailer, and pup trailer. An asset can be used in multiple equipment configurations, as long as the asset combination is unique. Each asset combination must be saved under a unique EquipmConfiguration name.
-
In the Configuration Setup section, enter the following information about the tractor and trailer(s):
Required field: *
Field Definition Equipment Configuration *
Select a configuration name. You must select a name that is not already assigned to a configuration.
Notes:
-
Each configuration corresponds to a record in the Jurisdiction Road Restrictions window. You use this window to define the maximum gross weight allowed for each jurisdiction. For details, see Recording jurisdiction road restrictions.
-
Your company defines configuration names in the EquipmConfiguration label.
Axles *
Enter the total number of axles in the train.
Note: An axle group is different from an axle, and may consist of one axle or multiple axles.
-
A tractor with one semi-trailer contains three axle groups.
-
A train with tractor, trailer, and pup trailer contains four or more axle groups.
In the Loading Matrix grid, you will enter weights for actual axle groups only.
Commodity Class
Select the commodity class associated with this equipment configuration.
Note: Your company defines commodity class options in the Classes feature of Commodity Profiles.
Tractor *
Select the tractor loading class.
Note: Your company defined the loading class options in the TrcLoadingClass label.
Lead Trailer
Select the trailer loading class for the lead trailer.
Note: Your company defined the loading class options in the TrlLoadingClass label.
Pup Trailer
Select the trailer loading class for the pup trailer.
Note: Your company defined the loading class options in the TrlLoadingClass label.
Front Axle Type
For the tractor and each trailer, select a front axle type from the drop-down list. The default options are:
-
Steer
-
Single
-
Tandem
-
Tri-dem
-
Kingpin
Note: The default options are system code entries in the AxleGroupType label. Your company may have added other axle type options to the label.
Rear Axle Type
For the tractor and each trailer, select a rear axle type from the drop-down list.
Note: The options in the Front Axle Type field are also used to define rear axle types.
Compartments
For each trailer, enter the total number of compartments.
-
-
In the Loading Matrix grid’s Group 1-5 columns, enter the percentage of each axle group’s weight capacity that is dedicated to supporting each compartment.
This will determine the maximum commodity weight allowed in each compartment.

In this illustration:
Group1
100% of the axle group’s cargo capacity supports compartment 1
Group2
-
89% of the axle group’s cargo capacity supports compartment 1
-
11% of its capacity supports compartment 2
Group3
-
3% of the axle group’s cargo capacity supports compartment 1
-
13% of its capacity supports compartment 2
-
43% of its capacity supports compartment 3
-
41% of its capacity supports compartment 4
Group 4
-
6% of the axle group’s cargo capacity supports compartment 4
-
94% of its capacity supports compartment 5
Notes:
-
You can make entries in Group N column fields for existing axle groups only. A Group column for a non-existent axle group will not accept entries.
-
Entries in a Group N column must total 100%.
-
-
Click Save to keep your changes. The specified number of compartments is added to the Loading Matrix grid.
-
To check weight distribution for a specific tractor and trailer(s), click Units Info Tester, enter the tractor and trailer IDs in the appropriate Unit# fields, and click Retrieve.
The Matrix Loading section displays the Max Gross, Max Net, and Max Volume values for each compartment in the trailer(s).

Notes:
-
This step is not required to save the configuration.
-
Assets that you enter in the Unit# fields are not saved with the equipment configuration.
-
The Max Gross, Max Net, and Max Volume fields are populated based on entries in the trailer profile’s Compartments tab.
-
-
Click Save.
Evaluating and modifying an equipment configuration
In the Equipment Configuration Maintenance window, you can:
-
Change percentages in an existing equipment configuration’s Loading Matrix grid.
-
Check the weight distribution for a specific tractor and trailer(s).
Follow these steps:
-
In TMW Operations, select Tools > Tools Maintenance > Equipment Configuration Maintenance.
The Equipment Configuration Maintenance window opens. -
In the Configuration Lookup section, click on a train configuration listing.
The Group N columns display the configuration’s axle loading percentages.
-
To check weight distribution for a specific tractor and trailer(s), follow these steps.
-
Click Units Info Tester.
-
Enter tractor and trailer IDs in the appropriate Unit# fields.
-
Click Refresh.
The Loading Matrix section displays the Max Gross, Max Net, and Max Volume values for each compartment in the trailer(s).
-
Deleting an equipment configuration
If needed, you can delete an equipment configuration in the Equipment Configuration Maintenance window. Only complete configurations can be deleted.
Follow these steps:
-
In TMW Operations, go to Tools > Tools Maintenance > Equipment Configuration Maintenance.
The Equipment Configuration Maintenance window opens. -
Click on a configuration listing.
-
Click Delete.
A confirmation message states, "The selected Equipment Configuration will be deleted. Do you wish to proceed?" -
Click Yes.
The system removes the equipment configuration.