Working with the extended set of Stop buttons
First available in TMW Operations 15.10.073
By default, the Stop buttons on the Stops tab in the Trip Folder and the Consolidation Manager window allow you to add, insert, or delete stops. However, you can extend the Stop buttons functionality by setting [.NetMisc]OverrideAddStopInsertRemove=Y in your TTS50. The system will display an extended set of Stop buttons.
| The Order Entry and Route Maintenance windows do not support the extended set of Stop buttons. |
With the extended set of Stop buttons enabled, dispatchers can perform the following extended functions directly from the Stops grid:
-
Consolidate orders
-
Split trips
-
Cross dock trips
-
Unconsolidate orders
-
Cancel orders
-
Undo cross docked trips
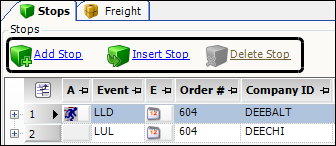
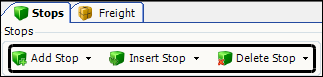
With the extended button set active, the system converts the buttons from the default button style into a drop-down button style.
-
Default stop buttons
-
Extended stop buttons
Note: There is a small drop-down arrow next to each of the extended set of stop buttons.
Enabling the extended Stop button set
By default, the system displays the default Stop buttons on the Stops tab of the Trip Folder and Consolidation Manager. However, the [.NetMisc]OverrideAddStopInsertRemove setting replaces the default buttons with drop-down buttons, which add extended functionality to the Stops grid.
| The Order Entry and Route Maintenance windows do not support the extended set of Stop buttons. |
Using the extended Add Stop and Insert Stop buttons
With the extended Stop button set feature enabled, the system converts the default Add Stop and Insert Stop buttons into drop-down buttons.
![]()
| The Order Entry and Route Maintenance windows do not support the extended set of Stop buttons. |
When you select either the Add Stop or the Insert Stop button, the system displays a drop-down window.
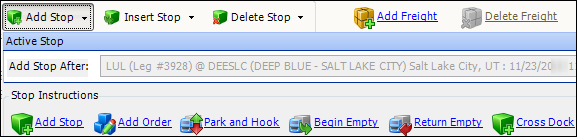
The extended Stop button set adds the following functionality to the Stops grid:
Add Stop
The Add Stop button adds a new stop to the bottom of the Stops grid.
| This function is available only under the extended Add Stop button. |
Use this procedure to add a new stop.
-
Click the extended Add Stop button.
-
Click Add Stop.
The system adds a new stop to at the bottom of the Stops grid.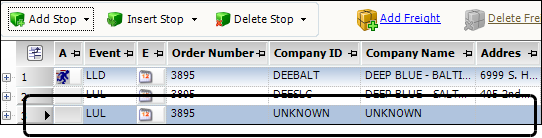
Insert Stop
The Insert Stop button inserts a new stop above the selected row.
| This function is available only under the extended Insert Stop button. |

Use this procedure to insert a new stop.
-
Select the row in the Stops grid where you want to insert a stop.
-
Click the extended Insert Stop button.
-
Click Insert Stop.
The system inserts a new stop above the selected row.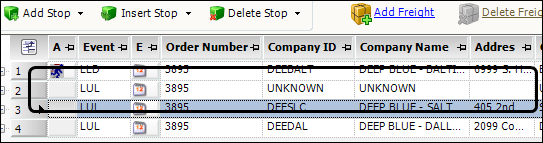
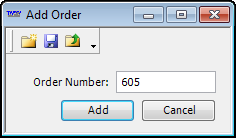
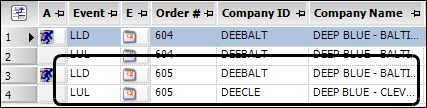
Add Order
The Add Order button opens the Add Order window. This window allows you consolidate orders without opening the Consolidation Manager window.

Use this procedure to consolidate orders.
-
Click the extended Add Stop button.
-
Click Add Order.
The Add Order window opens. -
Enter the order number that you want to add to the source order.
-
Click Add.
The system adds billable stop events to the source order. For more details on the billable event types, see Event.
Note: To close this window without consolidating orders, click Cancel.
-
Repeat this procedure for each additional order you want to add to the source order.
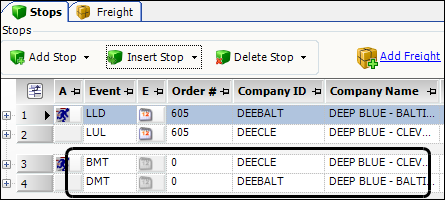
Park and Hook
The Park and Hook button opens the Park and Hook window. This window allows you to add a split trip to the order.

Use this procedure to add a split trip.
-
Click the extended Add Stop button.
-
Click Park and Hook.
The Park and Hook window opens. -
Enter the required information. For more details on split trips, see Using the Park and Hook command.
-
Click OK.
The system adds the split trip stops to the order.
Begin Empty
The Begin Empty button opens the Begin Empty window. This window allows you to add an empty move at the beginning of the order.

Use this procedure to add an empty move.
-
Click the extended Add Stop button.
-
Click Begin Empty.
The Begin Empty window opens. -
Enter the required information. For more details on begin empty moves, see Using the Begin Empty command.
-
Click OK.
The system adds an empty move at the beginning of the order.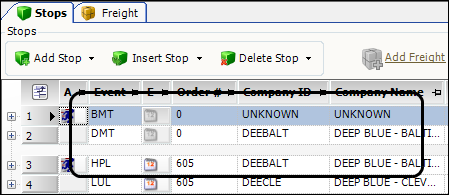
Return Empty
The Return Empty button opens the Return Empty window. This window allows you to add an empty move at the end of the order.

Use this procedure to add an empty move at the end of the order.
-
Click the extended Add Stop button.
-
Click Return Empty.
The Return Empty window opens. -
Enter the required information. For more details on return empty moves, see Using the Return Empty command.
-
Click OK.
Cross Dock
The Cross Dock button opens the Cross-Dock Quick Add window. This window allows you to cross dock an order.

Use this procedure to cross dock an order.
-
Click the extended Add Stop button.
-
Click Cross Dock.
The Cross-Dock Quick Add window opens. -
Enter the required information. For more details on using this window, see Using the cross dock feature.
-
Click Cross Dock.
The system converts the order into a cross docked order. For more details on cross docked stops, see Transferring or cross docking freight.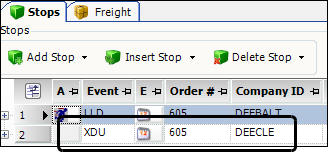
Using the extended Delete Stop button
With the extended Stop button set feature enabled, the system converts the default Delete Stop button into a drop-down button.
![]()
| The Order Entry and Route Maintenance windows do not support the extended set of Stop buttons. |
When you select the extended Delete Stop button, the system displays a drop-down window.
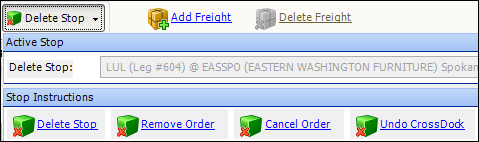
The extended Stop button set adds the following functionality to the Stops grid:
Delete Stop
The Delete Stop button opens the Delete window. This window allows you to remove stops from the order.

| The system prevents you from deleting cross docked (XDU or XDL) stops. Instead, you should use the Undo Cross Dock feature. |
To remove a stop, follow these steps.
-
Select the stop you want to remove from the order.
-
Click the extended Delete Stop button.
-
Click Delete Stop.
The selected row highlights and the Delete window opens.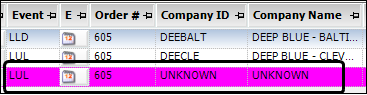
-
Click Yes.
The system removes that stop from the order.
| If you do not want to remove the selected stop, click Cancel. |
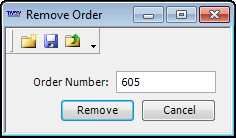
Remove Order
The Remove Order button opens the Remove Order window. This window allows you to remove a consolidated order without opening the Consolidation Manager window.

To remove an order, follow these steps.
-
Select the extended Delete Stop button.
-
Select Remove Order.
The Remove Order window opens. -
Enter the order number you want to remove, and then click Remove.
-
Repeat this procedure for each order you want to remove from the source order.
Cancel Order
The Cancel Order button opens the Cancel Trip/Order window. This window allows you to cancel an order.

To cancel an order, follow these steps.
-
Click the extended Delete Stop button.
-
Click Cancel Order.
The Cancel Trip/Order window opens. -
Enter the required information. For more details on canceling a trip/order, see Canceling an order in the Planning Worksheet or Trip Folder.
-
Click
 Save.
Save.
The system cancels the order.
Undo CrossDock
The Undo CrossDock button opens the Undo Cross Dock window. This window allows you to remove cross docked stops.

To remove the cross docked stops, follow these steps.
-
Select the cross docked stop you want to remove.
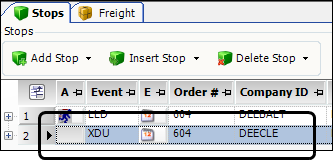
-
Click the extended Delete Stop button.
-
Click Undo CrossDock.
The Undo Cross Dock window opens. -
Click Yes.
The system removes the cross docked stops.