Exporting TMW data to 3G-TM
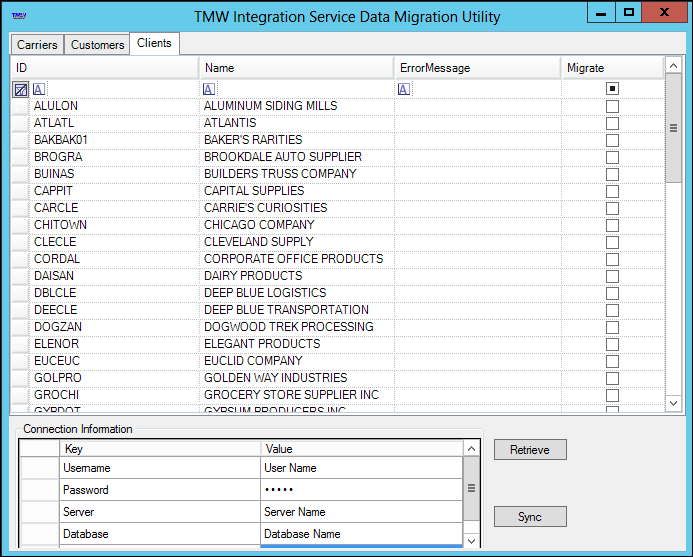
Before you can request a rate quote from 3G-TM, you must import company and carrier data to 3G-TM. The Data Migration Utility allows you to export company and carrier data from your TMW Operations database to 3G-TM’s Trading Partner page. When you retrieve data from the TMW database into the window, the data displays on one of three tabs:
-
Carriers
Displays carriers -
Customers
Displays shipper and/or consignee companies -
Client
Displays Bill To companies
|
Follow these steps to export company and carrier data from your TMW Operations database to the 3G-TM Trading Partners page.
-
Go to the folder in which the TMW Data Migration Utility.exe file resides.
Note: By default, the TMW Data Migration Utility.exe file is installed in this location:
C:\Program Files (x86)\TMW Systems, Inc\TMW Integration Service XX.XX.x.x\Data Migration Utility
(where XX.XX.x.x represents the version release number.) -
Double-click the TMW Data Migration Utility.exe file to launch the utility.
The TMW Integration Service Data Migration Utility window opens.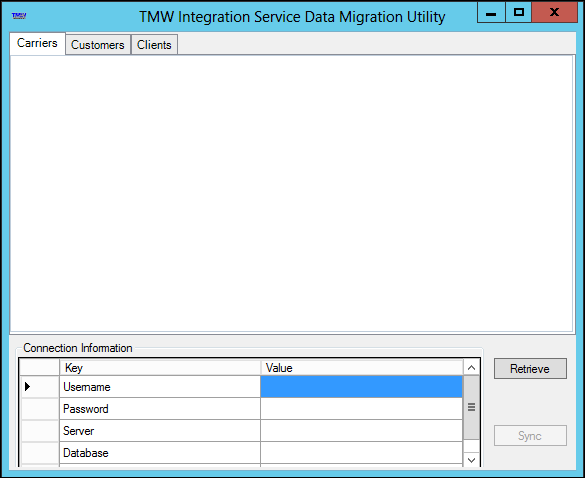
-
Enter the connection information.
Username
Your TMW Operations username
The user’s profile must include:
-
Access authority for TMW Operations
-
3G-TM credentials recorded in the External User Cross Reference window
Note: You must enter a valid username even when you have Y recorded in the UseServiceIdentity field and are set up to use the Service Identity username and password.
Password
Your TMW Operations password
Note: You do not need to make an entry here if:
-
The UserServiceIdentity field has a value of Y and
-
You are set up to use the Service Identity to log into the application.
Server
Server where the TMW Operations database resides
Note: You do not need to make an entry here if:
-
The UserServiceIdentity field has a value of Y and
-
You are set up to use the Service Identity to log into the application.
Database
TMW Operations database name
Note: You do not need to make an entry here if:
-
The UserServiceIdentity field has a value of Y and
-
You are set up to use the Service Identity to log into the application.
UseServiceIdentity
Enter Y to have the system use the Service Identity username, password, server, and database information to log into the Data Migration Utility.
You entered the Service Identity username, password, server, and database in the TMW Integration Service Setup Wizard’s Authentication Information window.
Notes:
-
The system stores the Service Identity username, password, server, and database information automatically in the ServiceIdentityAuthenticationInfo.xml file.
By default, this file is in this location:
c:\inetpub\wwwroot*your integration service name*\bin\ -
The Service Identity username must have access authority for TMW Operations set up in the user profile.
-
Typically, when a user can enter their own credentials, there is no need to use this method.
-
-
Click Retrieve.
The system populates the window with carrier, customer, and client data from your TMW Operations database.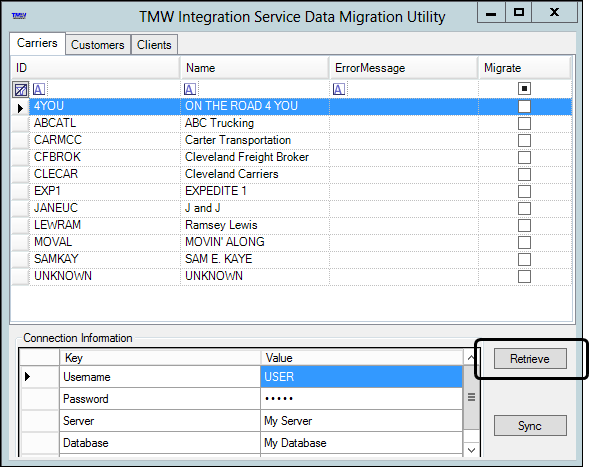
-
On the Carriers, Customers, and/or Clients tabs, select the entities you want to migrate to 3G-TM. Do one of the following:
-
To select individual entities, select the entity’s Migrate checkbox.
-
To select all entities on a tab, follow these steps:
-
Right-click in the grid.
-
Select Check > All.
-
If needed, you can clear the checkbox for individual entities.
-
-
-
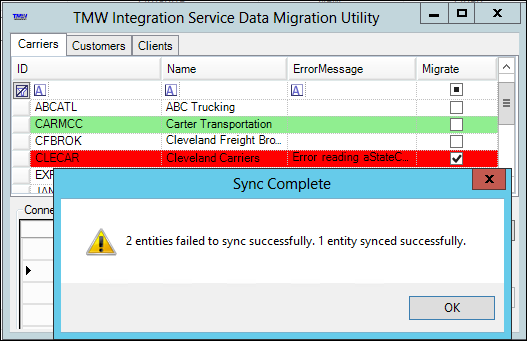
Click Sync.
The system transmits 20 records to 3G-TM at a time. While transmitting, the Sync button is disabled.When the migration is complete, the system does the following:
-
Applies a green highlight to the row(s) that synced successfully
-
Applies a red highlight to the row(s) that did not sync successfully
-
Displays error information in the Error Message column
-
Displays a message that confirms the number of files synced to 3G-TM
-
-
Click OK to close the message.
-
Close the Integration Service Data Migration Utility window.
When you successfully export a company or carrier to 3G-TM, the system sets a flag in the database for that company or carrier. Then, when the company or carrier’s information is changed in TMW, the flag will alert the system to send the update to 3G-TM.
By default, the flag for companies can be viewed or edited in the respective profile. However, you must add the flag to the Carrier Profile window. For more information, see Syncing master data.
Syncing master data
The Master Data Management Service checks your TMWSuite database periodically for any changes made to company and carrier data. If it finds changes, it uploads them to 3G-TM. The service only checks companies and carriers that are flagged for use with 3G-TM.
As part of the installation process, your system administrator may have used the Data Migration Utility to migrate existing company and carrier data to 3G-TM. The utility flags these company and carriers automatically.
If you need to flag a new company or carrier for use with 3G-TM, follow these steps.
Customers and clients
In 3G-TM, a company is a customer if its company profile lists it as a shipper and/or consignee. A company is a client if its company profile lists it as a Bill To. A company can be a customer and a client simultaneously.
To flag a new company for use with 3G-TM, follow these steps.
-
Go to Tools > Profiles > Company Profile.
The Company Profile window opens. -
Open the profile of the company you want to flag.
-
Select the Billing/Credit tab.
-
In the External Interface section, enter 3GTMS in the Vendor Type field.
-
Click
 Save.
Save.
Carriers
You use the Carrier Profile window to flag a carrier for use with 3G-TM. To access it, go to Tools > Profiles > Carrier Profile.
Before you can flag a carrier for 3G-TM, you must add a checkbox to the Carrier Profile window layout using QuickDesigner.
In the Add New Item window, select the following items:
-
Control Type = Checkbox
-
Field Group = bindingSource
-
Field = Carrier3G
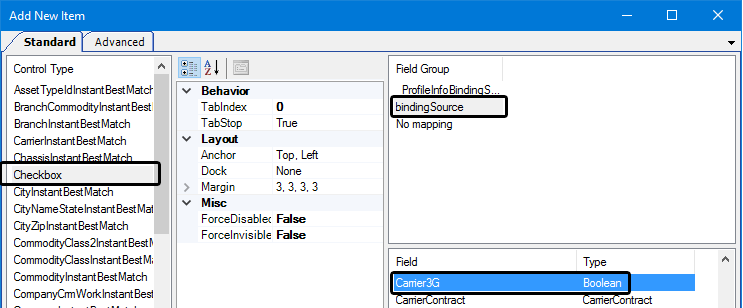
After adding the field, change the label to indicate that selecting this checkbox flags the carrier for use with 3G-TM. This illustration shows an example.
![]()
Save the layout and, if needed, assign it to other users or user groups.
If a carrier is already flagged for use with 3G-TM, the checkbox is automatically selected.
To flag a carrier for 3G-TM, select the checkbox and click ![]() Save.
Save.