Splitting a trip
A split trip is a movement with multiple trip segments due to a change in the driver or tractor. Sometimes the resources used to start a trip are unable (or not intended) to complete it. If you know this in advance, you can plan for it. Other times, a resource change is required unexpectedly, e.g., a driver becomes ill, or a tractor breaks down.
Whenever resources change, you must split that trip into multiple trip segments. A trip segment is the portion of a movement that is executed by the same set of resources.
Split trip options
The Split Trip commands under the Edit menu allow you to split a movement into trip segments. Each time a new driver and/or tractor are assigned to a movement a new segment is created. A unique, system-assigned ID is associated automatically with each trip segment.
When you select the Edit > Split Trip command, the system offers three sub commands:
-
Park and Hook
This command allows you to park a trailer at an interim location so that one of the following can occur:-
The driver can hook the trailer to a different tractor.
-
A new driver can change places with the original driver.
-
The trailer can be hooked to a different tractor driven by a different driver.
-
The load can be hauled in a different trailer for the next leg of the trip.
-
-
Begin Empty
This command allows you to insert a deadhead leg before the first loaded stop on the trip. This is useful when the driver and/or tractor that transported an empty trailer to the pickup site cannot continue the trip. -
Return Empty
This command allows you to insert a deadhead leg after the last stop on the trip. This is useful when the emptied trailer is to be moved from the final drop location by a different tractor and/or driver.
Understanding the various windows used to split a trip
Regardless of the sub command you use to split a trip, the windows opened by the sub commands share certain elements.
For example, the Begin Empty, Park and Hook, and Return Empty windows are all divided into three sections:
-
The first section identifies the first event for the trip and the location at which it takes place.
-
The second section allows you to specify the resources that are assigned to the new segment the split is creating.
-
The third section allows you to specify where and when the split event is to take place.
Park and Hook window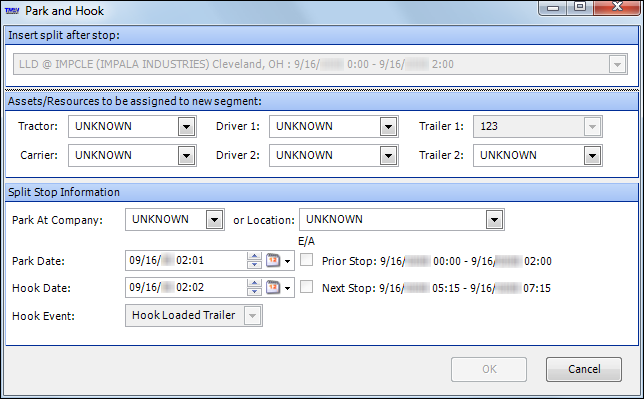 Begin Empty window
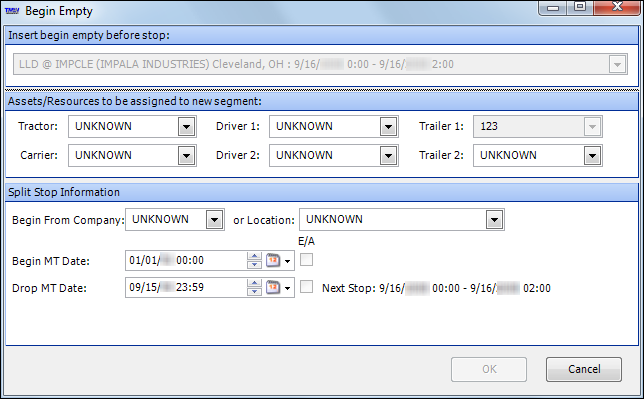 Return Empty window
Splitting trips to change driver/tractor assignments
These topics illustrate splitting a trip when you are changing the driver or tractor assignment.
If [Split]AllowChangeTrailer=No in your TTS50, you will be able to split a trip only to change the driver or tractor assignment.
|
Using the Park and Hook command
The Park and Hook command allows you to park a trailer at an interim location so that one of the following can occur:
-
The driver can hook the trailer to a different tractor.
-
A new driver can change places with the original driver.
-
The trailer can be hooked to a different tractor driven by a different driver.
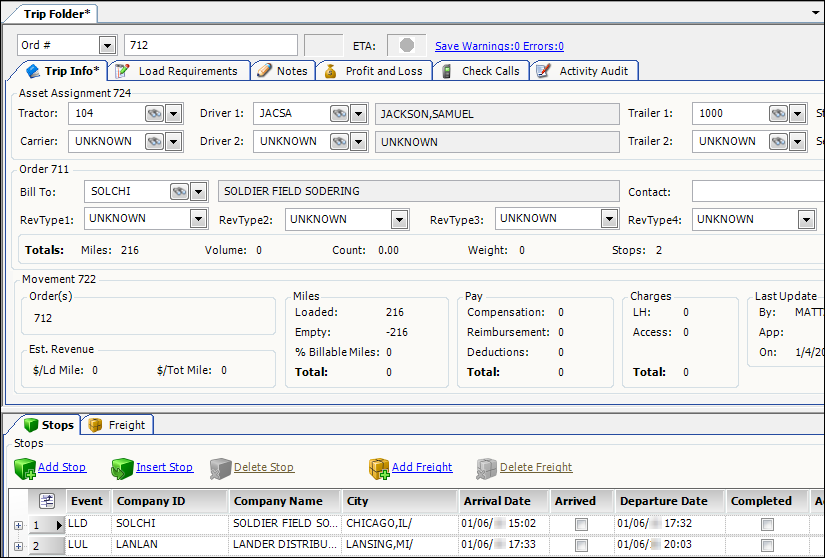
To understand how the system handles the insertion of park and hook events, consider this example. Suppose you have a load that is to be moved from Chicago to Lansing. You have pre-assigned the following resources to the trip:
-
Samuel Jackson, whose ID is JACSA
-
Tractor 104
-
Trailer 1000
When you look up the trip (order 712) in the Trip Folder, it looks like this:
Suppose you know the following in advance:
-
Samuel Jackson is able to take the load only as far as Fort Wayne.
-
Because Jackson always uses tractor 104, you know that he will need to drop the loaded trailer at a location in Fort Wayne.
-
You do not yet know which driver and tractor will be assigned to transport the load from Fort Wayne to its final destination in Lansing.
To indicate that a different driver and tractor are to handle the second half of the movement, you must split the trip. Using the Park and Hook sub command causes the system to add two additional events to the trip:
-
The drop of a loaded trailer, which you can specify either of these event types:
-
DLT-Drop Loaded Trailer
-
IDLT-Billable Drop Loaded Trailer
-
-
The hook of a loaded trailer, which you can specify either of these event types:
-
HLT-Hook Loaded Trailer
-
IHLT-Billable Hook Loaded Trailer
-
Before adding these two events to the trip, the system prompts you to indicate where they should be inserted. Since order #712 consists of just a load and an unload, the drop (i.e., park) and hook of the trailer occurs between them. The drop of the trailer designates the end of the first trip segment. The hook marks the start of the second trip segment.
|
If you set the
|
The following instructions describe how to split a trip.
-
Look up the trip to be split.
-
Go to Edit > Split Trip > Park and Hook.
The Park and Hook window opens.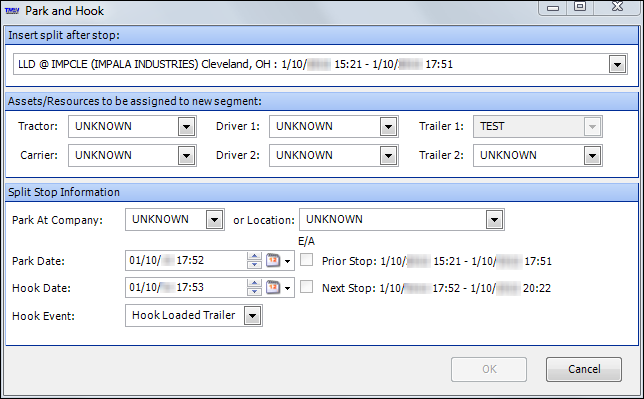
-
Make entries in these fields:
Field Definition Insert split after stop
Select the stop after which the park and hook is to be inserted. By default, the system lists the initial pickup.
Note: If you have only one pickup on your trip, the field is grayed out and the system automatically selects the pickup.
Tractor
ID of the tractor assigned to the new trip segment
Carrier
ID of the carrier, if applicable
Driver 1
ID of the lead driver
Driver 2
ID of the co-driver, if applicable
Trailer 1
ID of the primary trailer
Note: If the trailer has already been assigned, by default the system assumes that the same primary trailer will be used throughout the move, and this field is read-only. For instructions on changing the trailer assignment, see Splitting trips to change the trailer assignment.
Trailer 2
ID of the secondary trailer, if applicable
Note: If the trailer has already been assigned, the system assumes that the same secondary trailer will be used throughout the move, and this field is read-only.
Park at Company
If the park and hook is to occur at a particular site, enter the company ID for that site. Otherwise, leave UNKNOWN as the entry.
Park at Location
If you made an entry in the Park at Company field, the system automatically displays the city and state/province where the company is located. If you did not enter a company ID, do one of the following:
-
If it is not yet known where the park and hook is to occur, leave UNKNOWN as the value.
-
Type the name of the city and state/province.
Note: For order 712, Fort Wayne, Indiana, is designated as the location of the drop and hook of the trailer.
Park and Hook Dates
Dates/times of the park and hook events
E/A
The checkboxes indicate whether the park and hook events have already occurred. When the E/A checkbox is:
-
Cleared
Estimated (the driver has not yet made the stop) -
Selected
Actual (the stop is complete)
If the trip has not yet started, both checkboxes should be left empty to indicate that the park and the hook times are estimated rather than actual. If the trip is already in progress, you can select the E/A checkboxes to indicate that the park and hook events are complete. Selecting the E/A checkbox will automatically select the Arrived checkbox in the Stops grid.
Hook Event
This field is only editable when
[Split]AllowChangeTrailer=Yesin your TTS50. If you have enabled the field, you have four options:-
Hook Loaded Trailer
Hook a loaded trailer to a new driver/tractor. -
Billable Hook Loaded Trailer
Hook a loaded trailer to a new driver/tractor, and bill the customer for the stop. -
Hook Change Trailer
Hook a new trailer to the existing driver/tractor. -
Billable Hook Change Trailer
Hook a new trailer to the existing driver/tractor, and bill the customer for the stop.
-
-
When you have completed your entries, click OK.
-
When the Park and Hook window closes, click
 Save in the toolbar.
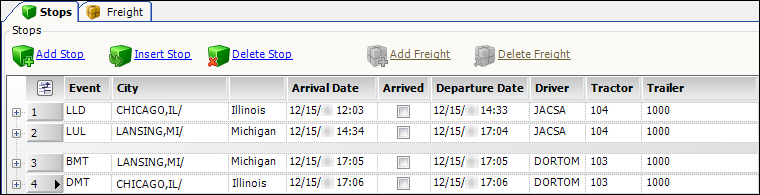
A park and hook split trip looks like this in the Trip Folder.
Using the Begin Empty command
On occasion, a driver may arrive at a pickup location with an empty trailer, but an event occurs which prevents the tractor and/or the driver from continuing with the trip. As a result, once the trailer is loaded, it must be brought to its final destination by a different tractor and/or driver.
For such trips, you can use the Begin Empty sub command to split the trip and insert a deadhead leg at the beginning.
-
Look up the trip to be split.
Note: By default, a trailer assignment is required before you can split the trip; however, you can waive the trailer requirement by including the
[Split]TrailerRequiredToSplit=Nosetting in your TTS50. Using this setting allows you to process split trips without assigning a trailer. -
Go to Edit > Split Trip > Begin Empty.
The Begin Empty window opens. -
Make entries in the following fields:
Field Definition Insert begin empty before stop
Location of the initial pickup
Tractor
ID of the tractor assigned to the deadhead
Carrier
ID of the carrier, if applicable
Driver 1
ID of the lead driver
Driver 2
ID of the co-driver, if applicable
Trailer 1
ID of the primary trailer
Trailer 2
ID of the secondary trailer, if applicable
Begin from Company
If the deadhead is to begin at a particular site, enter the company ID for that site. If you are not sure of the company location, leave UNKNOWN as the entry.
Begin from Location
If you made an entry in the Begin from Company field, the system displays the city and state/province where the company is located. If you did not enter a company ID, do one of the following:
-
If it is not yet known where the deadhead is to begin, leave UNKNOWN as the value.
-
Type the name of the city and state/province.
Begin MT Date
Date/time the deadhead is to start
Drop MT Date
Date/time the deadhead is to end
E/A
The E/A checkbox indicates whether the Begin Empty and/or Drop Empty events have already occurred. If the checkbox is:
-
Cleared
Estimated (the driver has not yet made the stop) -
Selected
Actual (the stop is complete)
-
-
When your entries are complete, click OK.
-
When the Begin Empty window closes, click
Save in the toolbar to save the split trip.
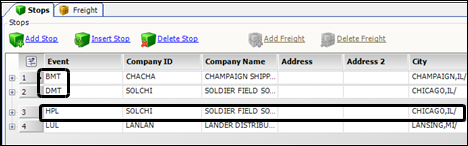
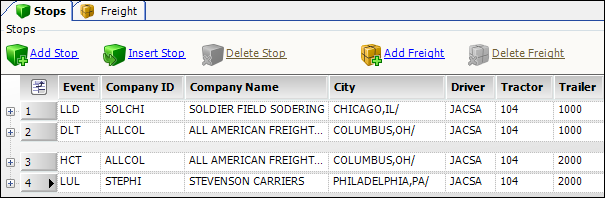
In this example, the Stops grid displays a trip with a deadhead leg that was recorded using the Begin Empty command. For the first segment, the system automatically inserted Begin Empty (BMT) and Drop Empty (DMT) events. For the second segment, the Live Load (LLD) event was changed to a Hook Preload (HPL) event; the stop location occurs at the place where the trailer was dropped. A gray divider separates the two segments.
Using the Return Empty command
Occasionally, a driver may bring a loaded trailer to its final destination, but an event occurs which prevents the tractor and/or the driver from moving the emptied trailer to its next location. As a result, a different tractor and/or driver must transport the empty trailer. For such trips, you can use the Return Empty sub command to split the trip and add a deadhead leg at the end.
-
Look up the trip to be split.
-
Go to Edit > Split Trip > Return Empty.
The Return Empty window opens. -
Make entries in these fields:
Field Definition Add return empty after stop
Final drop location
Tractor
ID of the tractor assigned to the deadhead
Carrier
ID of the carrier, if applicable
Driver 1
ID of the lead driver
Driver 2
ID of the co-driver, if applicable
Trailer 1
ID of the primary trailer
Trailer 2
ID of the secondary trailer, if applicable
Return to Company
If the deadhead is to end at a particular site, enter the company ID for that site. If you are not sure of the company location, leave UNKNOWN as the entry.
Return to Location
If you made an entry in the Return to Company field, the system displays the city and state/province where the company is located. If you did not enter a company ID, do one of the following:
-
If it is not yet known where the deadhead is to end, leave UNKNOWN as the value.
-
Enter the name of the city and state/province where the deadhead is to end.
Begin MT Date
Date/time the deadhead is to begin
Drop MT Date
Date/time the deadhead is to end
E/A
The E/A checkbox indicates whether the Begin Empty and/or Drop Empty events have already occurred. If the checkbox is:
-
Cleared
Estimated (the driver has not yet made the stop) -
Selected
Actual (the stop is complete)
-
-
When your entries are complete, click OK.
-
When the Park and Hook window closes, click
Save in the toolbar.
The result of using the Return Empty command is a trip that ends with a deadhead leg. A gray divider separates the two segments.
Splitting trips to change the trailer assignment
In TMW Operations, the tracking of an order to completion is done by tracking the trailer assigned on the order. To accommodate the times when the trailer must be changed to complete the order, you can use the [Split]AllowChangeTrailer=Yes setting in your TTS50. This setting makes the Hook Event field editable in the Park and Hook window, which you can use to change the trailer assignment when splitting a trip.
There is a variation to the typical LTL-style movement. You may have an order that does not require the full-fledged freight transfer feature. In such a situation, you want the cargo to stay on a single movement. However, the original trailer must be swapped out with another trailer. To allow this change in resources, you can split the trip into multiple trip segments. To signify that a change in trailers is needed, you use the Hook Change Trailer (HCT-Changed Trailer) event for the hook portion of the park and hook. This means that one trailer handles the first trip segment, while a different trailer handles the second trip segment.
For example, you have an order that starts in Chicago and ends in Philadelphia. Driver JACSA, tractor 104, and trailer 1000 have been assigned to the order.
When you look up the trip, order 714, in the Trip Folder Stops grid, it looks like this:

To indicate that a different trailer is to handle the second half of the movement you must split the trip using the Park and Hook sub command and selecting HCT as the event that starts the second half of the trip. This will add two events:
-
The drop of the initial loaded trailer, which has the event code DLT-Drop LD Trl
-
The hook of the second loaded trailer, which has the event code HCT-Changed Trailer
| You could also choose IHCT instead of HCT. This will create a billable HCT event. It will also create an IDLT event, which is a billable DLT. |
Before adding these two events to the trip, the system prompts you to indicate where they should be inserted. Since order 714 consists of just a load and an unload, the drop (i.e., park) and hook of the trailer occurs between them. The drop of the trailer designates the end of the first trip segment. The hook marks the start of the second trip segment.
The following instructions describe how to split a trip to accommodate a change in trailer.
-
Look up the trip to be split.
-
Go to Edit > Split Trip > Park and Hook.
The Park and Hook window opens.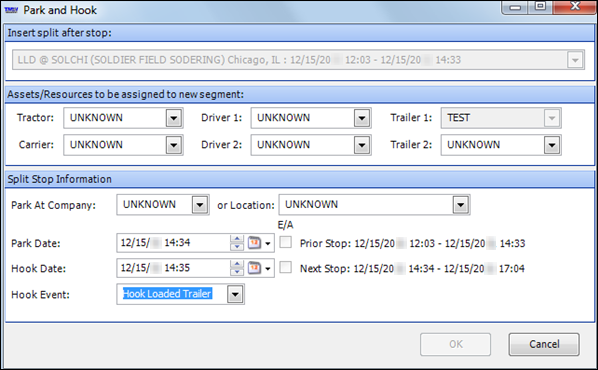
-
In the Hook Event field, select either
-
HCT-Hook Change Trailer
-
IHCT-Billable Hook Change Trailer, if the stop is to be billable to the customer
-
-
Make entries in these fields:
Field Definition Insert split after stop
Select the stop after which the park and hook is to be inserted from the drop-down list. By default, the system lists the initial pickup.
Note: If you only have one pickup on your trip, the field is grayed out and the system automatically selects the pickup location.
Tractor
To keep the same tractor on the new trip segment, enter its ID.
Carrier
To keep the same carrier on the new trip segment, enter its ID, if applicable.
Driver 1
To keep the same lead driver on the new trip segment, enter his/her ID.
Driver 2
ID of the co-driver, if applicable
Trailer 1
ID of the new primary trailer
Trailer 2
ID of the secondary trailer, if applicable
Park at Company
If the park and hook is to occur at a particular site, enter the company ID.
If the trailer will not be parked at a company site, leave UNKNOWN as the entry.
Park at Location
If you made an entry in the Park at Company field, the system displays the city and state/province where the company is located.
If you did not enter a company ID, enter the name of the city and state/province where the deadhead is to end.
Note: You cannot apply the split trip unless a value has been entered in either the Park at Company or Park at Location field.
Park Date
Date/time the trailer is to be dropped
Hook Date
Date/time the new trailer is to be picked up by the driver/tractor
E/A
The E/A checkbox indicates whether the park and hook events have already occurred. If the checkbox is:
-
Cleared
Estimated (the driver has not yet made the stop) -
Selected
Actual (the stop is complete).If the trip has not yet started, both checkboxes should be left empty to indicate that the park and the hook times are estimated rather than actual. If the trip is already in progress, you can select the E/A checkboxes to indicate that the park and hook events are complete. Selecting the E/A checkbox will automatically select the Arrived checkbox in the Stops grid.
-
-
When you have completed your entries, click OK.
-
When the Park and Hook window closes, click
Save in the toolbar.
When viewed in the Trip Folder Stops grid, the trip looks like this. A gray divider separates the two segments.
Two events, both taking place in Columbus, have been added:
-
DLT
The initial trailer is dropped at the park location. -
HCT
The new trailer is hooked at the park location.
|
If you chose the IHCT-Billable Hook Change Trailer option for the Hook Event field in the Park and Hook window, the following two events are created instead of the events above:
|
Viewing a split trip in the Trip Folder
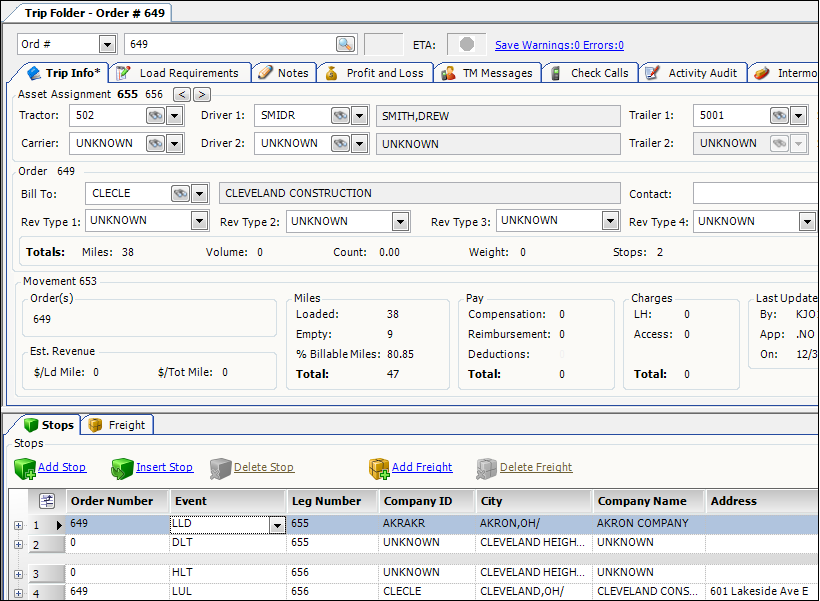
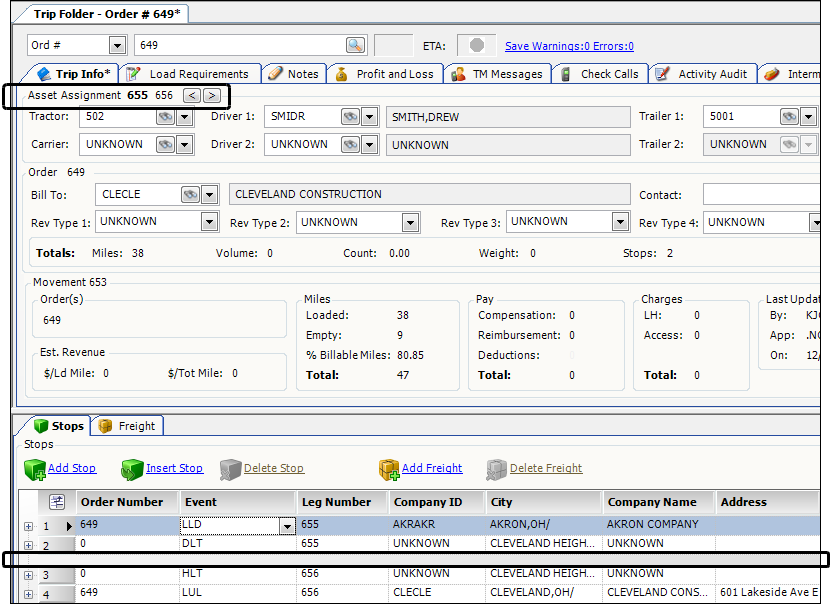
To see details for a split trip, look it up in the Trip Folder. Order 649 is shown below. Our sample trip is divided into two trip segments. You can use the arrow buttons in the Asset Assignment section to toggle between these trip segments. The number of the selected trip segment appears in bold, and the associated trip segment information appears in the Trip Info tab.
On the Stops tab, notice that a gray bar separates each trip segment as well.
|
To disable the Asset Assignment arrow buttons, set [.NetMisc]TripInfoDisableLegToggle=Y in your TTS50.
Viewing split trip reasons in the Trip Folder
The [Dispatch]RequireReasonForDeadHead feature allows you record a reason for split trips.
If you have `[Dispatch]RequireReasonForDeadHead=Y `set in your TTS50 and you have added the EmptyMoveReason field, you can view split trip reason in the Trip Folder. For details, see Adding the EmptyMoveReason field in the Split Trip windows and Tracking reasons when using split trip commands.

Viewing a split trip in the Planning Worksheet
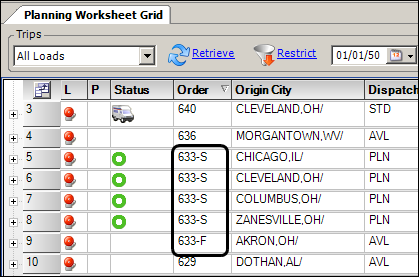
The Planning Worksheet indicates a split trip by appending either an S (non-final trip segment) or an F (the final trip segment) to the order number associated with the trip segment.
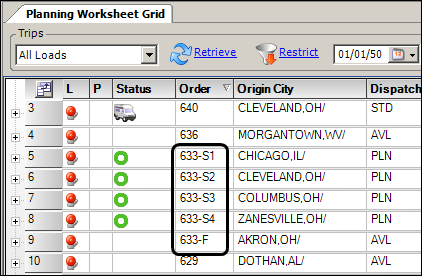
When you expand and collapse a trip segment row, the system assigns a number to the S value, such as S1. Segments are arranged in order based on their start times. For example, the system displays S1, S2, S3, S4 and F for a trip with five segments.
These illustrations display how order numbers appear before and after you expand and collapse a trip segment row.
Before:
|
After:
|
Removing a split
There may be times when you split a trip by mistake and want to return it to its original state. To do so, follow these steps:
-
Look up the trip in the Trip Folder.
Note: You can also highlight the trip in the Planning Worksheet and double-click it to display it in the Trip Folder.
-
Position the cursor in one of the stop lines that make up the split.
-
Click
 Delete Stop to delete the stop.
 -
Repeat Step 3 for each unwanted stop.
-
Click
Save.