Generating and managing driver schedules
At any time, you can make a change to the schedule templates and to the drivers' schedules. Modifications that you might need to make include both short-term and long-term changes:
-
A driver moves from one terminal to another.
-
A driver requests time off.
-
A driver moves from one shift to another.
-
You want to change the hours of a terminal’s shift.
Assigning a driver to a schedule
Before you can assign a driver to trips, you must generate a shift schedule. The schedule assigns the driver to a particular shift start company (or At Home location), terminal, fleet, shift start and end times, and default template, for a particular period of time. The system uses this information when you retrieve resources in the Trip Planner to determine whether the driver is on or off duty for the date you selected.
|
Use this procedure to generate a driver’s schedule.
-
Go to Operations > Schedule by Driver.
The Edit Driver Schedule window displays. -
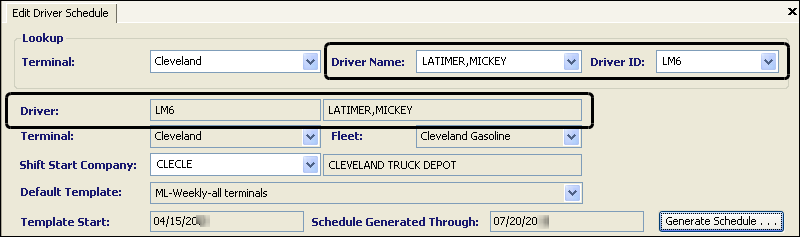
In the Lookup group, select the driver.
-
To restrict the number of driver names and IDs displayed, select the terminal to which the driver belongs.
-
Select a driver name or driver ID.
-
-
Click
 Open.
Open.
Fields in the Template header auto-fill with data recorded for the driver.Verify the driver name and ID are the same in the Lookup group and Schedule header.
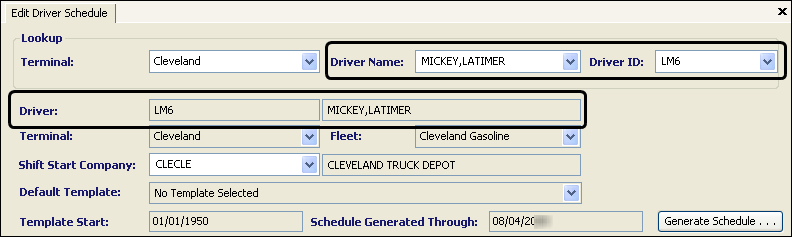
These fields appear in the Schedule header section of the window.
Field Definition Driver
Two fields are used to display the TMWSuite identification code and name for the driver that you looked up.
Note: These are read-only fields.
Terminal
Terminal location specified in the driver’s profile
Note: Options are user-defined in the Terminal label, accessed in the Edit User Definable Fields window.
Fleet
Fleet specified in the resource’s profile
Note: Options are user-defined in the Fleet label, accessed in the Edit User Definable Fields window.
Default Template
When you are generating a schedule for a driver for the first time, this field displays "No Template Selected."
Template Start
When you are generating a schedule for a driver for the first time, this field displays "01/01/1950."
Schedule Generated Through
When you are generating a schedule for a driver for the first time, this field displays the current date.
-
In the Shift Start Company field, do one of the following to identify where the driver starts and ends the workday, that is, his/her shift.
-
If you created the driver profile in the TMWSuite File Maintenance application, this field displays the At Home Location you identified there. If the driver is starting at a different location, select it from the list.
-
If you created the driver profile in TMW Operations, this field displays UNKNOWN, select a Shift Start Company from the list.
-
-
Click Generate Schedule.
The Generate Schedule window opens.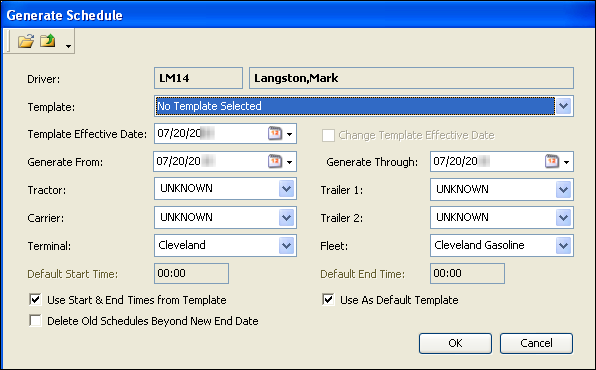
-
Select a Template from which to generate the driver’s work schedule.
Note: The terminal you selected determines which templates are listed. Templates created for that terminal are shown. The list also includes any templates created for use by all terminals.
-
Select the Template Effective Date, which defaults to the current date.
Notes:
-
For weekly schedules, you can change the date to a future date, but the generated shift schedule always recognizes the actual day of the week for the template’s cycle of on/off duty status.
-
For rotating schedules, this date represents day one of the template’s cycle of on/off duty status. Back-dating the effective date causes the generated shift schedule to start on a day other than day one of the rotating schedule.
-
-
Complete the fields in the Generate Schedule window as appropriate.
Field Definition Generate From
This field reflects the start date for the schedule you are currently generating, that is, today’s date. If you want to generate the schedule for a future time, enter or select that date.
Generate Through
This field reflects the end date for the schedule you are currently generating and defaults to today’s date. If you want to generate the schedule for a specific time manually, enter or select that date.
Note: Only one schedule date is necessary to generate a schedule for the first time.
Tractor
ID assigned to the tractor
Trailer 1 - 2
IDs assigned to the primary and secondary (pup) trailers
Carrier
ID assigned to the third party company that hauls loads
Terminal
Terminal location specified in the driver’s profile
Note: If you change the terminal, the list of available templates also changes to display those associated with the selected terminal.
Fleet
Fleet specified in the resource’s profile
Note
A note entered here displays in the Notes field in the Edit Shift Information window. You access it from the Trip Planner.
-
In the Trip Planner, right-click on the driver listed in the Shift pane.
-
From the shortcut menu, select Shift Login/Logout.
-
-
Do one of the following to identify the start and end times for this driver’s schedule.
-
Use the template’s default start and end times
Verify the Use Start & End Times from Template checkbox is selected.
Note: This checkbox is selected by default. The system will use these start and end times on the template for future auto-generated shift schedules. The start and end times auto populate from the pre-determined times set up for the schedule template.

-
Use different default start and end times
You can enter different start and end times for the period indicated by the Generated From and Generated Through fields. By default, after this date, the system will use the start and end times of the template for the auto-generated shift schedules, not the adjusted times for the driver.
-
Clear the Use Start & End Times from Template checkbox.
Note: By default, this checkbox is selected and the times are read-only fields.
-
Enter the new Default Start Time and Default End Time for the driver.

-
-
-
If you want this template to be the driver’s default template, select the Use As Default Template checkbox.
TMW Operations will automatically generate ongoing schedules for the driver based on this template. -
Click OK.
The selected driver’s schedule generates and displays in the Driver Schedule details grid.
-
If necessary, change the schedule for specific days.
-
Click
 Save.
Save.
The Schedule header fields are updated to reflect the information in the generated schedule.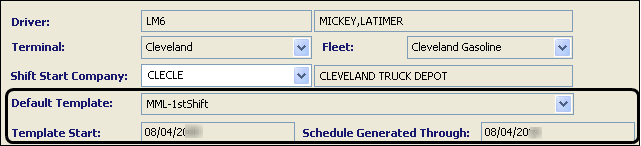
Regenerating a driver schedule
Once a shift schedule exists for a driver, the system will automatically generate his/her daily shift schedule on a regular basis when it retrieves the driver in the Trip Planner. There are times, however, when you must manually generate a driver’s shift schedule. For example, when you:
-
Need to switch a driver to a different schedule template for the same or different terminal.
-
Need to adjust a driver’s upcoming schedule to reflect such events as an active expiration, different start and end times, or a change to the home terminal location.
-
Made a change to the schedule template on which the shift schedule was based.
Shift schedules are viewed and generated in the Edit Driver Schedule window.
The Edit Driver Schedule window consists of three parts:
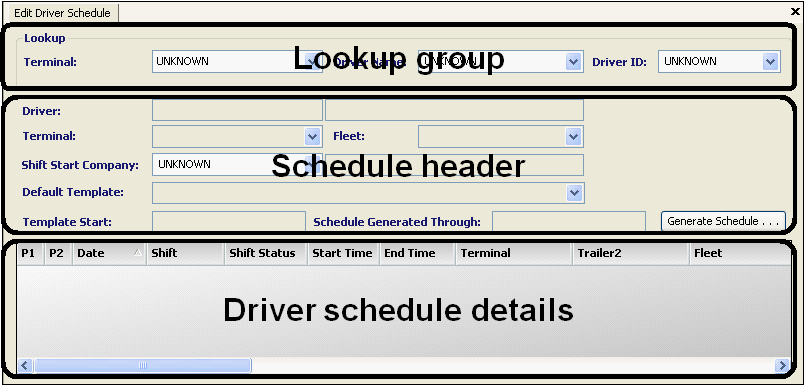
-
Lookup group
Use this section to look up a driver’s existing work schedule. -
Schedule header
Use this section to view information about the driver’s existing schedule. -
Driver schedule details
Use this section to view a driver’s schedule details or make changes to a driver’s schedule.
|
Use this procedure to regenerate a driver’s schedule.
-
Go to Operations > Schedule by Driver.
The Edit Driver Schedule window displays. -
In the Lookup group, select the driver.
-
To restrict the number of driver names and IDs displayed, select the terminal to which the driver belongs.
-
Select a driver name or driver ID.
-
-
Click
Open.
Fields in the Template header auto-fill with data recorded for the driver.Verify the driver name and ID are the same in the Lookup group and the Schedule header.
These fields appear in the Schedule header section of the window.
Field Definition Driver
Two fields are used to display the TMWSuite identification code and name for the driver that you looked up.
Note: These are read-only fields.
Terminal
Terminal location specified in the driver’s profile
Note: Options are user-defined in the Terminal label, accessed in the Edit User Definable Fields window.
Fleet
Fleet specified in the resource’s profile
Note: Options are user-defined in the Fleet label, accessed in the Edit User Definable Fields window.
Shift Start Company
ID code and name of the company where the driver starts and ends the workday, that is, his/her shift
If the driver is starting at a different location, select it from the list.
Default Template
Driver’s current default template
Template Start
Beginning date for which the current schedule was generated manually from the default template
Schedule Generated Through
Date through which the current schedule was generated
After this date, the driver’s schedule is automatically generated by the system when it retrieves the driver in the Card Planner and Planning WorksheetTrip Planner.
-
Click Generate Schedule.
The Generate Schedule window opens.
-
If appropriate, select a different Template from which to generate the driver’s work schedule.
Note: The list of available templates is determined by the selected terminal for which they were created. The list will also include any templates created for use by all terminals.
If you selected a rotating template, see Preventing a scheduling issue when switching to a rotating schedule template for more information.
-
Complete the fields in the Generate Schedule window as appropriate.
Field Definition Template Effective Date
Date the template took effect.
Notes:
If you changed to a different template, this field is editable.
If you did not change the template, this field is read-only.
To change this date, select the Change Template Effective Date checkbox.Change Template Effective Date
Select this checkbox when you want to change the Template Effective Date.
Generate From
Start date for the schedule you are currently generating, that is, today’s date. If you want to generate the schedule for a future time, enter or select that date.
Generate Through
End date for the schedule you are currently generating and defaults to today’s date. If you want to manually generate the schedule for a specific time, enter or select that date.
Tractor
ID assigned to the tractor
Trailer 1 - 2
IDs assigned to the primary and secondary (pup) trailers
Carrier
ID assigned to the third party company that hauls loads
Terminal
Terminal location specified in the resource’s profile
Note: If you change the terminal, the list of available templates also changes to display those associated with the selected terminal.
Fleet
Fleet specified in the resource’s profile
Note
A note entered here displays in the Notes field in the Edit Shift Information window. You access it from the Card Planner and Planning WorksheetTrip Planner.
-
In the Trip Planner, right-click on the driver listed in the Shift pane.
-
From the shortcut menu, select Shift Login/Logout.
-
-
Do one of the following to identify the start and end times for this driver’s schedule.
-
Use the template’s default start and end times
Note: This checkbox is selected by default. The system will use these start and end times on the template for future auto-generated shift schedules. The start and end times auto populate from the pre-determined times set up for the schedule template.
-
Use different default start and end times
You can enter different start and end times for the period of time indicated by the Generated From and Generated Through fields. By default, after this date, the system will use the start and end times on the template for the auto-generated shift schedules, not the adjusted times for the driver.
-
Clear the Use Start & End Times from Template checkbox.
Note: By default, this checkbox is selected and the times are read-only fields.
-
Enter the new Default Start Time and Default End Time for the driver.
-
-
-
If you want this template to be the driver’s default template, select the Use As Default Template checkbox.
TMW Operations will automatically generate ongoing shift schedules for the driver based on this template. -
Click OK.
The selected driver’s schedule generates and displays in the Driver Schedule details grid.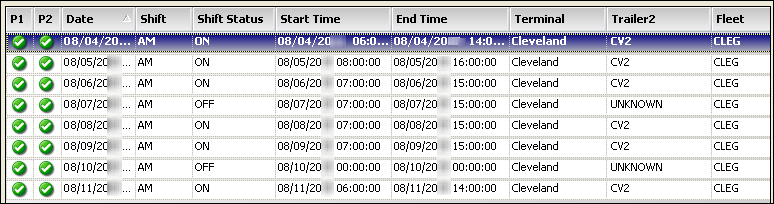
-
If necessary, change the schedule for specific days.
-
Click
Save.
The Schedule header fields are updated to reflect the information in the generated schedule.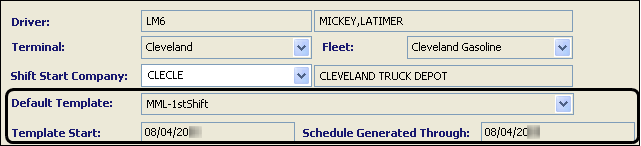
Switching a driver to a different template
It is likely that, when changing a driver from an existing schedule template to a another schedule template, the newly generated schedule can initially result in the driver being On Duty or Off Duty for an unacceptable number of days in a row.
See these sample scheduling issues:
-
Switching to a weekly schedule
The driver is currently working a weekly, Monday through Friday, shift schedule for the month shown here.
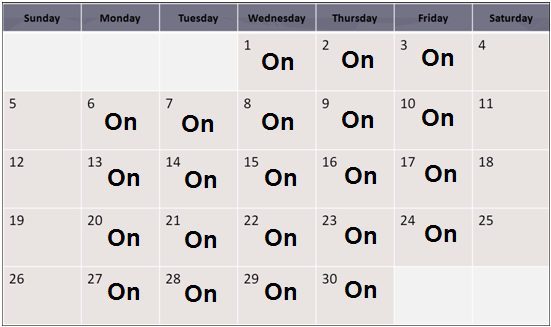
Suppose that, at the beginning of the next month (Friday, on the calendar above), the driver is switching to a different schedule, pictured here.
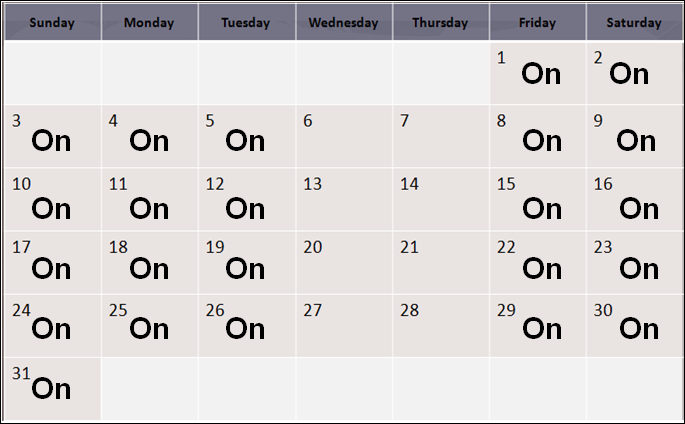
This schedule is generated from a different weekly, Friday through Tuesday, schedule template. If left this way, the driver will be On Duty for nine consecutive days when the new schedule takes effect.
-
Switching to a rotating schedule
The driver is currently working a weekly, Monday through Friday, shift schedule for the month shown here.
Suppose that, at the beginning of the next month (Friday, on the calendar above), the driver is switching to a different schedule, pictured here.
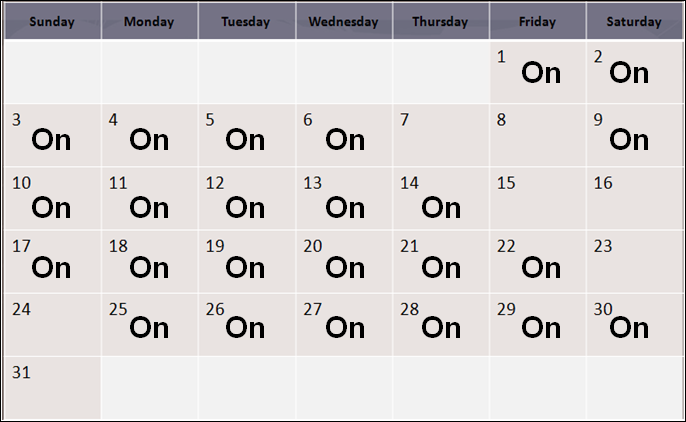
This schedule is generated from a rotating schedule template of six days on and two days off. If left this way, the driver will be On Duty for ten consecutive days when the new schedule takes effect.
How you remedy these situations is determined by:
-
Whether the new schedule is generated from a weekly or a rotating schedule template.
-
The template’s effective (start) date when the new schedule is generated.
With weekly schedule templates, the on and off days are the same from week to week.
For example, suppose a driver is On Duty five days and Off Duty two days. No matter what template effective date you set for the new schedule, if the two days off are Saturday and Sunday, the driver will be Off Duty every Saturday and Sunday.
With rotating schedule templates, the on and off days ordinarily change from week to week.
For example, suppose a driver is On Duty six days and Off Duty two days. One week the Off Duty days will be Thursday and Friday, and the next week the Off Duty days will be Friday and Saturday. The template effective date you set for the new schedule, determines when the eight-day cycle of on/off duty begins.
Preventing a scheduling issue when switching to a rotating schedule template
To change the template effective date for a schedule that is generated from a rotating schedule template, follow these steps:
-
Go to Application > Edit Driver Schedule.
-
In the Lookup group, select the driver.
-
Click
Open. -
Click Generate Schedule.
The Generate Schedule window opens.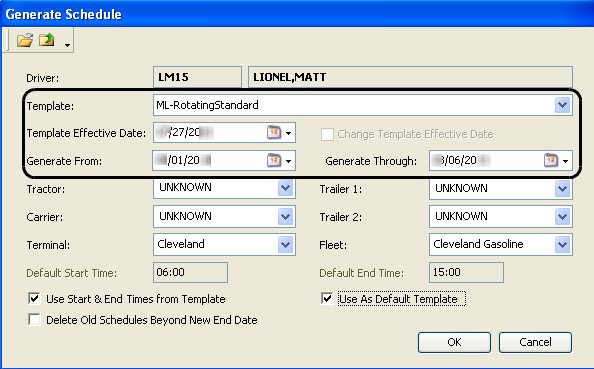
-
Select the appropriate rotating schedule template.
-
Change the starting dates.
-
Select the Change Template Effective Date checkbox.
-
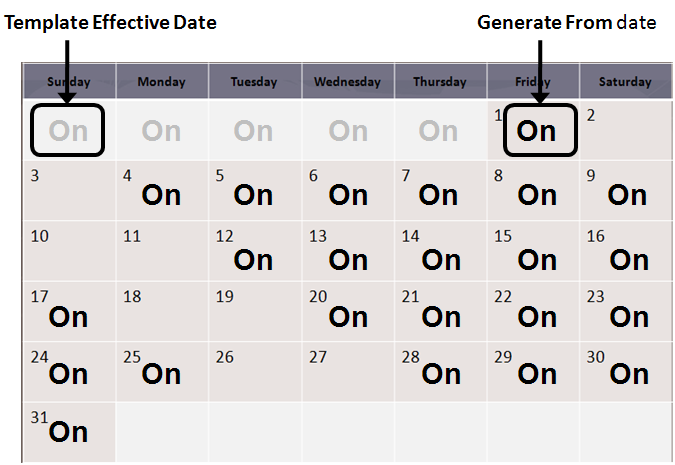
In the Template Effective Date field, select a date that is earlier than today’s date by a number of days.
Note: For example, you can change the date from the 1st of the new month to the 27th of the previous month.
-
In the Generate From field, select the actual date the driver will begin using this new shift schedule.
-
-
Make any other changes as appropriate.
-
Click OK.
-
Save the schedule.
The new schedule displays the new Template Start and the schedule is generated with the appropriate on/off status.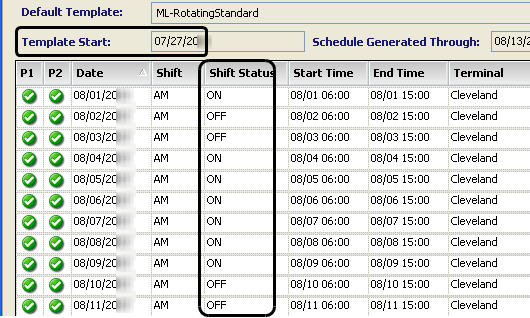
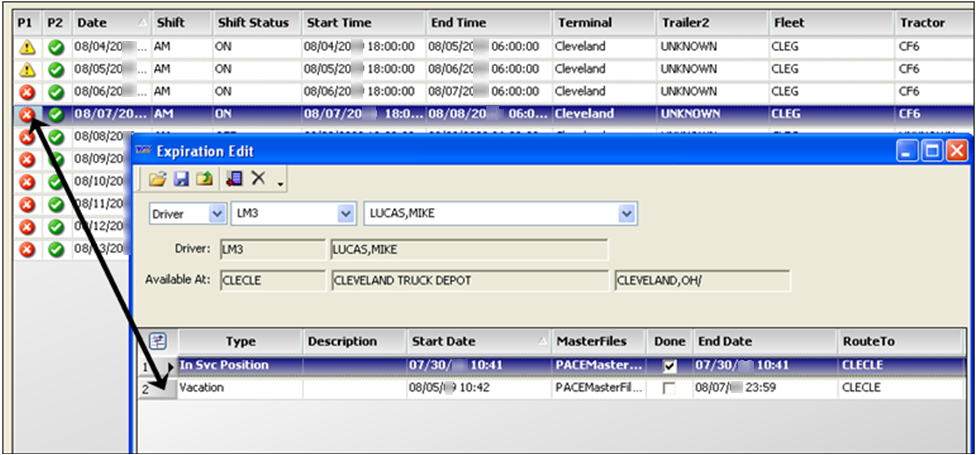
If the P1 column shows a red X, double-click on the expiration icon.
The Expiration Edit window opens.This sample shows the driver is on vacation. The Shift Status should be changed to OFF.
Remedying a scheduling issue when switching to a weekly schedule template
Once you have generated the shift schedule with a weekly schedule template, and you notice too many initial consecutive On Duty or Off Duty days, you can manually adjust each day’s Shift Status on the generated schedule.
To change a driver’s status designation for one or more days of the generated schedule, select the appropriate status in the Status column.
Changing a driver’s generated schedule
Use this procedure when a driver’s existing schedule needs to be modified to reflect a temporary change in his/her day-to-day schedule. A driver’s custom schedule overrides the schedule template that is assigned to him/her.
These events require you to change a driver’s schedule:
-
A driver’s status changes to reflect time off or an active expiration.
-
A driver’s home terminal location changes.
-
A driver’s start or end time changes.
-
A driver’s end company for a day changes.
-
A switch to a different schedule template initially results in the driver being On Duty or Off Duty for an unacceptable number of days in a row.
|
-
Go to Operations > Schedule by Driver.
The Edit Driver Schedule window displays. -
In the Lookup group, select the driver.
-
Select the terminal to which the driver belongs.
-
Select a driver name or driver ID.
-
-
Click
Open.
The selected driver’s schedule displays in the Driver schedule details grid.
Notes:
-
If no schedule displays, regenerate the schedule for the number of days that you want to adjust.
-
If the Default Template is highlighted in red, the template is either retired, or the terminal on the driver’s default template is not the same as the driver’s current home terminal.

If the template is retired, you must generate another schedule based on an active template.
If the terminals do not match, you can do either of the following:
-
Generate another schedule, changing the driver’s default template to one that is assigned to the same terminal as the driver’s home terminal.
-
Change the driver’s terminal assignment in his/her driver profile, and generate another schedule.
-
Field Definition P1 and P2
The P1 (Priority 1) and P2 (Priority 2) indicators serve as visual cues regarding expirations. These indicators change color based on expiration status.
-

Currently, no expirations are in affect. -

An expiration is due to go into effect shortly. -

An expiration is in effect for the resource.
Date
Represents a specific day on the schedule
Shift
Indicates whether the schedule is PM or AM
Status
Indicates whether the driver is ON or OFF
Start / End Time
Identifies the times when the shift begins and ends
Start / End Company
Identifies the company where the driver begins and ends the shift for the day
Terminal
Terminal location specified in the resource’s profile
Fleet
Fleet specified in the resource’s profile
Tractor
ID assigned to the tractor
Trailer 1 - 2
IDs assigned to the primary and secondary (pup) trailers
Carrier
ID assigned to the carrier
Note
Free-form text field to track notes per schedule date
These comments can also be viewed and modified in the shift login/logout window that is accessed from the Card Planner and Planning WorksheetTrip Planner.
-
In the Card Planner and Planning WorksheetTrip Planner, right-click on the driver listed in the Shift pane.
-
From the shortcut menu, select Shift Login/Logout.
Login Date
Date/time the driver logged in for the day
This field is read-only.
Logout Date
Date/time the driver logged out for the day
This field is read-only.
Tractor Mobile Comm Image
If you use mobile communications and you chose to have an image display, an image of a tractor appears.
Start Location
The ID code and name for the company where the driver starts and ends the workday, that is, his/her shift
-
-
If the shift dates you want to change are not included in the list, generate another schedule for the driver that includes those shift dates.
-
If you want to remove an existing schedule for dates that extend beyond the date you entered in the Generate Through field, select the Delete Old Schedules Beyond New End Date checkbox.
Note: If not selected, this new schedule will replace only those dates within the new date range. Any dates in the existing schedule that extend beyond the date you entered in the Generate Through field will remain from the existing schedule.
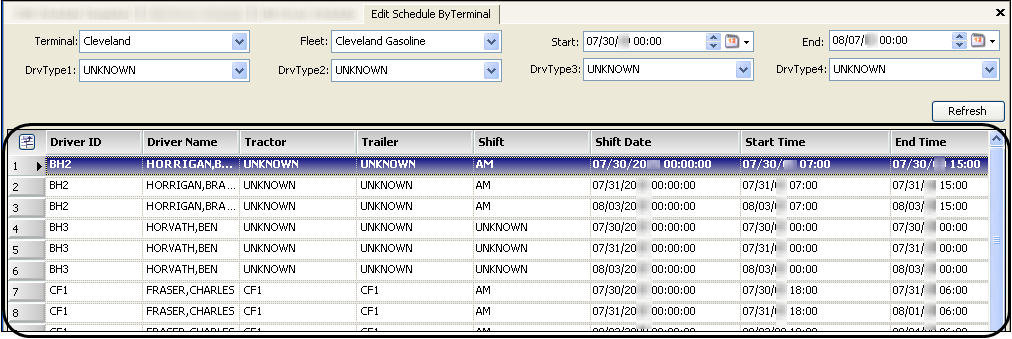
For example, this driver’s schedule was generated through 08/14, and assigned from 6:00 to 15:00 at the CLEG fleet.

He needs to be temporarily assigned for three days to earlier hours at the TOLK fleet, and then return to his regular shift schedule after that.
By not selecting the Delete Old Schedules Beyond New End Date checkbox, the resulting schedule was generated. The shift schedule for 08/10 through 08/12 was newly generated, and the shift schedule for 08/13 and 08/14 remained unchanged.
 .
. -
Make modifications as appropriate.
-
Terminal: one or more days
To change the driver’s terminal for a specific date or for a span of dates, select the appropriate location in the Terminal column. -
Shift
To change a driver’s shift designation (AM or PM) for one or more days of the generated schedule, select the appropriate shift in the Shift column. -
Status
To change a driver’s status designation for one or more days of the generated schedule, select the appropriate status in the Status column.If the P1 column shows a red X, double-click on the expiration icon.
The Expiration Edit window opens.This example shows the driver is on vacation. The Shift Status should be changed to OFF.

-
Start or End Time
To change a driver’s start or end time for one or more days of the generated schedule, set the appropriate time in the Start time or End time columns. -
Start or End Company
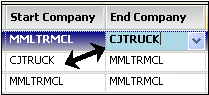
To change a driver’s start or end company for one or more days of the generated schedule, select the appropriate company in the Start Company or End Company columns.If you change the End Company for a day, the Start Company for the next day is changed to the same company. Conversely, if you change the Start Company for a day, the End Company for the previous day is changed.
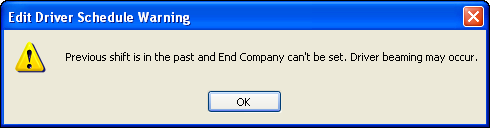
If you change the Start Company for the first day listed on the schedule, and a schedule for the previous day existed, a warning message is shown that the system cannot change the End Company for the previous shift as driver beaming may occur.
-
-
Click
Save.
Changing multiple driver schedules for one terminal
Use this procedure when you need to change the schedules of several drivers who are associated with the same terminal. Rather than open each driver’s schedule individually through Edit Driver Schedule, you can use Edit Schedule By Terminal.
-
Go to Operations > Schedule by Terminal.
The Edit Schedule by Terminal window displays.
-
Select the terminal.
-
If you want, select additional restrictions.
Field Definition Fleet
Fleet with which drivers are associated
Start / End Date
The shift start and end dates allow you to identify of range of shift dates to view in one grid
The default dates are both today’s date. See also Entering data in fields: Date and Time.
DriverType1 - 4
Driver classifications to which the driver has been assigned
Note: The name and options for these fields are user-defined in the DrvType1 - 4 labels, accessed in the Edit User Definable Fields window.
-
Click Refresh or
Open.
The data grid is populated with drivers meeting your restrictions.One row represents one driver for one shift.
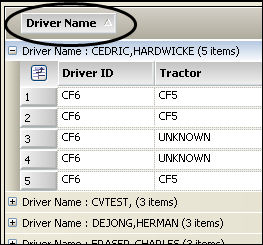
For large data returns, you might want to configure the data grid by grouping the data for easier navigation. This sample shows the data grouped by Driver Name.
-
Make changes as required.
Note: You can change data in any column except the Driver ID, Driver Name, Start Company, and End Company.
Field Definition Tractor
ID assigned to the tractor
Trailer 1 - 2
IDs assigned to the primary and secondary (pup) trailers
Shift
Indicates whether the schedule is PM or AM
Shift Date
Represents a specific day on the schedule
Start / End Time
Identifies the times when the shift begins and ends
Comment
Free-form text field to track notes per schedule date
These notes can also be viewed and modified in the shift login/logout window. You access it from the Card Planner.
Shift Status
Indicates whether the driver is ON or OFF
Note: The system administrator might have added other statuses to the list, such as On Call. Check with your administrator about which statuses are flagged as on and which as off. See
[FuelDispatch]AdditionalOnDutyStatus.If you change the shift status from one that is flagged as off to another that is flagged as off, the row in the data grid is highlighted in yellow. The highlighting remains until you click Refresh or close the window.
This example shows the status was changed from OFF to Absent, both of which are configured to be off duty.

Terminal
Terminal location specified in the resource’s profile
Start / End Company
Identifies the company where the driver begins and ends the shift for the day
You cannot change the start or end company in this window. See Changing a driver’s schedule for a specific day.
Fleet
Fleet specified in the resource’s profile
Login / Logout
Times the driver logged in and logged out on the shift date
These fields are read-only.
Driver Domicile
Starting in V.2023.3. Read Only field. Can be added or removed with Field Chooser.
-
Click
Save.
Note: Starting in V.2023.3. You can right-click and select View Profile in the data grid to access the respective driver’s profile without leaving the window.