Setting up Trimble Places
First available in TMW Operations 2023.2
The Trimble Places feature in TMW Operations integrates company location data in the TMWSuite database with Trimble Place data compiled by Trimble Maps. This provides a centralized collection point for customer addresses.
The feature’s setup includes:
-
Obtaining the PC*MILER Web Services (Premium) subscription and an API key for Trimble Places
-
Applying the Trimble Places license
-
Installing the Trimble Places Polling Service
-
Registering the permanent command line parameters
-
Applying a SQL file to your database
-
Activating the logging service (optional)
-
Configuring the feature
Verifying you have the required license
To use the Trimble Places feature, you must have the Trimble Places SQL license applied to your database. To verify that the license is applied:
-
Go to Help > About.
The About window opens. -
In the About window, click More.
The window that opens contains a list of licenses in a table. -
Look for Trimble Places in the Option Name column to verify that Y is set in the Value column.
If the Trimble Places license is not listed or is not set to Y, contact Trimble Transportation Support.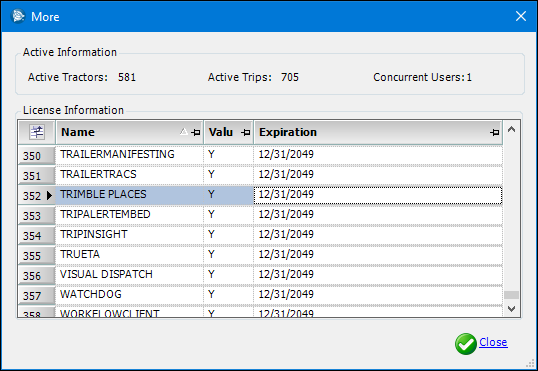
-
Close the window(s).
Installing the Trimble Places Polling Service
You must add the Trimble Places Polling Service to the machine running Trimble Places. The service updates data for companies linked to a Trimble Place, including:
-
Location
-
Contact information
-
Hours of operation
-
Notes
The service updates the edits made to notes in either application. Edits made in Trimble Places will update the notes in the company profile. Edits made in the company profile will update the notes in Trimble Places.
You use the Trimble.WindowsServices.TrimblePlaces.Install.msi file to install the service. You can obtain it from your support representative.
-
Double click the installer to start the installation.
The Trimble Places Polling Services Setup Wizard opens. -
Click Next.
-
Select the location to install the files.
-
Click Next.
A Confirmation window opens. -
Click Next.
An installation window opens, followed by the Set Service Login window. -
Enter the username and password for the machine on which the service will run.
-
Click OK to set the service login credentials.
The Installation Complete window opens. -
Click Close.
After installation is complete, your install directory should contain:
-
Trimble.WindowsServices.TrimblePlaces.exe
-
The .dll files needed to run the service
-
A SQL folder containing TMWBackOfficeDBMods.sql
|
The default install directory is at C:\Program Files (x86)\Trimble Transportation Enterprise\Trimble Places Polling Service |
In addition, the system created the Trimble Places Service. This Windows service periodically polls the database to check whether any company address data is ready for processing. You should not need to edit the service.

A Windows service is an application type that runs in the system background without a user interface. In the Services window, you can edit a service’s properties, and you can start, stop, pause, resume, or disable the service.
See your Windows documentation for information about accessing or using Windows services.
Applying SQL to your database
To ensure that your database is correctly modified, you must apply the TMWBackOfficeDBMods.sql file to your database. This file was installed in the SQL folder in the same directory as the other Trimble Places files.
For detailed instructions, consult your Microsoft SQL Server Management Studio or SQL Server Enterprise Manger help system. If you need further assistance, contact your support representative.
Registering the permanent command line parameters
You must register the permanent command line parameters that are passed to the service upon startup.
-
Open a command prompt as an administrator.
-
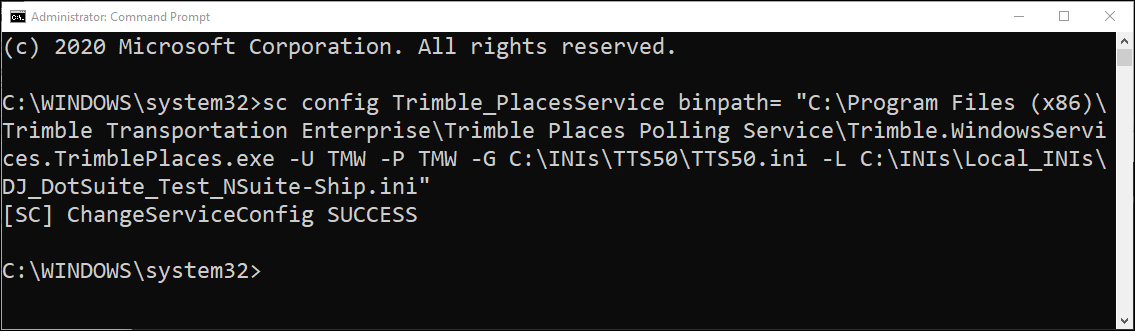
Enter this command:
sc config <1> binPath= "<2> -U <3> -P <4> -G <5> -L <6>"where
- <1>
-
Service name
- <2>
-
Path to the executable
- <3>
-
TMW login
- <4>
-
TMW password
- <5>
-
Path to the TTS50.ini file
- <6>
-
Path to the TTSlocal.ini file
Note: The space between the
binpath=option and the argument is required. -
Press ENTER.
When the command completes, the system displays a SUCCESS message.
Once the API settings are configured, the service can be started. In the Services utility, right-click the service and select Start.
Activating the logging service
As an option, you can set up the Trimble Places feature to record its processes in a log. The system logs messages to TMWSystemWideLogging database table.
To activate the logger, paste the following settings into the TTS50 you are using with the Trimble Places feature. Be sure to include the section names.
[LOGGER]
[LOGGER/ACTIVATIONRULES0]
RequiredKeywords0=TrimblePlacesWatcher
OptionalKeywords0=TrimblePlacesProcessing
OptionalKeywords1=TrimblePlacesWatcher
Configuring the feature
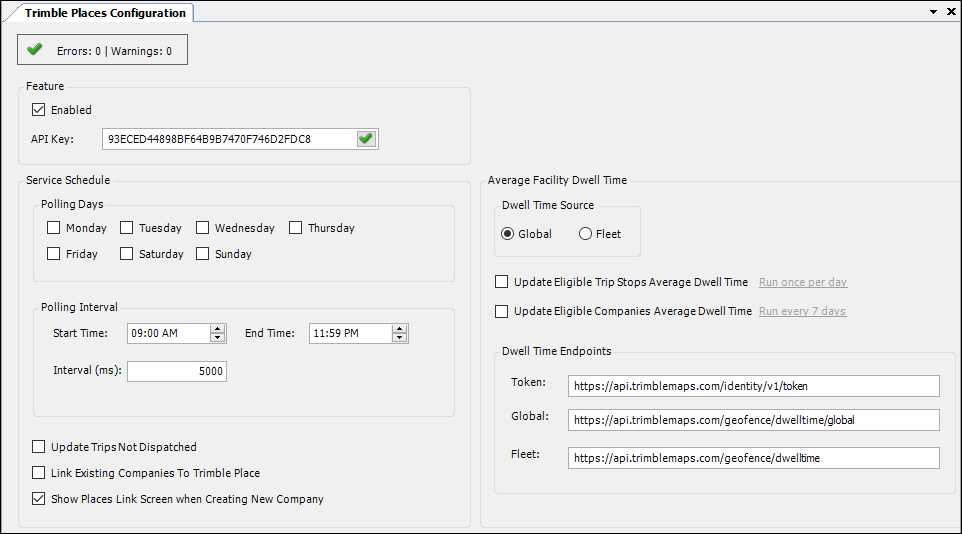
You set configuration options in the Trimble Places Configuration window.
-
Go to Tools > Trimble Places > Configuration.
The Trimble Places Configuration window opens. -
If you are using TMW Operations version 2023.3 or later, the window is automatically editable. If you are using an earlier version, go to File > Open.
-
Enable the feature.
Field Description Enabled
Select to activate the feature.
API Key
-
Enter your API Key.
The API key comes with the PC*MILER Web Services (Premium) subscription. -
To verify the key, click the
 green check mark at the end of the field.
-
If the key is valid, a second
 green check mark displays.
 -
If the key is invalid, a
 red X displays.
-
-
-
In the Service Schedule section, set the polling service schedule.
Field Description Polling Days
Select the checkbox of each day of the week on which you want the polling service to run.
Start Time
Set the time when polling should start on the selected days.
End Time
Set the time when polling should end on the selected days.
Interval (ms)
Enter the polling interval in milliseconds.
The default is 5,000 milliseconds (5 seconds).Note: The polling service updates companies linked to a Trimble Place when the Place’s update date is greater than the company’s last update date. It updates:
-
Location
-
Contact
-
Hours of operation
-
Notes
-
-
Set additional options.
Field Description Update Trips Not Dispatched
When selected, the system updates company data recorded on existing trips if all these conditions are true:
-
The company was updates from the Trimble Places API.
-
The trip has not been dispatched or started.
Link Existing Companies To Trimble Places
When selected, the system searches for companies not linked to a Trimble Place and attempts to link them.
Show Places Link Screen when Creating New Company
When selected, the Create Company with Trimble Place Link window opens when you start creating a new company.
-
-
Set options in the Average Facility Dwell Time section. For more information on dwell times and how to use them, see Viewing average facility dwell times.
-
Click
 Close.