Assigning a carrier to an order
Once you decide which carrier to assign to a load, you make the assignment in the Advanced Carrier Selection window. You access it from the Brokerage board’s Asset pane. It opens when you click Award on the Company Carriers or External Equipment tab.
You can use the window to:
-
Review or edit target profit calculations
-
Assign the carrier
-
Create and edit pay details
-
Submit a confirmation to the carrier
Once you complete these steps, save your entries in the Advanced Carrier Selection (ACS) window.
-
If needed:
-
Go to Operations > Company Planner > Brokerage.
-
Click
 Refresh at the top of the window to display the loads ready for assignment.
 -
Locate the load you want to assign and click its Cover button.
-
-
In the Assets pane, select the carrier that you want to assign to the load and click Award.
The Advanced Carrier Selection (ACS) window opens.
Advanced Carrier Selection window layout
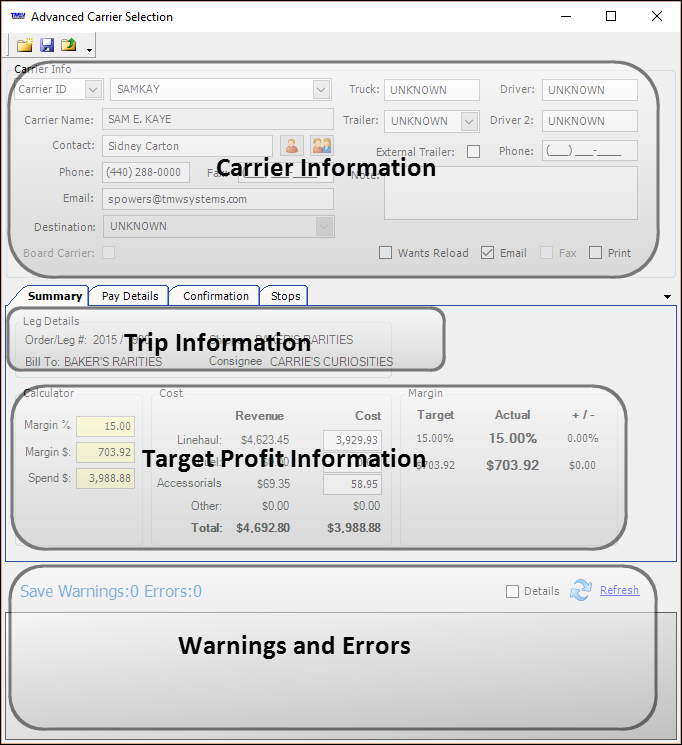
The Advanced Carrier Selection window includes the Carrier Info and Save Warnings sections, and four tabs.
Carrier Information
This section shows the information from the profile of the carrier you are assigning to the trip.
Summary tab
This tab has two sections:
-
Trip Information
This section shows the order’s:
-
Order and Leg numbers
-
Bill To
-
Initial pickup company
-
Final drop company
-
-
Target Profit Information
This section shows the ideal pay amount calculated by the system, based on the order’s revenue. Orders must be pre-rated for the system to show the projected profit. For details, see Understanding the revenue/cost spread.
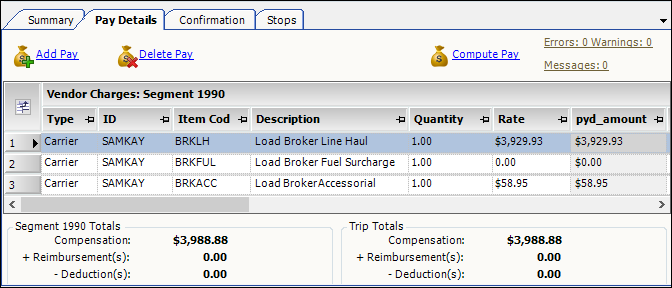
Pay Details tab
When you assign carriers to trips in the ACS window, the system automatically creates pay details. Pay is based on the profit target amounts specified on the Summary tab. This tab shows the estimated pay.
For details, see Reviewing the carrier pay details.
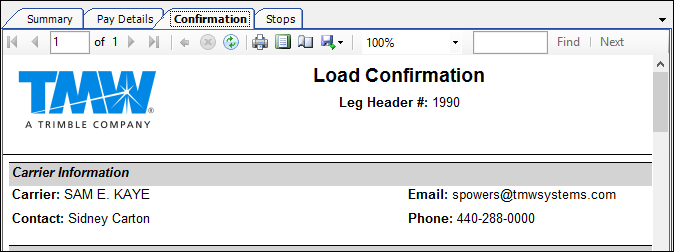
Confirmations tab
This tab displays the Load Confirmation. It provides details about the load.
For details, see Reviewing/sending the Load Confirmation.
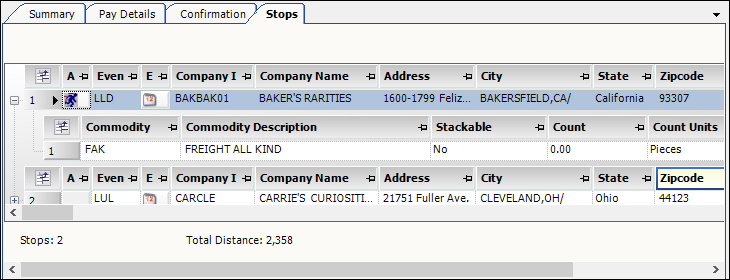
Stops tab
This tab shows the stop details for the order. Click ![]() Expand to view freight information for a particular stop.
Expand to view freight information for a particular stop.
Save Warnings and Errors section
This section shows warning and error messages when certain conditions conflict with the trip assignment. The top of the section lists the number of warnings and errors.
![]() Warning
Warning
A non-critical conflict exists, such as:
-
Priority 2 expiration
-
Load requirement signified by a should condition
The resource assignment can be saved.
![]() Error
Error
A critical conflict exists, such as:
-
Priority 1 expiration
-
Load requirement signified by a must condition
The resource assignment cannot be saved.
For details, see Responding to warnings and fixing errors.
Recording carrier contact and asset information
By default, the Carrier Info section shows the contact information from the carrier’s profile.
| If an offer was recorded for this load in the Add/Edit Offer window, any changes to the carriers contact information made there are shown here. The changes are for this load only. The carrier’s profile is not updated. |
You can change contact information and add asset information for the carrier.
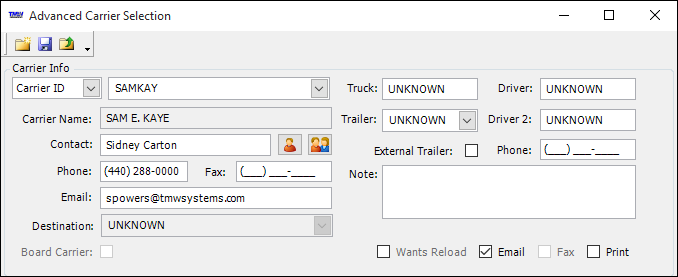
Information in these fields comes from the Contacts tab in the carrier profile. If needed, you can edit these fields.
Contact |
Enter the name of the person you are dealing with at the carrier. |
Phone |
Enter the phone number used to contact the carrier. |
Fax |
Enter the carrier’s fax phone number. |
Enter the e-mail address of the person you are dealing with at the carrier. |
Other editable fields allow you to enter asset information and notes.
|
Changes you make here appear in the Advanced Carrier Selection window for the selected trip. They are used to send the load confirmation if you award the trip to this carrier. They do not update the carrier’s profile. Starting in V.2021.1, the changes you make in the ACS window will update the company and carrier’s profile if the General Info Table setting AllowAdHocContactsPhoneEmail = N in String1.
|
Recording follow-up information
You can add information for a future action and a date for that action to the Check Call/Status Update window. These details appear in the Next Action columns in the Company Planner’s Brokerage and Covering boards.
You can also add two fields, Next Action and Next Action Date, to the ACS window. When you open the ACS window in the Trip Folder, these fields contain the details as well. You can view, change, and save information in these fields. The results appear in the Company Planner.
| The Next Action and Next Action Dates fields are not offered in the ACS-Carrier Mass Assignment window. |
Adding Next Action fields
Use QuickDesigner to add the Next Action and Next Action Date fields.
-
Go to Operations > Company Planner > Covering.
The Covering board opens. -
Right-click on an order in the window and select ACS. The ACS window opens.
-
Right-click in the window and select Toggle Quick Designer.
-
Right-click in the window where you want to add the Next Action field and select Add New Item.
The Add New Item window opens.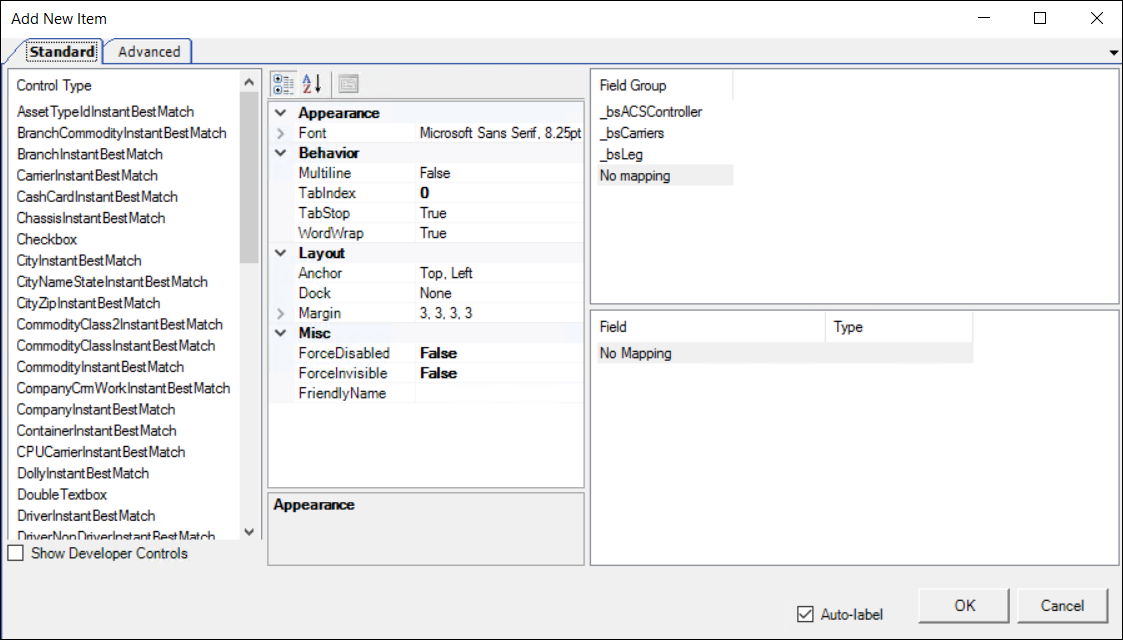
-
In the Control Type section, select Textbox.
-
In the Field Group section, select bsACSController.
The Field section shows applicable fields. -
In the Field section, select NextAction.
-
Click OK.
-
Right-click in the window where you want to add the Next Action Date field and select Add New Item.
The Add New Item window opens. -
In the Control Type section, select SmartDateEditor.
-
In the Field Group section, select bsACSController.
The Field section shows applicable fields. -
In the Field section, select NextActionDate.
-
Click OK.
-
Toggle out of Quick Designer.
-
Save the layout.
For more information, see Adding fields to a window.
Including Next Action details
-
Go to Operations > Company Planner > Covering.
The Covering board opens. -
Right-click on an order in the window and select ACS.
The ACS window opens. -
In the Next Action field, enter the next action for the dispatcher to take on this order.
-
In the Next Action Date field, enter the scheduled date and time for the dispatcher to complete the task.
-
Click Save.
Updates appear in the Next Action and Next Action Date fields for this order in:-
The Active grid in the Company Planner’s Brokerage board
-
The Covered grid in the Company Planner’s Covering board
-
The ACS window in the Trip Folder
-
Understanding the revenue/cost spread
Using the Summary tab, you can calculate profit margin amounts and costs to determine your profit target value. The tab includes theses sections:
-
Leg Details
Displays the order/leg numbers and identifies the Bill To, Shipper and Consignee on the order.
-
Calculator
Shows the default target profit information, which includes the Margin %, Margin $ and Spend $ fields. You can change the percentage of the target profit amount on an order-by-order basis by adjusting the amounts in these fields
By default, the target profit percent is 15%. You can use the
[Misc]BrokerPercentsetting in your TTS50 to identify the percentage of profit you wish to make when you broker loads. -
Cost
The Revenue fields show the revenue expected for the pre-rated order. You cannot change values in these fields.
The Cost fields show the estimated dollar amount you will pay the carrier. By default, the system calculates the cost as 85% of the revenue values in the Linehaul, Fuel, and Accessorials fields. For example, if the line haul revenue is $4623.45, the system calculates the estimated line haul cost as $3929.93.
-
Margin
The Target fields show the default Margin % and the Margin $ field values from the Calculator section.
The Actual fields show the results of changes you make in the Calculator and Cost sections.
When the profit margin exceeds the default target margin, the system displays the Actual values in green. When the profit margin falls below the default target values, the system displays the Actual values in red.

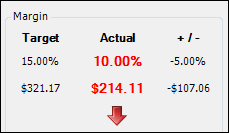
The fields in the +/- section show the variance between:
-
The target profit percentage and the actual profit percentage
-
The target revenue and the actual revenue
To change the revenue and cost calculations on the Summary tab, follow these steps.
-
Select the Summary tab.
-
In the Calculator section, change values in the fields as needed. Your entries immediately update the values in the Cost section and the Actual values in the Margin section.
-
Record a target profit percentage in the Margin % field.
By default, the target profit percent is 15%.
Note: Your company may have set a different default percentage using the
[Misc]BrokerPercentINI setting. -
Record a target dollar amount in the Margin $ field.
-
-
In the Cost section, enter values in the fields as needed. Your entries immediately update the Actual values in the Margin section.
-
Enter a line haul cost in the Linehaul field.
-
Enter a fuel cost in the Fuel field.
-
Enter an accessorial cost in the Accessorials field.
-
In this example, the ACS window shows the default percentage, 15.00.
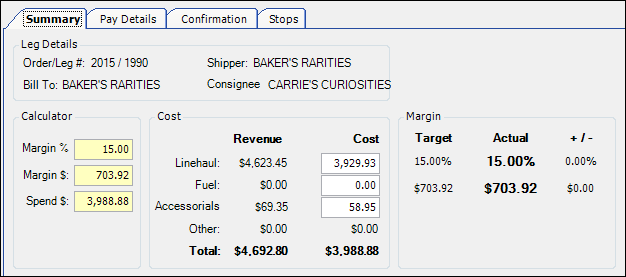
Using the calculation method, the system shows $703.92 in the Margin $ field.
However, the Margin %, the Margin $ and the Spend $ fields are editable.
When we decrease the percentage to 13.50, the Margin $ amount decreases to $633.53, a difference of $70.39.
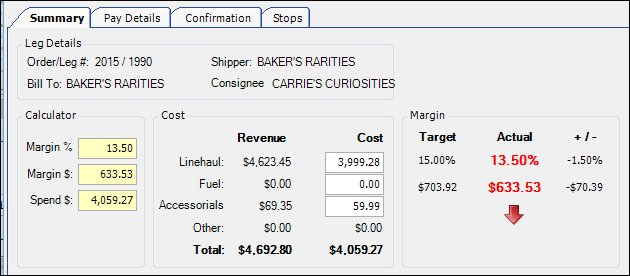
Notice also that the Spend $ value increases by that same amount. The Margin section reflects a change in the amount we expect to make on the trip.
Alternatively, we can change the Margin $ field value to update the Margin % value with the correct percentage to match our entry.
Suppose we increase the Margin $ dollar amount to $800.00. The system updates the Margin % to 17.05. Notice that the Spend $ value decreases based on the difference between it and the Spend $ amount calculated using the default margin values.
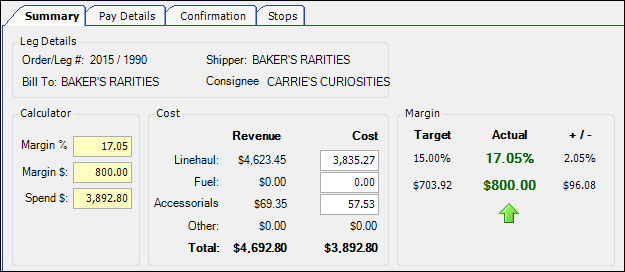
Basing manually entered pay on the Spend $ amount can ensure that profit on the trip meets your target value.
| You can exclude certain types of revenue, such as tolls, from the target profit calculation in the Advanced Carrier Selection window. Use Quick Designer to add the ExcludeFromCarrierRevenueDisplay checkbox to the Charge Type Maintenance window, and select the checkbox for charges that you want to exclude from target profit calculations. See Excluding charges from target profit calculations for details. |
Reviewing the carrier pay details
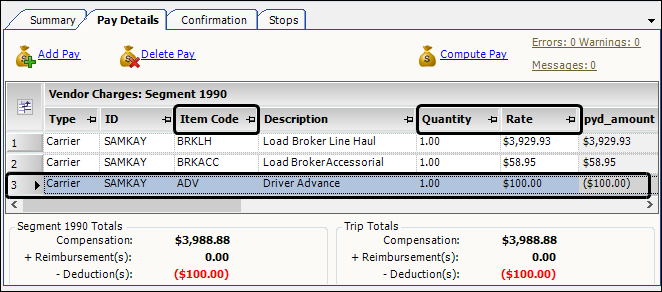
When you assign carriers to trips in the ACS window, the system automatically adds pay details to the grid. The pay is based on the profit target amounts specified on the Summary tab. To view them, select the Pay Details tab. If you want, you can add additional pay details, delete existing ones, or have the system compute the carrier’s pay in the Vendor Charges grid.
Manually adding pay details
-
To add a manual pay detail, click Add Pay.
The system adds a blank pay detail. -
Make entries in the following fields:
Item
Select an item code in the Item Code field and press TAB.
The system enters a pay description in the Description field.Quantity
Record a quantity in the Quantity field.
Rate
Record a rate in the Rate field and press TAB.
The system:-
Enters the pay in the pyd_amount field
-
Displays pay values as compensation, reimbursements, or deductions in the Segment Totals and Trip Totals sections
-
-
When you are finished, click Save.
The Send Confirmation message opens. See Reviewing/sending the Load Confirmation.
Deleting a pay detail
-
To delete pay, select the pay detail and click Delete Pay.
The Delete Confirmation message asks, "Are you sure you want to delete the pay item?" -
Click Yes.
-
When you are finished, click Save.
The Send Confirmation message opens. See Reviewing/sending the Load Confirmation.
Calculating pay
-
To calculate pay, click Compute Pay.
The system applies the previously set up rates and removes any pay details with zero rate amounts. -
When you are finished, click Save.
The Send Confirmation message opens. See Reviewing/sending the Load Confirmation.
Reviewing/sending the Load Confirmation
The Confirmation tab displays the Load Confirmation. It provides details about the load, including:
-
Carrier Information
-
Stop Information
-
Load Summary
-
Pay Information
The Confirmation toolbar ![]() allows you to:
allows you to:
|
Refresh the document data |
|
Print the document |
|
View the Print Layout of the document |
|
Edit Page Setup for the document |
|
Export the document data to a different file type |
The Load Confirmation is e-mailed to the carrier when you save the assignment. The Send Confirmation message opens. It asks, "Do you wish to send the Load Confirmation to the carrier?" Click Yes.