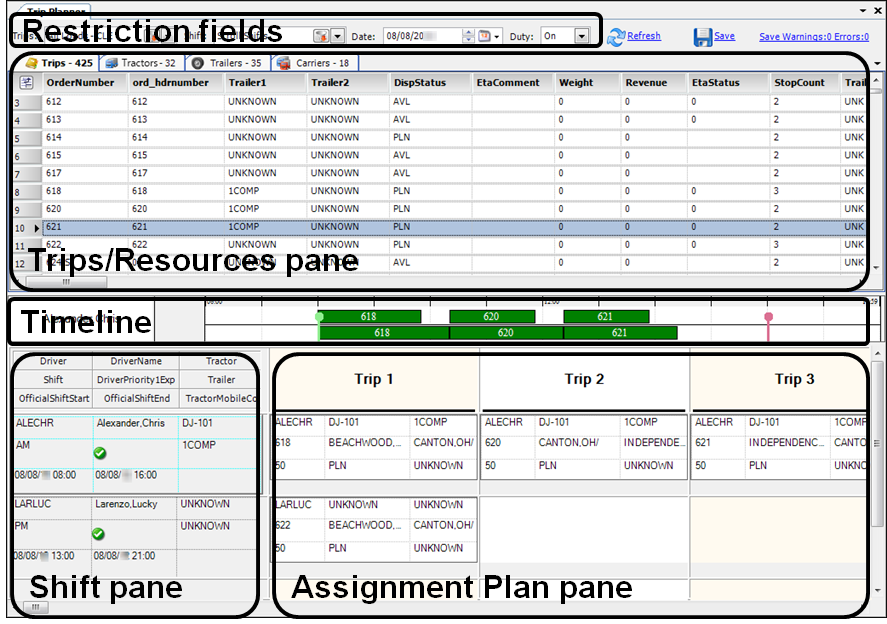
Introduction to the Trip Planner
You use the Trip Planner to match trips with drivers who are on duty during a specific day. Available drivers are listed in Shift pane in the lower left of the window. By default, the Shift pane also lists the tractor and trailer assigned to each driver.
When you select a driver, the Timeline area shows markers for his/her shift start and end times. Trip blocks are shown in the Assignment Plan pane to the right of each driver’s name. You assign a load by dragging-and-dropping an order from the Trips/Resources pane to a trip time block for a driver. You can plan up to 30 trips per driver per shift.
General process you will follow when using the Trip Planner
Before you can manage trips and resources in the Trip Planner, drivers need to be assigned to shift schedules. For more information on creating and managing driver schedules, see Introduction to scheduling drivers.
After you have assigned drivers to shifts, you can use the following general process to manage trips and resources using the Trip Planner:
Restriction fields
The Restriction fields are located at the top of the Trip Planner. These fields allow you to limit the trips and resources retrieved in the Trip Planner.
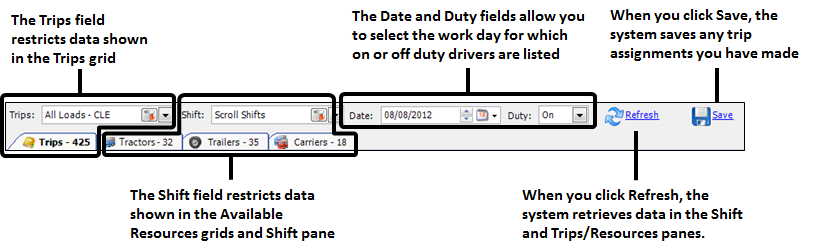
You can filter the trips/resources based on:
-
User-defined restriction sets
-
Date
-
Drivers on duty, off duty, or all
Trips/Resources pane
The Trips/Resources pane is located below the Restriction fields in the upper half of the Trip Planner. This pane has four tabs. Each tab contains spreadsheet-style grids that list available trips and resources.
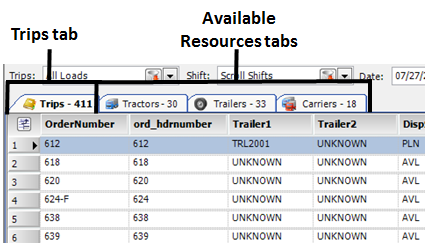
Trips grid |
The Trips grid lists outbound trip segments that are ready for dispatch. This tab can be considered a to-do list. It displays the trip segments that match the restrictions you set when retrieving trips and resources. |
Available Resources grids |
The Available Resources grids are used to determine which resources are (or will be) available for dispatch in particular locations. There is a tab for each resource type:
The data shown reflects information that is stored in each resource’s profile. |
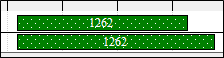
Timeline
The Trip Planner Timeline, also called the Gantt bar, is located below the Trips/Resources pane in the Trip Planner.
When no trips are assigned to a driver, the Timeline shows only the start/end times for the driver’s shift.

When trips are assigned, the Timeline shows the duration and status of each trip.
-
Planned trips show in green.

-
Started trips show in blue.

-
Completed trips show in gray.

|
Color indicates trip status. Shading indicates a trip assigned outside of the Trip Planner.
Shaded trips ignore driver schedules and may have unexpected effects on other trips assigned to that driver. Immediately un-assign all shaded trips. To avoid these issues, do not assign shift-based drivers to trips outside of the Trip Planner. |
Shift pane
The Shift pane is located in the lower left corner of the Trip Planner. This pane shows the drivers that are on duty for the selected date. The tractor and trailer associated with a driver when his/her schedule was generated are also listed.
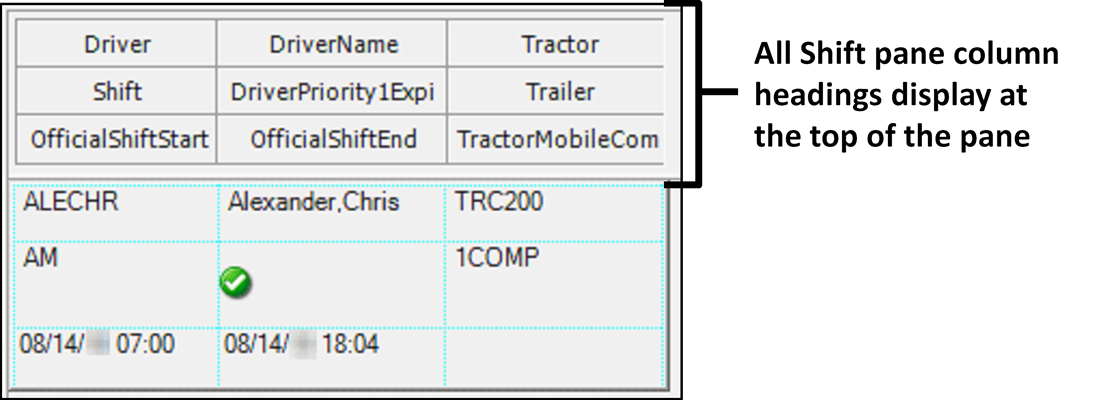
The system administrator can use the Cell Designer to change the information shown in the Shift pane, but the default information shown for each driver includes the following.
Top row
Driver |
Identifies the ID associated with the driver. |
DriverName |
Identifies the driver’s first and last name. |
Tractor |
Identifies the tractor associated with the driver. |
Middle row
Shift |
Identifies whether the driver works an AM or PM shift. |
DriverPriority1ExpirationImage |
Signals whether Priority 1 expirations(s) exist for the driver. Note: For more information on expirations, see What are expirations? |
Trailer |
Identifies the trailer associated with the driver. |
Bottom row
OfficialShiftStart |
Displays the current day and the driver’s shift start time. |
OfficialShiftEnd |
Displays the current day and the driver’s shift end time. |
TractorMobileCommImage |
If you use mobile communications, this cell will display a satellite icon when the driver is logged on for the day. |
Assignment Plan pane
The Assignment Plan pane is located in the lower right corner of the Trip Planner. This pane allows you to plan the trips a driver will complete during his/her shift. You can move trips around and line up several for a driver so that one trip ends near where the next begins. This allows you to arrange trips in an efficient sequence to minimize your deadhead miles.
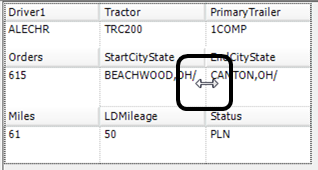
You can view the trip details in the Trip Planner. Each trip is shown in its own cell in the Assignment Plan pane.
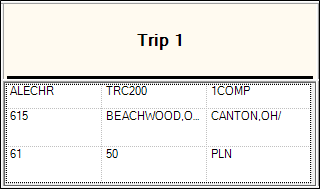
The system administrator can use the Cell Designer to change the information that is shown in the Assignment Plan pane, but the default information shown for each trip includes the following.
Top row
Driver1 |
ID of the primary driver planned on the trip. |
Tractor |
ID of the tractor associated with the driver planned on the trip. |
PrimaryTrailer |
ID of the trailer associated with the trip. |
Middle row
Orders |
Unique identifier assigned to the order. |
StartCityState |
The city and state in which the trip starts. |
EndCityState |
The city and state in which the trip ends. |
Bottom row
Miles |
Total miles for the planned trip. |
LDMileage |
Number of loaded miles for the planned trip. |
Status |
The current status of the trip. |
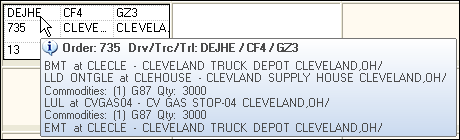
When you pause on a trip, its information summary window is displayed.
Trip assignments are not saved immediately, which lets you rearrange trips as much as you want. Assignments are saved when you click the Save button at the top of the window.
Designing cell layouts for the Shift and Assignment Plan panes
For each driver who is available for work, the Shift pane displays a grid of information, which is made up of data elements called cells. The Assignment Plan pane also uses cells to display data for each trip assigned to a driver.

When TMW Operations is first installed, the cells are arranged in default layouts. However, you may prefer to use a different set of fields for the cells, and/or a different data arrangement. A special configuration tool called the Cell Designer allows you to modify cell layouts. Using Cell Designer, you can:
-
Add or remove the data elements that make up cells.
-
Resize or rearrange cells.
-
Save the cell configuration for a particular user or group of users.
|
-
In the Trip Planner, click Refresh to populate the Shift pane.
-
If you want to design a Trip cells layout, temporarily plan one trip to populate the Assignment Plan pane. (You do not need to save the assignment.)
-
Right-click in the Shift cells or Trip cells area.
A shortcut menu is shown. -
Click Cell Designer.
The Cell Designer window opens.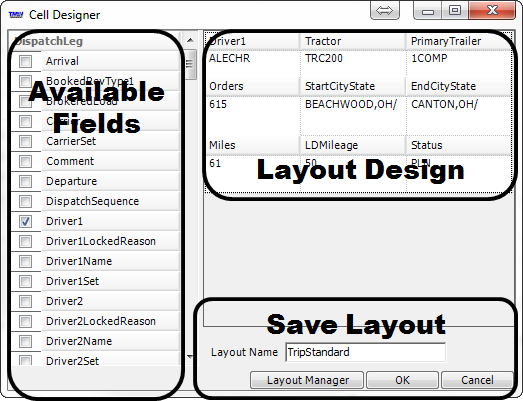
-
Use any of these tools to design your layout.
-
If you want, apply conditional formatting to any field.
-
If you want, for the Shift cells, change the labels displayed in the column header.
-
Right-click in the column heading you want to change.
A shortcut menu is shown. -
Select Column Header Name.
A text box showing the current column label is shown in a sub menu. -
In the text box, change the label.
-
Click in a different location on the window.
The menu disappears and the label is changed.
-
-
In the Layout Name text box, enter a name for the new layout.
Note: This is a required field.
-
When finished, click OK.
If you decide not to save the changes after all, click Cancel instead.
Add fields
Do one of the following:
-
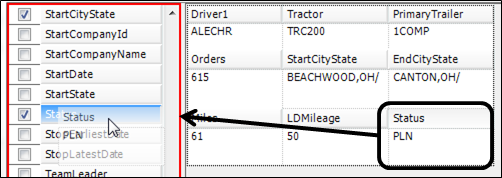
From the Available Fields section, select the checkbox to the left of each field to be added as a cell.
-
From the Available Fields section, drag an item to the desired location in the Layout Design section.
As you drag, the system displays a red box (as shown below) or red arrows to indicate where the field would be positioned on the existing grid if you were to drop it.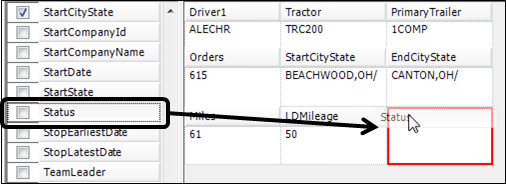
| The Shift cells area is limited to 12 cells in a four-by-three grid.If you add more, they will not be displayed. |
Remove fields
Do one of the following:
-
From the Available Fields section, clear the checkboxes of those fields you do not want displayed.
-
From the Layout Design section, drag an unwanted item to the Available Fields section.
The system displays a red box around the Available Fields section to indicate that you are returning the field there.
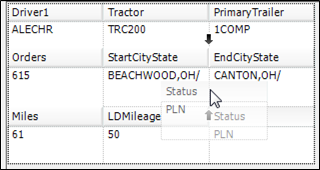
Rearrange fields
In the Layout Design section, move the fields to the desired locations.
As you drag, the system displays red arrows to indicate where the field would be positioned on the existing grid if you were to drop it.
Resize fields
In the Layout Design section, position the mouse over a grid line until the pointer turns into a double-headed arrow.Drag the grid line to the desired size.
-
Increase or decrease the row height:
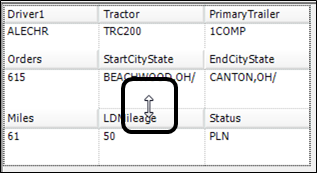
-
Increase or decrease the column width:
Assigning a layout to a user or group of users
After designing a layout of the Shift or Trip cells areas, use this procedure to assign the layout to a user or group of users.
| You can only assign saved layouts. For more information on creating and saving a layout, see Designing cell layouts for the Shift and Assignment Plan panes. |
-
Do one of the following:
-
To access a Shift cells layout
-
Click Refresh to populate the Shift pane.
-
Right-click in the Shift pane.
A shortcut menu is shown.
-
-
To access a Trip cells layout
-
Temporarily assign a trip to a driver. (You do not need to save the assignment.)
-
Right-click in the planned trip.
A shortcut menu is shown.
-
-
-
Click Cell Designer.
The Cell Designer window opens. -
Click Layout Manager.
The Grid Layout Permissions window opens. -
Under Layout Name, select the layout you want to assign.
If users or user groups are already assigned, they are listed in the lower part of the window.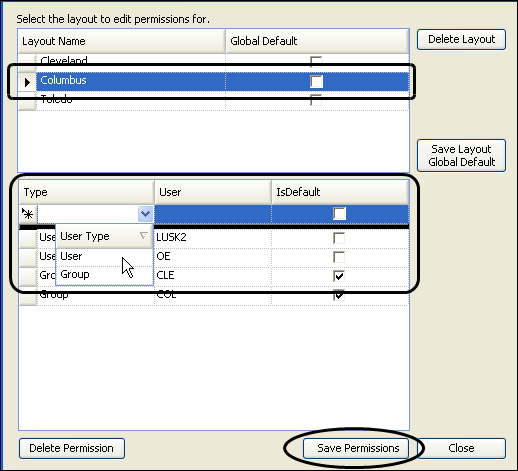
-
Under Type, click New, and select the assignment type as User or Group.
-
Under User, select the user or group name to assign.
-
If you want this layout to be the default layout for the user or group instead of the Global Default layout, select the checkbox under IsDefault.
-
Click Save Permissions.
-
When finished, click Close.
-
Close the Cell Designer window.
Removing a layout assignment from a user or group of users
Use this procedure to delete a layout assignment from a user or group of users.
-
Do one of the following:
To access a Shift cells layout
-
Click Refresh to populate the Shift pane.
-
Right-click in the Shift pane.
A shortcut menu is shown.
To access a Trip cells layout
-
Temporarily assign a trip to a driver. (You do not need to save the assignment.)
-
Right-click in the planned trip.
A shortcut menu is shown.
-
-
Click Cell Designer.
The Cell Designer window opens. -
Click Layout Manager.
The Grid Layout Permissions window opens. -
Under Layout Name, select the layout to which the user or group is assigned.
Users or groups assigned to the selected layout are listed in the lower part of the window. -
Select the user or group for which you want to remove the assignment.
-
Click Delete Permission.
A confirmation message is shown.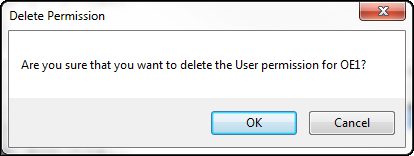
-
To delete the layout assignment, click OK.
If you decide not to delete the layout assignment, click Cancel instead. -
Click Save Permissions.
The permission changes are saved. -
When finished, click Close.
-
Close the Cell Designer window.
Modifying a layout
Use this procedure to change a saved layout.
-
Do one of the following:
-
To access a Shift cells layout
-
Click Refresh to populate the Shift pane.
-
Right-click in the Shift pane.
A shortcut menu is shown.
-
-
To access a Trip cells layout
-
Temporarily assign a trip to a driver. (You do not need to save the assignment.)
-
Right-click in the planned trip.
A shortcut menu is shown.
-
-
-
Click Cell Designer.
The Cell Designer window opens showing the current layout. -
Change the displayed layout, following the steps above for designing the layout.
-
Do one of the following:
-
To apply your changes to the current layout, do not change the Layout Name field.
-
To save your changes to another existing layout, enter the exact name of that layout in the Layout Name field.
Note: The name you enter and the saved name for that layout must be identical. To check the spelling of the layout name, click Layout Manager and review the layout names in the Grid Layout Permissions window.
-
To save your changes as a new layout, enter a new layout name in the Layout Name field.
-
-
Click OK.
If you decide not to make the changes after all, click Cancel instead.
Deleting a layout
Use this procedure to remove a saved layout that you no longer need.
-
Do one of the following:
-
To access a Shift cells layout
-
Click Refresh to populate the Shift pane.
-
Right-click in the Shift pane.
A shortcut menu is shown.
-
-
To access a Trip cells layout
-
Temporarily assign a trip to a driver. (You do not need to save the assignment.)
-
Right-click in the planned trip.
A shortcut menu is shown.
-
-
-
Click Cell Designer.
The Cell Designer window opens. -
Click Layout Manager.
The Grid Layout Permissions window opens. -
Under Layout Name, select the layout to delete.
If users are already assigned, they are listed in the lower part of the window.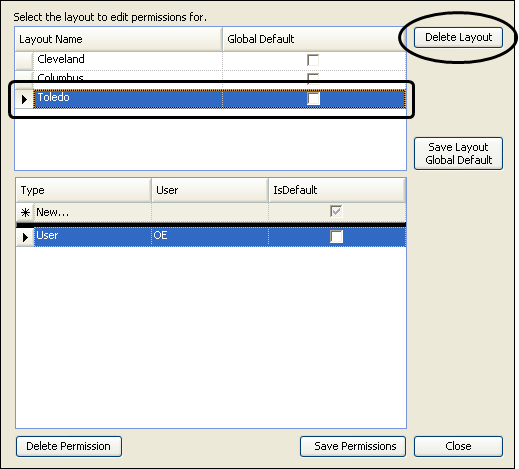
-
If users or groups are assigned, you must remove their assignment to the layout.
-
Click Delete Layout.
-
In the confirmation window, click OK.
If you decide not to delete the layout after all, click Cancel instead. -
Click Save Permissions.
The layout is removed from the list. -
Click Close.