Applying security to fields
You can use the QuickDesigner to apply security to a field, panel, group box, or an entire window. You can make an item:
-
Read-only: The item will be displayed, but cannot be edited.
-
Hidden: Although the item will be visible to you when you use QuickDesigner, it will be invisible in data entry mode.
Making an item read-only
Use this procedure if you want users to see an item, but not change it.
|
-
Right-click on one of the following:
-
Field or Field Name
Right-click directly on the field or the field name. -
Group box, panel, or window
Right-click on a spot other than a field or field name.
Note that the system highlights the entire area in green.
-
-
Select Show Preferences.
The Field Preferences window opens with current settings for the selected item.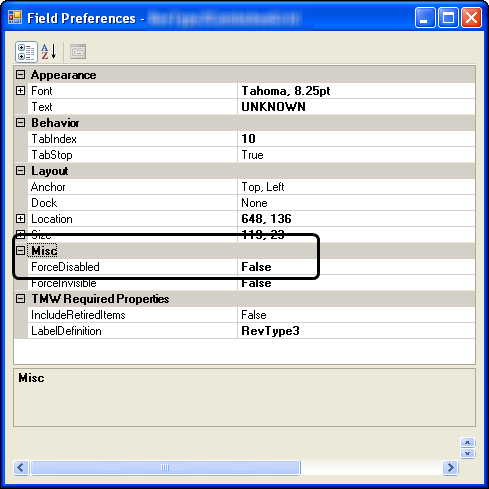
-
Under the Misc category, set ForceDisabled to True.
-
Click OK.
-
Toggle out of QuickDesigner mode to view the changes you have made.
Returning a read-only item to active status
Use this procedure when you want to return a read-only item to an editable state.
| When you made the field read-only, the system automatically removed the field from the tabbing sequence by assigning it a value of 0 (zero.) When you return the item to active status, the system does not automatically change the tabbing sequence value from 0. |
-
Right-click on the item.
-
Select Show Preferences.
The Field Preferences window with current settings for the selected item. -
Under the Misc category, set ForceDisabled to False.
-
Click OK.
-
Toggle out of QuickDesigner mode to view the change you made.
Showing and hiding fields in QuickDesigner mode
Ordinarily, when you hide fields for data entry mode, they are still visible in QuickDesigner mode, and appear with a light red fill color.
Use this procedure if you want to hide them from your view while working in QuickDesigner mode.
-
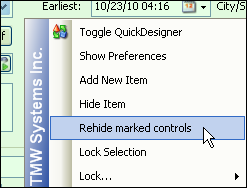
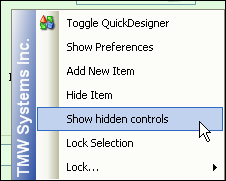
Right-click on the area of the window where you are working.
-
Do one of the following:
-
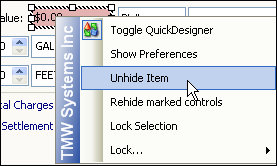
To hide the items that are marked as hidden, select Rehide marked controls.
-
To display the items that are marked as hidden, select Show hidden controls.
-
-
Toggle out of QuickDesigner mode.
Hiding an item
Use this procedure if you do not want users to see a factory default item. Even though it cannot be seen in data entry mode, it can still be visible in QuickDesigner mode.
-
Right-click on one of the following:
-
Field or Field Name
Right-click directly on the field or the field name. -
Group box, panel, or window
Right-click on a spot other than a field or field name.
Note that the system highlights the entire area in green.
-
-
Select Hide Item.
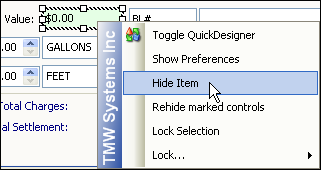
The item now displays with a light red fill color.
-
Toggle out of QuickDesigner mode to view the changes you have made.