Basic data entry
In TMW Operations, you will be entering data in fields, selecting options from drop-down lists, and entering or selecting dates/times.
In some fields, the instant best match feature allows you to conduct an automatic search for a correct code or name as soon as you start to enter an ID code or name in the field.
Fields that display master file entities (for example, companies) allow you to access a scroll window or profile window with a simple mouse click.
Entering dates and times
The date/time fields provide the appropriate formatting for entering dates or dates and times. You can enter a date/time in a field or select a date from a calendar.
You may enter dates and times in three formats:
-
Ten-digit date/time format (MMDDYY HHMM)

-
Twelve-digit date/time format (MMDDYYYY HHMM)

Note: To move from the date to the time, press CTRL+RIGHT ARROW. To move from the time to the date, press CTRL+LEFT ARROW.
-
Six-digit date format (MMDDYY)
To enter dates and times more quickly, you may want to use keyboard shortcuts. For details, see Using the keyboard keys to enter dates and times.
Entering dates
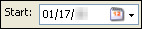
Enter the date using the MMDDYY or MMDDYYYY format. Do not enter the slashes.
![]()
| If you enter a date or time in an incorrect format, an error message appears. |
Entering a time of day
Enter time in the 24-hour format (HHMM), also known as military time. For example, to enter 6:15 AM, type 0615. To enter 6:15 PM, type 1815.
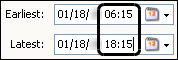
| Do not enter the colon. |
Understanding the default dates/times
Some fields use the default dates, which are also called the genesis and apocalypse dates. These dates/times represent the earliest and latest possible dates allowed by the system.
![]()
-
The genesis date/time of 01/01/50 00:00 represents the earliest possible date/time allowed by the system.
-
The apocalypse date/time of 12/31/49 23:59 represents the latest possible date/time allowed by the system.
These default dates and times often appear in fields where a date range is expected. For online searches and reports, if you do not override the defaults, the system will list all applicable records from 01/01/1950 to 12/31/2049.
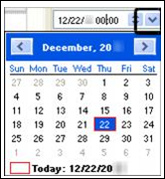
Using the calendars to select a date
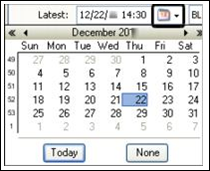
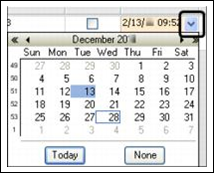
To select a date from a drop-down calendar, click the drop-down arrow or ![]() Calendar icon in the field. The date highlighted in blue is the date displayed in the dd section of the date field. The date boxed in red is today’s date.
Calendar icon in the field. The date highlighted in blue is the date displayed in the dd section of the date field. The date boxed in red is today’s date.
Examples of how to go to a date:
|
Options:
|
|
Options:
|
|
Options:
|
Using the spin dial to set a date/time
Some date fields include a spin dial. Click on the spin dial arrows to cycle through the dates.
![]()
-
mm
Click the cursor at the left side of the field. Click the up and down spin dial arrows to display the appropriate month. -
dd
To change to another day, click in the dd section and click the spin dial arrows. -
yy
To change to another year, click in the yy section and click the spin dial arrows. -
hh
To change to another hour, click in the hh section and click the spin dial arrows. -
mm
To change to another minute, click in the mm section of the time and click the spin dial arrows.
Entering numbers
Many fields provide the appropriate formatting for the number type, such as for phone numbers and dollar amounts. Other number fields provide a spin dial for increasing or decreasing numbers.
Entering phone numbers
When entering phone numbers, enter the 3-digit area code and 7-digit phone number.
Do not enter the parentheses or dashes. Some phone number fields provide the appropriate formatting.
![]()
In other phone fields (i.e., profiles), the unformatted phone number is transferred to a formatted field in another location.
![]()
Entering dollar amounts
When entering dollar amounts, enter the decimal point. Do not enter the dollar sign or comma.
![]()
Entering other numbers
When entering count, length, miles, and so on, do not enter commas in numbers 1000 and greater.
In some number fields, you can use the spin dial to increase or decrease the number displayed.
![]()
-
Click the up arrow to increase the number by 1.
-
Click the down arrow to decrease the number by 1.
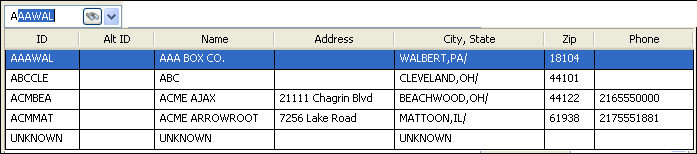
Using the instant best match data entry feature
Many data entry fields allow you to identify a company, driver, tractor, trailer, carrier, commodity, or city and state/province. As you begin to enter the entity’s ID code or name, the system displays an ID or name that begins with the characters you typed. This automatic search for the correct code or name is known as the instant best match feature.
To use the instant best match feature, follow these steps:
-
In a field with a drop-down arrow, enter the first few characters of the entity’s ID code or name.
A drop-down grid displays a maximum of 10 items that match your entry. To help identify the record you want, the grid displays columns of data relating to the records.
Note: If your login permits you to use QuickDesigner, you can change the maximum number of results shown in the drop-down list for a company field. For more information, see Controlling the number of instant best match results for a company field.
-
Continue entering characters until the appropriate ID/name appears in the list.
-
Select the item from the grid.
Note: To undo your selection before moving the cursor to another field, press ESC.
-
Press TAB to move to the next field.
In some windows, pressing TAB automatically completes the entity name in the next field.
Sometimes two closely related fields are positioned next to each other. For example, one field may be for an ID and the second field is for the name associated with that ID. After you make an entry in one field and press TAB or SHIFT+TAB to move to the next or previous field, the system automatically populates data in the second field.
For example:
-
If you enter a company code in the first field and press TAB, the corresponding company name automatically displays in the second field.

-
If you enter a company name in the second field and press SHIFT+TAB, the corresponding company code automatically displays in the first field.

-
If you select a company from a data grid, both the company code and company name fields automatically populate.
TMW Operations does not support the [Misc]dddwrows setting in your TTS50.
|
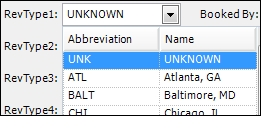
Making selections from drop-down lists
Many user-defined fields in TMW Operations display options that your company has set up in the label file. Labels allow your organization to assign its own names to fields and the options those fields display. When you click in such fields, the system displays a list of options.
Use one of these methods to select an item from the list:
-
Click on your selection.
-
Press the DOWN ARROW and UP ARROW keys to highlight your selection and then press TAB.
-
Type the first letter of the option name to display the option in the field. If more than one option begins with the same letter, press the letter until the option appears in the field.
All fields that list label entries have UNKNOWN as the default option. You cannot delete or retire this option. The system requires it as a way to identify records that have not yet been assigned any of the other values in the drop-down list.
| System administrators can create or edit options for labels, but the changes are not immediately available. First, you must close and re-open TMW Operations. Or, you can clear the label file cache in TMW Operations, by closing the tab (e.g., Order Maintenance) then selecting Tools > Clear Cache > Label Files. |
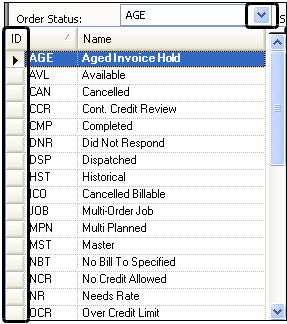
Selecting multiple items in restriction windows
Some windows, such as the scroll windows, allow you to retrieve multiple records at the same time. They provide sub tabs that display fields in which you enter restrictions. Typically, you can select only one option at a time from a drop-down list. However, when you retrieve data, you may want to select more than one restriction for the same field. Therefore, some restriction fields allow you to select multiple options in their drop-down lists. One example is the Order Status field in the Order Scroll window.
To see the list, click the drop-down arrow. The boxes displayed in the column at the left side of the list indicate that you can select multiple items.
-
To select a single item, click on it. It is highlighted in blue. The system inserts the option’s code in the restriction field.

-
To select two or more consecutive items, press SHIFT and click on the first item and the last item in the sequence.
-
To select two or more non-consecutive items, press CTRL and click on each item.
When you have made your selections, click the cursor in another field in the restriction window.
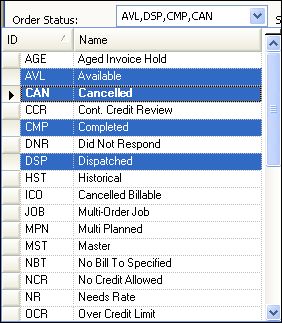
You do not have to use the drop-down list to specify multiple restrictions. Instead, you can manually enter the code for each restriction option in comma-delimited format. In this example, the codes for Available, Dispatched, and Planned order statuses have been entered.
![]()
Accessing a scroll window from a field
The scroll windows in TMW Operations allow you to see lists of:
-
Master file records (company and driver profiles, for example)
-
Orders
In TMW Operations, you can access a scroll window from an order, resource, company, or commodity field.
-
Right-click in the field.
-
From the shortcut menu, select View Scroll.
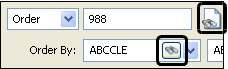
In some fields, the ![]() View Scroll icon or
View Scroll icon or ![]() Search/Load an Order icon indicates that you can access the scroll window from that field.
Search/Load an Order icon indicates that you can access the scroll window from that field.
You can also open the scroll window by placing the cursor in the field and pressing CTRL+ALT+S.
For details on scroll windows, see Using scroll windows to look up records.
Accessing a profile window from a field
The term master file refers to profiles for the entities used in the operation of your business. For example, you must create a profile for each company with which you do business.
Types of profiles you can access include:
-
Company
-
Driver
-
Tractor
-
Trailer
-
Carrier
-
Commodity
-
City
In TMW Operations, you can display the profile for an entity from any field that displays this information.

-
Right-click in the field.
-
From the shortcut menu, select View Profile.
If you are authorized to do so, you can modify a profile after accessing it.
For some ID fields, the  View Profile icon is shown to the right. You can double-click the icon to open the profile window for that record.
![]()
You can also open the profile for that record by placing the cursor in the field and pressing CTRL+ALT+P.
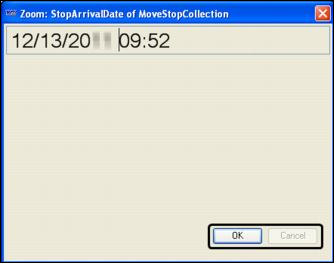
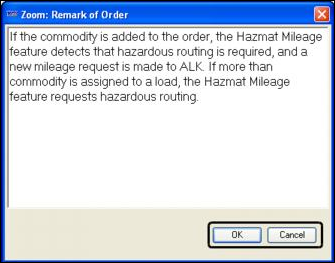
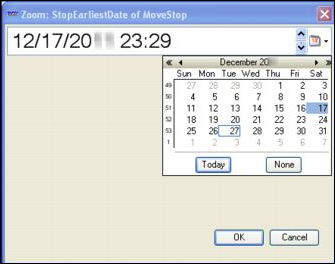
Using the Zoom Field feature
The Zoom Field feature allows you to display the contents of a field in a larger window for better viewing. In some cases, you can edit the information in this larger view.
This feature is particularly useful for notes, remarks, and date fields.
To use the zoom feature, follow these steps:
-
Right-click in the field.
-
From the shortcut menu, select Zoom Field.
-
If the information cannot be modified, only the OK button will be activated.
-
If the information in the Zoom window can be modified, both the OK and Cancel buttons will be activated.
-
-
If a date field can be edited in the Zoom window, you can:
-
Click in the month, day, year, hours, or minutes, and change the information with the keyboard.
-
Use the spin dial to increase or decrease the number, or display the drop-down calendar to select another date.
-