Scheduling appointments
The Appointment Scheduler allows you to book appointments for stops on a trip. An appointment is defined as a scheduled pickup or delivery time.
Scheduling features are available in:
-
The Appointment Scheduler window in the Trip Folder
Allows you access to all scheduling features.
Note: The illustration above shows only the basic fields in the Schedule Detail section. QuickDesigner was used to hide all custom fields. Your user interface may look different. For information about using QuickDesigner, see Toggling in and out of QuickDesigner mode.
-
Trip Folder’s Scheduling tab
Allows you to view appointment data and record contact information when the earliest and latest times are changed to previously scheduled appointments.
-
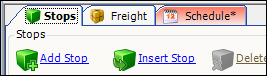
Trip Folder’s Stops tab
Allows you to set the status for appointments.

-
Order Entry’s All Stops tab
Allows you to set the status for appointments.
Setting up the scheduling feature
Before you can schedule an appointment, you must set up your TTS50, label file, and company profiles. You will:
-
Activate scheduling features
-
Set up reasons for rescheduled appointments
-
Record appointment requirements for companies
-
Set up company contacts
Activating scheduling features
When you have [.NetMisc]ScheduleReschedule=Y set in your TTS50, these Appointment Scheduler features are available:
-
The Operations > Schedule Reschedule command in the Trip Folder
This command launches the Appointment Scheduler window. -
The Schedule tab in the Trip Folder
-
The AppointmentStatus column on the Stops tab in the Trip Folder
-
The AppointmentStatus column on the AllStops tab in Order Maintenance
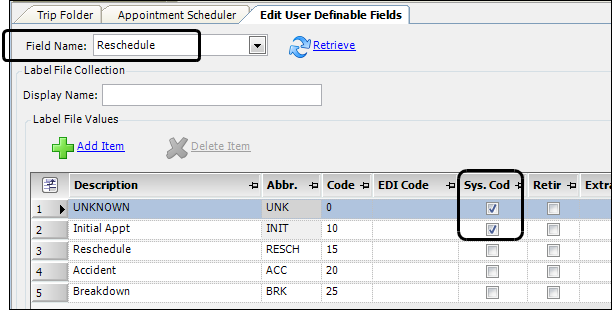
Setting up reasons for rescheduled appointments
When you use the ![]() Edit Schedule command to reschedule an appointment, the system requires that you select a reason for the change in the Reschedule field.
Edit Schedule command to reschedule an appointment, the system requires that you select a reason for the change in the Reschedule field.
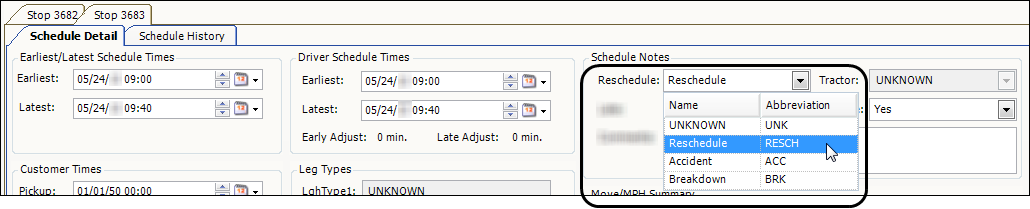
You define rescheduling reasons in the Reschedule label. You should never retire either of these system code options:
-
Unknown
Defaulted value for the Reschedule field before an appointment is scheduled. -
Initial Appt
Used for the stop’s original appointment.
|
Recording appointment requirements in company profiles
You define the scheduling requirements for a company on the Scheduling tab in the company’s profile.
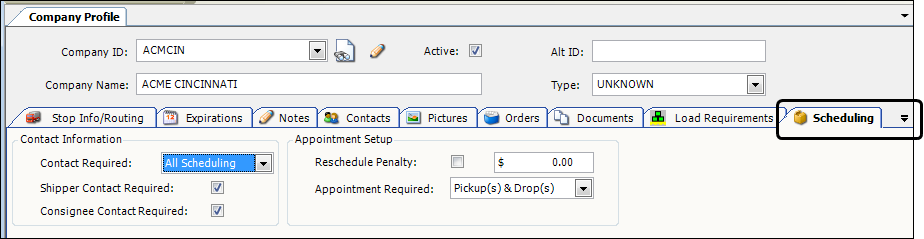
| The illustration above shows only the basic Appointment Scheduler fields. QuickDesigner was used to hide all custom fields. Your user interface may look different. For information about using QuickDesigner, see Toggling in and out of QuickDesigner mode. |
| Field | Definition |
|---|---|
Contact Required |
Specifies the type of appointment scheduling that requires you to contact the company. The options include:
|
Shipper Contact Required |
Select the checkbox to allow Bill To companies to override the stop company contact requirement. For example, if the shipper company is set to No Contact Required, but the Shipper Contact Required checkbox in the Bill To profile is selected, the system will require the shipper to be contacted. Note: For non-Bill To companies, this checkbox is automatically selected and cannot be changed. |
Consignee Contact Required |
Select the checkbox to allow Bill To companies to override the stop company contact requirement. For example, if the consignee company is set to No Contact Required, but the Consignee Contact Required checkbox in the Bill To profile is selected, the system will require the consignee to be contacted. Note: For non-Bill To companies, this checkbox is automatically selected and cannot be changed. |
Reschedule Penalty |
Select the checkbox to access a field that you can use to record a suggested penalty for a Bill To company. Enter the dollar amount in the field to the right of the checkbox. Note: This field is informational only; the system does not automatically create an invoice detail for a reschedule penalty. |
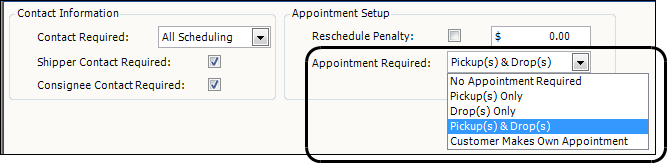
Appointment Required |
Specify which stop types require you to schedule an appointment. Options are:
|
Understanding contact requirements
Your setup, along with default requirements, determines if contact information must be recorded before an appointment can be saved.
To save an initial appointment, contact information must be recorded in these situations:
-
Stop company requires contact and either of the following are true.
-
Stop is the first pickup and the Earliest date and/or Latest date has changed.
Note: Contact is not required if only the time changes.
-
Stop is not the first pickup and the stop company requires contact.
-
-
Stop is first pickup and Bill To requires shipper contact and the Earliest date and/or Latest date have changed.
Note: Contact is not required if only the time changes.
-
Stop is last drop and Bill To requires consignee contact.
To save a rescheduled appointment and the Earliest and/or Latest date or time has changed, contact information must be recorded in these situations:
-
Stop company requires contact.
-
Stop is first pickup and Bill To requires shipper contact.
-
Stop is last drop and Bill To requires consignee contact.
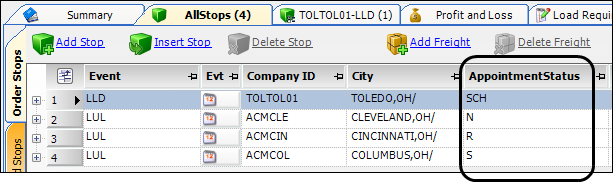
Scheduling appointments during order entry
If your company receives new orders by telephone, your customer service representative (CSR) probably sets the stop appointments for some or all of the stops during the phone call. After setting the appointment(s), the CSR should update the appointment’s status so that other scheduling personnel will know which appointments have been scheduled.
To simplify this process, the CSR can set the appointment status in the AppointmentStatus column in either of these locations:
-
The AllStops tab in Order Maintenance#
-
The Stops tab in the Trip Folder#
| If the AppointmentStatus column is not displayed, use the Field Chooser to add it. For more information, see Adding or hiding a column using the Field Chooser. |
The AppointmentStatus column is editable when all the following criteria are met:
-
The stop is billable
-
The AppointmentStatus is not set to a value of C or N
-
The stop is not actualized
The options in the AppointmentStatus column are:
| Option | Description | Can be changed to |
|---|---|---|
blank |
Needs to be scheduled |
S or SCH |
S |
Needs to be scheduled |
SCH |
SCH |
Scheduled |
R |
R |
Needs to be rescheduled |
SCH |
C |
Customer makes own appointments Note: This option is set in the company’s profile. |
Cannot be changed in the AppointmentStatus column. |
N |
No appointment needed Note: This option is set in the company’s profile. |
Cannot be changed in the AppointmentStatus column. |
Note: If you change the AppointmentStatus to an invalid code, the change will not be saved. |
||
The default value in the AppointmentStatus column is determined by:
-
The type of stop
-
The option recorded in the Appointment Required field in the company profile.
For more information, see Recording appointment requirements in company profiles.
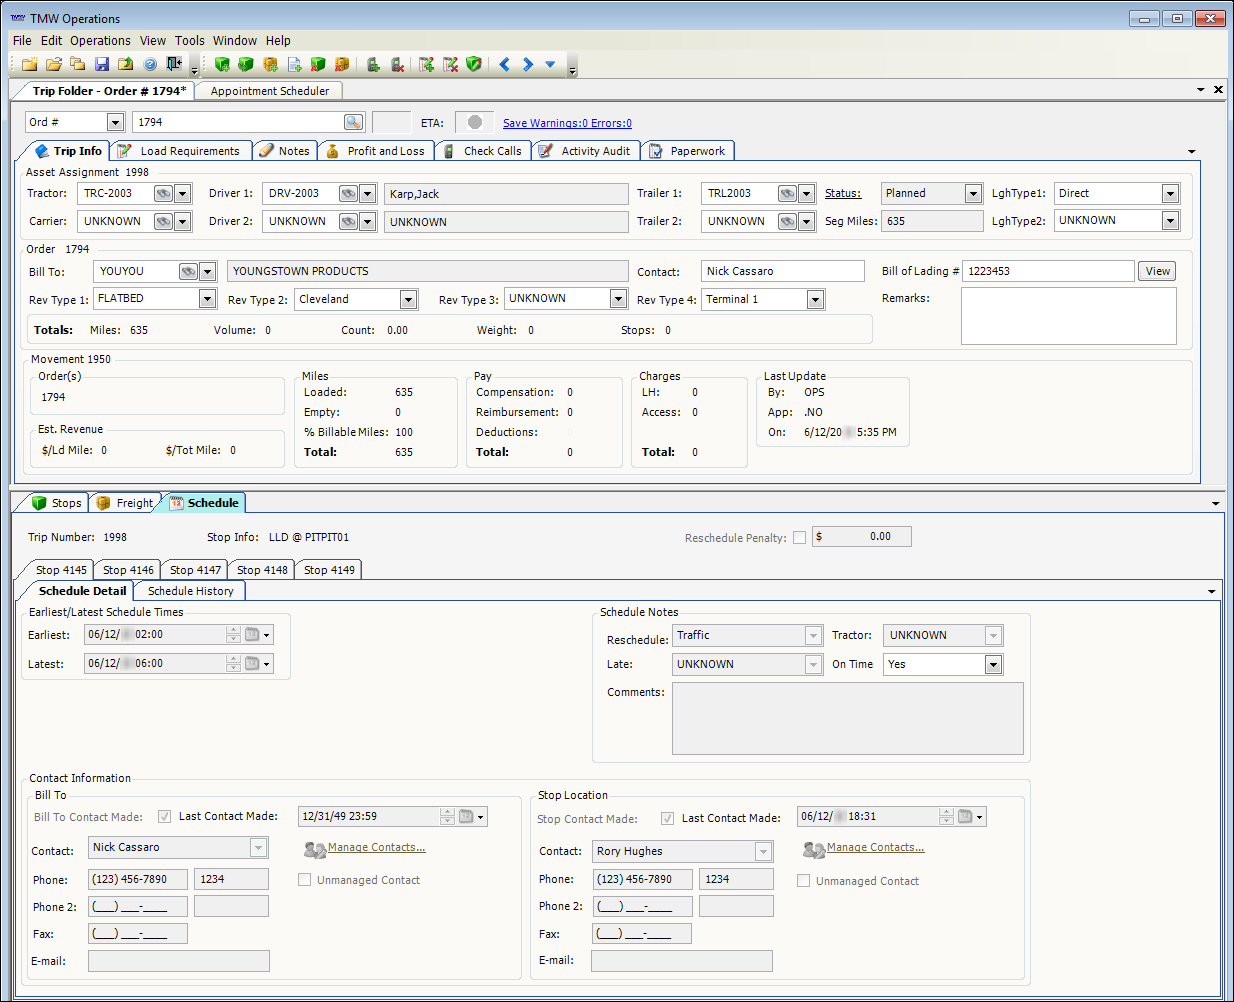
Working with appointments in the Trip Folder
The Appointment Scheduler window contains all the scheduling functionality. However, you can access several important Appointment Scheduler features within the Trip Folder without opening the Appointment Scheduler window. These features in the Trip Folder allow you to:
For more information about using the Appointment Scheduler window, see Managing appointments for multiple trips.
Viewing appointment data on the Schedule tab
You can view appointment data on the Schedule tab in the Trip Folder. When you select the Schedule tab, each stop on the trip for which you have scheduled an appointment is displayed on a sub tab. Each sub tab displays the appointment data appropriate for that stop. If no appointment has been scheduled for any stop on a trip, no sub tabs appear and the fields on the Schedule tab are blank.
For field descriptions, see Scheduling an appointment.
Rescheduling appointments for a specific trip in the Trip Folder
If you change the earliest or latest date/time for a scheduled stop that requires contact, you must record the contact data before saving the trip. The system alerts you by applying red highlighting to the Schedule tab.
When you click the Schedule tab, the system applies red highlighting to each stop tab that requires entries and displays an ![]() icon next to the fields that require entries.
icon next to the fields that require entries.
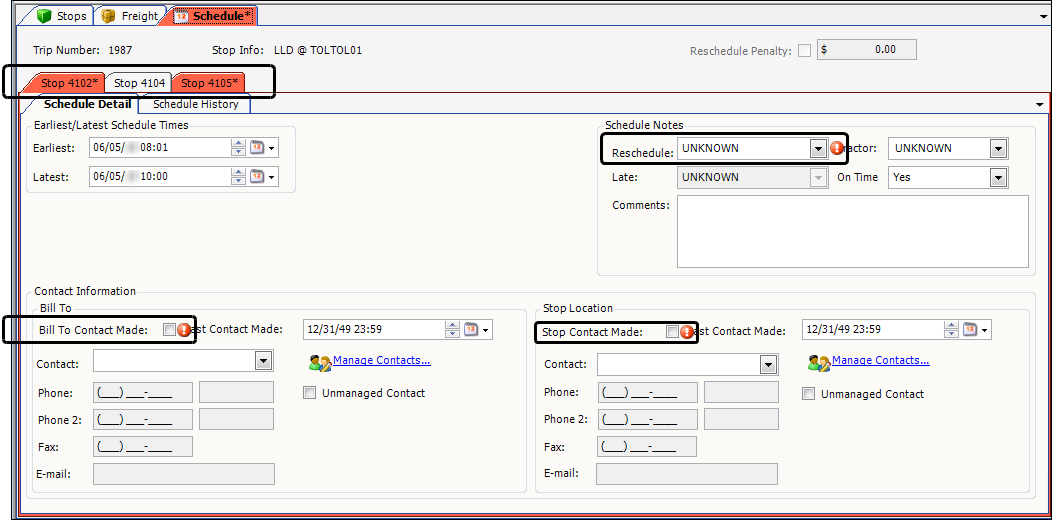
As you make the required entries, the system removes the alert icons and red highlighting. After all required entries are made, you can save the order. For field descriptions, see Scheduling an appointment.
Managing appointments for multiple trips
The Appointment Scheduler window is available in the Trip Folder. This window provides a quick and efficient method of recording and editing appointment data for multiple trips. The window allows you to:
-
Set up initial appointments
-
Reschedule existing appointments
-
Manage contact information
Accessing the Appointment Scheduler window
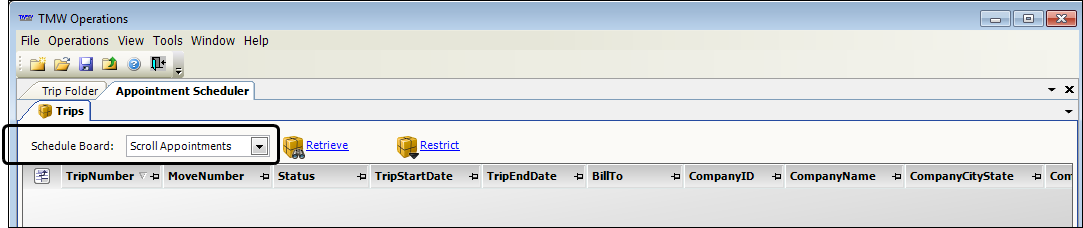
The Appointment Scheduler window is available in the Trip Folder. To access the Appointment Scheduler, select Operations > Schedule/Reschedule. The window displays without data. When you click the Retrieve button the system will filter the data retrieved based on the view selected in the Schedule Board field.
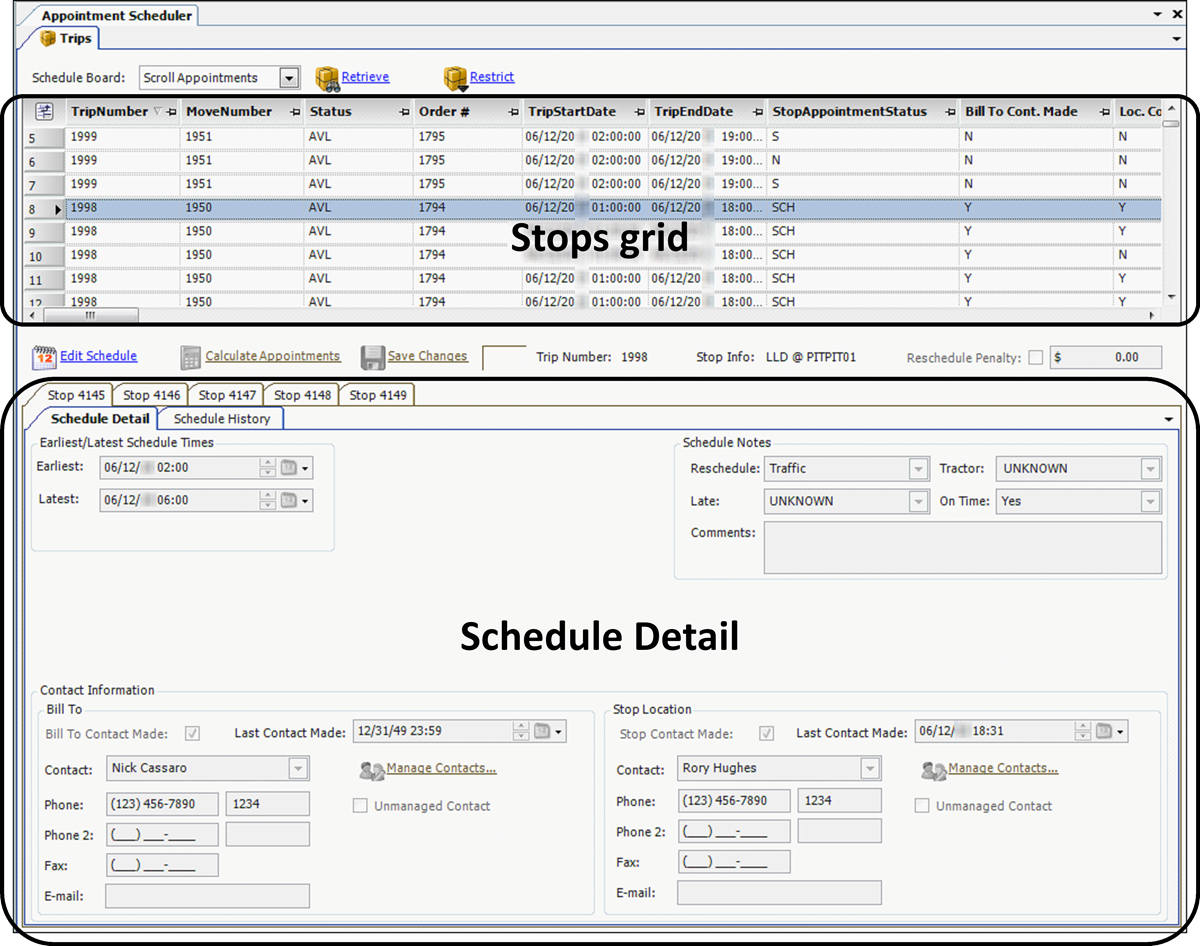
Layout of the Appointment Scheduler window
The Appointment Scheduler window has two sections:
-
Stops grid
Lists all active stops that meet the restrictions set by the view in use. For field descriptions, see Stops grid field descriptions.Note: Completed stops never display in this grid.
-
Schedule Detail tab
Displays appointment information for the selected stop. For field descriptions, see Scheduling an appointment.
| Field | Definition |
|---|---|
OrderNumber |
Order’s system-assigned numeric ID |
TripNumber |
System-assigned numeric ID for the trip segment to which the stop belongs |
MoveNumber |
System-assigned ID for the movement to which the stop belongs |
Status |
Dispatch status of the trip segment to which the stop belongs. Options include:
|
StopAppointmentStatus |
Appointment status of a stop. Options are:
|
TripStartDate |
Date and time recorded in the Earliest field for the first stop on an order |
TripEndDate |
Date and time recorded in the Latest field for the last stop on an order |
BillTo |
ID of the company to be billed for shipment |
CompanyID |
ID of the company where the stop will take place |
Filtering trips in the Stops grid
You can use a board view to filter the data retrieved in the Appointment Scheduler’s Stops grid. With the Appointment Scheduler window displayed, do one of the following:
-
To use the default board view, click Retrieve.
-
To use an alternate board view:
-
Select a view from the drop-down list in the Schedule Board field.
-
Click the Retrieve button.
Note: For more information about setting up views, see
-
The system retrieves stops based on the view you selected.
Scheduling an appointment
After retrieving data, the Stops grid displays multiple rows for each order. Each row represents one unactualized stop.
After you select a stop from the Stops grid, the appointment details for that stop are displayed in the Schedule Detail tab. Follow these steps to schedule or reschedule an appointment:
-
Do one of the following:
-
Click
 Create Schedule.
Create an appointment for a stop that has not yet been scheduled. -
Click
 Edit Schedule.
Edit an appointment for a stop that has been scheduled.The fields in the Schedule Detail tab are enabled.
Notes:
-
For a stop that has not yet been scheduled, only default values are shown.
-
The system displays an exclamation point icon next to required fields. You cannot save the appointment until you have made entries in these fields.
-
-
Make entries on the Schedule Detail tab.
Field Definition Earliest/Latest Schedule Times
These times correlate to the earliest and latest times recorded for the stop on the order. Any changes you make on the Schedule Detail tab will be reflected on the order.
Schedule Notes
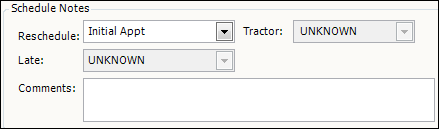
-
Reschedule
Do one of the following:-
To create a new appointment, select Initial Appt.
-
To edit an existing appointment, select the appropriate user-defined option.
Note: Options are set up in the Reschedule label. See Setting up reasons for rescheduled appointments.
-
-
Late
Select an option when rescheduling an existing appointmentThis field is activated when the rescheduled time on the trip falls outside of the grace period you define in the Appointment Change Window field on a company’s profile. You set user-defined options in the ReasonLate label.
-
Comments
Free-form text field to record notes for the appointment -
Tractor
Read-only field
Contact Information
Bill To
and
Stop Location
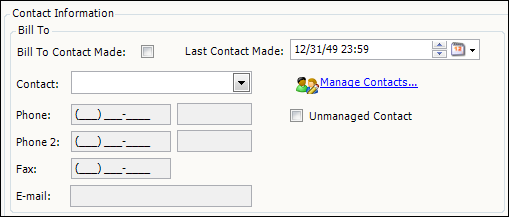
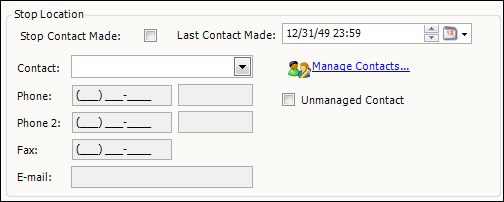
If the companies are set up to require contact for this stop, you must select a contact for the Bill To company and the stop for which you are creating the appointment. For more information on selecting a contact, see Setting up company contacts.
Bill To Contact Made
Indicates whether you made contact with the Bill To company
Bill To Contact Made Date
Date when you contacted the Bill To company
Bill To Contact Name
Name of the person you contacted from the Bill To company
Stop Contact Made
Indicates whether you made contact with the stop company
Stop Contact Made Date
Date when you contacted the stop company
Stop Contact Name
Name of the person you contacted from the stop company
-
-
Click
 Save Changes.
How the system updates stop times
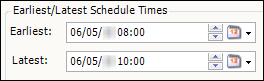
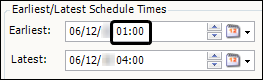
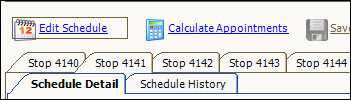
When you adjust the earliest or latest time for a stop, you can use the ![]() Calculate Appointments command to cascade the change to all subsequent stops. For example, this illustration shows our trip’s earliest and latest times.
Calculate Appointments command to cascade the change to all subsequent stops. For example, this illustration shows our trip’s earliest and latest times.
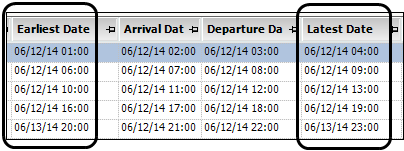
In the Appointment Scheduler, we changed the earliest time of the first stop from 01:00 to 02:00.
Original time
|
Updated time
|

Then we clicked the ![]() Calculate Appointments command. The system cascaded the change to all subsequent stops.
Calculate Appointments command. The system cascaded the change to all subsequent stops.
Because the times changed on all stops, we had to update the reschedule appointments for all stops before we could save our changes. After saving, our updated earliest and latest times looked like this.
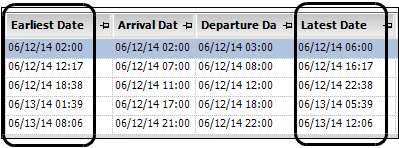
Be aware that only the earliest and latest date/times are affected, the arrival and departure times are not affected.
The Calculate Appointments function mimics the functionality associated with the [Dispatch]AutoRecalcTimes=Y setting in your TTS50. However, the Calculate Appointments function is independent from the AutoRecalcTimes setting and is not affected by it.
|
Setting up Appointment Scheduler views
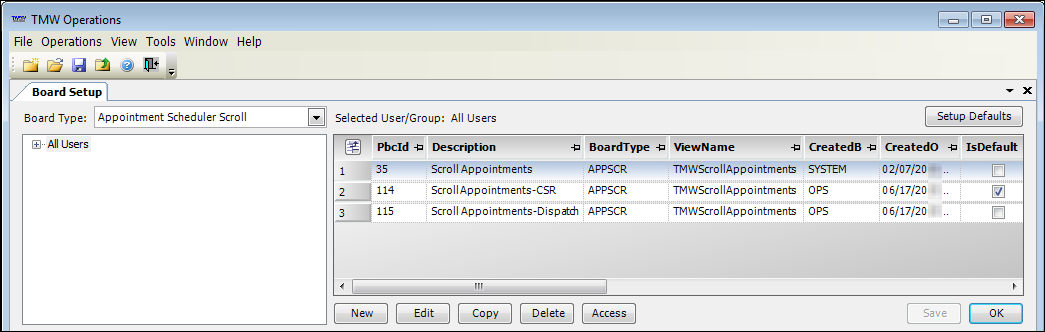
The data displayed in the Appointment Scheduler window is controlled by the view selected in the Schedule Board field. The ScrollAppointments view is the only board view supplied by the system.
Editing a system view such as the ScrollAppointments view is not recommended. However, in the Board Setup window, you can copy the system view and then modify the copy as needed. This illustration shows the ScrollAppointments system view and two user-defined views based on that system view.
For more information about setting up board views, see General process for creating and modifying views.
Temporarily modifying the current view
You can temporarily modify the current view restrictions for the Appointment Scheduler window. Your modified view remains in effect until you exit the window or select another view.
-
Click the Restrict button.
The Appointment Filters window opens.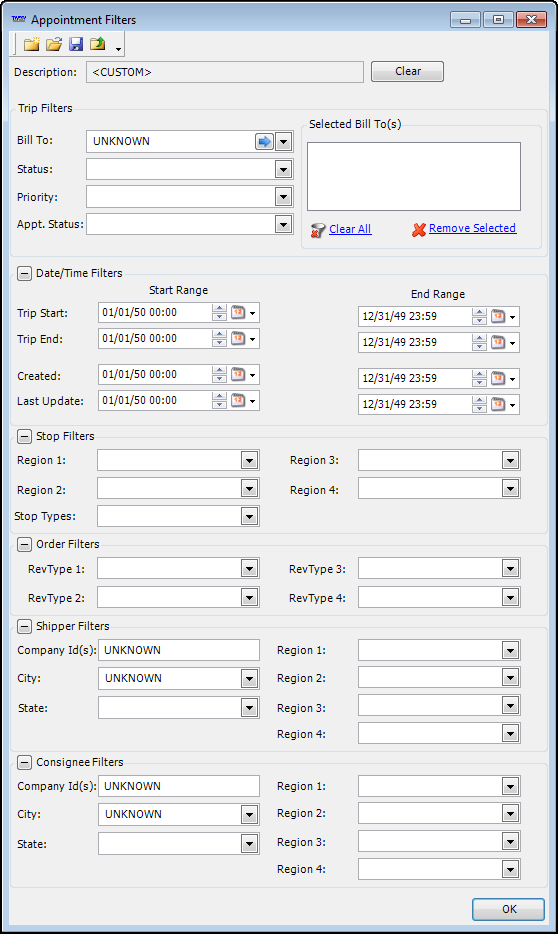
-
Enter restrictions as needed.
-
Click OK.
The window closes.Notice that <CUSTOM> displays in the Schedule Board field.
-
Click
 Retrieve.
The system retrieves stops based on the restriction you selected.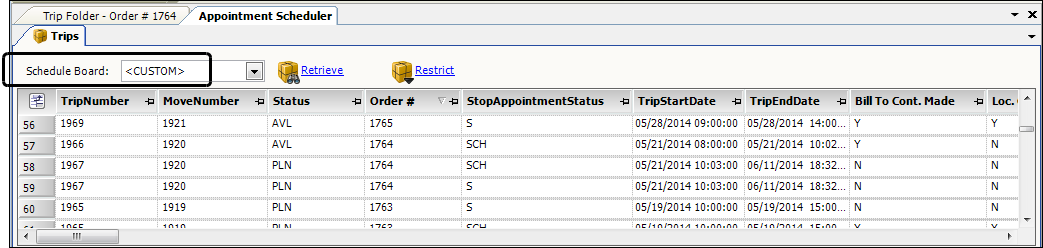
| Completed stops do not display in the Appointment Scheduler’s Stops grid. |
Viewing appointment history
The Appointment Scheduler provides a way to quickly view the appointment history for a stop.
-
Select a stop from the Stops grid.
-
Select the Schedule History tab.
The stop’s appointment history is displayed. Each row represents a change made to the stop’s appointment.

| Some columns may not be in view by default. You can view them by using the Field Chooser, or scrolling to the right. |
| Field | Definition |
|---|---|
Stop Sched ID |
Unique numerical identifier for the selected stop |
Reason Code |
Option selected in the Reschedule field when you created or edited the appointment |
Bill To Contact Made |
Indicates whether you made contact with the Bill To company |
Bill To Contact Made Date |
Date when you contacted the Bill To company |
Bill To Contact Name |
Name of the person you contacted from the Bill To company |
Stop Contact Made |
Indicates whether you made contact with the stop company |
Stop Contact Made Date |
Date when you contacted the stop company |
Stop Contact Name |
Name of the person you contacted from the stop company |
Comment |
Information recorded in the Comments field |
Created By |
Login ID of the person who created the appointment |
Created On |
Date when the appointment was created |
Updated By |
Login ID of the person who updated the appointment |
Updated On |
Date when the appointment was updated |
Reason Late |
Reason recorded in the Late field in the Schedule Notes section of the Schedule tab |
Setting up company contacts
A contact is the person at a company with whom you will communicate appointment information. In TMW Operations, there are two types of contacts:
-
Managed contact
A managed contact is a person at the company with whom you talk frequently. You create, edit, and delete managed contacts in the Contacts window, which can be accessed from the Appointment Scheduler and from the company’s profile. The contact’s information is saved in the company’s profile. For more information, see Accessing the Contacts window. -
Unmanaged contact
An unmanaged contact is a person with whom you will probably talk to once and not talk to again. You add unmanaged contacts only in the Appointment Scheduler. Unmanaged contacts are saved only on the stop on which you recorded the contact’s information. For more information, see Adding an unmanaged company contact.
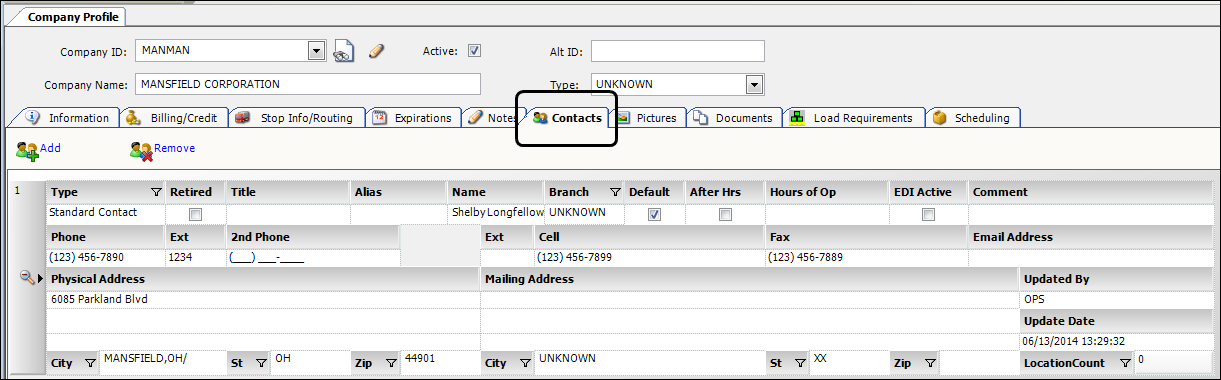
Accessing the Contacts window
You edit contact data in the Contacts window. You can access the window from either:
-
The company profile
-
Select Tools > Profiles > Company Profile.
-
Look up the company for which you want to add a contact.
-
Click the Contacts tab.
-
-
The Appointment Scheduler window
With the schedule displayed, click Manage Contacts in the Contact Information pane.
The Contacts window opens.
Adding a company contact
In the Contacts window or tab, follow these steps:
-
Click
 Add.
Add.
By default, the system displays an expanded view of contact records
-
If you prefer to enter information in a single row, or collapsed view, double-click the magnifying glass
 at the left side of the record. The system will collapse the record.
To return to the expanded view, double-click the magnifying glass again.
-
Make entries in the fields displayed for the contact record.
Field Definition Type
Identifies the type of contact record you are creating. Select the appropriate type:
-
Standard Contact
Identifies the contact record as a general contact, i.e., not for use by TMWSuite’s EDI or Imaging add-on modules. -
EDI/Imaging Email
Identifies the contact record as available for use by TMWSuite’s EDI or Imaging add-on modules. When this option is selected, you can record an e-mail address for the contact. Phone number fields are not accessible. -
EDI/Imaging Fax
Identifies the contact record as available for use by TMWSuite’s EDI or Imaging add-on modules. When this option is selected, you can provide a fax number for the contact. Other phone number fields are not accessible.
Note: These options are system code entries in the CmpContactType label.
Retired
Applicable when a person is no longer a contact for your company
Note: This field is not available on the Company Contacts window in TMWSuite core applications.
Title
Free-form text field used to record the contact’s title. The system saves a maximum of 30 alphanumeric characters.
Alias
Contact’s alternate name
Note: This field is not available on the Company Contacts window in TMWSuite core applications.
Name
Free-form text field used to record the contact’s name. The system saves a maximum of 30 alphanumeric characters.
Branch
Cost center associated with the company
Note: For details, see:
-
Branch File Maintenance in the File Maintenance online help
-
Guide: Status Based Loads Grid | Chapter: Setting up the system to use booking and executing entities
Default
There can be only one default, i.e., primary, contact for a company. When you add the first contact, the system automatically selects the Default checkbox for it.
If the first contact is not the primary, select the Default checkbox for the person who is the primary contact.
When an activity is created for the company on the Activity Details window, the system will automatically default the primary contact’s information in the Contact, Phone, Ext, and E-mail fields.
Note: If the Default checkbox is not selected for any contact, the system shows a red warning indicator below the checkbox for each contact.
After Hrs
Select if the contact can be contacted after hours
Hours of Op
Free-form text field for entering the company’s standard hours of operation
EDI Active
Applies if the type is EDI/Imaging Email or EDI/Imaging Fax
-
If the contact information is to be used by one of the EDI add-on modules, select the checkbox.
-
If the contact information is to be used by one of the Imaging add-on modules, clear the checkbox.
Comment
Enter free-form text about the contact.
Note: This field is not available on the Company Contacts window in core TMWSuite applications.
Phone
Primary telephone number by which the contact can be reached
Ext
Extension number for the contact’s primary phone number
2nd Phone
Alternate telephone number by which the contact can be reached
2nd Ext
Extension number for the contact’s secondary phone number
Cell
Contact’s cell phone number
Fax
Contact’s fax number
Email Address
Contact’s e-mail address
Physical Address
City St, ZipContact’s geographic address, city, state/province, and ZIP/postal code
Note: This field is not available on the Company Contacts window in core TMWSuite applications.
Mailing Address
City, St, ZipAddress, city, state/province, and ZIP/postal code to which mailed items must be delivered
Note: This field is not available on the Company Contacts window in core TMWSuite applications.
Updated By
TMWSuite ID of the person who last updated the contact’s information
Update Date
Date/time when the contact’s information was last updated
-
-
Click
 Save.
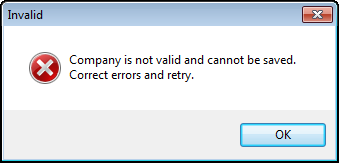
Save.Note: If you did not select the Default checkbox for any contact, a message indicates that you cannot save.
Removing a company contact
When a contact record is no longer valid, such as when the contact has left the company or changed positions, you can delete the record.
With the contact displayed in the Contacts window or tab, follow these steps:
-
Click in one of the fields of the contact record.
-
Click
 Remove.
One of the following occurs:-
The system displays a confirmation message.
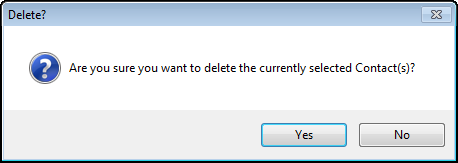
Click Yes to complete the deletion.
-
If the contact you are deleting is marked as the default contact, the system displays a message similar to the following:
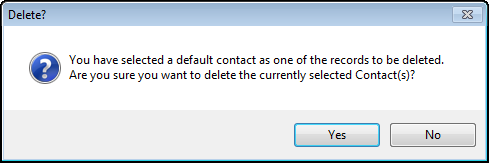
Click Yes to complete the deletion.
-
-
Click
Save.
Adding an unmanaged company contact
You can add an unmanaged contacts from the Appointment Scheduler window and from the Schedule tab in the Trip Folder.
With the schedule displayed, follow these steps to add an unmanaged contact.
-
In the Contact Information pane, select the Unmanaged Contact checkbox.
The contact detail fields are enabled.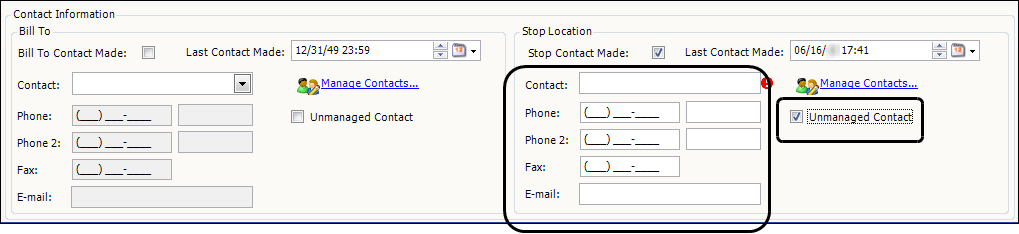
-
Enter the contact’s name and information as required.
-
Click
 Save.
Save.