Understanding the Custom Menus window
The Custom Menus window allows you to define custom commands and add them to any menu or toolbar in TMW Operations. The following sections comprise the Custom Menus window.
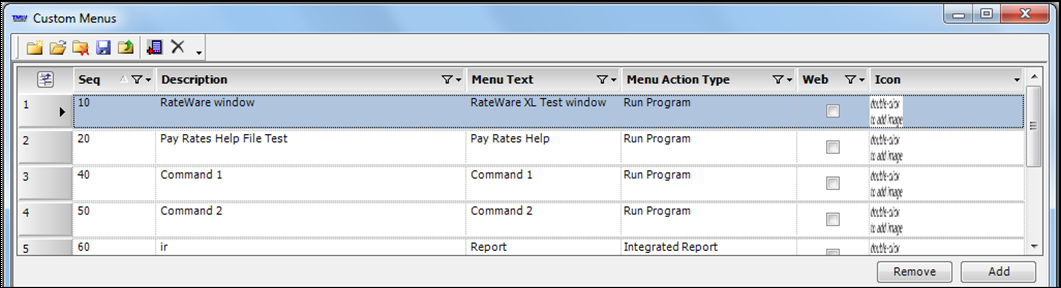
Existing custom commands
The fields in the grid are read-only, and provide a recap of existing custom commands. The grid displays command definitions that you already created here, as well as those you might have added through TMWSuite’s System Administration application.
| Field | Definition |
|---|---|
Seq |
Displays each command’s sequence number (10, 20, 30, etc.), which determines the order in which commands are listed under a menu. |
Description |
Displays the text entered in a command’s Description field. |
Menu Text |
Displays the text entered in a command’s Display Text field. This is the command’s name as it will appear in an application’s menu. |
Menu Action type |
Displays the option selected as a command’s Menu Action Type when the command was defined. |
Web |
Displays whether the command launches a Web page. |
Icon |
Displays an icon for the custom command if an icon has been set. Note: If a custom icon is not set, a default icon |
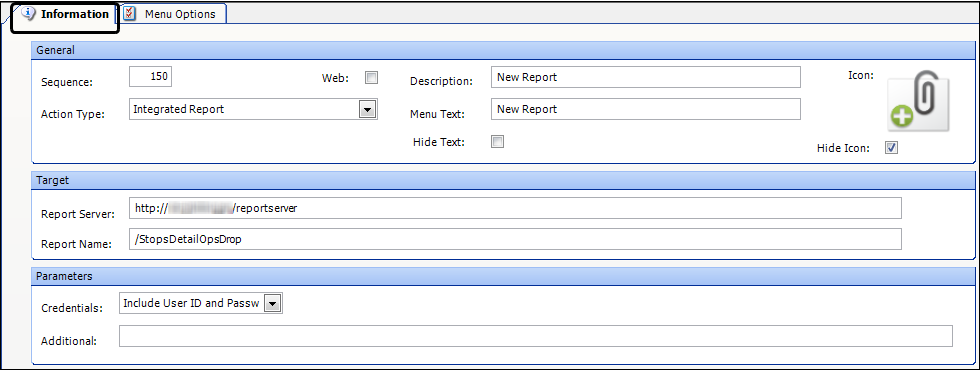
Information tab
The fields on this tab are used to define a custom command and are grouped according to General, Target, and Parameter fields.
General field definitions
| Field | Definition |
|---|---|
Sequence |
The sequence number is an identifier for the custom command that can be used as a method of sorting the list.
|
Web |
By default, the File to Open field lists parameters to add to the command line in the sequence they appear in the Menu Options tab. If this checkbox is selected, you will need to add any parameters to the File to Open field manually. |
Description |
Free-form text that describes the custom command. |
Action Type |
This drop-down list provides options that define the type of action the custom command will perform:
|
Menu Text |
Free-form text for the custom command default name as it is to appear in an application’s menu. Note: If you change the display text for a custom command using the Customize dialog box, you should record the name. This can be done in the Description field. |
Hide text |
This checkbox indicates whether the Menu text for the custom command will display in a menu. |
Hide icon |
This checkbox indicates whether the Icon for the custom command will display in a menu. |
Icon |
Displays an icon for the custom command if an icon has been set. Note: If a custom icon is not set, a default icon |
Target field definitions
When Program File is selected as an Action Type, these fields are shown:
| Field | Definition |
|---|---|
Target |
This field records the path to the program to be executed by the custom command. If needed, use the Browse button to locate the program. Executable files include these extensions: .EXE, .COM, .BAT, and .VBS. You can also identify files that are associated with known executables, such as .MPS, .JPG, and .adoc. Note: The program file can be anywhere on your system, as long as the correct path and file name appear in this field. If the path or file name is incorrect, the custom command can be assigned to a menu, but it will be inoperative. |
File to Open |
If the program specified in the Target field is to open a specific file, record the path to that file. If needed, use the Browse button to locate the file. |
When Integrated Report is selected as an Action Type, these fields are shown:
| Field | Definition |
|---|---|
Report Server |
Displays the address for the report server. |
Report Name |
Displays the name of the Integrated Report that will be run. |
Parameters field definitions
| Field | Definition |
|---|---|
Credentials |
If the custom command launches an application that requires access to the TMWSuite database, and you are not using Windows authentication, this field is used to enable the custom command to pass the user’s Trimble login ID and password, or login ID only, as command line parameters. The options in this drop-down list are:
|
Additional |
If the program is to process additional run-time parameters, enter them in this field in the format required by the program. |
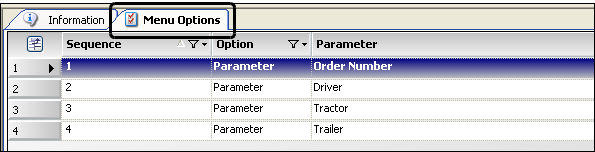
Menu Options tab
The Menu Options tab is a grid used for creating, editing, sequencing, or deleting parameters that are passed by the custom command to the target application.
| Field | Definition | |
|---|---|---|
Seq |
This read-only sequence number column displays the order in which the menu options defined in the Menu Options grid will be attached to the custom command. Note: If the Credentials field is set to include the user ID, or user ID and password, the Menu Option parameters will follow the user ID/password in the order shown in the Seq fields. |
|
Option |
This read-only column displays Parameter for each row added to the Menu Options grid. |
|
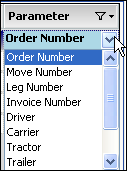
Parameter |
|
This selection field specifies the type of record number or ID that will be passed as a menu option parameter. |
Command buttons
In addition to the fields described above, the bottom of the existing custom commands grid and the Menu Options grid contains two command buttons.
![]()
| Field | Definition |
|---|---|
Add |
To append a row to the bottom of the grid, click the Add button. |
Remove |
To delete the currently selected row, click the Delete button. A confirmation message is shown. |
Defining a custom command to run an executable file
Use this procedure to create or later modify a custom command that will run an executable file. Executable files include these extensions: .EXE, .COM, .BAT, and .VBS. You can also identify files that are associated with known executables, such as .MPS, .JPG, and .adoc.
This example illustrates the entries for opening a document in WordPad.

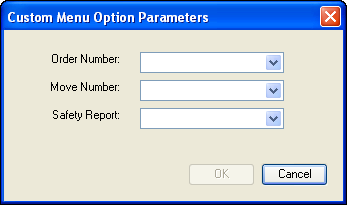
This example illustrates the entries for running a batch file with menu option parameters.
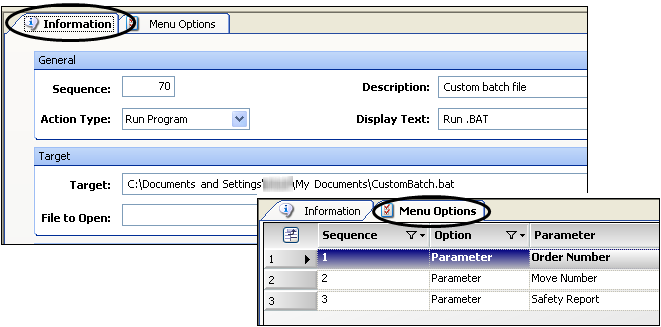
When this batch file is run, the parameters display in a window like the following:
-
Open the Custom Menus window.
Note: Access to the Custom Menus window is commonly located under the Maintenance menu as Custom Menu Entries. If your system administrator added the command to a different menu or toolbar, access it from there.
-
At the bottom of the existing custom commands grid, click Add.
A new row appears in the grid and the fields on the Information tab are ready for input.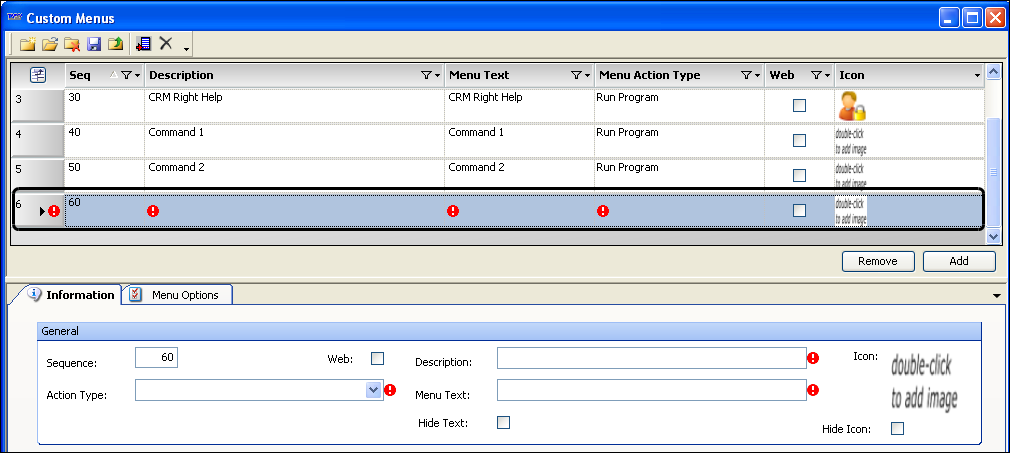
-
On the Information tab, make entries in the fields as needed:
Required field: *
Field Definition Web
By default, the File to Open field lists parameters to add to the command line in the sequence they appear in the Menu Options tab. If this checkbox is selected, you will need to add any parameters to the File to Open field manually.
Description *
Enter a custom command description
Action Type *
Select the Run Program option.
Menu Text *
Enter the custom command default name as it is to appear in the menu or toolbar.
Note: If you change the display text for a custom command using the Customize dialog box, you should record the name. This can be done in the Description field.
Target *
Enter the path and filename of the program to be executed by the custom command. If needed, use the Browse button to locate the program.
File to Open
If the program specified in the Target field is to open a specific file, record the path to that file. If needed, use the Browse button to locate the file.
<<ord>>
<<mov>>
<<lgh>><<inv>>
<<drv>>
<<car>><<trc>>
<<trl>>
<<sft>><<usr>>
<<stp>>Credentials
If the custom command launches an application that requires access to the TMWSuite database, and you are not using Windows authentication, this field is used to enable the custom command to pass the user’s Trimble login ID and password, or login ID only, as command line parameters. Select one of the following:
-
Include User ID and Password
-
Include User ID only
Additional
If the program is to process additional run-time parameters, enter them in this field, in the order and format required by the program.
-
-
If you want, define an icon for the command.
-
Include any additional parameters required by the command.
Note: When the program is called, it will order the parameters according to the sequence listed. If you need to change the sequence order, change the selections in the Parameters column.
-
Click on the Menu Option tab.
-
At the bottom of the tab, click Add.
-
From the Parameter list, select from the available Trimble system IDs.
-
Repeat steps b and c for each parameter.
-
-
Click
 Save.
Save. -
Click OK.
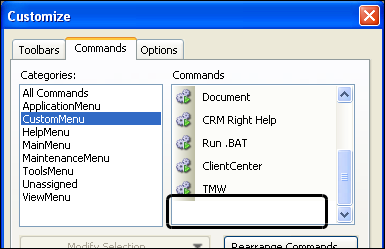
At this point, a new command is not included in the list of Custom Menu commands to add to a menu or toolbar.
In this example, a newly created custom command to run the Windows calculator is not in the list of available commands.
-
Exit and return to the application.
The command will be added to the list of available commands.
Defining a custom command to launch a Web page
Use this procedure to create or later modify a custom command that will run an Internet browser and open a particular page. You can also pass parameters to the page.
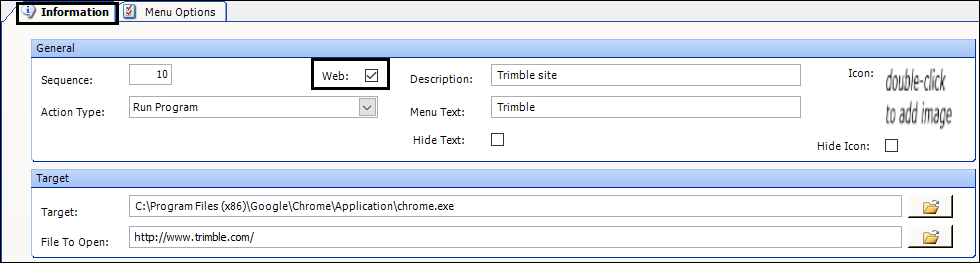
This example illustrates the entries for opening the Trimble Web page.
-
Open the Custom Menu window.
Note: Access to the Custom Menus window is commonly located under the Maintenance menu as Custom Menu Entries. If your system administrator added the command to a different menu or toolbar, access it from there.
-
At the bottom of the existing custom commands grid, click Add.
A new row appears in the grid and the fields on the Information tab are ready for input. -
On the Information tab, make entries in the fields as needed:
Required field: *
Field Definition Web
By default, the File to Open field lists parameters to add to the command line in the sequence they appear in the Menu Options tab. If this checkbox is selected, you will need to add any parameters to the File to Open field manually.
Description *
Enter a custom command description.
Action Type *
Select the Run Program option.
Menu Text *
Enter the custom command default name as it is to appear in the menu or toolbar.
Note: If you change the display text for a custom command using the Customize dialog box, you should record the name. This can be done in the Description field.
Target *
Enter the path and filename of the Internet browser. If needed, use the Browse button to locate the program.
File to Open
Enter the URL address to open in the browser. If appropriate, you can include any of the following tokens in page parameters to pass information from TMW Operations to the Web page:
Credentials
If the custom command launches an application that requires access to the TMWSuite database, and you are not using Windows authentication, this field is used to enable the custom command to pass the user’s Trimble login ID and password, or login ID only, as command line parameters. Select one of the following:
-
Include User ID and Password
-
Include User ID only
Additional
If the program is to process additional run-time parameters, enter them in this field, in the order and format required by the program.
-
-
If you want, define an icon for the command.
-
Include any additional parameters required by the command.
-
Click on the Menu Options tab.
-
At the bottom of the tab, click Add.
-
From the Parameter list, select from the available Trimble system IDs.
-
Repeat steps b and c for each parameter.
-
-
Click
Save. -
Click OK.
At this point, a new command is not included in the list of Custom Menu commands to add to a menu or toolbar.
In this example, a newly created custom command to run the Windows calculator is not in the list of available commands.
-
Exit and reopen the application.
The command is added to the list of available commands.
Defining a custom command to run an Integrated Report
Use this procedure to create or later modify a custom command that will run an Integrated Report.
This example illustrates the entries to generate license cards for drivers.

-
Open the Custom Menus window.
Note: Access to the Custom Menus window is commonly located under the Maintenance menu as Custom Menu Entries. If your system administrator added the command to a different menu or toolbar, access it from there.
-
At the bottom of the existing custom commands grid, click Add.
A new row appears in the grid and the fields on the Information tab are ready for input. -
On the Information tab, make entries in the fields as needed:
Required field: *
Field Definition Web
By default, the File to Open field lists parameters to add to the command line in the sequence they appear in the Menu Options tab. If this checkbox is selected, you will need to add any parameters to the File to Open field manually.
Description *
Enter a custom command description.
Action Type *
Select the Integrated Report option.
Menu Text *
Enter the custom command default name as it is to appear in the menu or toolbar.
Note: If you change the display text for a custom command using the Customize dialog box, you should record the name. This can be done in the Description field.
Report Server *
Enter the full address of the report server.
Report Name *
Enter the name of the Integrated Report you want to run.
-
If you want, define an icon for the command.
-
Include any additional parameters required by the command.
-
Click on the Menu Option tab.
-
At the bottom of the tab, click Add.
-
From the Parameter list, select from the available Trimble system IDs.
-
Repeat steps b and c for each parameter.
-
-
Click
Save. -
Click OK.
At this point, a new command is not included in the list of Custom Menu Reports commands to add to a menu or toolbar.
In this example, a newly created custom command to run an Integrated Report is not in the list of available commands.

-
Exit and return to the application.
The report will be added to the list of available commands.
Defining a custom command to create a menu
Follow this procedure if you want to create your own menus to add to a menu bar, or as a sub menu within a menu.
Each menu command is unique. You can add it to multiple menu bars, but, if you change it on one, it will change on the other. For this reason, you might want to create several and keep them as placeholders. They would be ready to use when you need them.
-
Open the Custom Menus window.
-
At the bottom of the existing custom commands grid, click Add.
A new row appears in the grid and the fields on the Information tab are ready for input. -
On the Information tab, make entries in the fields as needed.
Required field: *
Field Definition Description*
Enter a custom command description.
Note: After you use the menu, you can modify this description to record any details. This can help you track how or where you used the custom menu command.
Action Type*
Select the Popup Menu option.
Menu Text*
Enter the custom command default name as it is to appear in the menu or toolbar.
If you are creating it now to use later, enter menu text such as, Custom Menu 1, Custom Menu 2, etc.
Note: When you add the menu to a menu bar, you can change the display text using the Customize dialog box. This display text is not changed in the list of commands.

You can record the new name in the Description field.
-
If you want, define an icon for the command.
-
Click
Save. -
Click OK.
At this point, a new command is not included in the list of Custom Menu commands to add to a menu or toolbar.
-
Exit TMW Operations and reopen it.
The command will be added to the list of available commands. -
Add the new command to a menu or toolbar.