Creating and managing intermodal orders
First available in TMW Operations V.16.10
The term intermodal usually designates the process of transporting loaded freight containers by several modes of transportation such as ship, rail, air, or truck. However, this feature could be used with moving interline trailers by two or more modes of transportation.
You create and manage intermodal orders in the Trip Folder.
| You must enable the intermodal feature before you can create or manage intermodal orders. For details, see Activating the intermodal feature. |
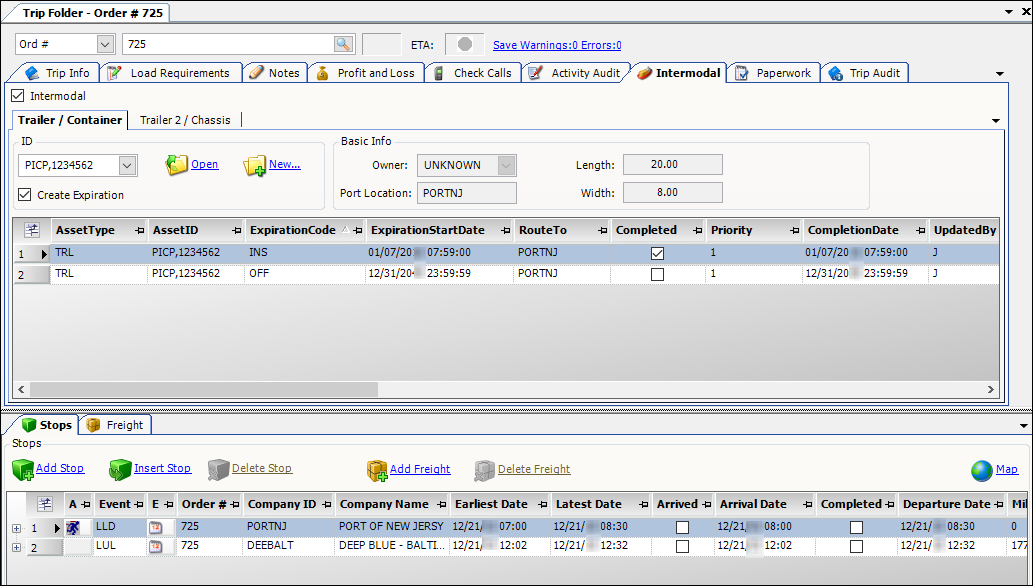
This illustration shows a sample intermodal order in the Trip Folder.
Intermodal tab overview
With the intermodal feature enabled, the Intermodal tab appears in the Trip Folder. Go to Operations > Trip Folder and select the Intermodal tab.
| By default, the Intermodal tab is blank. You must create an order and select the Intermodal checkbox before this tab displays the information. |
This illustration shows a sample order and the key areas of the tab.
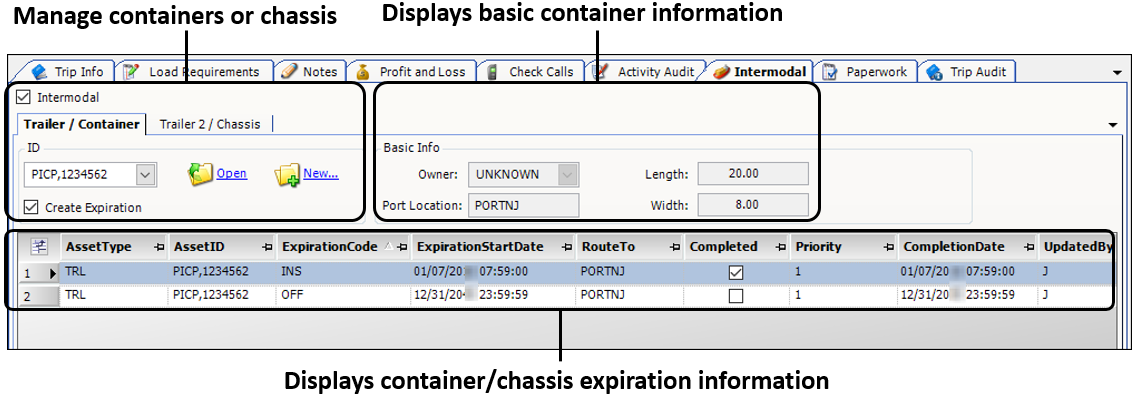
On this tab, you can:
-
Identify an order as an intermodal order
-
Create new containers or chassis
-
Assign existing containers or chassis to an order
-
View container or chassis expirations
Creating intermodal orders
You can create orders in the Trip Folder or the Order Maintenance windows. However, you must use the Trip Folder to assign containers on an intermodal order.
|
To assign containers to an intermodal order, follow these steps:
-
Go to Operations > Trip Folder.
The Trip Folder opens. -
Open an existing order or create a new one.
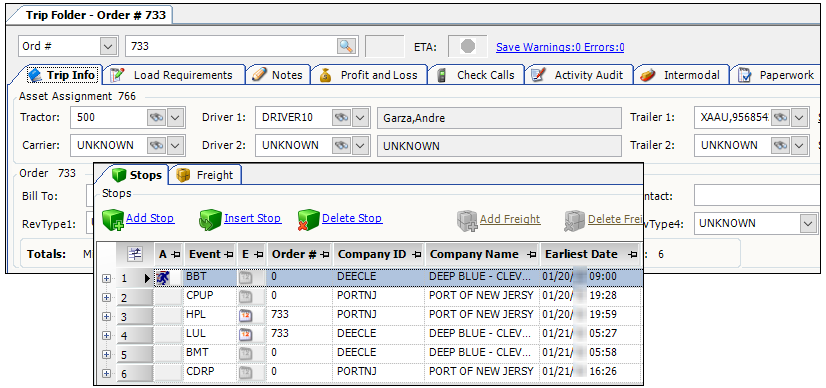
This illustration shows a sample intermodal order.
-
Click the Intermodal tab.
The system displays intermodal information. -
Select the Intermodal checkbox.
This flags the order as an intermodal order. -
Click
 Save.
Save.
Assigning assets to an intermodal order
Once you have flagged an order as an Intermodal order, the system allows you to assign a chassis and a container. You use the Intermodal tab on the Trip Folder to assign these assets. You must activate the intermodal feature before you can assign containers or chassis to orders. For details, see Activating the intermodal feature.
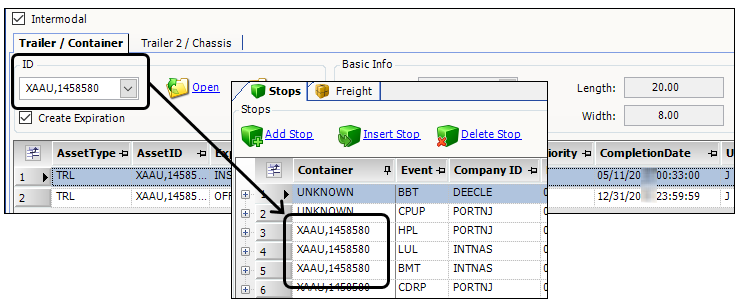
This illustration shows a container assigned to an order.
Creating a container or chassis profile when assigning assets
Sometimes you will not know which chassis or container you are using until your driver or carrier arrives at the port.
To create a new container or chassis using the Add Container/Chassis window, follow these steps:
-
Go to Operations > Trip Folder.
The Trip Folder window opens. -
Open an existing intermodal order or create a new one.
-
Click the Intermodal tab.
The system displays intermodal information. -
Select the Intermodal checkbox.
The sub tabs become editable.Note: With the Create Expiration checkbox selected, the system automatically creates the container/chassis expirations. The system is set up to create these expirations by default. You can change this feature so that the system does not create expirations automatically. For details, see Removing automatic container/chassis expirations.
-
Do one of the following:
-
Select the Trailer / Container tab.
Use this tab to create a container. -
Select the Trailer 2 / Chassis tab.
Use this tab to create a chassis. The system requires you to enter an ID similar to the format required for containers.
Note: Depending on which tab you select, the system will create a container or a chassis.
-
-
Click
 New.
New.
The Add Container/Chassis window opens.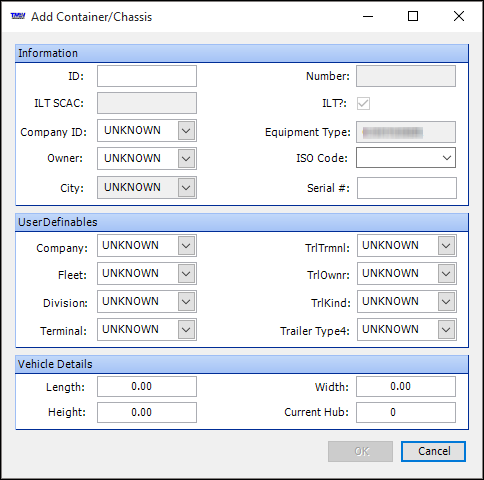
-
Make entries in these fields:
Required field: *
Field Definition ID *
Enter the new container ID number or chassis ID number.
Enter the SCAC code, trailer separator, container/chassis ID number, and the check digit. For example, DEPU,1234567.
Notes:
-
New containers use the ContainerCheckDigitTest GIT setting to verify the check digit.
-
New chassis do not use this setting.
Number
Read-only field that displays the container/chassis number, including the check digit
ILT SCAC
Read-only field that displays the SCAC code
Equipment Type
Read-only field that displays the equipment type
Displays Container or Chassis depending on which tab you select.
ISO Code
Select the container’s ISO code from the drop-down list. For details, see Setting up ISO containers.
Note: Trimble does not recommend selecting an ISO code for chassis.
User Definables (section)
Complete this section as needed.
Vehicle Details (section)
The system populates this section based on the container ISO code information.
-
-
Click OK.
The system assigns the container or chassis to the order.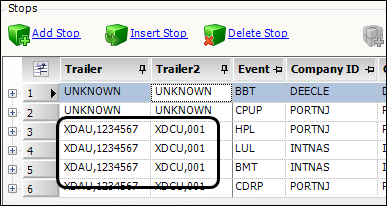
Note: The system uses the Trailer column for containers and the Trailer2 column for the chassis.
-
Click
 Save.
Save.
Assigning an existing container or chassis to a trip
Sometimes you will not know which chassis or container you are using until your driver or carrier arrives at the port. However, there may be instances where you use a container or chassis that is already in your system.
To assign an existing container or chassis to a trip, follow these steps:
-
Go to Operations > Trip Folder.
The Trip Folder window opens. -
Open an existing intermodal order or create a new one.
-
Click the Intermodal tab.
The system displays intermodal information. -
Select the Intermodal checkbox.
The sub tabs become editable.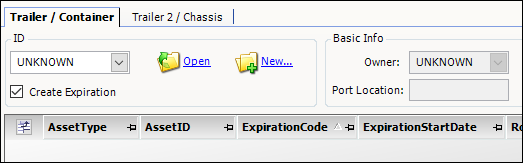
-
Do the following as needed:
-
Select the Trailer / Container tab.
-
Select the Trailer 2 / Chassis tab.
-
-
Enter the container or chassis ID in the ID field.
-
Click Open.
Note: With the Create Expiration checkbox selected, the system automatically creates the container/chassis expirations. The system is set up to create these expirations by default. You can change this feature so that the system does not create expirations automatically. For details, see Removing automatic container/chassis expirations.
-
Click
Save.
Completing an intermodal order
You use the Stops tab in the Trip Folder to complete intermodal orders.
To complete an intermodal order, follow these steps:
-
Go to Operations > Trip Folder.
The Trip Folder window opens. -
Open an existing intermodal order.
-
Use the Arrived and Completed checkboxes to complete the trip.
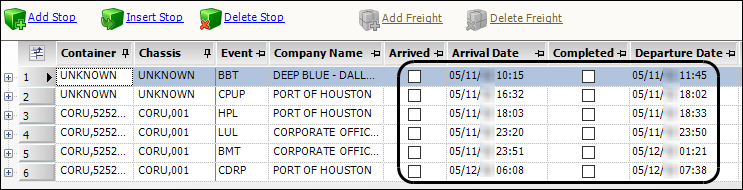
For details on completing the trip, see Quick Start: How do I update trips?
Note: Once the order is complete, the system changes the Off Hire expiration date to one minute after the value in the Departure Date field. This allows you to assign the container to other orders.
-
Click
Save.