Entering freight details
On the Order Maintenance window, you can record detailed information about the freight being transported for an order, including commodity type, quantity, unit of measure, and reference numbers. To do so, you can use the Summary tab, the All Stops tab, and the Stop Detail tab, all of which are located below the order header.
Summary tab
In the lower half of the Summary tab, you can record freight data for the first commodity on the trip. Freight data is saved for both the first pickup and the last drop.
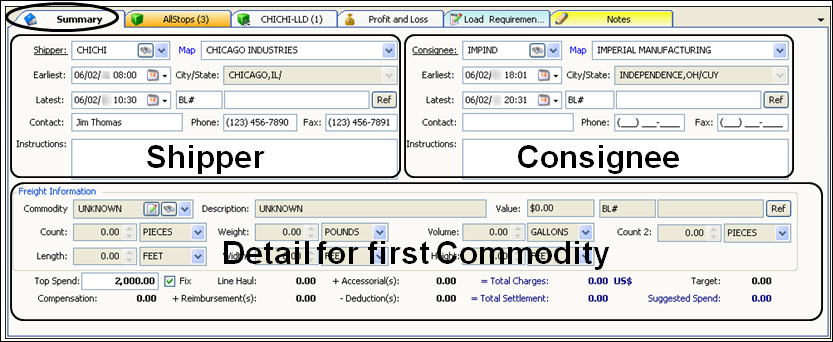
On this tab, you cannot:
-
Add additional commodities for the shipper and consignee.
-
Enter commodities for other stops.
To perform those tasks, you must use either the All Stops tab or the Stop Detail tab.
All Stops tab
On the All Stops tab, the Order Stops sub tab displays stop information for all stops and commodities in a grid format. This tab:
-
Displays more stop and freight data than the other two tabs.
-
Allows you to add or delete stops and freight details. This is the only tab on which you can do so.
By default, the freight information is hidden. To view it, you must open the stop by clicking ![]() Expand at the beginning of stop’s row.
Expand at the beginning of stop’s row.
In this illustration, details for two commodities are shown for the third stop. The ![]() Expand icon changes to a
Expand icon changes to a ![]() Collapse icon (circled below), which you can click to hide the freight information.
Collapse icon (circled below), which you can click to hide the freight information.

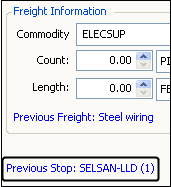
Stop Detail tab
On the Stop Detail tab, you can enter freight details for a single stop. To display data for the previous stop or the next stop on the order, click the Previous Stop and Next Stop hyperlinks.
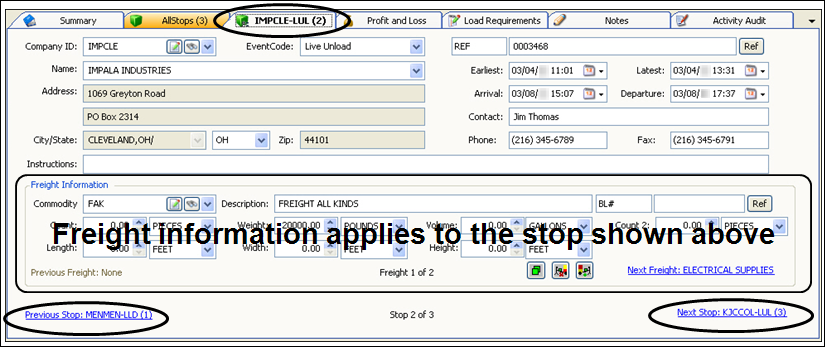
On this tab, you cannot add or delete stops. However, you can:
-
Record more than one commodity per stop.
-
Copy freight data from one stop to another stop.
Although this help file uses the name Stop Detail for this tab, the tab does not have a set name. Instead, it shows the company ID of the selected stop, followed by a dash, the stop’s event code, and a sequence number in parentheses that identifies where the stop falls in the trip.
For example, in the illustration shown above, the tab shows IMPCLE-LUL (2).
This means the data displayed is for the second stop, which is a Live Unload at a company with the ID of IMPCLE.
In this illustration, only freight information is shown. Callouts are used to identify freight-specific elements that are unique to the Stop Detail tab.
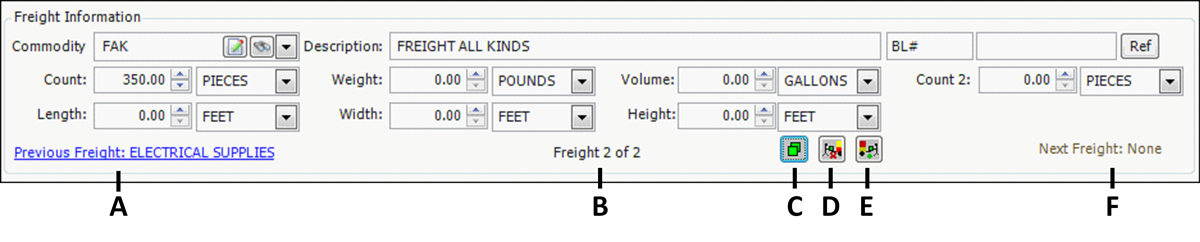
The letters in this table correspond to the lettered callouts in the illustration:
A |
A hyperlink indicates that a previous commodity exists for the stop. Click the link to move information for that commodity into view. If there are no previous freight details, you see a notation that indicates this. |
B |
Indicates the total number of commodities for the stop, as well as where the freight detail in view falls sequentially in the commodity list. |
C |
When you click
|
D |
The |
E |
The |
F |
A hyperlink indicates that an additional commodity exists for the stop. Click the link to move information for the next commodity into view. If there are no additional freight details, you see a notation that indicates this. |
Definitions for freight related fields
The Summary, All Stops, and Stop Detail tabs of the Order Maintenance window all show information for stops and freight. However, each tab has unique characteristics:
-
The Summary tab shows fields for the shipper, consignee, and the first commodity. The number of fields is limited. You cannot enter additional stops or freight detail.
-
The All Stops tab shows information in grid form. Because it is a grid, it allows you to see many columns. In the Order Stops sub tab you can add, enter, and delete data for multiple stops and freight details.
-
The Stop Detail tab shows fields for a specific stop, including fields for the stop’s first commodity. The number of fields is limited. You cannot enter additional stops, but you can add, copy, and delete freight details for a stop.
This table lists, in alphabetical order, definitions for fields that are available on all three tabs. Despite the tabs' differences, the definitions of the fields they display are the same.
Field Definition Commodity
The unique ID code that identifies the goods to be shipped.
To the right of the Commodity field, you can:
-
Click
 View Scroll to open the Commodity Scroll window.
 -
Click
 View Profile to open the profile window for the selected commodity.
Description
The system automatically fills in the description of the commodity ID code you entered. If no commodity code is entered, you can manually record the name of a commodity in this field.
Value
The dollar value of the goods consigned on the order.
reference number fields
Two unnamed fields:
-
The first field specifies the reference number type.
-
The second field is used to record the reference number.

Ref (button)
Opens a dialog box in which reference numbers pertaining to the commodity can be can added, edited, or deleted.
Count
First field is used to enter the count quantity.
Second field is used to select the count unit type.
Weight
First field is used to enter the weight quantity.
Second field is used to select the weight unit type.
Volume
First field is used to enter the volume quantity.
Second field is used to select the volume unit type.
Count 2
Custom fields.
Length
Two fields:
-
The first field is used to enter the length quantity.
-
The second field is used to select the length unit type.
Width
Two fields:
-
The first field is used to enter the width quantity.
-
Second field is used to select the width unit type.
Height
Two fields:
-
The first field is used to ente
-
The second field is used to select the height unit type.
-
Entering the commodity ID for a stop
On the Order Maintenance window, there are multiple ways for you to enter the proper commodity ID for a stop.
When you know the commodity ID
As you begin to type an ID, the system tries to match your entry with the IDs on file. Immediately under your entry, it automatically displays a list of commodities having IDs that begin with the letter or combination of letters you have typed. This automatic search for the proper ID is what is known as the "instant best match" feature.
For example, suppose you type 'F' in a commodity ID field. As you begin to type, the system will check the characters you enter with all commodity IDs that begin with the letter 'F'. Each time you type a character, the system continues to search the commodity table to locate a match. It reduces the list shown below to those that match what you have entered so far. If you get to the point where no IDs match, the system will not allow you to type any further. When the system displays the entry you want, select it and exit the field.
If all selections cannot be shown at one time in the list, a scrollbar displays on the right. To scroll additional selections into view, click on the scrollbar, or use the DOWN ARROW or UP ARROW keys.
When you want to search for the commodity
Do either of the following:
-
Click on the View Scroll
 button, which is the second button to the right of the commodity ID field.
 -
Right-click in the Commodity field and select View Scroll.
The system displays the Scroll Commodities window. It has a Quick Search tab, which you can use to enter search criteria.
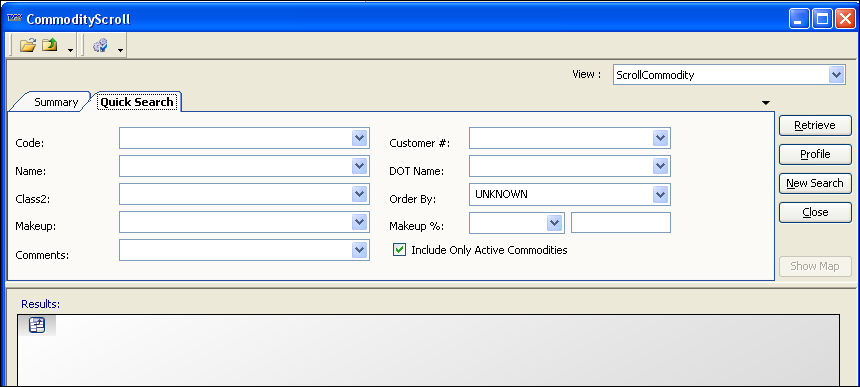
After you enter restrictions, click the Retrieve button. The system displays a list of matching records in the lower half of the window. To select a commodity, double-click on it. The system closes the Commodity Scroll window, and inserts the ID of the selected commodity in the commodity ID field.
Adding commodities
In Order Maintenance, the Summary tab allows you to enter information for a single commodity, which applies to both the shipper and the consignee. However, to record additional commodities, or to record commodities for other stops, you must use the All Stops tab or the Stop Detail tab.
| A new freight detail is always added below any existing freight details. There is no way to insert a commodity above another commodity. |
On the All Stops tab
Use this procedure to add a commodity (freight detail) to a stop. With the order displayed in the Order Maintenance window, follow these steps:
-
Select the All Stops tab.
Note: If necessary, select the Order Stops sub tab.
-
Select the stop for which you want to add freight and do one of the following:
-
Click
 Add Freight at the top of the tab, or in the toolbar.
 -
Select Edit > Add Freight.
-
Press CTRL+INSERT.
-
At the beginning of the row for the stop, click
 Expand. Right-click on an existing freight detail and select Add Freight from the shortcut menu.
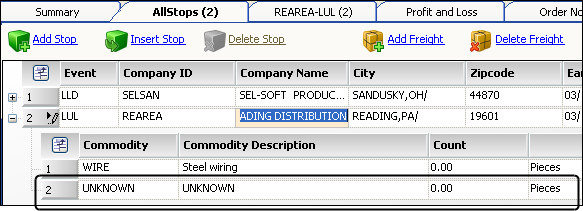
For the second stop in this illustration, a freight detail already existed for Steel Wiring. A second freight detail has been added directly below Steel Wiring.
Notes:
-
Even if no one previously entered a freight detail for a stop, the system assigns a default freight detail with UNKNOWN as the commodity. Therefore, when you add a freight detail, the system will add another one below the default freight detail.
-
To insert a new freight detail above an existing freight detail, right-click on the existing one and select Insert Freight from the shortcut menu.
-
-
Enter the needed data in the new freight detail row.
For field descriptions, see Definitions for freight related fields. -
Save the trip.
On the Stop Detail tab
With the order displayed in the Order Maintenance window, follow these steps:
-
On the Order Stops sub tab of the All Stops tab, select the row to which you want to add freight.
-
Select the Stop Detail tab.
-
Click
 Add Freight.
The system loads a blank form in the Freight Information section.
-
Enter the needed data.
For field descriptions, see Definitions for freight related fields. -
Save the trip.
Deleting commodities
To delete a commodity for a stop, you must use the All Stops tab or the Stop Detail tab of the Order Maintenance window.
On the All Stops tab
With the order displayed in the Order Maintenance window, follow these steps:
-
On the Order Stops sub tab of the All Stops tab, locate the stop from which you want to delete freight.
-
Click the
 Expand button at the beginning of that stop.
All commodities for the stop are listed immediately below the stop.
The
Expand button is boxed in this illustration.
When you click the
Expand button, the stop’s commodities appear below the stop.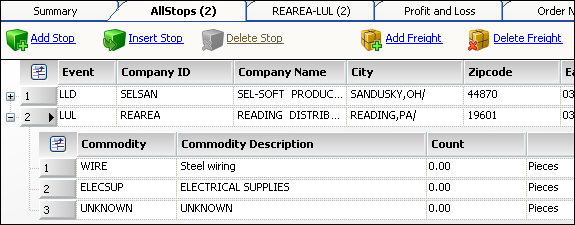
-
Click anywhere in the row of the commodity that you want to delete.
Note: To select multiple freight details, hold down the CTRL key while selecting.
-
Do one of the following:
-
Click
 Delete Freight.
 -
Press CTRL+DEL
-
Right-click on the desired freight detail and select Remove Freight from the shortcut menu.
The system highlights the row that you selected and displays a message asking you to confirm your intent to delete.
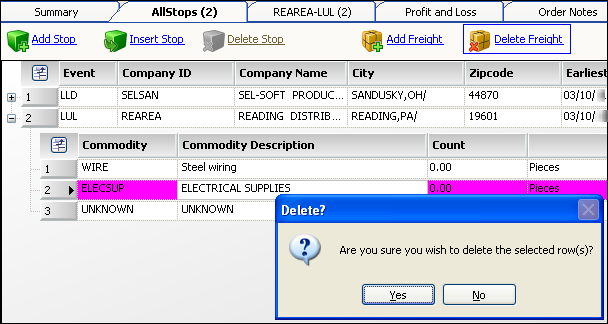
-
-
Click Yes to delete the commodity from the stop.
On the Stop Detail tab
With the order displayed in the Order Maintenance window, follow these steps:
-
On the Order Stops sub tab of the All Stops tab, select the row for which you want to delete freight.
-
Select the Stop Detail tab.
Note: If multiple commodities exist for the stop, the system shows the first one.
-
Do one of the following:
-
If the commodity you want to delete is shown:
-
Click the
 Remove Freight button at the bottom of the Stop Detail tab.
 -
In the confirmation prompt, click Yes.
-
-
If the commodity you want to delete is not shown:
-
Use the blue hyperlink(s) at the bottom left and/or right of the window to find to the commodity.

-
When the freight detail is in view, click the
Remove Freight button at the bottom of the Stop Detail tab. -
When the system displays a message asking you to confirm your intent to delete, click Yes.
-
-
-
Click
 Save.
Save.
Copying commodities
The Stop Detail tab of the Order Maintenance window allows you to copy a stop’s freight detail and add the copy to another stop. A source stop is the stop that has the commodity you want to copy. A target stop is the stop to which you want to add the copy. If the target stop already has one or more freight details, you have the option to:
-
Replace all existing commodities with the copy.
-
Append the copy to the list of existing commodities.
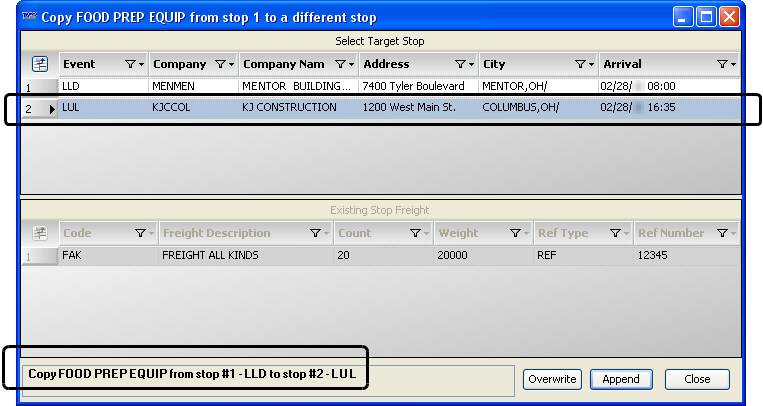
Overview of the Copy window
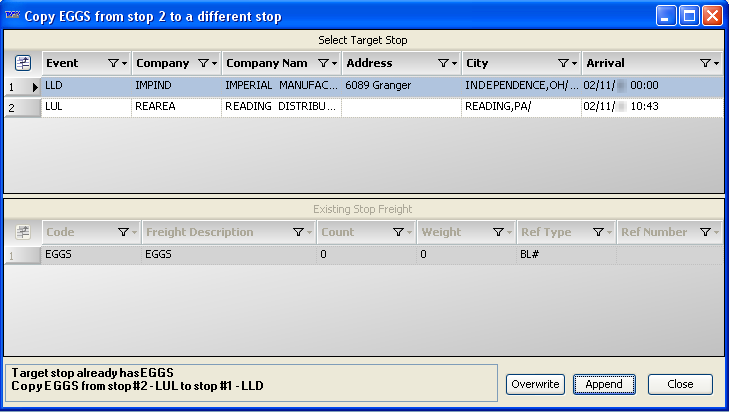
On the Stop Detail tab, when you select a commodity and click the ![]() Copy Freight button, the system opens the Copy window, shown here.
Copy Freight button, the system opens the Copy window, shown here.

The letters listed in this table correspond to the lettered callouts in the illustration:
A |
The title bar identifies the commodity that is being copied, and identifies the sequence number for the stop to which the commodity belongs. This is known as the source stop. |
B |
The Select Target Stop grid lists all of the stops on the order. In this grid, you must select the stop to which the freight detail is to be copied. This is known as the target stop. |
C |
The Existing Stop Freight grid lists the freight details that already exist for the target stop you have selected. |
D |
The message at the bottom left identifies:
|
E |
The Overwrite button allows you to replace all existing commodities for the target stop with the copied freight detail. |
F |
The Append button allows you to add the copied freight detail to the target stop without deleting any of its existing freight details. |
Copying a commodity
With the order displayed in the Order Maintenance window, follow these steps to copy a freight detail.
To locate the commodity you want to copy, do one of the following:
-
On the All Stops tab
-
On the Order Stops sub tab of the All Stops tab, click the image:OM-Freight/image2.pngExpand icon for the source stop that has the freight that you want to copy. The system expands the rows to display the freight data.
-
Select the freight detail that you want to copy.
-
Select the Stop Detail tab.
The selected commodity appears at the bottom of the tab.
-
-
On the Stop Detail tab
-
If the source stop is not already in view, use the blue hyperlink(s) at the bottom of the window to find it.
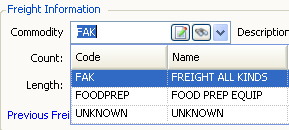
In this illustration, the hyperlink on the left side of the window indicates that a stop precedes the stop that is in view. If another stop follows the stop in view, a hyperlink for that stop will appear on the right side of the window.
-
If the commodity for the source stop is not already in view, use the blue hyperlink(s) at the bottom of the window to find it.
In this illustration, the hyperlink on the left side of the window indicates that a freight detail precedes the one that is in view. If another freight detail follows the one in view, a hyperlink for that freight detail will appear on the right side of the window.
Note: Hyperlinks for freight details display above hyperlinks for stops.
-
Continue with these steps.
-
Click
 Copy Freight.
The Copy window opens. -
In the Select Target Stop section of the window, select the stop to which you want to copy the commodity.
In this example, Stop 2 is the target stop. The Food Prep Equip commodity will be copied from Stop 1 (the source stop) to Stop 2.
Notes:
-
If the target stop already has the commodity you selected, a message displayed in the lower left of the window notifies you. If you choose to append the copy, the target stop will have multiple freight details for the same commodity.

-
A source stop cannot be used as a target stop. If you inadvertently select the source stop as your target stop, a message will indicate this. The Overwrite and Append buttons will not be functional and will have a grayed out appearance.

-
-
Do one of the following:
-
To replace all of the target stop’s existing freight details with the copy, click Overwrite.
-
To add the copy to the target stop’s existing list of freight details, click Append.
-
-
Click Close.
-
Click
Save.