Working with vendor flat file layouts
The File Layout window displays the flat file layout for the import files that are provided by all supported vendors.
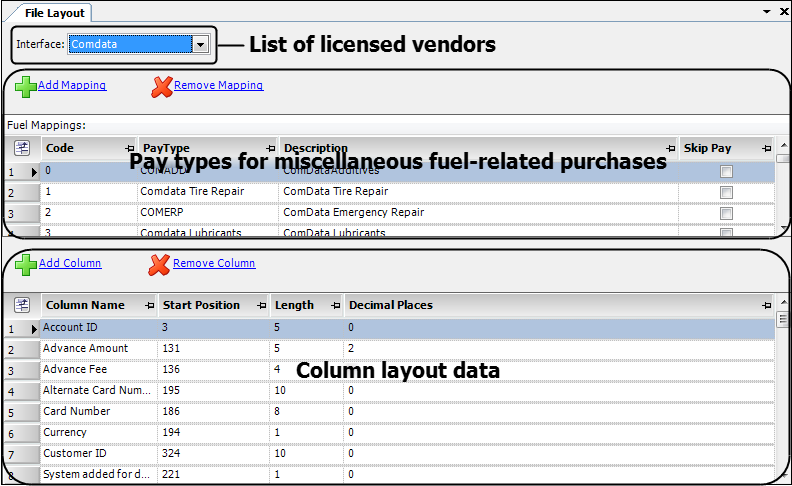
The window consists of three sections:
-
The window header contains the Interface field. The list shows only the vendors for which you are licensed. Select a vendor to display the file layout information.
-
The Fuel Mappings grid lists the pay types used to identify miscellaneous fuel-related purchases and the codes your vendor assigns to these transactions in the import files that you receive. You can add, edit, or remove these pay types as needed.
-
The Column Layout grid describes the layout of the import file. It lists each column, its start position in the file, its character length, and any decimal places, if applicable. You can add, edit, or remove these columns as needed.
Editing file layout columns
To edit the file layout, follow these steps.
-
Go to Operations > Fuel Maintenance > File Layout.
The File Layout window opens. -
In the Interface field, select the vendor whose file layout you want to edit.
The bottom grid displays information about the columns.Required field: *
Field Definition Column Name *
Column name used by the vendor
Start Position
Location of the first character of the column in the flat file
Length
Total number of characters in the column
Decimal Places
Number of decimal places included in the column
-
Do any of the following:
-
Add a new column
-
Click Add Column.
A new row appears at the bottom of the grid. -
Enter column information.
Note: You may want to sort the grid by start position to see where the column exists in the file layout. If it is between two existing columns, you may need to adjust the start position and length of the columns that follow.
-
-
Edit an existing column
-
Click on the row that contains the column data you want to edit.
-
Make changes as needed.
-
-
Remove a column
-
Click on the row that contains the column you want to remove.
-
Click Remove Column.
The row is deleted from the grid.
-
-
-
When you have completed all edits, click
 Save.
Save.
A message indicates that your changes were saved successfully.
Editing pay type mappings for miscellaneous fuel purchases
The Fuel Mappings grid lists the pay type mappings used to identify miscellaneous fuel-related purchases and the codes your vendor assigns to these transactions in its fuel files.
You must have [FuelServ]COMMISC=Y in your TTS50 for the system to process transaction records for miscellaneous purchases.
| Not all vendors support miscellaneous purchases. |
To edit mappings, follow these steps.
-
Go to Operations > Fuel Maintenance > File Layout.
The File Layout window opens. -
In the Interface field, select the vendor whose mappings you want to edit.
The Fuel Mappings grid displays pay type information.Required field: *
Field Definition Code *
Default code your vendor assigns to transactions for the purchase
PayType *
Description recorded for the pay type in the Settlement Item Maintenance window. For more information, see:
Guide: Pay Rates Basics | Chapter: Setting up pay types
Description
Description that will appear on the pay details created when the import file is processed
Skip Pay
When this checkbox is selected, the system will not create pay details for the purchase
-
Do any of the following:
-
Add a new mapping
-
Click Add Column.
A new row appears at the bottom of the grid. -
Enter information as indicated.
-
-
Edit an existing mapping
-
Click on the row representing the mapping you want to edit.
-
Make changes as needed.
-
-
Remove a mapping
-
Click on the row representing the mapping you want to remove.
-
Click Remove Column.
The row is deleted from the grid.
-
-
-
When you have completed all edits, click
Save.
A message indicates that your changes were saved successfully.