Performing the TMW-side setup
In addition to installing the TMW 3GTMS Integration Service, you must set up TMW Operations to work with the integration.
Verifying setup in 3G-TM is complete
To retrieve rates and plan loads successfully using the integration, setup specific to 3G-TM must be complete in your 3G-TM application. To perform the setup, you work with your 3G-TM implementation specialist. Use the checklist below to verify each task has been accomplished.
-
Organizations are defined
-
User profiles created
-
Roles assigned to users
-
Trading partner profiles created (Carrier and Client)
-
Customer profiles created (Shipper and Consignee)
-
House carriers created for generic rates
-
Handling units defined
-
Areas - if you want to define zones or regions
-
Contracts
-
Client-specific Cost rates defined (Buy)
-
Client-specific Billing rated defined (Sell)
-
Blanket Cost rates defined (Buy)
-
Blanket Billing rates defined (Sell)
-
-
Strategies defined
-
Mileage rates defined on strategies
-
-
Tiers defined
-
RateWareXL, CzarLite, Continental, …external, or custom rating organizations
-
-
Markups defined
-
Fuel surcharge rates defined
-
Accessorial codes defined
-
Accessorial rates defined
-
Accessorial rates linked to:
-
Specific contract
-
One or more Contract Types
-
Specific carrier
-
Specifying the integration web address
The 3G-TM Rating Integration is a web service that provides communication between your TMW application and your 3G-TM account. The [IntegrationService]EndPointAddress setting in your TTS50 must provide the location of the server on which the service resides.
Adding 3G-TM credentials in user profiles
You use the Rate Quote window to request rates from 3G-TM.
You use the Optimization Batch Maintenance window to send orders to 3G-TM for planning.
Users who will have access to the?se? windows must have 3G-TM credentials recorded in their user profiles.
The credentials identify your company’s 3G-TM application user ID and password.
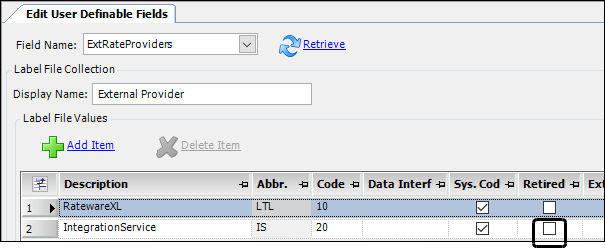
Verifying the required label option has been added
When 3G-TM Rating Integration is installed, SQL scripts are applied to your TMWSuite database. These scripts add new tables, columns, and label options used by the integration.
One such update involves the ExternalUserXref label. When the database is updated, the 3GTMS Integration option is added to the label. You use this option when recording 3G-TM credentials in user profiles.
Before adding the credentials in user profiles, check that the ExternalUserXref label has been updated. If the option is not in the label, contact your TMW system administrator.
For instructions on accessing the label, see Accessing labels associated with the label file.
Recording user credentials
To access user profiles for editing, you must use the TMWSuite System Administration application’s Edit User Profiles window.
To add 3G-TM Rating credentials to a user’s profile, follow these steps.
-
In the System Administration application, open the user’s profile.
Note: For instructions on accessing the window and retrieving a user’s profile, see:
Guide: System Administration | Chapter: Establishing user profiles | Section: Editing an existing user profile
-
Click
 next to the Login ID field.
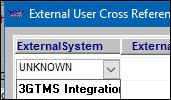
The External User Cross Reference window opens. -
Click Add.
A blank row of fields is added. -
In the ExternalSystem field, select 3GTMS Integration.
-
In the External User ID field, enter the user ID created to represent 3G-TM integration.
Note: The user ID is case sensitive.
-
In the External Password field, enter the password associated with that user.
Note: The password is case sensitive.
-
Click Save.
-
Click Close.
The External User Cross Reference window closes.
Repeat these steps to record credentials for each user who will use the Rate Quote window.
Creating external rates that call 3G-TM Rating
TMW’s 3G-TM Rating Integration ties the 3G-TM rating engine to TMW Operations and TMW rates. For the system to make the call to 3G-TM Rating, you must set up an external rate in TMWSuite’s Rate Schedules application that will call 3G-TM for rating.
| When using 3G-TM rates, you must rate the trip in TMW Operations. You cannot retrieve 3G-TM rates in TMW Back Office or in TMWSuite. |
Activating the IntegrationService label option
You need to use the IntegrationService option in the ExtRateProviders label to set up external rates for 3G-TM. By default, the option is retired. To make it available you must clear its Retired checkbox.
For more information, see Retiring or deleting a user-defined label option.
Setting up the billing rate that calls 3G-TM Rating
In TMWSuite’s Rate Schedules application, you set up an external billing rate to call 3G-TM for rating. For details, see:
Guide: BillingRates | Folder: 3_BillingRateExamples | File: Using 3G-TM tariffs with TMWSuite billing rates.
Setting up the pay rate that calls 3G-TM Rating
In TMWSuite’s Rate Schedules application, you set up an external pay rate to call 3GTMS for rating. For details, see:
Guide: Pay Rates | Folder: 3_PayRateExamples | File: Using 3G-TM tariffs with TMWSuite pay rates.
Matching your pallet count unit to 3G-TM’s pallet handling unit
Applicable prior to TMW Operations: V.17.50
If you rate by pallet, to ensure that rates are returned correctly, you must match your UnitCounts label option for Pallets to the handling unit name in 3G-TM.
The Abbr field value in the label must be set to PLT.
For details, see Editing a user-defined label option.
Matching your count units to 3G-TM handling units
First available in TMW Operations: V. 17.50
You define handling units in 3G-TM. Handling units correspond to the count units used by TMW Operations. To ensure that rates are returned correctly, the options recorded for the CountUnits label in your TMW database must match the handling unit names in 3G-TM.
For example, the CountUnits label has a number of system code options. By default, the label contains an option for pallets, using the plural form. If the 3G-TM handling unit is Pallet, the entry in the CountUnits label must also be Pallet. You would change the Description field entry to the singular form.
If needed, add options to the label for each of the handling units you have defined in 3G-TM.
Identifying accessorial charge types and pay types used with 3G-TM Rating
Applicable prior to TMW Operations: V.17.50
For 3G-TM rates to be applied to trips correctly, the pay types and charge types you use for accessorials must be mapped to their 3G-TM equivalents. The mappings you enter are based on your 3G-TM implementation.
You map pay types and charge types in the TMWSuite Rate Schedules application, using the LTL Accessorials window.
|
To map accessorial pay types and charge types, follow these steps.
-
Open the TMWSuite Rate Schedules application.
-
Go to Edit > LTL Accessorials.
The LTL Accessorials window opens.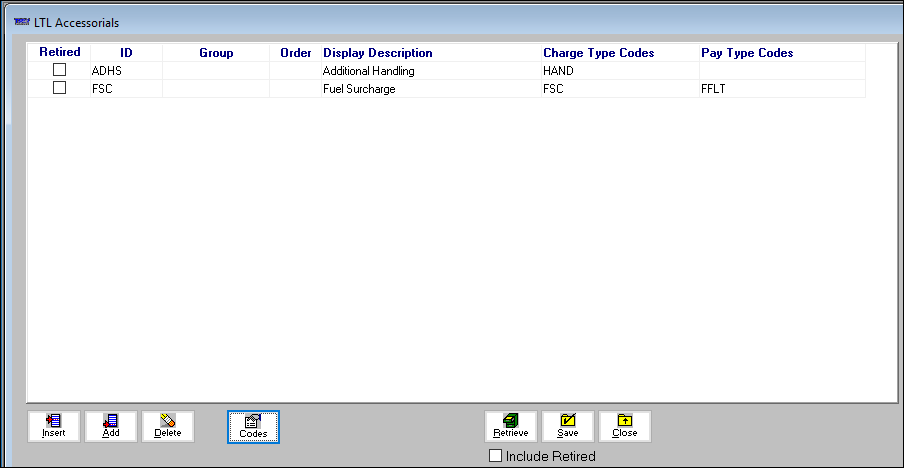
-
Click Add.
A blank row for mapping is added. -
Make entries in these fields.
Field Definition ID
Enter the accessorial code as it is recorded in 3G-TM.
Display Description
Enter the description provided for the code in 3G-TM.
-
To record the corresponding charge or pay type, click Codes.
The Select LTL Charge and Pay Types window opens.-
To identify a charge type:
-
Scroll through the list in the Charge Types Available pane.
-
Select the needed charge type.
-
Click Add.
-
Close the Select LTL Charge and Pay Types window.
The selected charge type appears in the Charge Type Codes field.
-
-
To identify a pay type:
-
Scroll through the list in the Pay Types Available pane.
-
Select the needed pay type.
-
Click Add.
-
Close the Select LTL Charge and Pay Types window.
The selected pay type appears in the Pay Type Codes field.
-
Note: Although the window allows you to select multiple charge type or pay type codes to map to a 3G-TM code, select only one. Mapping multiple charge types or pay types to a code will cause the system to ignore the charge or pay type.
-
-
Repeat Steps 3 through 5 to add each needed charge or pay type.
-
Click Save.
-
Click Close.
Mapping pay types and charge types to 3G-TM rate codes
First available in TMW Operations: V. 17.50
For 3G-TM rates to be applied to trips correctly, the pay types and charge types you use must be mapped to their 3G-TM equivalent. The mappings you enter are based on your 3G-TM implementation.
To map your pay types and charge types to the 3G-TM rate codes, follow these steps.
-
Go to Tools >Tools Maintenance > 3G Rate Type Mapping.
The Rate Type Mapping window opens. -
Click
 Add.
Add.
A blank row is added for your entries. -
Make entries in these fields.
Required: *
Field Definition ThreeGCode *
Code that identifies the type of 3G-TM rate
For example:
-
LH
Line haul -
FSC
Fuel surcharge -
INSDLV
Inside delivery
Strategy
The 3G-TM contract strategy associated with rating code
ThreeGRateType
The 3G-TM unit basis
Description
Text that identifies how the type of charge
For example, mileage based, flat charge, fuel surcharge
TMWChargeType *
The charge type code that is the equivalent of the 3G-TM code
For example, if the 3G-TM code is LH and the ThreeGRateType is Distance, an equivalent charge type code in your TMWSuite database would be LHD.
TMWPayType *
The pay type code that is the equivalent of the 3G-TM code
For example, if the 3G-TM code is LH and the ThreeGRateType is Distance, an equivalent pay type code in your TMWSuite database would be TSM.
CreatedDate
The system provides the date and time this mapping was entered.
CreatedBy
The system provides the user ID of the person who created this mapping.
LastUpdateDate
The system provides the date and time this mapping was edited.
LastUpdateBy
The system provides the user ID of the person who edited this mapping.
-
-
Click
 Save.
Save.Note: You must save any additions or changes you make to the mappings. If you attempt to close the window without saving, the Unsaved Changes message opens. It states, "You have some uncommitted changes on the window. Would you like to save these changes?".
-
Do one of the following:
-
Click Yes to save the changes and close the window.
-
Click No to abandon them and close the window.
-
Click Cancel to close the message and return to the window.
-
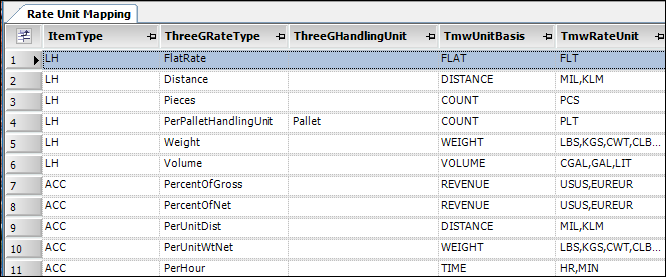
Reviewing how rate units are mapped to 3G-TM
You define handling units in 3GTMS. To ensure that rates are returned correctly, the options recorded for the CountUnit label in your TMW database must be mapped to the handling unit names. The system automatically provides mapping, based on how your 3G-TM system was implemented. You can review these mappings in the Rate Unit Mapping window.
To access the window, go to Tools >Tools Maintenance > 3G Rate Unit Mapping.
Information is shown in these fields.
Required field: *
| Field | Definition |
|---|---|
sItemType * |
Code that identifies the type of 3G-TM rate Options are:
|
ThreeGRateType * |
The 3G-TM unit basis |
ThreeGHandlingUnit |
Text that identifies the handling unit The entry should match the Description field value for the unit in the CountUnit label. |
TMWUnitBasis |
The type of measurement on which the rate is based The drop-down list shows all the options recorded in the ChargeUnitBasis label. |
TMWRateUnit * |
The calculation method for the charge type or pay type The drop-down list shows all the options recorded in the RateBy label. |
CreatedDate |
The system provides the date and time this mapping was entered. |
CreatedBy |
The system provides the user ID of the person who created this mapping. Note: For items included in the initial, automatic mapping, the value is dbo. |
LastUpdateDate |
The system provides the date and time this mapping was edited. |
LastUpdateBy |
The system provides the user ID of the person who edited this mapping. Note: For items included in the initial, automatic mapping, the value is dbo. |
If needed, you can edit a mapping, add a new one, or delete an existing one.
To edit a mapping:
-
Make changes in the fields as needed.
-
Click
Save.
To add a mapping:
-
Click
Add.
A new row is added at the bottom of the grid. -
Make entries in the fields as described above.
-
Click
Save.
To remove a mapping: . Select its row in the grid.
-
Click
 Delete.
 -
Click
Save.
|
You must save any additions or changes you make to the mappings. If you attempt to close the window without saving, the Unsaved Changes message opens. It states, "You have some uncommitted changes on the window. Would you like to save these changes?". Do one of the following:
|
Ignoring delivery dates in rate requests
A trip’s begin and end dates affect the 3G-TM rating process. The rating API uses 550 miles as the maximum distance a truck can travel in one day. If 3G-TM evaluates a trip’s start and end dates as impossible, it will not return any rates.
| Five hundred fifty maximum miles is the rule of thumb used for feasibility of Truck Load (TL) rates. However, it is different for Less Than Truckload (LTL) rates. In 3G-TM, you define service days for LTL rates. The service days are the typical, expected number of days for delivery, based on routing and processing through their facilities. Service days can vary from carrier to carrier and complexity of the product being handled. |
If you want, you can use the [IntegrationService]UseDeliveryDateForRateRequests setting in your TTS50 to exclude the delivery date from the information sent to 3G-TM when you send the rate request. With this setup, you can be sure that a failure to return rates is not based on 3G’s feasibility evaluation.
Verifying commodity profiles include NMFC classes
One of the criteria used in finding 3G-TM rates is the commodity’s NMFC class. To ensure rates are returned correctly, commodity profiles should include appropriate entries in the NMFC Class field. The field is located in the Information tab’s Commodity Class section.
When you enter order information in the Rate Quote window the system automatically supplies the NMFC Class, based on the specified commodity.
| There is no master file sync for commodities. The commodities in your TMW database do not have to exist in 3G-TM. Only the freight class, as defined in the NMFC field, is pertinent for rating. |
Adding the Rate Quote command
You request rates for a trip in the Rate Quote window. To access the window, you use the Rate Quote command. By default, the command is not available in the Operations menu. You must add it.
To add the command, follow these steps.
-
Right-click in the menu bar.
The shortcut menu opens. -
Select Customize.
The Customize window opens. -
Click the Commands tab.
-
In the Categories list, select All Commands.
-
In the Commands list, select Rate Quote.

-
Drag the command to the Operations menu.
-
Close the Customize window.
-
Go to Tools > Save Menu for User(s).
The User Chooser window opens. It shows a list of all users who have access to the application. -
Select the checkbox for each user who will work in the Rate Quote window.
-
Click OK.
The User Chooser window closes.
For more information about adding commands to menus, see Adding existing commands to a menu.
Passing data to 3G-TM constraints
In TMW Operations, you can use must have load requirements to restrict the assets that can perform a load.
You can use one of the TrailerType1-4 fields on an order to specify the type of trailer you prefer to have assigned on the order.
In 3G-TM, these constraints are defined in Compatibility Profiles. You can set up the integration to include these restrictions when sending orders for planning.
| For assistance with defining Compatibility Profiles in 3G-TM to match load requirements and equipment types, consult your 3G-TMS support representative. |
Sending must load conditions
To pass must condition load requirements on an order, they must match compatibility profiles in 3G-TM.
-
Use Equipment profiles for tractor or trailer accessory requirements.
-
Use Carrier profiles for carrier or driver qualification requirements.
In 3G-TM, use the Abbr field value from the label used to define the qualification or accessory as the profile name.
To pass the constraints, you must have [IntegrationService]Use3GConstraints=Yes in your TTS50.
| For more information, see What are load requirements/preferences? |
Sending trailer types
You can set up the system to have the trailer type specified on the order header affect how 3G-TM Advanced Mode Planning consolidates and assigns orders.
Trailer types must match the Available Equipment constraint in 3G-TM. The constraint name in 3G-TM must match the Abbr field value in the label defining the trailer type.
Use the [IntegrationService]TrailerType setting to map Order Constraints to one of the order header TrailerType1-4 fields.
| For more information on setting up trailer type options, see Using the label file to customize fields. |