Processing Inbound 214 status updates
An Inbound 214 status update file tells you an order’s current status, as completed by the carrier. If you are licensed for the EDI 214 Shipment Status SmartLink add-on, you can use the Inbound214Validation General Info Table setting to actualize each stop and update the date/time and reason code automatically. The reason code indicates whether the stop was on time, early, or late.
In TMW Operations, you can review 214 data in the Process Inbound 214s window and manually update a trip’s status based on that data.
To process 214 status updates, the following must be true:
-
The LTSL EDI 214 service must be running for the 214 file to process through the Inbound 214 folder that was set up during the service installation process.
-
In each carrier profile, the 214 option must be selected in the EDI section.
-
Each 214 status code is set up in one of these General Info Table settings:
What is a 214?
The 214 Transportation Carrier Shipment Status Message is an EDI transaction sent to the shipper to indicate current shipment status. Each record in a 214 file includes this information:
-
Carrier code
-
SCAC code
-
Reference number
-
Status code
-
Status date/time
-
Reason code
-
Location
-
Time zone
Understanding Inbound 214 status update files
The carrier sends a 990 Load Tender Acknowledgement upon accepting a load and a 214 Acknowledgement status upon starting a load. The 214 file is processed into the LTSL EDI 214 folder, and is available to be accepted or declined as a stop update in TMWSuite.
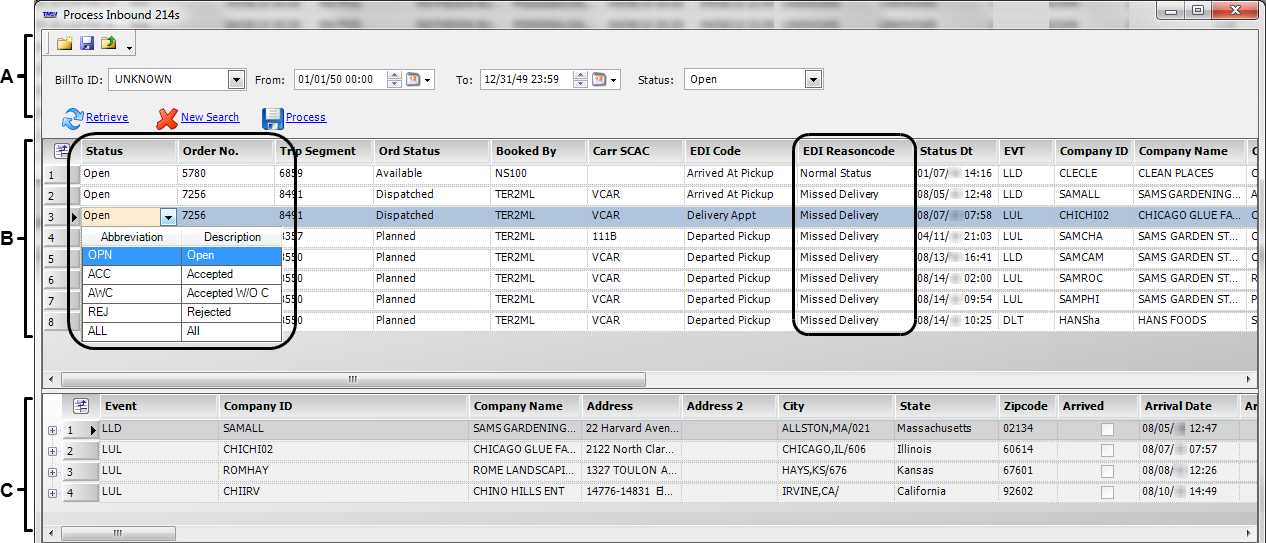
The Process Inbound 214s window (shown here with sample data) allows you to review the events listed on a 214, and the current status and reason code associated with each event.
-
The header allows you to specify the criteria that will restrict which 214s can be reviewed.
-
The 214 Data grid displays the stops and appointment information contained in the 214 file.
-
The Stop Detail grid displays stops and events data as they would appear in the Trip Folder’s Stops tab.
Processing Inbound 214s
To process 214 data, complete the following steps:
-
Go to Edit > EDI > Inbound 214 Updates.
The Process Inbound 214s window opens.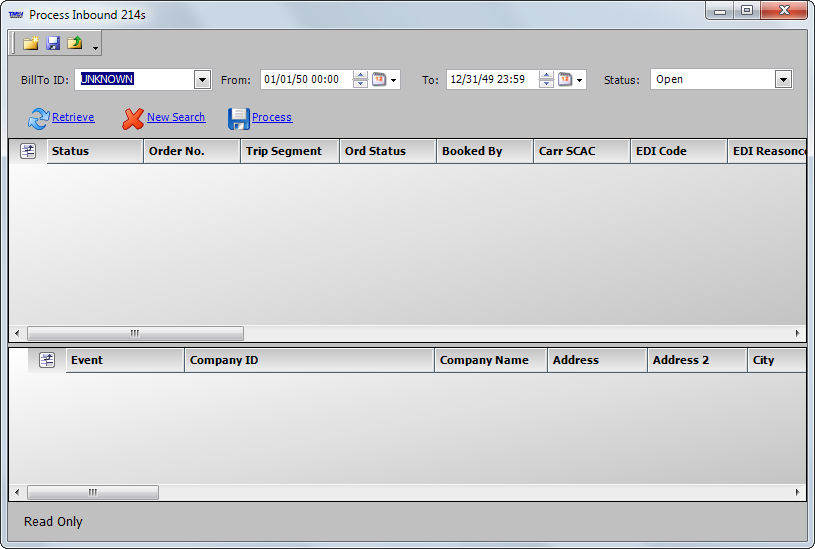
-
Complete the fields in the header section.
Field Definition Bill To Id
Select the company ID of the Bill To company for which you want to process 214 data.
From / To
Enter the start and end dates of the stops that you want to process.
Status
Select the status for the 214 stops that you want to process.
Note: The status of each stop is stored in the TMW Operations database. Events that have been previously processed are accessible through this window for review.
Note: To retrieve a group of 214s based on different criteria, click
 New Search.
 -
Click
 Retrieve to view the available 214s.
 -
Review the data in the 214 Data grid. All data is from the Inbound 214 file.
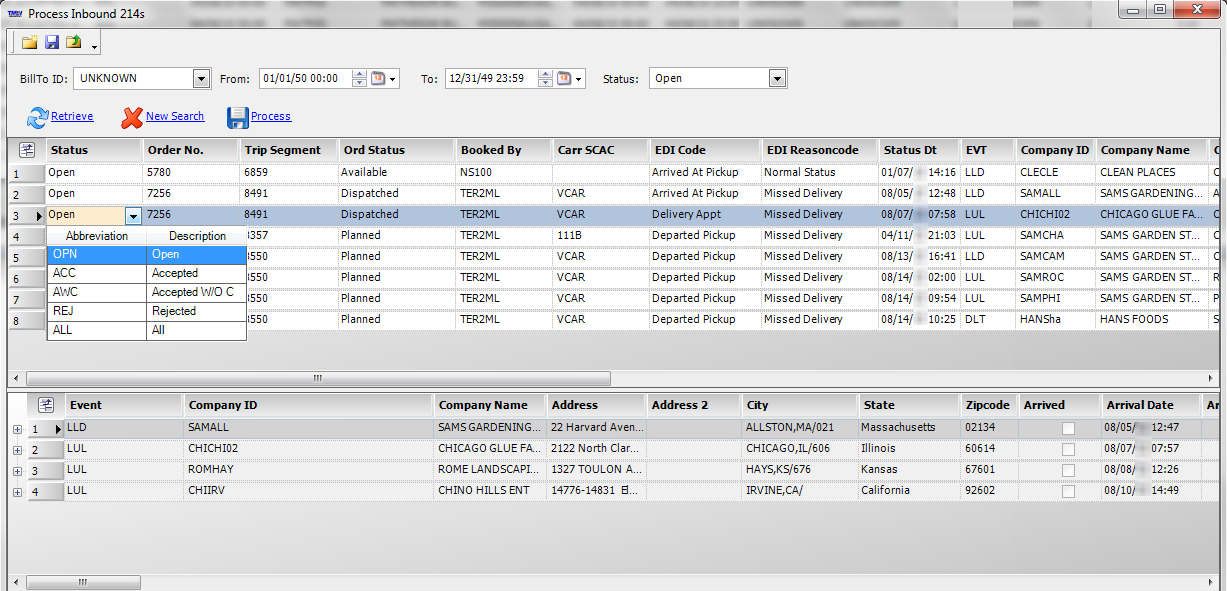
Field Definition Status
Select the status for the 214 event. The options are:
-
Open
The data has not been accepted or rejected. This is the initial status for 214 events.Note: You may change data in the EDI Reasoncode and Status Dt fields when the 214 stop is in the Open status.
-
Accepted
Actualize the event and update the date/time in the database. The 214 event is removed from the grid. -
Accepted W/O Cmp
Update the stop reason code and date/time. The event is not actualized. You must manually actualize the stop in the Trip Folder. The 214 event is marked as accepted and removed from the grid. -
Rejected
Decline any updates made to the database.
Order No.
Unique identifier assigned to the order
Trip Segment
Unique identifier assigned to the trip segment
Ord Status
Current dispatch status of the stop. Status levels include:
-
Planned
The carrier has been assigned. -
Dispatched
The assignment has been communicated to the carrier. -
Started
The trip is in progress. -
Completed
The carrier has reached the stop.
Booked By
Identifies the user who created the order
Carr Scac
Carrier’s unique four-digit SCAC code
EDI Code
Event mapped to the 214 status code in the X12 mapping data
Note: The event codes are identified in the Inbound214Status label in the label file.
EDI Reasoncode
Late reason code mapped to the 214 reason code in the X12 mapping data
Note: Late reason codes are identified in the Inbound214Reason label in the label file.
Status Dt
Date/time the event occurred
EVT
Event type that identifies the primary activity that occurred at the stop
Company ID
ID of the company at the stop
Company Name
Name of the company at the stop location
City
Name of the city for the stop location
State
State abbreviation for the stop location
Stat
Status of the arrival stop event: Estimated (E) or Actual (A)
Arrival DT
Date and time the carrier is scheduled to arrive at the stop
Stat
Status of the departure stop event: Estimated (E) or Actual (A)
Depart DT
Date and time the carrier is scheduled to leave the stop
Status City
Name of the city stop location for which the 214 status was recorded
Status State
State abbreviation for the stop location for which the 214 status was recorded
Stop Latitude
Latitude recorded for the Status City/Status State
Stop Longitude
Longitude recorded for the Status City/Status State
Ref Type
Type of reference number recorded for the stop
Ref Number
Reference number recorded for the stop
Rejection Error Reason
If Status is Rejected, enter the reason the 214 was rejected
-
-
Review the data in the Stop Detail grid at the bottom of the window.
When you select a row in the 214 Data grid, the stop detail for the selected row is highlighted in the Stop Detail grid.
Notes:
-
This section of the window is read-only.
-
The columns contain the data that appears in the Trip Folder’s Stops tab.
-
-
After you select the status for each 214 stop, click
 Process to update the 214 data in the window and TMW Operations database.
The 214 files marked with the Accepted status are actualized and the date/times are updated.
-
Click
 Close.