Transferring or cross-docking freight
First available in TMW Operations: 15.10.073
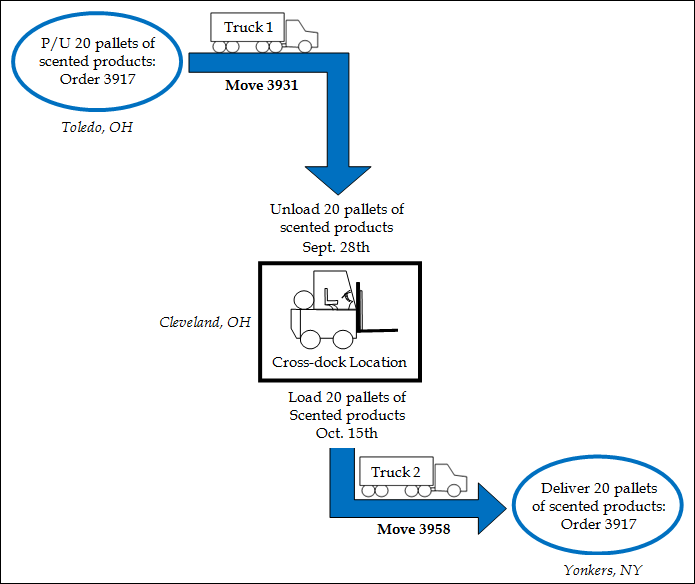
A cross-docking facility receives shipments from various locations, sorts them, and then loads them onto trucks for delivery.
For example, a truck from Cleveland might drop freight at a cross-dock facility in Toledo. The freight would be sorted and then delivered to stops in Detroit, Chicago, and Indianapolis. In this example:
-
Each delivery would probably be delivered by a different truck.
Or
-
Depending on the drop locations, multiple deliveries could be made by one truck.
The cross-dock feature accomplishes two important functions. It lets you:
-
Separate an order’s cargo by delivery location for dispatching purposes
-
Keep all the deliveries linked to the order for record keeping and billing purposes
The methods TMW Operations uses to handle truckload orders and cross-docked orders are not the same.
-
On a truckload trip, a single order is associated with a single movement. That single movement details all the activities of the loaded trailer. Usually, only one trailer is used for these orders.
-
For a cross-docked trip, an order is handled by multiple trailers on multiple movements. As the trip progresses, cargo is temporarily unloaded at a physical location. Each time a freight transfer (or cross-dock) occurs, a new movement is created. Ultimately, this method allows the dispatcher to assign different trailers to handle the cargo as it proceeds to the final destination(s).
Note: Freight transfer is most frequently used with less than truckload (LTL) movements, but you can cross-dock full truckload (TL) movements, as well.
Here are a few examples:
-
A full truckload (TL) vehicle picks up freight that cannot be delivered immediately. The freight must be unloaded at a warehouse and then reloaded onto a truck when the delivery date is closer.
-
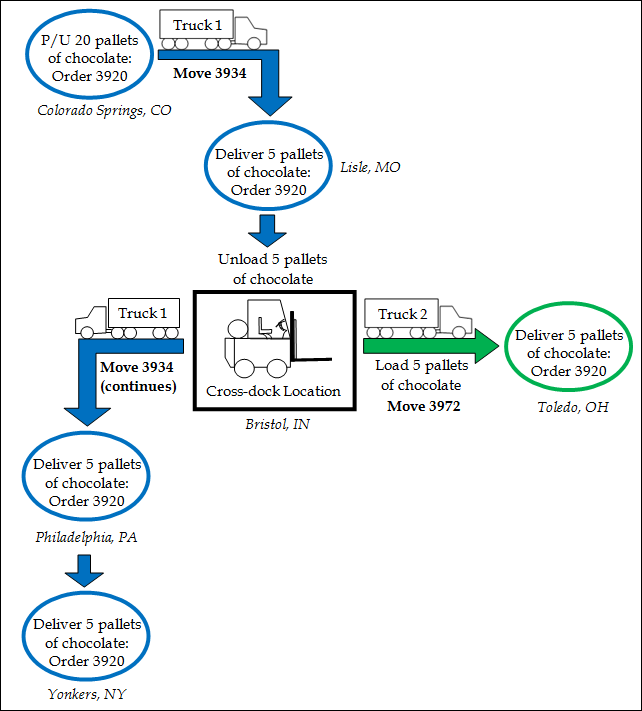
A full truckload (TL) vehicle needs to split the freight because one or more of the deliveries is not close to the others. If the truck does not split the freight, it could miss the delivery window for the other drop off locations.
-
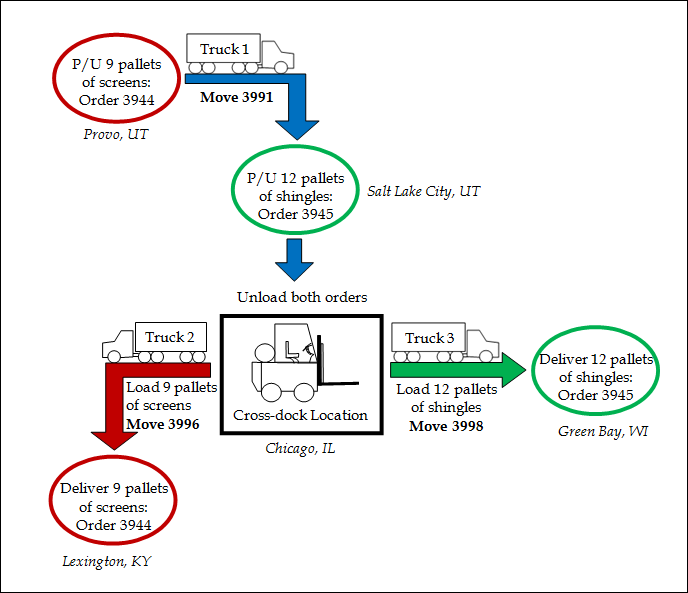
A less than truckload (LTL) vehicle picks up two orders that have pickup locations close together. However, the drop locations are far enough apart that the truck will need to cross-dock once it is closer to that part of the country.
The cross-dock feature uses two unique event codes.
-
XDU (Trnsfr Unload XDU)
-
XDL (Trnsfr Load XDL)
When you cross-dock an order, it separates the movement into two smaller movements.
-
The cross-dock unload occurs on the first movement. This is the XDU event.
-
The cross-dock load occurs on the next movement. This is the XDL event.
Cross-docking lets you unload the freight at a warehouse or other location and makes the resources available. Later, the same or other resources can be assigned to pick up the freight from the cross-dock location and deliver it.
|
Setting up optional cross-dock features
In TMW Operations, no set up is required to use the cross-dock feature. There is optional functionality you can set up.
Activate the extended set of Stop buttons
When you have [.NetMisc]OverrideAddStopInsertRemove=Y in your TTS50, the extended Stop button set is active. For details, see Working with the extended Stop button set.
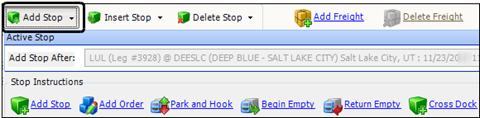
This illustration shows the extended Add Stop button selected. Notice the additional command buttons that are available below, including the Cross Dock button.
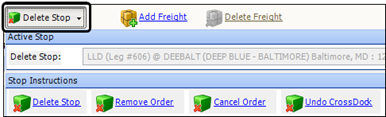
This illustration shows the extended Delete Stop button selected. Notice the additional command buttons that are available below, including the Undo Cross Dock button.
Adding the Group Stops checkbox
When you select the checkbox, the system hides duplicate consecutive stops in the Stops grid. You see only one row for stops at the same location with the same event code. The Group Stops checkbox is available when you have [.NetMisc]StopsPanelGroupStops=Y set in your TTS50.

|
For the cross-dock feature to work correctly, you must have both these settings in your TTS50. The settings must have their default values, as shown here: |
Adding the Next Move and Prior Move buttons
The Next Move and Prior Move buttons let you move easily between movements on a cross-docked trip.

If you want, you can add them to the Trip Folder Stops grid.
-
On the Stops tab, right-click on the blank area above the Stops grid.
-
Select Toggle QuickDesigner.
-
Right-click on the blank area above the Stops grid again.
-
Select Add New Item.
-
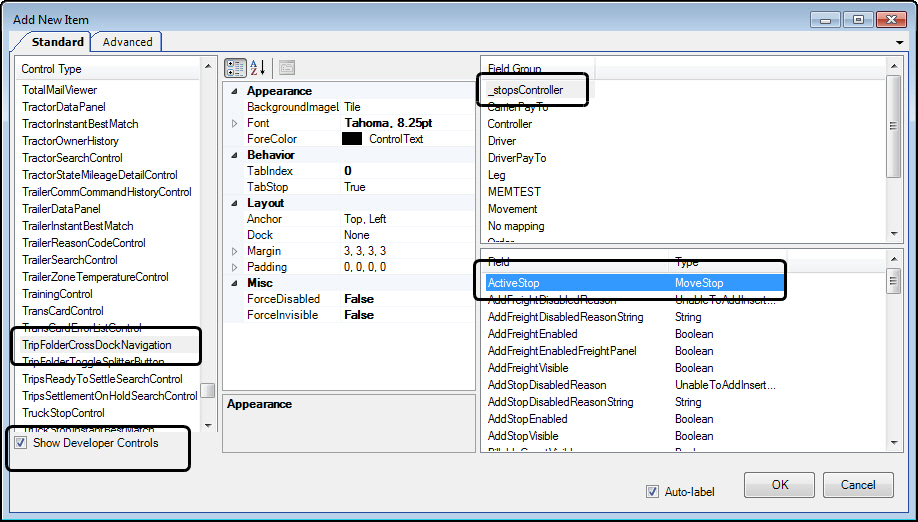
Choose these settings:
-
Select the Show Developer Controls checkbox.
-
In Control Type, select TripFolderCrossDockNavigation.
-
Under Field Group, select _stopsController.
-
Under Field, select ActiveStop.
-
Select the Auto-label checkbox.
-
-
Click OK.
-
Right-click on the blank area above the Stops grid again.
-
Select Toggle QuickDesigner.
-
Save the layout.
For more information, see Saving a new window layout.
Automatically calculating travel times
By default, TMW Operations requires you to enter all stop times manually. If you want, you can have the system calculate them automatically. To do this, have [Dispatch]AutoRecalcTimes=Y in your TTS50. When you enter a new stop time or adjust an existing one, the system calculates all subsequent stop times based on the travel times stored in the mileage database.
Setting up dwell times
Dwell time is the number of minutes spent at a stop. You can set up default dwell time in TMW Operations. The system adds the dwell times to the stop’s arrival time when it calculates the departure date/times for the stops.
When you have [Dispatch]AutoRecalcTimes=Y in your TTS50, the system looks at two INI settings to determine the time to add to the stop:
-
It uses the
[FuelDispatch]DefaultLoadUnloadDwellTimeMinutesentry as the default number of minutes between the arrival time and the departure time. -
If that setting has a value of 0, it uses the
[Operations]DefaultLoadTimeentry as the default number of minutes between the arrival time and the departure time.
If both of these settings are set to 0 (zero), the system sets the departure time to equal the arrival time.
Cross-docking orders in V.17.50 and earlier
If you are using a version before V.17.60, you use the Cross-Dock Quick Add window in the Trip Folder to cross-dock a trip.
-
Using the menu
-
Retrieve the order you want to cross-dock.
-
Go to Menu > Transfer/Cross Dock/Cross Dock.
-
-
Using the extended Stop buttons
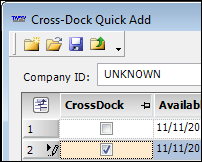
This illustration shows the Cross-Dock Quick Add window.
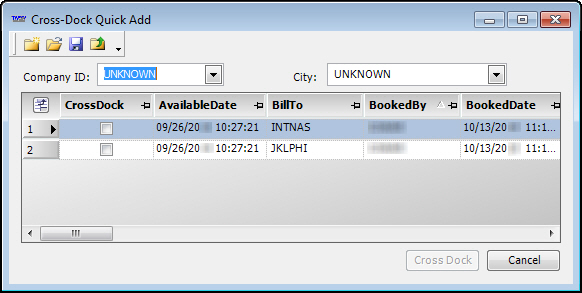
The top of the window has two fields. You use them to say where the cross-dock will take place.
-
Company ID
Company ID of the cross-dock locationThis location could be a warehouse or yard location. It must have a company profile in TMW Operations. When you make an entry, the system adds the city from the location’s profile in the City field.
-
City
Cross-docking does not have to occur at a company location. You can leave the company as UNKNOWN and record a city location in the City field.Although you cannot record an address in the Cross-Dock Quick Add window, you can record an address on the Stops tab after you close the window.
If you are working with a consolidated order, you can cross-dock multiple orders in the consolidation.
To cross-dock an order:
-
With the order displayed in the Trip Folder, open the Cross-Dock Quick Add window.
-
Do one of the following to specify the cross-dock location:
-
Select a company in the Company ID field.
-
Select a city in the City field.
You cannot record an address in the Cross-Dock Quick Add window. You can record an address on the Stops tab after you close the window.
-
-
If you are cross-docking a consolidated order, select the CrossDock checkbox for each order you want to cross-dock. Orders that are not consolidated have only one checkbox.
-
Click Cross Dock.
The window closes. An XDU event is created for each delivery on each of the selected orders.The XDU events appear in the Stops gird.
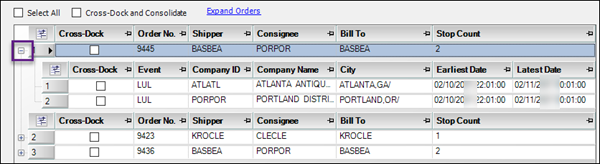
This example shows two orders. Each of them has one delivery.

This example shows one order that has multiple deliveries.
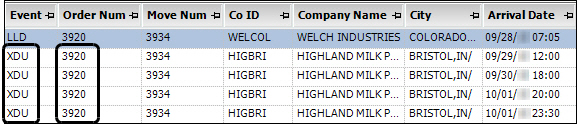
The XDU events are using the dates and times that were previously associated with the LUL events.

-
In the Stops grid, manually adjust the arrival dates and times for all XDU events as needed.
-
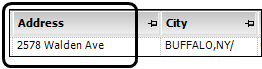
If you left the Company ID field as UNKNOWN for the XDU event, fill in the address in the appropriate column in the Stops grid. If you don’t, it may not route correctly.
If you need to add the Address column to the grid, see Adding or hiding a column using the Field Chooser.
-
Assign resources.
For more information, see Assigning resources to a trip. -
Click
 Save.
Save.You must save before viewing the next movement.
-
Double-click the first XDU row.
The system displays the movement containing the XDL and LUL events for this delivery.If the order has multiple XDU events, double-click the first one.
-
Manually adjust the arrival date and time for each event.
-
Assign resources.
For more information, see Assigning resources to a trip. -
If you left the Company ID field as UNKNOWN for the XDL event, you must fill in the address in the appropriate column. Otherwise, it may not route correctly.
-
Click
Save. -
Double-click the XDL event row to go back to the prior move.
-
Double-click the next XDU row and repeat Steps 10-13 for all movements.
Once you have cross-docked an order, the movements appear separately in the Planning Worksheet.

Cross-Dock at Company or City window overview
First available in V.17.60
The Cross-Dock at Company or City window replaces the Cross-dock Quick Add window. There are several ways to access it.
-
In the Trip Folder
-
Retrieve the order you want to cross dock.
-
Go to Menu > Transfer/Cross Dock/Cross Dock.
-
-
In the Planning Worksheet
-
Select the order you want to cross dock in the Available Trips grid.
-
Go to Menu > Transfer/Cross Dock/Cross Dock.
You could not cross-dock trips in the Planning Worksheet before V.17.60.
-
If you set up your system to use the extended set of Stop buttons in the Trip Folder, you can use them to open the window.
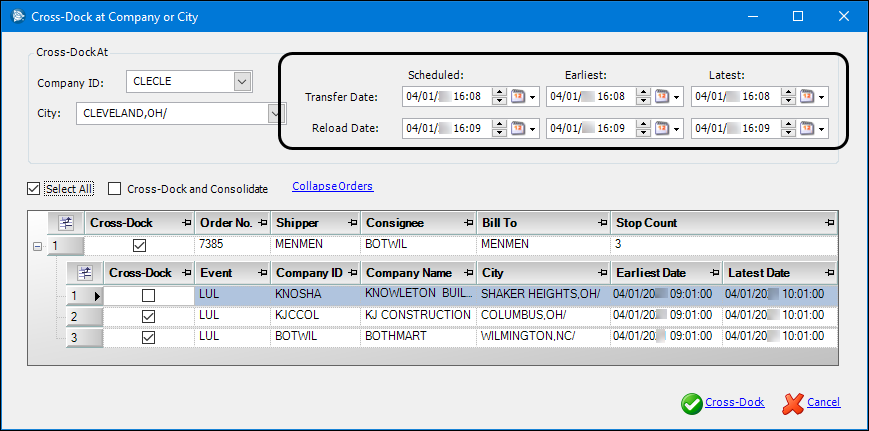
This illustration shows the Cross-Dock at Company or City window introduced in V.17.60.
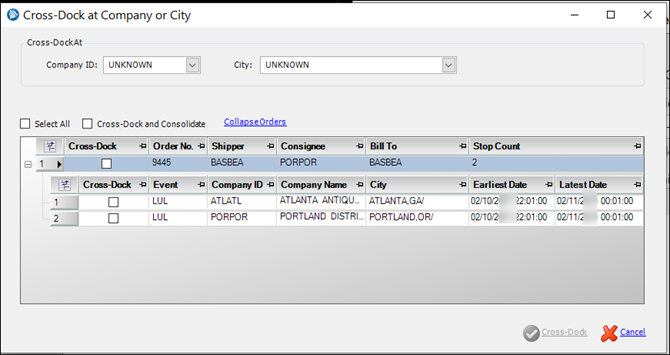
The Cross-Dock At section contains two fields for specifying where the cross-dock takes place. You must make an entry in one of these fields. If you don’t, the window’s Cross-Dock command is not active.
-
Company ID
Company ID of the cross-dock locationThis location could be a warehouse or yard location. It must have a company profile in TMW Operations. When you make an entry here, the system adds the city from the location’s profile in the City field.
Cross-docking does not have to occur at a company location. You can leave the company as UNKNOWN and record a city location in the City field.
-
City
City where the cross-dock occursAlthough you cannot record an address in the Cross-Dock Quick Add window, you can record an address on the Stops tab after you close the window.
Above the grid, there are two checkboxes:
-
Select All
Select the checkbox if you want to select the Cross Dock checkbox for all drops on all orders. -
Cross-Dock and Consolidate
Select the checkbox if you want to cross dock all selected drops to the same movement instead of individual movements. -
CrossDock
Select the checkbox for each order you wish to cross dock.Note: You can cross-dock multiple orders.
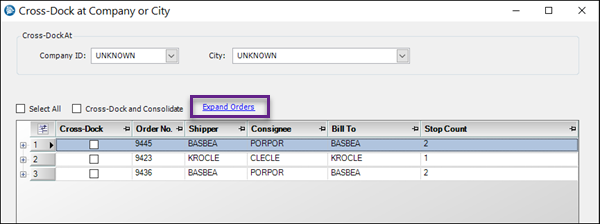
To the right of the checkboxes, is the Expand Orders/CollapseOrders toggle.
By default:
-
The window opens with the order(s) collapsed.
-
The grid contains the Cross-Dock checkbox and these fields:
-
Order No.
-
Shipper
-
Consignee
-
Bill To
-
Stop Count
You can use Field Chooser to add additional fields.
-
Click the toggle to expand all stops on all orders.
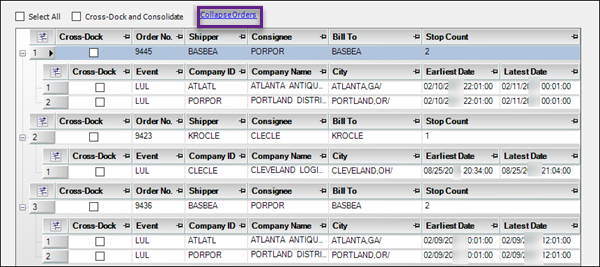
When expanded, the grid shows a row for each of the order’s drops.
The Cross-Dock checkbox lets you select a drop to be cross-docked.
Basic information appears in these fields:
-
Event
-
Company ID
-
Company Name
-
City
-
Earliest Date
-
Latest Date
If you want to expand a single order, click ![]() Expand in its row.
Expand in its row.
Click it again to collapse the order.
Starting in V.2021.1, date and time fields are available in the Cross-Dock at Company or City window. You use these fields to specify times for the drop and reload events at the cross-dock facility.
-
Transfer Date (for the drop at the cross-dock location)
-
Scheduled
-
Earliest
-
Latest
-
-
Reload Date (for the pickup at the cross-dock location)
-
Scheduled
-
Earliest
-
Latest
-
Cross-docking individual drops using V.17.60 and later
In earlier versions, when you cross-docked an order, you had to cross-dock all the drop stops. Starting with V.17.60, you can choose which drop stops you want to cross-dock.
You use the Cross-Dock at Company or City window. To cross-dock an order’s drop(s):
-
From the Trip Folder or Planning Worksheet, open the order in the Cross-Dock at Company or City window.
-
Do one of the following:
-
To specify a company in your database, select its ID in the Company ID field.
The system enters the city/state location from its profile in the City field.
-
To specify a location that is not a company in your database, make an entry in the City field.
-
-
Do one of the following:
-
To cross-dock all the drops, select the Select All checkbox.
-
To cross-dock individual drops, expand the order and select the Cross-Dock checkbox for each drop as needed.
-
-
Do one of the following:
-
To have all the cross-docked drops on one movement, select the Cross-Dock and Consolidate checkbox.
-
To have each cross-docked drop on its own movement, leave the Cross-Dock and Consolidate checkbox cleared.
-
-
Click Cross-Dock.
The window closes.If you are working in the Trip Folder, the Stops grid shows the XDU event.
If you are working in the Planning Worksheet, the Available Trips grid shows a row for each
This illustration shows two orders in the Trip Folder. Each of them has one delivery.
This illustration shows one order that has multiple deliveries.
The XDU events are using the dates and times that were previously associated with the LUL events.
-
In the Stops grid, manually adjust the arrival dates and times for all XDU events as needed.
-
If you specified a city as the location of the cross-dock, enter an address for the XDU event in the appropriate Stops grid column. If you don’t, it may not route correctly.
If you need to add the Address column to the grid, see Adding or hiding a column using the Field Chooser.
-
Assign resources.
For more information, see Assigning resources to a trip. -
Click
Save.You must save before viewing the next movement.
-
Double-click the first XDU row.
The system displays the movement containing the XDL and LUL events for this delivery.If the order has multiple XDU events, double-click the first one.
-
Manually adjust the arrival date and time for each event.
-
Assign resources.
For more information, see Assigning resources to a trip. -
Click
Save.
Cross-Docking individual drops using V.2021.1 and later
Starting in V.2021.1, date and time fields are available in the Cross-Dock at Company or City window. You use these fields to specify times for the drop and reload events at the cross-dock facility.
-
Transfer Date (for the drop at the cross-dock location)
-
Scheduled
-
Earliest
-
Latest
-
-
Reload Date (for the pickup at the cross-dock location)
-
Scheduled
-
Earliest
-
Latest
-
To cross-dock an order’s drop(s):
-
From the Trip Folder or Planning Worksheet, open the order in the Cross-Dock at Company or City window.
-
Do one of the following to specify the cross-dock location:
-
To specify a company in your database, select its ID in the Company ID field.
The system enters the city/state location from its profile in the City field.
-
To specify a location that is not a company in your database, make an entry in the City field.
-
-
In the Transfer Date fields, enter the dates/times for the drop at the cross-dock location.
-
In the Reload fields, enter the dates/times for the pickup at the cross-dock location.
-
Do one of the following:
-
To cross-dock all the drops, select the Select All checkbox.
-
To cross-dock individual drops, expand the order and select the Cross-Dock checkbox for each stop as needed.
-
-
Do one of the following:
-
To have all the cross-docked stops on one movement, select the Cross-Dock and Consolidate checkbox.
-
To have each drop on its own movement, leave the checkbox cleared.
-
-
Click Cross-Dock.
The window closes.If you are working in the Trip Folder, the Stops grid shows the XDU event.
If you are working in the Planning Worksheet, the Available Trips grid shows a row for each
This illustration shows two orders in the Trip Folder. Each of them has one delivery.

This illustration shows one order that has multiple deliveries.

The final XDU event is set to the date/time you recorded in the Scheduled Transfer Date field in the Cross-Dock at Company or City window.

-
You can manually adjust the arrival dates and times for all XDU events as needed. Do this in the Stops grid.
-
If you left the Company ID field as UNKNOWN for the XDU event, fill in the address in the appropriate column in the Stops grid. If you do not, it may not route correctly.
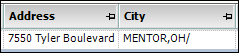
If you need to add the Address column to the grid, see Adding or hiding a column using the Field Chooser.
-
Assign resources.
For more information, see Assigning resources to a trip. -
Click
Save.You must save before viewing the next movement.
-
Double-click the first XDU row.
The system displays the movement containing the XDL and LUL events for this delivery.If the order has multiple XDU events, double-click the first one.
-
Manually adjust the arrival date and time for each event as needed.
-
Assign resources.
For more information, see Assigning resources to a trip. -
Click
Save.
Undoing a cross-dock
To undo a cross-dock for an individual delivery:
-
In the Trip Folder, select the XDU row that was created for that delivery.
Notes:
-
XDU events are listed in the same order as the original deliveries.
-
To see all of the events, clear the Group Stops checkbox.
-
If you are unsure which XDU event goes with which delivery, go to the delivery movement by double-clicking the XDU event. Then you can double-click the XDL event to return.
-
-
Do one of the following:
-
Go to Edit > Transfer/Cross Dock > Undo Cross Dock.
-
Use the extended set of Stop buttons
The extended Stop button set is available when you have
[.NetMisc]OverrideAddStopInsertRemove=Yset in your TTS50.
For details, see Using the extended Add Stop and Insert Stop buttons.
-
-
The Undo Cross Dock message window opens. It asks, "Are you sure you want to undo cross dock?". Click Yes.
-
Repeat the steps until all the deliveries that should stay on the trailer are no longer cross-docked.
Note: If the Group Stops checkbox is selected by default, you must clear it each time before you undo a cross- dock.
If you undo a cross-dock by mistake, you must undo the cross-docks for each delivery before cross-docking the order again. If you do not, the system will add an additional cross-dock to each delivery that was already cross-docked.