Adding, inserting, and deleting stops
In the Trip Folder, the Stops tab shows information regarding the stops and events recorded for the trip. You can add or delete stops using any of the following methods:
-
Stop-related commands from the Edit menu:
-
Edit > Add Stop
-
Edit > Insert Stop
-
Edit > Delete Stop
-
-
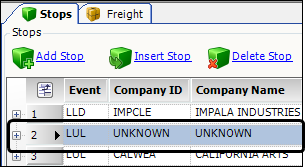
The default Stops buttons on the Stops tab
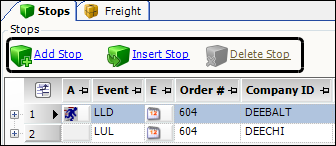
Note: When you select a row in a grid, some buttons may take on a grayed-out appearance, which means that you cannot use them. In the illustration above, the Delete Stop button is not available because the stop cannot be deleted.
-
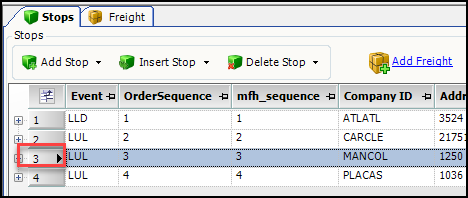
The extended set of Stop buttons on the Stops tab
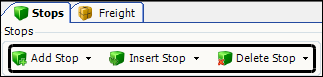
Note: The extended Stop button set is active when you have
[.NetMisc]OverrideAddStopInsertRemove=Yin your TTS50. For more details, see Working with the extended Stop button set. -
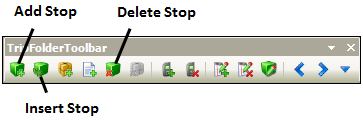
Stop-related icons on the TripFolderToolbar
-
Right-click on a stop and select Add Stop, Insert Stop, or Remove Stop from the shortcut menu
Note: If freight details are displayed under a stop, use care to right-click on the stop itself. Right-clicking on a freight detail opens a shortcut menu containing freight-related commands, rather than stop-related commands.
-
Keyboard shortcuts:
-
SHIFT+INS (adds a stop)
-
SHIFT+DEL (deletes a stop)
-
Adding a stop to the end of a trip
When you add a stop on the Trip Folder’s Stops tab, it is placed below the last stop.
To add a stop to a trip on the Stops tab:
-
Go to Operations > Trip Folder.
The Trip Folder opens.
-
Retrieve the order.
-
On the Stops tab, do one of the following:
-
Select Edit > Add Stop.
-
Click
 Add Stop on the TripFolderToolbar.
 -
Click the default
Add Stop button on the Stops tab. -
If enabled, click the
 extended button.
 -
Right-click on a stop and select Add Stop from the shortcut menu.
-
Press SHIFT+INS.
A new stop is added to the bottom of the grid.
+
+ By default, the event is a Live Unload (LUL).
-
-
If needed, select a different event code from the Event drop-down list.
-
Specify the location, that is, a company ID or city, at which the stop will occur.
-
Enter information for the added stop.
Note: For details about individual fields, see Trip folder - Stops tab.
-
Save the trip.
Inserting a stop before an existing stop
To insert a stop above an existing stop on the Trip Folder’s Stops tab:
-
Go to Operations > Trip Folder.
The Trip Folder opens. -
Retrieve the order.
-
On the Stops tab, select the stop that you want to insert a new stop above.
-
Do one of the following:
-
Select Edit > Insert Stop.
-
Click
 Insert Stop on the TripFolderToolbar.
 -
Click the default
Insert Stop button on the Stops tab. -
If enabled, click the
 extended button.
 -
Right-click on the stop and select Insert Stop from the shortcut menu.
A new stop is inserted above the stop you identified in Step 2. The subsequent stops are renumbered.
-
-
If needed, select a different event code from the Event field’s drop-down list.
-
Specify the location, that is, a company ID or a city, at which the stop will occur.
-
Enter information for the inserted stop.
Note: For details about individual fields, see Trip folder - Stops tab.
-
Save the trip.
Deleting a stop
To remove a stop from a trip on the Trip Folder’s Stops tab:
-
Go to Operations > Trip Folder.
The Trip Folder opens. -
Retrieve the order.
-
On the Stops tab, select the stop you wish to remove.
-
Do any of the following:
-
Go to Edit > Delete Stop.
-
Click
 Delete Stop on the toolbar.
 -
Click the default
Delete Stop button on the Stops tab. -
If enabled, click the
 extended button.
 -
Right-click on the stop and select Remove Stop from the shortcut menu.
-
Press SHIFT+DEL.
The system highlights the selected stop and displays a confirmation message.
-
-
Click Yes to confirm the deletion.
Note: If you do not want to remove the stop, click No to cancel.
-
Save the trip.
Manually resequencing stops
If needed, you can resequence the stops on an order manually.
|
First available in TMW Operations V. 2020.3 You use the |
To resequence stops:
-
Go to Operations > Trip Folder.
The Trip Folder opens. -
Retrieve the order.
-
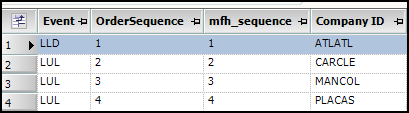
In the Stops Detail grid, click the stop indicator.
-
Drag the stop to the new order position.
The numbers that appear in the OrderSequence and mfh_sequence fields reflect the option you are using for the[.NetMic]StopsPanelDragDropResequenceOrdersetting.This illustration shows the stops in their original order.
-
When you use use the
Noption, the mfh_sequence (routing)) field is resequenced while the OrderSequence (billing) field remains in the original order.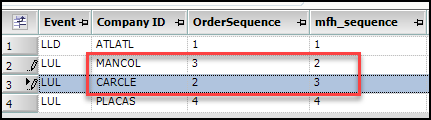
-
When you use use the
Yoption, both the mfh_sequence (routing)) field and the OrderSequence (billing) field are reordered.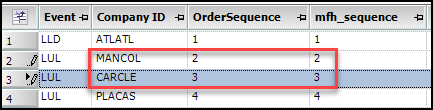
-
When you use use the
Boption, the OrderSequence (billing) field is resequenced. The mfh_sequence (routing) field remains in the original order. Remember that when you use this option, you must adjust the dates/times manually before saving the trip.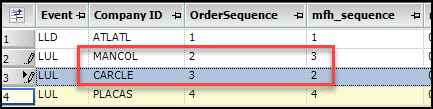
-
Adding a round trip
First available in TMW Operations: 14.30.132
Your company may have a designated location, such as a terminal, where you want your assets to start and end trips. The round trip feature allows you to use a single command to add a begin empty stop and an end empty stop to a trip.
| The begin empty and end empty stops must be at the same location. |
To create a round trip:
-
Go to Operations > Trip Folder.
The Trip Folder opens. -
Retrieve the order.
-
Select the Stops tab.
-
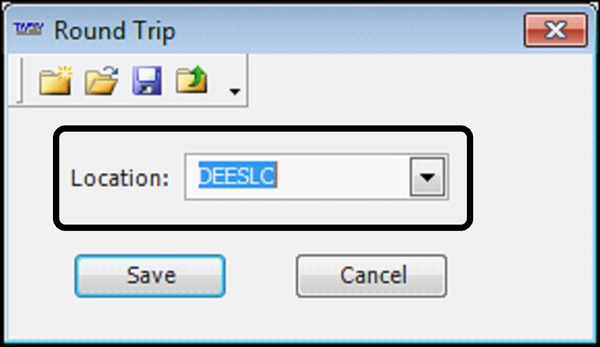
Right-click in the grid and select Round Trip.
The Round Trip window opens. -
Enter the ID of the company where the trip will begin and end.
-
Click Save.
The system adds the begin empty and end empty stops.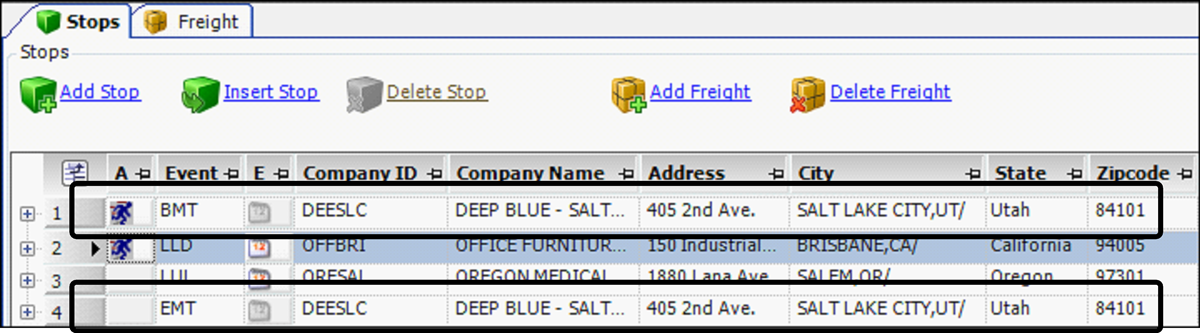
Notes:
-
By default, the system inserts a non-billable Begin Empty (BMT) and a non-billable End Empty (EMT) to the trip.
-
You can set up the system to insert billable stops instead of non-billable stops by setting
[.NetOperations]RoundTripEmptyStopsBillable=Yin your TTS50.
-
-
Save the trip.