Creating custom SQL views
A SQL view is a stored query that joins one or more database tables, resulting in a virtual table. When you use a SELECT statement to retrieve data, that data is not stored in the database. The SELECT statement is stored in the database. A virtual table is comprised of the result set retrieved by the SELECT statement.
Each SQL view is a filter of the table data referenced in it. This filter can restrict the columns and rows of the referenced database table. A system administrator with knowledge of SQL can create additional custom SQL views. Each custom SQL view is based on a default system view. A custom view retrieves columns from the default view, and any table columns that you may want to add.
| As a courtesy, some topics provide instructions on using Microsoft SQL Server Management Studio. This information is relevant to Microsoft SQL Server Management Studio Version 11.0.2100.60, using a Windows 10 operating system. TMW does not track updates to third party applications. If you are using a later version of Microsoft SQL Server Management Studio and/or a different operating system, you should consult Microsoft’s user documentation for instructions. |
When creating custom SQL views, remember these important warnings:
-
Do not change the SQL script of a default view.
Your changes will be overridden when you upgrade to a newer release of TMW Operations. For details, see Basing a custom SQL view on a default view. -
Do not remove required columns.
In order to function, boards must include certain columns. Because almost all columns in a default view are required, do not remove a required column from the SELECT statement. You will use SQL to add columns, and use the Board Setup window and Field Chooser to hide or remove columns. For details, see Removing and hiding unwanted columns.
Basing a custom SQL view on a default view
With each new release of TMW Operations, default SQL views may be modified to include additional columns. Customized views, which are modified copies of default views, do not automatically include the additional columns.
You can set up a custom SQL view to inherit the default SQL view on which it is based.
The examples used here create a SQL view that is based on OperationsInboundView, with additional driver contact phone numbers.
|
-
Open Microsoft SQL Server Management Studio.
-
Connect to the database.
-
Create the view’s query from an existing view.
-
In the database’s Views list, locate the view you want to copy.
-
Right-click on the view and select Script View as > CREATE To > New Query Editor Window.
The query is presented for editing.
-
-
In the query, replace the view name with the new view name.
In this example, the
OperationsInboundViewdefault view has been toOperationsInboundView_DRV_Phone.
Note: It is helpful to add a custom identification at the end of the new view name. This will ensure that all related view names are listed together in Microsoft SQL Server Management Studio.
-
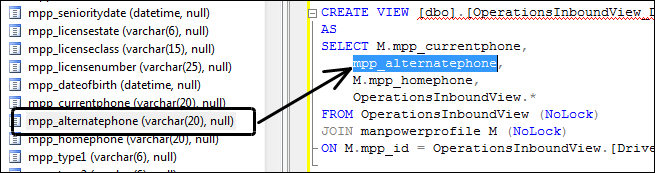
Replace the existing SELECT script.
In this illustration, the customized view is based on theOperationsInboundViewdefault view.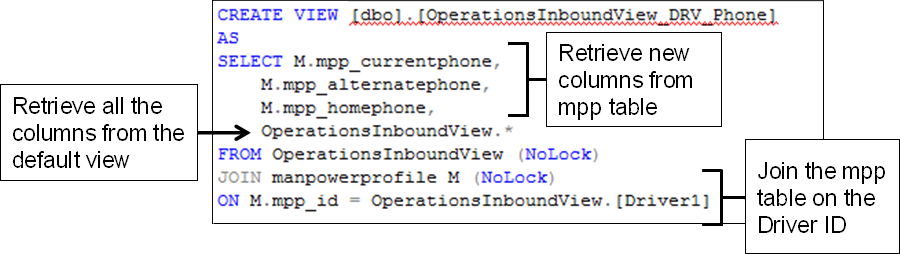
When the default view is updated, the customized view automatically adds any new columns.
To see a list of fields from which to choose, open the Columns folder under the appropriate table.
This illustration shows columns from the
dbo.manpowerprofiletable.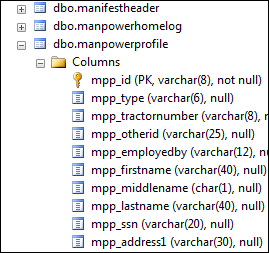
To add columns (fields) to the view, you can:
-
Enter each column name in the query. As you type, the matching columns are available for selection.
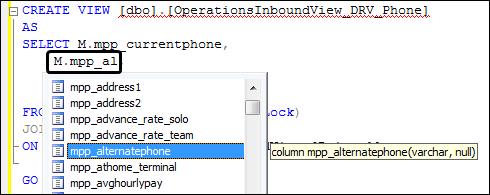
-
Drag each column from the Columns list to the SELECT statement.
To allow SQL to access the data even though it may be locked by another user or process, use
WITH (NOLOCK)after the table definition in theFROMstatements.
-
-
Test the SELECT statement.
To verify the correct data is retrieved, execute only theSELECT/` FROM `command. -
Check the performance of the customized view.
As system performance relies upon efficientdata retrieval, check the view’s performance with SQL Profiler. -
To create the new view, click Execute.
-
Allow others to use the view:
-
Enter
grant select on [View_Name] to public. -
Execute the
grant selectcommand.
-
To set up and assign users or user groups to the view, access the new view from TMW Operations. If you have TMW Operations open, you must close and reopen it.
To modify a custom SQL view, make the necessary changes in Microsoft SQL Server Management Studio using the Alter view SQL command.
|
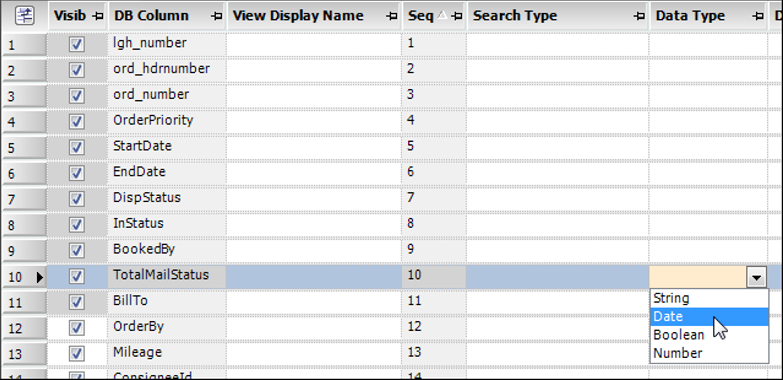
If you add a date column, you must select Date in the Data Type column of the View Editor window of Board Setup. For details, see Editing the columns for board views.
|
Removing and hiding unwanted columns
There are several ways to remove or hide unwanted columns from a grid. How and where you remove or hide them can affect the amount of data retrieved, and determine whether the columns are available in Field Chooser on the resulting data grid.
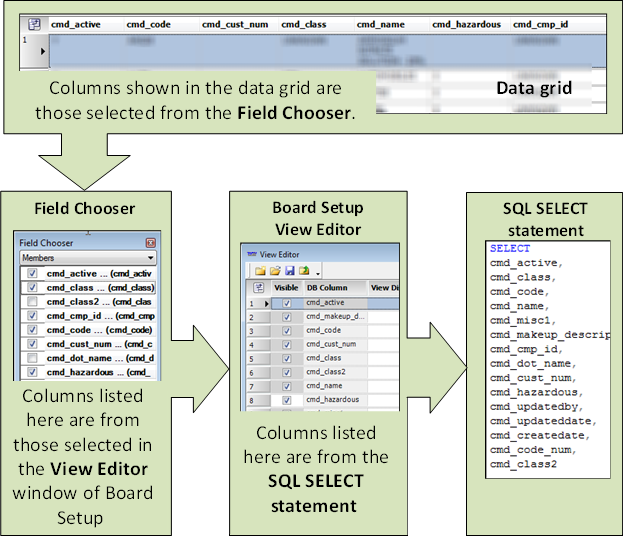
Hiding columns with Field Chooser
The columns shown in the data grid are those selected in the Field Chooser. Use the Field Chooser to hide unwanted columns from the data grid layout. This allows you to use one board view to create multiple grid layouts, each with different columns.
Individual users can also use the Field Chooser to add or hide columns. However, if you want to prevent users from accessing the Field Chooser to change their setup, you can prevent users from modifying data grid columns. For details, see Preventing users from modifying data grids.
Hiding columns from a Board View
The columns listed in the Field Chooser are from those selected in the View Editor window of Board Setup.
See Editing the columns for board views to prevent columns that are in the SQL view from displaying in the Field Chooser for the related data grid. This allows you to use one SQL view to create multiple board views, each with different columns hidden.
Note: You cannot edit columns for a shift planning board view. An example of a shift planning board view is the ShiftPlanningDriverView.
Removing non-required columns from SQL
Few columns in the default planning board views are not required. Because you must not remove any required columns from a view, you should know which columns are required.
To view the required columns for the Board Type, run a SQL SELECT script against the PlanningBoardRequired table in Microsoft SQL Server Management Studio.
SELECT * +
FROM PlanningBoardRequired +
WHERE BoardType = 'xxxxx'
Replace xxxxx with the Board Type you want to use as a basis for the customization. See Listing of SQL view names for boards for each Board Type.
In this example, the command displays the required columns for the OperationsInboundView (INBSCR)`.
![]()
Usually, you will add columns to your custom views rather than remove them. However, a more recent version of TMW Operations might include newly added columns in the default SQL views that are not in your custom views.
If you still want to remove non-required columns, you cannot use the best practice in Basing a custom SQL view on a default view. Do not replace the existing SELECT script (as in Step 5 of that procedure) with dbo.ViewName.*. You must include all the columns from the default view as presented, and then individually remove any non-required columns from the SELECT statement.
Renaming column headings
Frequently, the default column names in the application’s data grids are the column names in the database table. In the database, column names may be long and difficult to understand. You can improve the appearance and readability of the columns in a data grid by renaming them.
However, renaming a column heading can make it difficult to trace a column to the source column in the database table. Tracing a column to the default column name is useful when creating reports and when resolving issues with the data displayed in a column.
You can rename column heading text in several locations. Therefore, you should know how to determine the default column name in each location.
The following sections show how to determine the default column name in SQL, in the Board Views, and in grid layouts. For our example, we changed the car_name column to Name.
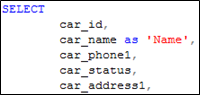
Renaming columns in SQL
Use the SQL SELECT statement to change the database column name. When you rename a column in the SQL script, you must view the script to identify the default column name.
The new column name displays as the default column name in the view. This illustration shows that the column name was changed from car_name to Name.
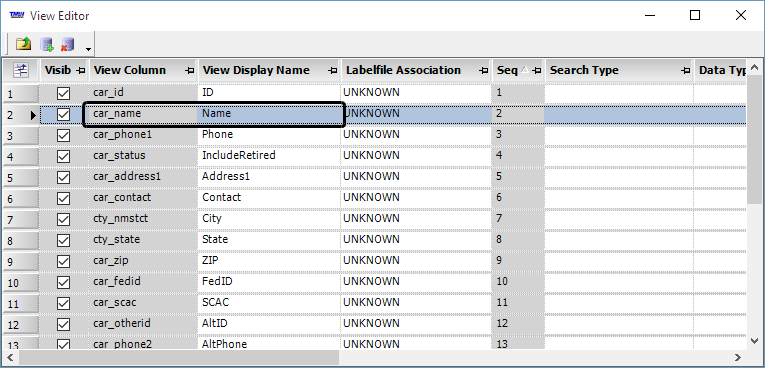
Renaming columns in the Board View
If you rename a column in the Board view, you must open the View Editor window to identify the database column name from the SQL. In the View Editor window:
-
The View Column name shows the database column name
-
The View Display Name column shows the column name in the data grid
In this illustration, the column name was changed from car_name to Name.
For details, see Editing the columns for board views.
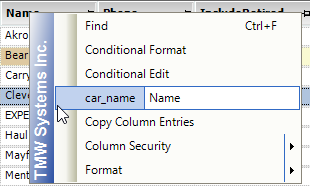
Renaming columns in a grid layout
If you rename a column in a data grid, you must do one of the following to identify the database column name from the view.
-
Right-click on the column name in the grid.
The shortcut menu indicates whether the text was changed. The default column name displays first, followed by the new column name.
In this illustration, the column name was changed from car_name to Name.
-
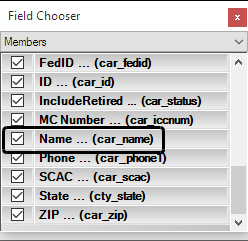
Open the Field Chooser.
The new column text displays first, followed by the default column name.
In this illustration, the default column name for the Name column is car_name.