Basic setup
Using system settings, you can configure the Assign Driver/Equipment window so that you can control:
-
How to determine which assigned resources change the status of a trip from Available to Planned
-
How driver/tractor pairings are recorded in resource profiles.
-
How to protect the driver/tractor pairing.
-
How slip-seating will affect driver/tractor pairings.
-
How the system can be set up to handle resource assignment changes for slip-seating.
-
Whether the last primary trailer used by a tractor will be assigned to the tractor’s current trip.
-
Whether the last secondary trailer used by a tractor will be assigned to the tractor’s current trip.
-
How to prevent edits to Tractor, Driver 1 and Driver 2 assignments based on a trip status
-
Whether the system will automatically add an empty move to the start of a trip when you assign a tractor that is not at the shipper’s location.
-
How the system determines the start time for an empty move at the start of a trip.
-
Whether the system will allow you to shift a begin empty move to the end of the tractor’s prior trip.
Requiring driver and tractor assignment for a Planned status
By default, assigning a driver or tractor to a trip will cause the status of the trip to change from Available to Planned.
However, you can use the TractorDriverforPlanned General Info Table setting to require that both a driver and tractor must be assigned in order to change the status to Planned.
Recording driver/tractor pairings in resource profiles
By default, when a driver and tractor are assigned to a trip, the system records that pairing in the tractor and driver profiles. Then, when either of those resources is assigned to a future trip, the system will automatically assign the paired (linked) resource.
If you wish to manually record a pairing for a driver and tractor that are always (or usually) assigned together, you can link them together in either of these ways:
-
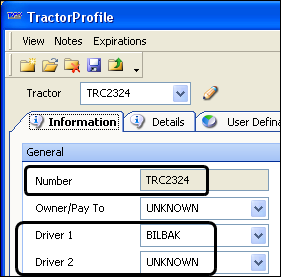
In a tractor profile, you can record the lead driver and co-driver who typically use the tractor in the Driver 1 and Driver 2 fields.
-
In a driver profile, you can record the tractor that the driver ordinarily uses in the Tractor field.
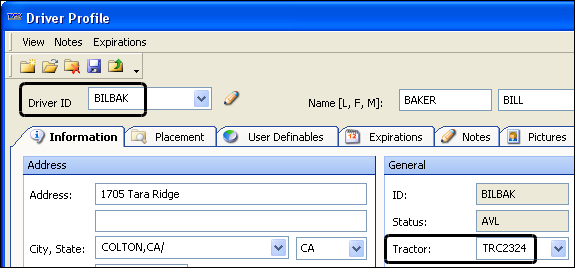
By linking resources together, when one is assigned to a trip, the system will automatically assign the other one.
By default, the driver profile lists the tractor that was assigned to the driver’s last Started or Completed trip. By default, the tractor profile lists the driver who was assigned to the tractor’s most recent Started or Completed trip. If you want to prevent automatic updates, use the DrvTrcProt General Info Table setting to protect the relationship recorded in the master files of the driver, the tractor, or both.
|
Protecting the driver/tractor pairing
By default, the driver/tractor relationship is not protected. This means that the system will automatically update the driver/tractor pairing recorded in the profiles each time a driver and tractor are started on a trip. As a result, the next time you assign that tractor or driver, the system will automatically assign the resource with which it was last paired.
For example, when you assign a driver to a trip, the system will automatically fill in the Tractor field with the ID of the tractor most recently paired with that driver.
However, you can use the DrvTrcProt General Info Table setting to protect the relationship recorded in the master files of the driver, the tractor, or both.
Editing driver/tractor pairings in Dispatch
By default, the system automatically updates the driver/tractor pairing based on each completed order. For example, suppose you assign Driver 1 and Tractor 1 on an order. However, Tractor 1 goes out of service before it starts. You change the tractor assignment to Tractor 2. If you have the General Info Table setting DrvTrcProt=None, the next time you add Driver 1 to an order, Tractor 2 is also assigned.
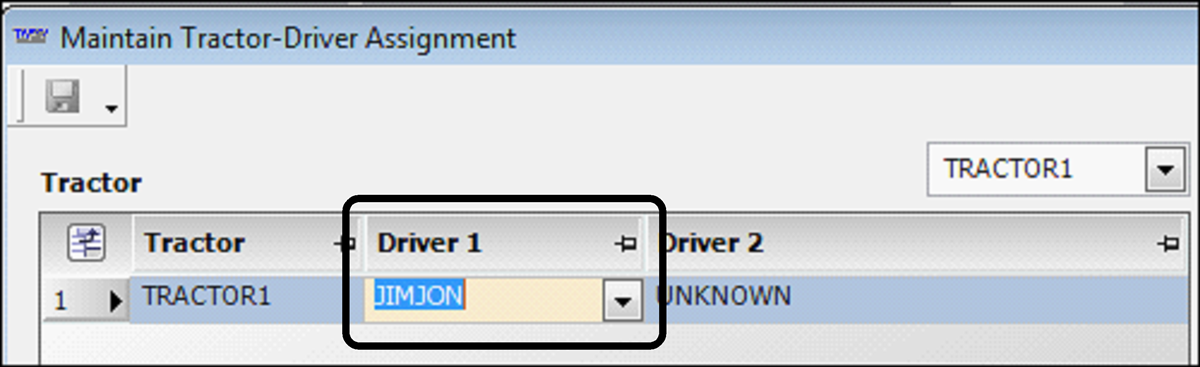
You can change the default pairings without accessing the Driver profile or the Tractor profile using the Maintain Tractor-Driver Assignment window.
In this window, you can:
-
Verify a driver/tractor pairing is correct
-
Change a driver/tractor pairing
-
Remove multiple pairings
When you use the Maintain Tractor-Driver Assignment window, the DrvTrcProt setting does not protect master profile records. Changes made in this window will update master profile records.
|
Adding the Driver/Tractor Relationships command
In TMW Operations, you can add the Driver/Tractor Relationships command to:
-
Menus
-
Sub menus
-
Toolbars
This example shows the Driver/Tractor Relationships icon added to the Trip Folder toolbar.
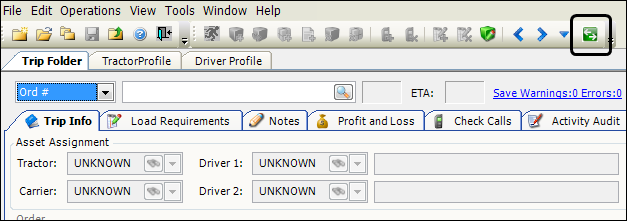
| In the Customize window, the command is listed as Driver/Tractor… |
For details, see:
Using the Maintain Tractor-Driver Assignment window
You use the Maintain Tractor-Driver Assignment window to view or change driver/tractor pairings while dispatching trips.
| The following procedure is based on the example of adding the Driver/Tractor Relationships icon to the Trip Folder toolbar. |
To change driver/tractor pairings, follow these steps.
-
In the Trip Folder, click
 Driver/Tractor Relationships.
The Maintain Tractor-Driver Assignment window opens.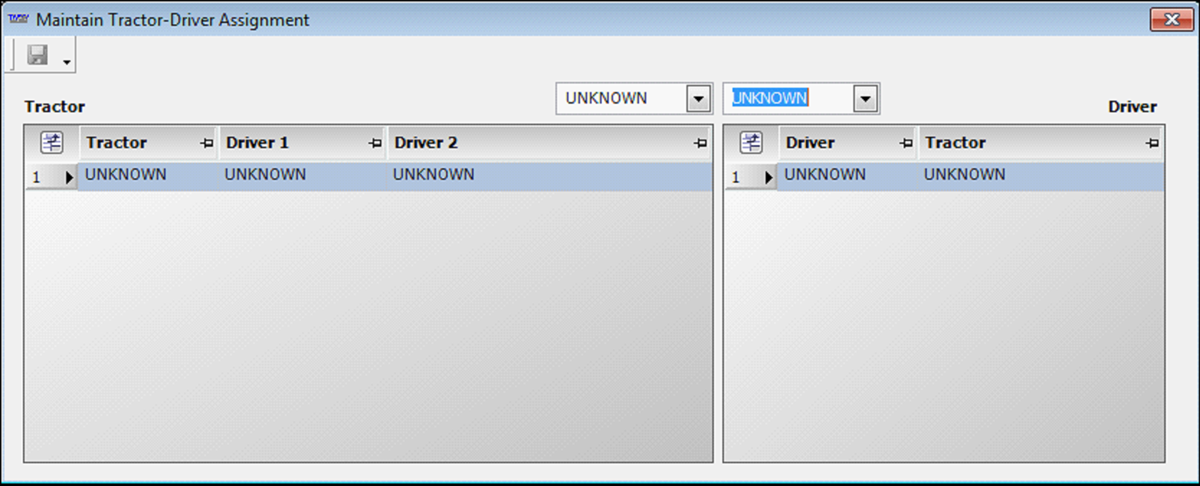
-
Do one of the following to look up the pairing for a driver or tractor:
-
In the Tractor field, enter the tractor ID.
When you enter a tractor ID, the drivers associated with that tractor appear in the Driver section.

-
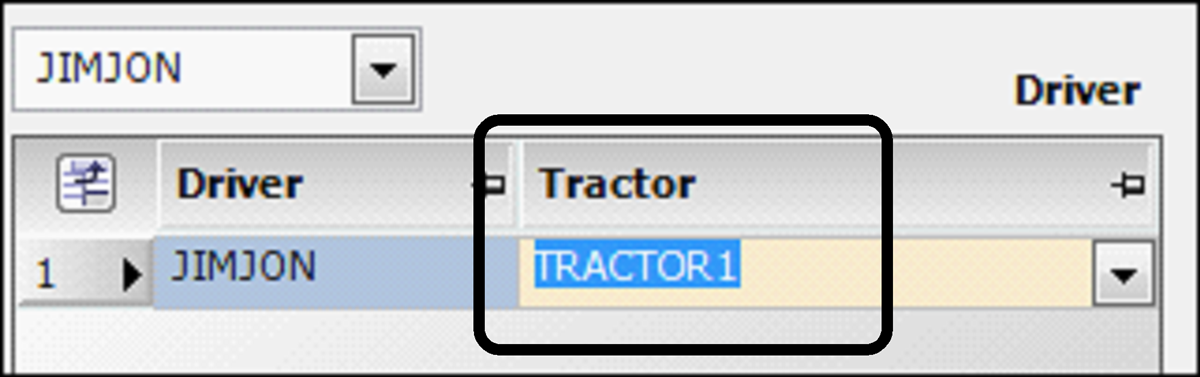
In the Driver field, enter the driver ID.
When you enter a driver ID, the tractors associated with that driver appear in the Tractor section.

Note: If there are multiple pairings, the
 symbol appears.
-
-
Do one of the following to change the driver/tractor pairings.
-
To change the driver associated with a tractor, enter a different driver ID or UNKNOWN in the Driver1 field.
-
To change the tractor associated with a driver, enter a different tractor ID or UNKNOWN in the Tractor field.
-
-
If you need to change multiple driver or tractor pairings:
-
Determine which pairings you need to change.
-
Select either the Driver 1 field or the Tractor field.
-
Enter a different driver ID, tractor ID, or UNKNOWN.

-
-
Click
 Save.
Save.
Automatically changing or removing linked assets
When you assign a driver to a trip, the system automatically assigns the tractor with which the driver is linked in File Maintenance. By default, if you assign the driver and tractor to an order and then remove or change one of them, the linked asset remains assigned to the order. You have to remove or change it manually.
The [Dispatch]UnassignLinkedAssets setting in your TTS50 allows you to set up the system so that, when the tractor or driver is unassigned (i.e., you select UNKNOWN), the linked asset will also be unassigned. For example, if you change Tractor to UNKNOWN in the Asset Assignment window, Driver 1 is also set to UNKNOWN.

This functionality is available in the Assign Driver/Equipment window, which you access in Order Maintenance, Trip Folder, or Planning Worksheet. It is also available when you assign assets to a trip using the Trip Folder’s Stops tab and the All Stops tab of the Order Maintenance window.
Allowing for slip-seating without changing driver/tractor pairings
By default, when you assign a driver or tractor to a trip, the system automatically assigns the other resource based on the pairing recorded in the resource’s profile. This functionality is helpful when your company usually keeps a driver assigned to the same tractor.
However, there may be times when a driver must be paired with a different tractor. This type of assignments is sometimes called slip-seating. It refers to the type of scheduling used when a driver is not always assigned to a regular tractor, but moves in and out of tractors as needed.
To manage slip-seating, you can use the [Dispatch]KeepTractorDriverRelationship setting in your TTS50 to set up the system so that it will handle changes to resource assignments in one of three ways:
-
Changing the driver or the tractor on a trip will not affect the other resource.
When you assign a driver and tractor to a trip and then remove or replace one of them, the other remains assigned to the trip.
Note: This is the default behavior.
-
Changing the driver on a trip will not affect the assigned tractor.
Note: When this option is set and you change the tractor, the system will automatically update the driver to the one recorded in the tractor’s profile.
-
Changing the tractor on a trip will not affect the assigned driver.
Note: When this option is set and you change the driver, the system will automatically update the tractor to the one recorded in the driver’s profile.
|
The [Dispatch]KeepTractorDriverRelationship setting in your TTS50 controls which method is used.
Preventing edits to driver/tractor assignments based on trip status
By default, you can edit the Tractor, Driver 1, and Driver 2 assignments in the Assign Driver/Equipment window. However, you can use the [Asset Assignment]AssetAssignmentDisabledStatus setting in your TTS50 to prevent editing based on a trip segment status, such as Started.
When you protect the Tractor, Driver 1, and Driver 2 fields on the Assign Driver/Equipment window, you can use the [Asset Assignment]AssetAssignmentDisabledMessage setting in your TTS50 to add a customized or system-default message to the window.
This illustration shows the system default message on the Assign Driver/Equipment window.

Use this setting to add a message to the Assign Driver/Equipment window.
Starting trips with an empty move by default
If your company routinely starts trips with an empty move, you can use the [Asset Assignment]DHCheckBox setting in your TTS50 to select the Enable Dead Head/Bobtail checkbox in the Assign Driver/Equipment window by default. You can always clear or re-select the checkbox as needed.
Determining the start time for an empty event
In the Dead head start time, location and trailer(s) section of the Assign Driver/Equipment window, the Start On field displays the date/time the empty move will start. You can use the [Asset Assignment]UseTripStartForBeginEmptyTime setting to control the start time for an empty event that occurs at the start of a trip. You can base the start time on travel time or on the time for the first pickup.
Calculating the start time based on travel time
You can base the start time for an empty movement on the time required to travel from the tractor’s last completed stop to the first pickup on a new trip.
For example, a driver, tractor, and trailer completed a trip in Dayton, OH. We want to assign them to an order that starts in Richmond, IN. We must add an empty movement to get the resources from Dayton to Richmond. If you have [Asset Assignment]UseTripStartForBeginEmptyTime=N, the system calculates the amount of time required to travel from Dayton to Richmond and uses that to set the start time for the BMT event.
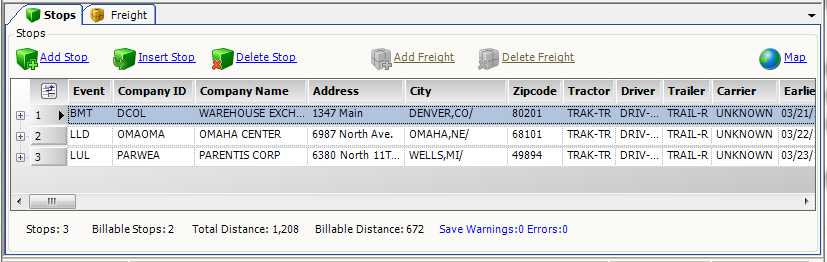
For this illustration, [MileageInterface]DefaultMPH=45. The Mileage column tells us that the distance from Dayton to Richmond is 42 miles. Based on the distance and average MPH, travel time is 48 minutes. The start time for the BMT event is set to 05/14 07:12, or 48 minutes before the scheduled start time for the LLD event in Richmond on 05/14 08:00.

Note: If the tractor is newly placed in service, prior trip information may be unavailable in the Prior Tractor Location section.
Setting the start time based on the first pickup
You can also set the start time for an empty movement as one minute before the first pickup on the new order. To do this, set [Asset Assignment]UseTripStartForBeginEmptyTime=Y.
In this illustration, the first pickup on the trip is scheduled for 05/14 08:00. The start time for the BMT event is set to 05/14 07:59.

Allowing an empty move to be shifted to the end of the tractor’s prior trip
When you plan a trip in the Trip Folder using previously assigned resources and add a bobtail or deadhead, the system by default inserts a Begin Empty (BMT) event at the start of the trip. The location for this event is the ending location of the tractor’s previous trip.
The following setup allows you to add the empty event to the end of the tractor’s prior trip, rather than the start of the current trip. By default, the system adds the event as an End Empty (EMT), but you can change the event type during asset assignment.
The required setup includes:
-
Creating Fleet classifications
-
Assigning Fleet classifications to tractors
-
Setting options in the General Info Table to activate the feature and to specify the approved Fleet classifications
|
For a tractor to support this functionality, the tractor must meet the following requirements:
|
Creating and assigning Fleet classifications
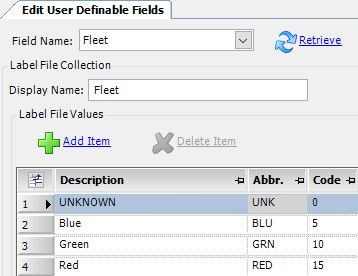
You use the Fleet label to specify which tractors can use this feature. After you create the Fleet classifications, you must assign the appropriate Fleet classifications to your tractors. When you activate the AssetAssignAllowPrevTripEmpty General Info Table setting, you will record those fleet classifications in the setting’s String2 field.
-
In the Edit User Definable Fields window, creat options for the Fleet label. Each option is used to classify a tractor fleet.
-
Assign the tractor(s) to a Fleet classification:
-
In TMW Operations, go to Tools > Profiles > Tractor Profile.
-
In the Tractor field, enter the tractor ID to load the tractor.
-
Click the User Definables tab.
-
In the Fleet field, select an appropriate fleet classification.
-
Click
 Save.
Save.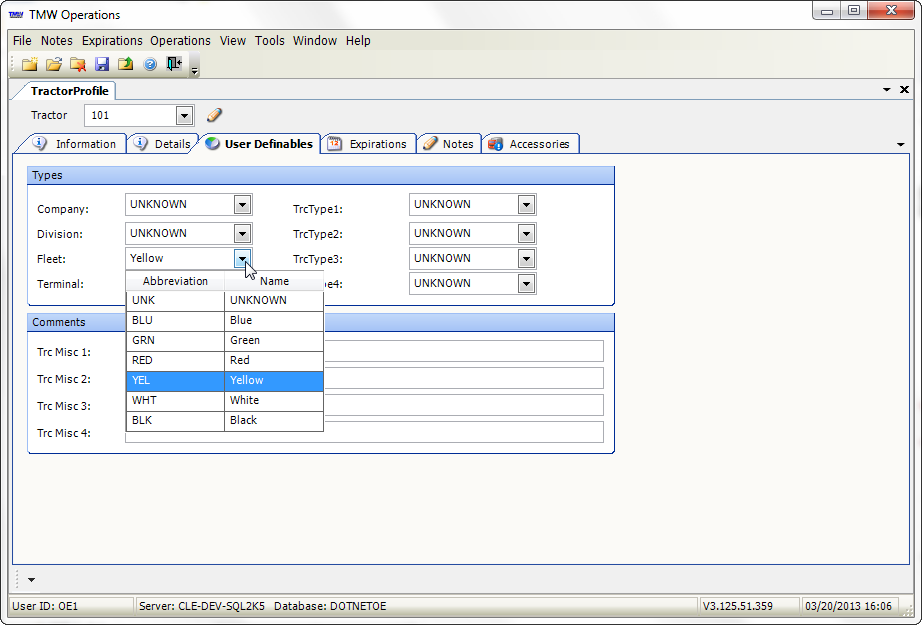
Note: Although you can also assign drivers and trailers to the same fleets using the options you define for the Fleet label, this feature does not use driver or trailer fleets.
-
Activating the functionality to switch a deadhead to the previous leg
Set up the AssetAssignAllowPrevTripEmpty General Info Table setting to specify the tractor fleet(s) that can trigger the functionality.