Setting up your system for intermodal functionality
The transportation industry defines air, truck, ship, and rail as modes of transportation. The term intermodal designates the process of transporting loaded freight containers by two or more of these modes.
By default, the intermodal feature is disabled.
To use the intermodal feature, you should perform the following tasks:
-
Active the intermodal feature and enable the system to display the Intermodal tab in Trip Folder
-
Create port profiles
-
Set up the Off Hire expiration
-
Identify the container separator
-
Enable the check digit verification
-
Set up ISO container expiration defaults
-
Create container, chassis, and/or dolly profiles
-
Rename the Trailer and Trailer2 columns (recommended)
The system uses the Trailer column for the container and the Trailer2 column for the chassis.
Activating the intermodal feature
By default, the intermodal feature is disabled. When you enable it with the [Order]InterModalEdit setting in your TTS50, the Intermodal tab displays in the Trip folder. On this tab, you can identify an order as an intermodal trip.
Creating port locations
Ports are locations where drivers/carriers pick up or drop containers/chassis. Ports can be a shipping port, airport, or rail ramp.
You set up port locations in the Company Profile window.
| The system sets the Off Hire expiration start date to the date on the stop plus one minute if a port is the last stop on a trip. For details, see Setting up the container Off Hire expiration. |
To create a port location, follow these steps:
-
Go to Tools > Profiles > Company Profiles.
The Company Profile window opens. -
Click
 New.
New.
The system displays a blank company profile. -
On the Information tab, enter basic port information (such as the Company ID or Address1) as needed.
-
In the Switches section, select the Port checkbox.
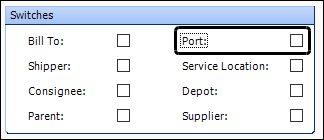
-
Click
 Save.
Save.
Setting up the container Off Hire expiration
When a container is assigned to a trip, the system creates an Off Hire expiration. This expiration prevents you from assigning that container to multiple trips. When the system creates the Off Hire expiration, it makes it a Priority 1 expiration. When a Priority 1 expiration is in effect, you cannot dispatch that resource on, or after the expiration’s effective date. By default, the system sets the Off Hire expiration date to the apocalypse date of 12/31/2049 23:59:59.
| You must add the Off Hire option to the TrlExp and TrlStatus labels. |
This illustration shows the Off Hire option in the TrlExp label.

Trimble Recommends: Use an expiration code with a Code field value of 900 or higher.
Setting the default expiration code
The system assigns an expiration code to containers and chassis when they are added to intermodal orders. Use the [Order]InterModalExpType setting in your TTS50 to define a default expiration code.
| The default expiration code must match the value in the Abbr field of the TrlExp label for the expiration you want to use. |
Updating the container’s Off Hire expiration date
By default, the system does not update the container off hire expiration date. You can change this using the [Order]InterModalContainerExpire setting in your TTS50.
Removing automatic container/chassis expirations
By default, the system creates the In Service and Off Hire container and/or chassis expirations when you add them to intermodal orders. You can change this using the following INI settings in your TTS50:
Working with chassis, container, and dolly profiles
Chassis, containers, and dollies are equipment associated with intermodal orders.
-
Chassis
Chassis are frames with wheels that hold the container during transport. -
Containers
Containers, also known as intermodal containers, are large metal boxes designed for transporting freight between countries. -
Dolly
Dollies are unpowered, wheeled vehicles designed to connect two trailers.
You use the Trailer Profile window to create chassis, containers, or dollies. Go to Tools > Profiles > Trailer Profile to open the Trailer Profile window.
Often, you will not know the container ID until your driver arrives at the port. You can enter the container profile from the Trip Folder. The Add Container/Chassis window allows you to create a container or chassis and immediately add it to an order.
Specifying the default container ID or chassis ID separator
By default, the system uses a comma (,) to separate the SCAC code and the container/chassis ID. TMW Operations also supports using the dash (-) as the separator. Use the [FileMaint]TrailerSeparator setting in your TTS50 to determine the separator.
Verifying the accuracy of the container check digit
All intermodal containers have a unique registration number. This number has three parts:
-
SCAC code
-
Six-digit suffix
-
Check digit
The check digit is a single digit (0-9) at the end of the container registration number. This digit corresponds to the SCAC code and to the container ID. Companies use this digit to track intermodal containers.
You can use the Add Container/Chassis window to enter new containers. When you do, the system automatically verifies the accuracy of the check digit. By default, you cannot save a new container if the check digit is incorrect. If you want, you can have the system warn that the check digit is incorrect. Use the ContainerCheckDigitTest General Info Table setting to determine the system’s behavior.
Creating a container, chassis, or dolly profile
You can use the Trailer Profile window to create chassis, containers, or dolly profiles. The system does not have fields dedicated to containers or chassis. It uses the Trailer and Trailer2 fields for containers and chassis.
-
Trailer = Container
-
Trailer2 = Chassis
| When you create a container profile, the ID must include a valid check digit. The Trailer Profile window does not verify that the check digit is included. Therefore, this window is more appropriate for setting up chassis and dolly profiles. |
From the Trip Folder, you can create a container profile using the Add Container/Chassis window. It verifies that the container ID includes the required check digit.
For details on adding a container while working with an intermodal order, see Creating a container or chassis profile when assigning assets.
To create a new container, chassis, or dolly using the Trailer Profile window, follow these steps:
-
Go to Tools > Profiles > Trailer Profile.
The Trailer Profile window opens. -
Click
 New.
New. -
In the Trailer field, enter a unique ID for the container, chassis, or dolly.
Notes:
-
The system does not verify the accuracy of the check digit when you add containers, or chassis in this window.
-
You must enter the trailer separator between the SCAC code and the trailer ID number. If you do not enter the separator, the system displays a message stating, "The Trailer ID is not valid." For more information on the trailer separator, see Specifying the default container ID or chassis ID separator.
-
-
If needed, select the ILT checkbox.
This checkbox indicates that the trailer is an interline trailer.
-
In the Equipment Type field, select one of the following:
-
Chassis
Chassis are frames with wheels and container locking devices in order to secure the container for movement. -
Container
A large standard-size metal box that is packed with cargo for shipment. The International Standards Organization (ISO) regulates container sizes. Companies use ships, railcars, and truck chassis to transport containers. -
Dolly
Dollies are auxiliary axle assemblies having a fifth wheel. Dollies are used to connect two chassis for transport along highways/turnpikes.
Container example:
+

-
-
Click
Save.
Setting up ISO containers
Intermodal containers, also known as ISO containers, are large metal boxes designed for transporting freight between countries. The International Standards Organization (ISO) standardizes shipping container sizes and functionality. This means that a 20-foot general-purpose container is the same between the U.S. and Europe.
You use the ISO Codes window to set up intermodal containers. This window allows you to record information, such as:
-
ISO Code
-
Container description
-
Length/width/height
-
Max weight
-
Max pallet count
To set up ISO containers, follow these steps:
-
Go to Tools > Tools Maintenance > Container ISO Codes.
The ISO Codes window opens.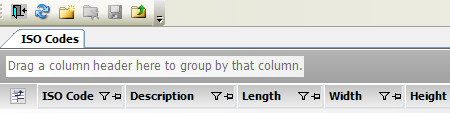
Note: This window opens with the grouping feature enabled by default. For details, see Grouping data in a grid.
-
Click
 New.
New.
The system adds a blank row. -
Make entries in these fields:
Required field: *
Field Definition ISO Code *
Enter the container’s ISO code.
For example, a 20GP container is a 20-foot, general-purpose container.
Description
Enter a description for the container.
Length/Width/Height
Enter the length, width, and height of the container.
Note: These fields do not support decimal values.
-
Repeat steps 2 and 3 as needed for additional containers.
Note: To remove a container from the grid, click Delete.
 -
Click
Save.