Processing fuel transactions and card advances
In the Fuel Import window, you work with fuel transactions data. Transactions include fuel purchases, cash advances, and charged fees. You can import, review, and process transactions.

Transaction errors appear in red. You can correct them in the window.
You can create pay details for some or all validated transactions. Pay details are transferred to Settlements. They are also used to track fuel purchases.
Retrieving transaction and advance data
You can retrieve data in two ways:
-
Import new data from a file
-
Reload saved data
Transaction records appear in a grid at the bottom of the Fuel Import window. The number and type of columns come from the cdfuelbill table, and differ depending on the vendor.
Importing new transaction and advance data
To import transaction data, follow these steps.
-
Go to Operations > Fuel Maintenance > Fuel Import.
The Fuel Import window opens. -
In the Vendor field, select a vendor.
-
Select the Import File radio button.
-
Do one of the following:
-
In the Import File field, enter the path and name of the import file.
-
Click Browse. In the window that opens, select the import file and click Open.
-
-
Click Parse.
Reloading existing transaction and advance data
If you have already imported data from a file and saved it, you can view it again by following these steps.
-
Go to Operations > Fuel Maintenance > Fuel Import.
The Fuel Import window opens. -
Select the Reload Data radio button.
-
Make entries in the fields as indicated.
-
Click Refresh.
Required field: *
Field Definition Start Transaction Date *
Enter the starting date for transaction records.
The system will not retrieve records with a transaction date that is earlier than this value.
Note: You can view only transactions that were made within a seven-day window. If you enter a date in the End Transaction Date field that is outside this window, the value in this field will change.
End Transaction Date *
Enter the ending date for transaction records.
The system will not retrieve records with a transaction date that is later than this value.
Note: You can view only transactions that were made within a seven-day window. If you enter a date in the Start Transaction Date field that is outside this window, the value in this field will change.
Customer ID
Select the customer code associated with the transaction.
Driver ID
Select the driver ID associated with the transaction.
Tractor ID
Select the tractor ID associated with the transaction.
Show Only Not Processed
Clear the checkbox to view both processed and unprocessed transactions.
Select it to view only unprocessed transactions.
If you want to retrieve transactions for the same seven-day window using a different set of ID criteria, follow these steps.
-
Click Clear Filters.
-
Enter new information in the Customer ID, Driver ID, and/or Tractor ID fields.
-
Click Refresh.
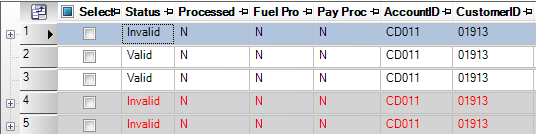
Validating transaction and advance data
The system performs initial validation on the data before displaying it in the grid at the bottom of the Fuel Import window.
-
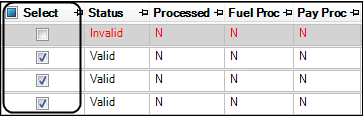
Valid transactions appear in black.
-
Invalid transactions appear in red.
Fields that contain incorrect values show the
 Error icon. Place your cursor over the icon to view a ToolTip that provides more information about the specific error.
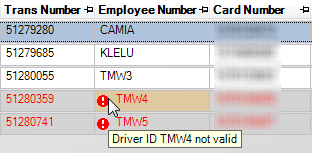
To view all errors, click
 Expand next to the transaction row number.
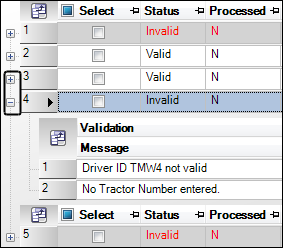
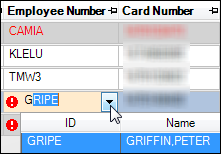
To make corrections for an individual transaction, click in the field and change the value.
When all errors are corrected, the text color changes to black. The value in the Status field changes to Valid.
If you want, you can check all the transactions again by clicking Re-Validate.
To save your changes, click ![]() Save. Note that this does not process the transactions.
Save. Note that this does not process the transactions.
To cancel your changes and start again, click Parse (for newly imported data) or Refresh (for reloaded data).
Processing transaction and advance data
When you process transaction and advance records, the system creates:
-
Fuel purchases for all assets
-
Pay deductions for fuel purchases made by owner/operators
-
Pay deductions for cash advances given to all payable assets
| To avoid problems with settlements, be sure to process only validated records. |
To process data, follow these steps:
-
If needed, validate any invalid transactions.
-
For each valid transaction you want to process, select the Select checkbox.
-
If you want to create fuel purchase records, select the Fuel Purchases checkbox in the General Options section of the window.
-
If you want to create pay details, do the following:
-
Select the Pay Details checkbox in the Pay Detail Options section of the window.
-
In the Asset Type for Pay field, select the resource for which the system will create pay details. Options are:
-
AUTO
Create pay details for either drivers or tractors depending on the Accounting Type value in the resource’s profile. -
DRV
Create driver pay details. -
TRC
Create tractor pay details.
-
-
-
Choose the settlement schedule you want to use for these transactions.
-
Click Period.
The Set Settlement Dates window opens.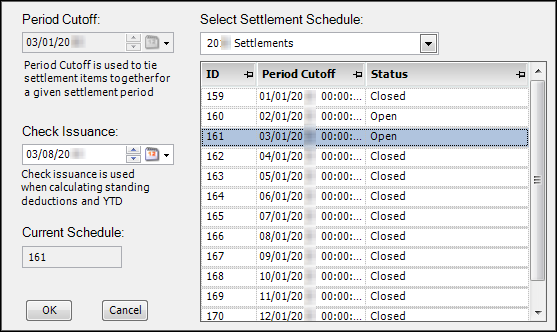
-
Select the schedule you want to use.
Note: For more information on using the Set Settlement Dates window, see:
Guide: Trip Settlements | Chapter: Selecting a pay schedule
-
Click OK.
The Settlement Options fields contain the dates for the schedule you selected.
-
-
Click Process.
If the process is successful, the Processed field value is Y. Depending on the selections you made, the value in the Fuel Proc and/or Pay Proc fields is also Y. To view the fuel purchase and/or pay detail records that will be created, click
Expand next to the transaction row number.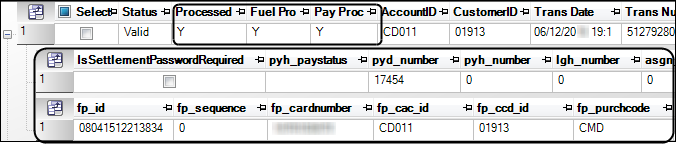
-
To save your changes, click
 Save.
Save.