HubTran Trimble Integration setup
First available in: TMW Web Products, V.2019.3.2
Preparing WorkCycle to export Trimble data to HubTran
Before you can export data from TMW Operations to HubTran, you must verify that:
-
The HubTran.dll that you downloaded from ClientCenter is in your WorkCycle/Plugins folder. The .dll adds the WorkCycle Activities needed for HubTran integration. Once the dll is placed in the folder, you must restart your WorkCycle service.
-
The SQL files you downloaded from ClientCenter have been applied to your TMW Operations database. These files are:
-
GetAllCarrierInfoForHubtran_sp.sql
-
GetCarrierInfoByIDForHubtran_sp.sql
-
getExportData_Hubtran.storedprocedure.sql
-
getExportDataByOrder_Hubtran.storedprocedure.sql
-
If you want, you can log messages to the logout.text file so you can view them. To do this, open the Workflow.exe config file and set the Logtofile property to True. You access the logout.text file in the WorkCycle directory.
Downloading .dll and .sql files
The required .dll and SQL files are available for downloading on ClientCenter. For instructions, see Downloading product updates in the ClientCenter online help.
On the Build Delivery page, after selecting TMWSuite as the Line of Business, select Special Products as the Product. Download these files:
-
HubTran_2019.x .dll file
-
HubTran_2019.x.sql file
Performing the initial data upload
The first time you export data to HubTran you do three different uploads. You create separate WorkCycle Workflows to accomplish each of the uploads.
Exporting all carriers
To export carriers:
-
Start WorkCycle.
-
Drag and drop the BulkCreateUpdateCarriers workflow activity from the Activities pane on the right to the Designer pane.
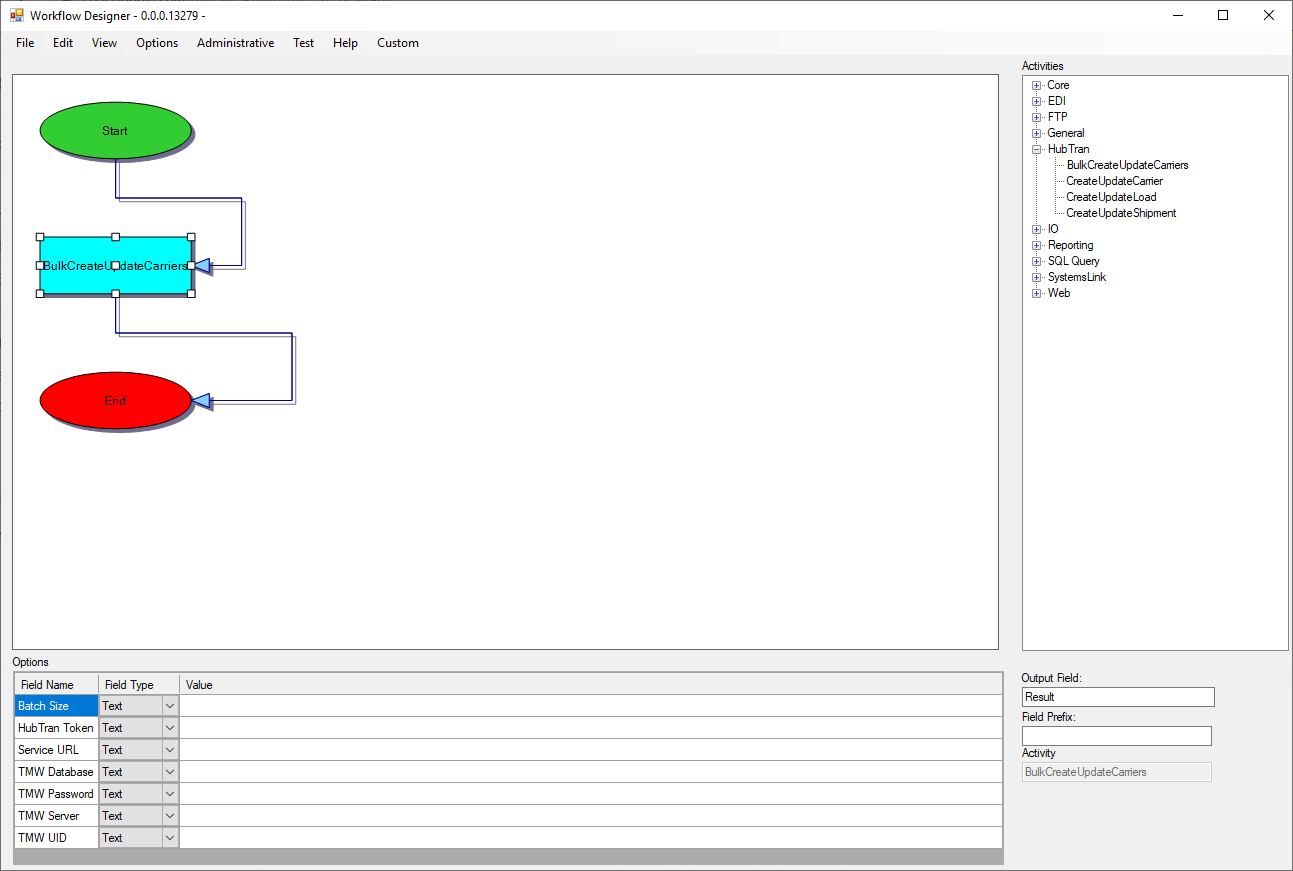
-
In the Options pane, set the following options:
-
Batch size
Number of carrier records to send in each communicationTrimble recommends 100.
-
HubTran Token
The customer specific login information provided by HubTran -
Service URL
Your HubTran service in SystemsLinkDefault URL is
http://localhost/TMWSystemsLinkExternal/HubTran/HubTranService.svc
-
TMW SERVER
Enter the name of the server on which your TMW Operations database resides. -
TMW DB
Enter the name of your TMW Operations database. -
TMW ID
Enter the User ID used to access your TMW Operations database. -
TMW PW
Enter the password linked to the User ID you entered.
-
-
Save the workflow.
-
Go to Test > Run Now On Server.
WorkCycle executes the workflow and start sending carrier data to HubTran.
You can open and examine the logout.txt file in your WorkCycle directory to check any errors.
Exporting load data
To export loads:
-
Start WorkCycle.
-
Drag and drop the CreateUpdateLoad workflow activity from the Activities pane on the right to the Designer pane.
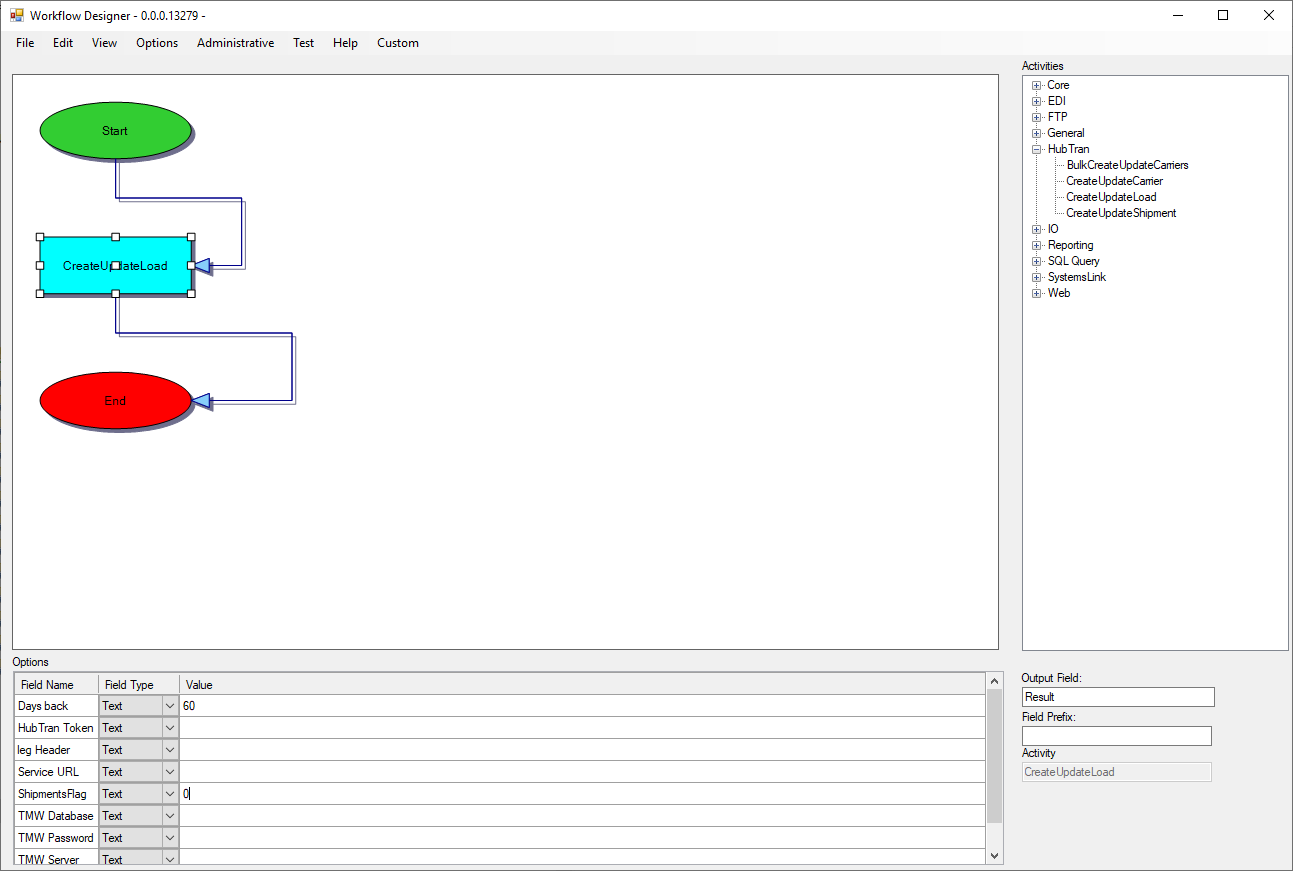
-
In the Options pane, set the following options:
-
Days back
The number of days back which you would want to start sending legheader data. Trimble recommends 60 days. -
HubTran Token
The customer specific login information provided by HubTran -
Leg Header
Leave this field blank.Specifying a legheader number will send only that leg.
-
Service URL
Your HubTran service in SystemsLinkDefault URL is
http://localhost/TMWSystemsLinkExternal/HubTran/HubTranService.svc
-
ShipmentsFlag
Set to 0 (zero) on the initial upload -
TMW SERVER
Enter the name of the server on which your TMW Operations database resides. -
TMW DB
Enter the name of your TMW Operations database. -
TMW ID
Enter the User ID used to access your TMW Operations database. -
TMW PW
Enter the password linked to the User ID you entered.
-
-
Save the workflow.
-
Go to Test > Run Now On Server.
WorkCycle executes the workflow and start sending legheader data to HubTran.
Exporting shipment data
To export shipments:
-
Start WorkCycle.
-
Drag and drop the CreateUpdateShipment workflow activity from the Activities pane on the right to the Designer pane.
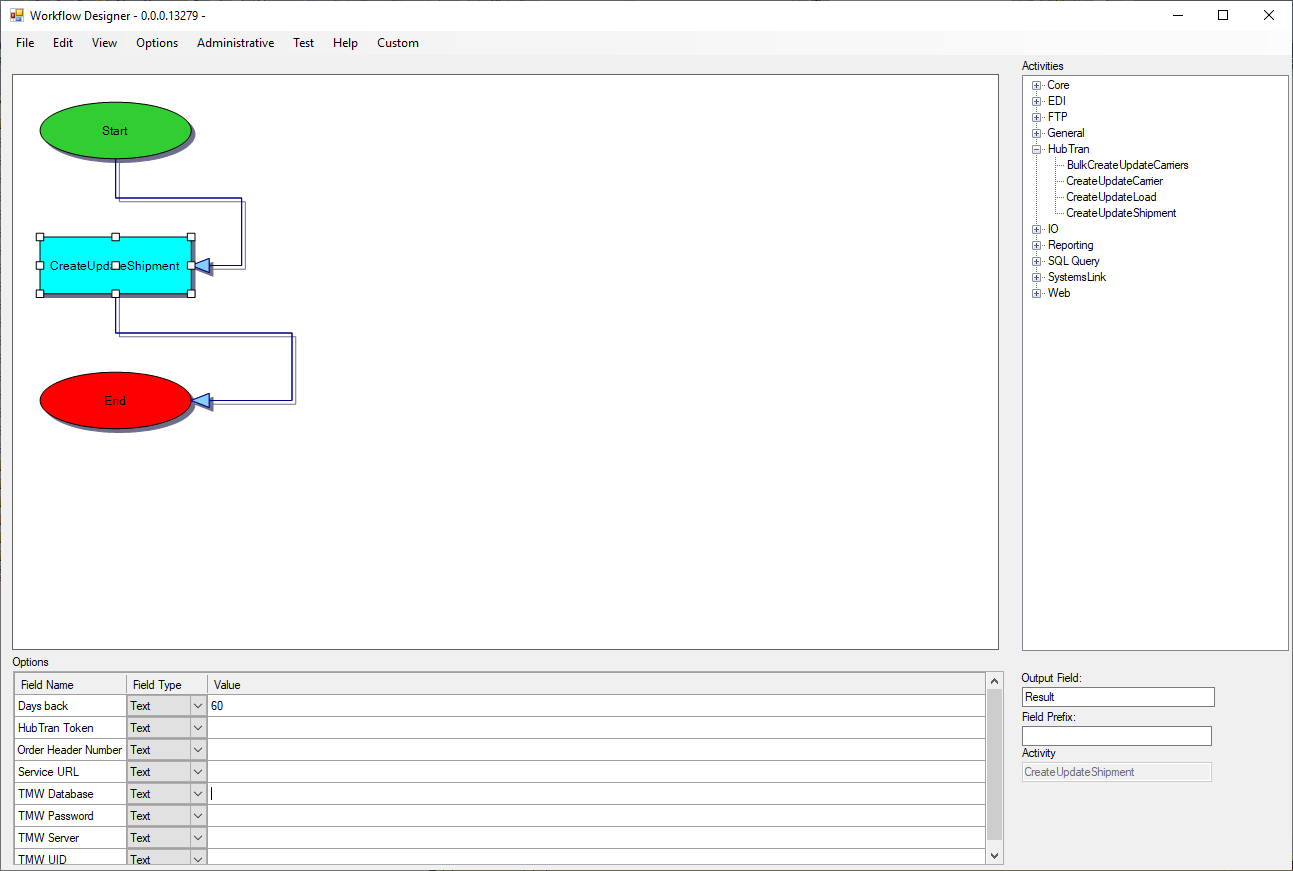
-
In the Options pane, set the following options:
-
Days back
The number of days back which you would want to start sending shipment data. Trimble recommends 60 days. -
HubTran Token
Enter the login information provided to you by HubTran. -
Order Header Number
Leave this field blank.Specifying an order header number will send only that order.
-
Service URL
Your HubTran service in SystemsLinkDefault URL is
http://localhost/TMWSystemsLinkExternal/HubTran/HubTranService.svc
-
TMW SERVER
Enter the name of the server on which your TMW Operations database resides. -
TMW DB
Enter the name of your TMW Operations database. -
TMW ID
Enter the User ID used to access your TMW Operations database. -
TMW PW
Enter the password linked to the User ID you entered.
-
-
Save the workflow.
-
Go to Test > Run Now On Server.
WorkCycle executes the workflow and start sending legheader data to HubTran.
Setting up the system to upload updated data
Once the initial upload is complete, you set up the system to send updated data to HubTran. Whenever a change is made to a carrier profile, a legheader, or shipment record, the record is resent to HubTran, replacing previous versions of the record.
-
Activate the listener workflow that monitors data and sends any changes to HubTran.
To activate it, set the
HubTranIntegrationGeneral Info Table setting String1 field to Y. -
Download the .xml workflow templates.
-
Go to the ClientCenter Build Delivery page
-
After selecting TMWSuite as the Line of Business, select Special Products as the Product.
-
Download these files:
-
HubTranCarrierUpdates.xml
-
HubTranLoadUpdates.xml
-
-
-
Install them on the internal server in:
C:\TrimbleProducts\WorkCycle_2019.xx\Plugins
where xx is the version number.
-
Start WorkCycle designer.
-
Go to File > Import.
The Open window opens. -
Locate your template xml files and import them.
Creating the workflow to monitor changes to carrier records
To have changes in carrier records uploaded to HubTran, you must set the options for the CreateUpdateCarrier activity.
-
Start WorkCycle.
-
In the Activities pane, select CreateUpdateCarrier and drag it to the Designer pane.
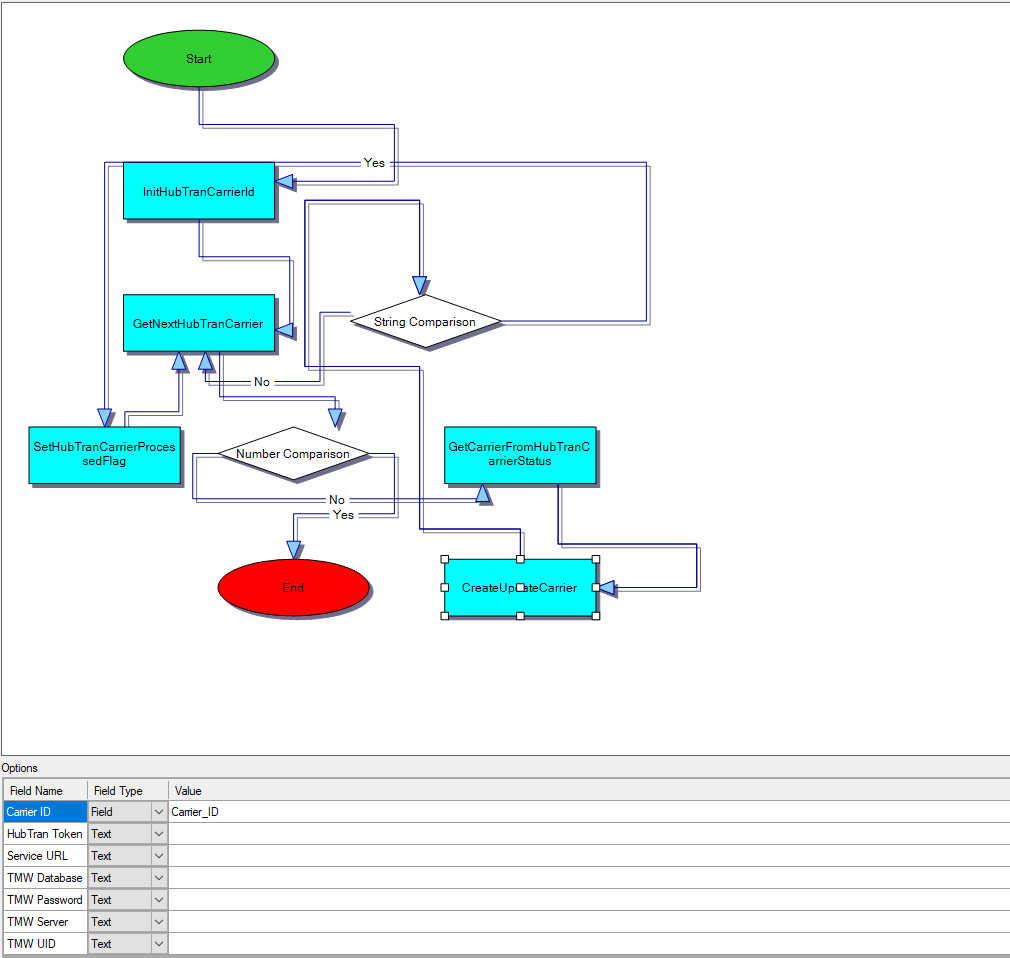
-
In the Options pane, set the following options:
-
Carrier ID
The default entry is Carrier_ID. Do not change the entry. -
HubTran Token
The customer specific login information provided by HubTran -
Service URL
Your HubTran service in SystemsLink -
TMW SERVER
Enter the name of the server on which your TMW Operations database resides. -
TMW DB
Enter the name of your TMW Operations database. -
TMW ID
Enter the User ID used to access your TMW Operations database. -
TMW PW
Enter the password linked to the User ID you entered.
-
-
Save the workflow.
-
Go to Options > Manage Workflow Launching.
The WorkflowLaunching window opens.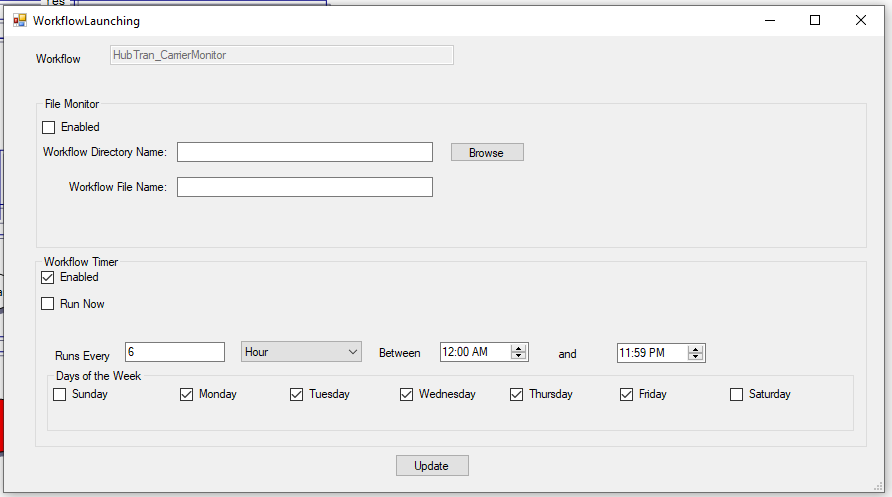
-
In the Workflow Timer section:
-
Verify the Enabled checkbox is selected.
-
In the Run Every fields, enter the number in the first field and select the increment in the second field.
-
In the Between fields, set the start and end times.
-
In the Days of the Week section, select the checkbox for each day you want the workflow to run.
-
-
Click Update to save your entries.
Creating the workflow to upload updated legheader data
To have changes in carrier records uploaded to HubTran, you must set the options for the CreateUpdateLegactivity.
-
Start WorkCycle.
-
In the Activities pane, select CreateUpdateCarrier and drag it to the Designer pane.
-
In the Options pane, set the following options:
-
Days Back
The number of days back which you would want to start sending legheader data. Trimble recommends 60 days. -
HubTran Token
The customer specific login information provided by HubTran -
Leg Header
The default value is 60. Do not change the value. -
Leg Number
The field is blank by default. Do not make an entry. -
Service URL
Your HubTran service in SystemsLinkDefault URL is
http://localhost/TMWSystemsLinkExternal/HubTran/HubTranService.svc.
-
Shipments Flag
Set to 1 to include changed shipment records in updates sent to HubTran. -
TMW SERVER
Enter the name of the server on which your TMW Operations database resides. -
TMW DB
Enter the name of your TMW Operations database. -
TMW ID
Enter the User ID used to access your TMW Operations database. -
TMW PW
Enter the password linked to the User ID you entered.
-
-
Save the workflow.
-
Go to Options > Manage Workflow Launching.
The WorkflowLaunching window opens.
-
In the Workflow Timer section:
-
Verify the Enabled checkbox is selected.
-
In the Run Every fields, enter the number in the first field and select the increment in the second field.
-
In the Between fields, set the start and end times.
-
In the Days of the Week section, select the checkbox for each day you want the workflow to run.
-
-
Click Update to save your entries.
Receiving data from HubTran
Once all the required data is sent to HubTran, the following process takes place:
-
When a carrier sends an invoice to HubTran and that invoice matches pay information in TMW Operations, HubTran makes a REST call to a webhook provided by SystemsLink.
-
The webhook allows HubTran integration to provide information in real time, such as releasing pay detail information for a carrier. To facilitate the pushing of information from HubTran to TMW.Suite, we recommend that you create a user profile and ID for HubTran in your TMW.Suite database. This allows HubTran to get a token needed to access the SystemsLink endpoint.
-
The data that HubTran sends is stored in HubTran audit tables in the TMW.Suite database.
Tables used for Approved pay details:
-
HubTranApproved
-
HubTranApprovedInvoice
-
HubTranApprovedLineItem
-
HubTranApprovedShipments
-
HubTranApprovedEmailMessages
-
HubTranApprovedDocuments
-
HubTranApprovedPages
Tables used for Exception payloads:
-
HubTranException
-
HubTranExceptionMessages
-
HubTranExceptionEmailMessages
-
HubTranExceptionDocuments
-
HubTranExceptionPages
-
When the data in HubTran does not match the data in TMW.Suite, you must resolve the conflict manually.
To view information from HubTran, you must log into you HubTran account.
|