Setting up TruETA in the ETA Agent window
Before dispatchers can work with TruETA, you must configure the ETA Agent window.
Accessing the ETA Agent window
To access the ETA Agent window:
-
In Windows Explorer, find the location where you installed TruETA.
-
Double-click the tts_eta.exe executable file.
The login window opens. -
Enter the User ID and Password associated with the database for which you want to run TruETA calculations.
Note: To avoid the need to sign on with a logon ID and password each time the program is launched, set
[Misc]GlobalLogon=Yand[MobileComm]ETAExtendedGlobalLogon=Yin your TTS50. -
Click OK.
The ETA Agent window opens.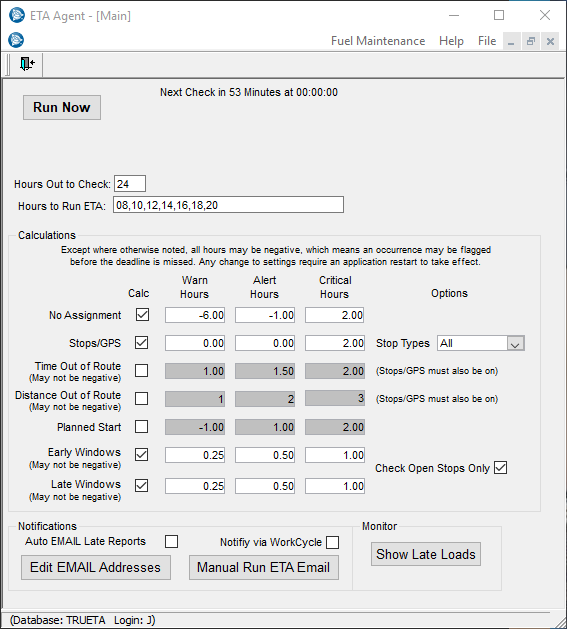
Note: Each field has a corresponding setting in the
[MobileComm]section of your TTS50. When you open this window, the system uses the values in the INI settings to populate each field. If you change a field’s value in the ETA Agent window, it saves your changes and updates your TTS50 automatically.
Specifying the number of hours to check
You can control how far into the future the system checks for late orders.
-
If needed, open the ETA Agent window.
-
In the Hours Out to Check field, enter the number of hours into the future the system should check for late orders. This field corresponds to the
[MobileComm]ETAHoursOutsetting in your TTS50. The default is 24.
Specifying how often the agent runs
You must specify how frequently ETA Agent should run. You can identify the hours in which the agent runs or you can specify how often it runs.
Specifying the hours the agent runs
This method uses a countdown timer. The timer runs on an hourly cycle from the moment the program is opened, and it repeats the cycle until the program is closed.
At the completion of each hourly countdown cycle, the system checks the Hours to Run ETA field to see if ETA calculations are scheduled to run. For example, if the timer activates at 10:25 AM, it checks the Hours to Run ETA field. If the number 10 is in the Hours to Run ETA field, the TruETA feature runs the calculations immediately.
-
If needed, open the ETA Agent window.
-
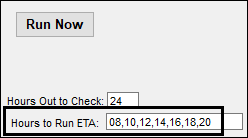
In the Hours to Run ETA field, record the hours of the day during which you want to run calculations. You must enter values in the 24-hour day format and separate times with a comma. For example, the values 08, 10, 12, 14, 16, 18, and 20 would cause the ETA Agent to run calculations at 8 am, 10 am, noon, 2 pm, 4 pm, 6 pm, and 8 pm.
Notes:
-
The Hours to Run ETA field is available when you have
[MobileComm]ETACalcFrequency=0in yourTTS50. It is not available when the setting has any other value. -
The values in this field correspond to your entries in the
[MobileComm]ETAHoursToRunsetting. -
The countdown timer determines when the program wakes up and checks the Hours to Run ETA field.
-
Running the calculations manually does not affect the countdown timer.
-
The program checks the Hours to Run ETA field once per hour, but runs calculations and sends late warnings only during the hours listed.
-
Trimble Transportation does not recommend using this method with TruETA.
-
Specifying the frequency at which the agent runs
You can set up the agent to run calculations more frequently than every hour.
-
If needed, open the ETA Agent window.
-
In the Frequency field, record how often you want the agent to run in minutes.
Note: The Frequency field is available when you set
[MobileComm]ETACalcFrequencyto any value other than zero (0)This illustration shows the result of having
[MobileComm]ETACalcFrequency=30in your TTS50. The ETA Agent is set to run calculations every 30 minutes.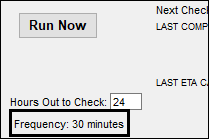
After running calculations for the current session, the LAST ETA CALC BEGAN indicator shows the time when ETA checks last occurred.

Setting up warning message parameters
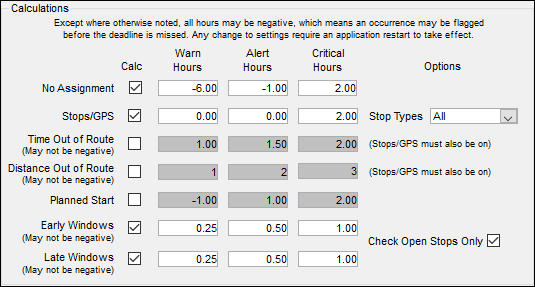
In the Calculation section, you can specify which warning messages you want to use. You set parameters and additional options for each parameter.
-
If needed, open the ETA Agent window.
-
To use a warning message, select its Calc checkbox.
-
For messages you want to use, make entries in these fields to set the hours that determine if it a Warning, an Alert, or Critical.
You can enter negative or positive numbers.
-
A negative value causes the system to generate a warning the specified number of hours before the deadline.
Example: In the illustration above, the No Assignment Warn Hours value of -6.00 means that if a load is scheduled to start within the next six hours, but has not yet been assigned resources, a Warning level notice is generated.
-
A positive value causes the system to generate a warning the specified number of hours after the deadline.
Example: In the illustration above, the No Assignment Critical Hours value of 2.00 means that if a load is two hours past the scheduled start time and there are no resources assigned, a Critical level notice is generated.
-
| Field | Definition |
|---|---|
Warn Hours |
Number of hours used to generate a Warning level late occurrence Notes:
|
Alert Hours |
Number of hours used to generate an Alert level late occurrence This value should be greater than the Warn Hours value in the same row. Notes:
|
Critical Hours |
Number of hours used to generate a Critical level late occurrence This value should be greater than the Alert Hours value in the same row. Notes:
|
For details on how a warning functions, see its topic:
No Assignment
Warning messages are generated if assets are not assigned to orders within the specified time.

These INI settings determine if this setting is active or inactive. They control the values in the Warn Hours, Alert Hours, and Critical Hours field when you open the ETA Agent window.
Stops/GPS
Warning messages are generated based on whether the tractor will arrive on time at its un-actualized stops based on the tractor’s most recent check call (GPS) location.
![]()
These INI settings determine if this setting is active or inactive. They control the values in the Warn Hours, Alert Hours, and Critical Hours field when you open the ETA Agent window.
In the illustration above, the Stops/GPS Warn Hours value of 0.25 means that if the TruETA feature calculates that a tractor will arrive a quarter of an hour late, or more, a Warning level notice is generated.
To use the Stops/GPS warnings, you must be using both:
-
Trimble Maps PC*MILER, PC*MILER|Streets, or PC*MILER Web Services
-
TotalMail
Your tractors must be equipped with GPS units that interface with the TMWSuite database via TotalMail
Distance Out of Route
Warning messages are generated if the most efficient routes are not being used. TruETA does this by adding the miles from the last actualized stop to the current location with the miles from the current location to the next un-actualized stop. The system then compares this total to the miles it would take to go directly from the last actualized stop to the next un-actualized stop.
![]()
These INI settings determine if this setting is active or inactive. They control the values in the Warn Hours, Alert Hours, and Critical Hours field when you open the ETA Agent window.
Planned Start
Warning messages are generated based on whether trips start at the planned time.
![]()
These INI settings determine if this setting is active or inactive. They control the values in the Warn Hours, Alert Hours, and Critical Hours field when you open the ETA Agent window.
In the illustration above, the Planned Start Warn Hours value of -2.00 means that if a trip is scheduled to start within the next two hours, but has not started, a Warning level late occurrence is generated for that trip.
Early Windows
Warning messages are generated when a stop’s scheduled Arrival time occurs before its Earliest time.
If you select the Check Open Stops Only checkbox, the system performs Early window calculations only for stops that are not actualized.
When the checkbox is cleared, calculations are run on all stops. Viewing information for all stops could be useful when reviewing a trip’s history.

|
These INI settings determine if this setting is active or inactive. They control the values in the Warn Hours, Alert Hours, and Critical Hours field when you open the ETA Agent window.
Late Windows
Warning messages are generated when a stop’s scheduled Arrival time occurs after its Latest time.
If you select the Check Open Stops Only checkbox, the system performs Early window calculations only for stops that are not actualized.
When the checkbox is cleared, calculations are run on all stops. Viewing information for all stops could be useful when reviewing a trip’s history.
|
These INI settings determine if this setting is active or inactive. They control the values in the Warn Hours, Alert Hours, and Critical Hours field when you open the ETA Agent window.
Setting up e-mail notifications
You can set up the system to send e-mail notifications automatically or you can run the ETA Email process manually.
To run the process at will, open the ETA Agent window and click Manual Run ETA Email.
To set up the system to send email notifications automatically:
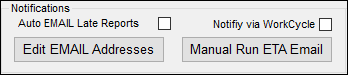
-
If needed, open the ETA Agent window.
-
Select the Auto EMAIL Late Reports checkbox.
-
If your company is using WorkCycle to manage the e-mail notifications, select the Notify via WorkCycle checkbox.
Editing e-mail addresses
You can edit e-mail addresses in the ETA Agent window.
-
If needed, open the ETA Agent window.
-
Click Edit EMAIL Addresses.
The ETA Agent - Edit Email Address window opens.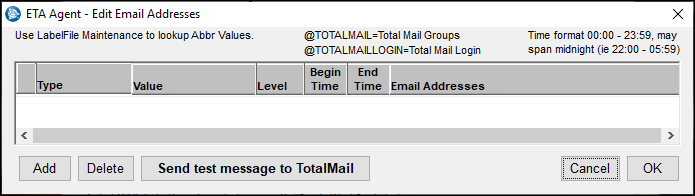
-
Make changes as needed.
-
Click OK.