Customizing toolbars
The default toolbar icons ordinarily provide access to all the commands needed to function in TMW Operations. You might want to customize the toolbars to better meet your company’s organizational structure, role assignments, or general way of doing business.
Toolbars, like menus, can belong to the application’s main window or to a tab that opens within the main window.
The toolbars of TMW Operations can be customized in any of the following ways:
-
Add, move, or remove toolbars and command icons.
-
Design a new toolbar.
-
Define a custom command to open an executable file or a web page.
-
Change the icon image, displaying ScreenTips, and changing the viewing size of icons.
Positioning a toolbar
By default, you can move a toolbar to a different place on the window. If needed, you can disable this capability by locking the toolbar.
Locking a toolbar
To lock a toolbar and prevent it from being moved to another location, follow these steps:
-
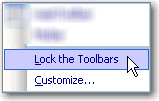
Select the toolbar you want to lock, and right-click to display the shortcut menu.
-
Select Lock the Toolbars.
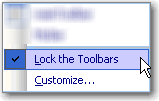
Right-click on the toolbar and you will notice a checkmark adjacent to the Lock the Toolbars option - this denotes the toolbar is now locked.

Floating (unlocked) toolbars include a series of white dots on the left-side of the toolbar.

Locked toolbars do not include a series of white dots on the left-side of the toolbar.
Designing a toolbar
If you find that you typically perform certain tasks, you will want to create a toolbar designed to list only those categories and commands needed to perform your daily tasks.
Creating a new toolbar
To create a toolbar, follow these steps:
-
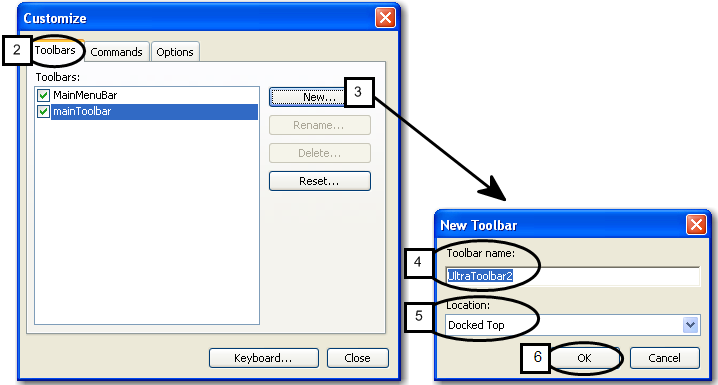
Right-click on any toolbar and click Customize.
The Customize dialog box opens. -
Select the Toolbars tab.
-
Click New to create a toolbar and to open the New Toolbar dialog box.
-
Type the toolbar name.
Notes:
-
The toolbar name defaults to UltraToolbar#. It is suggested that you rename the toolbar and provide a more descriptive label.
-
You can rename the toolbar at any point.
-
-
From the Location list box, select the location of the toolbar.
-
Click OK.
Toolbar name
Identifies the toolbar.
Location
Where the toolbar appears on the window. For example, a Docked Right location forces the toolbar to display at the right side of the window. The default is Docked Top.
A blank toolbar is placed on your window.
-
Continue to add commands to the new toolbar.
Adding a command to a toolbar
After creating a toolbar, the next step is to add one or more commands (menu options). An example would be if you used commands on a regular basis, such as various reporting commands, then you will want to add these to your toolbar.
To add a command to a toolbar, follow these steps:
-
Right-click on the toolbar and click Customize.
The Customize dialog box opens. -
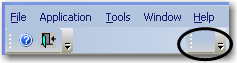
On the Toolbars tab, make sure the toolbar for which you want to add commands is selected.
This action will cause the toolbar to be visible on the TMW Operations menu bar and appear as
 .
. -
Click Commands.
-
Select the category (e.g., Unassigned) to add to the toolbar.
-
Select the command (e.g., Reports) to add to the toolbar.
-
Drag the selection to the toolbar.
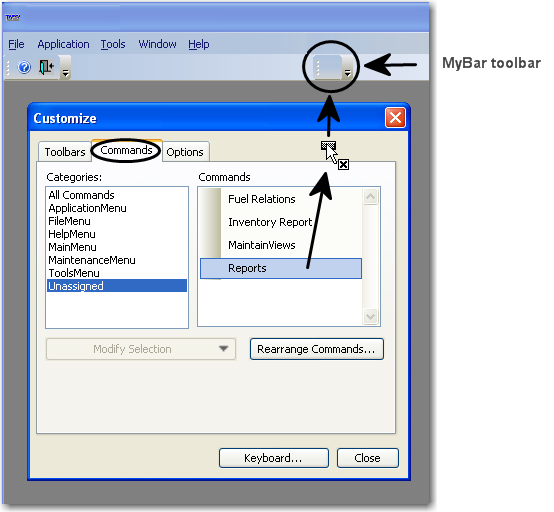
Note: Position the
 -bar where you want the command to be on the toolbar.
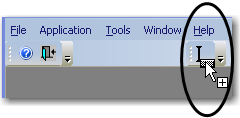
In our example, the Reports command appears as
 on the Mybar toolbar.
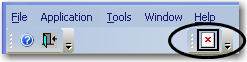
-
Format the command so that it no longer appears as the
on the toolbar.-
Right-click on the
to display the shortcut menu.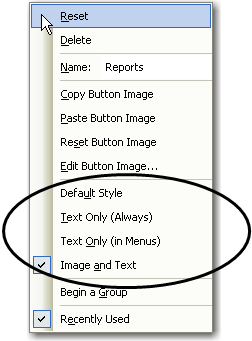
-
From this shortcut menu, choose the desired option to apply to the command.
The following is a list of the available options when formatting a toolbar:
Default Style
Displays the default.
Text Only (Always)
Always displays descriptive text for the command.
Note: Enabling this option applies the setting to all occurrences of the command.
Text Only (in Menus)
For all menu types, displays only the descriptive text and not the icon image for the command.
Note: Enabling this option applies the setting to all occurrences of the command.
Image and Text
Displays both the icon image and descriptive text for the command.
Example:
Notes:
-
The Image and Text option must first be assigned before an icon can be added to the text.
-
Does not apply to all occurrences of the command.
-
-
-
On the Customize window, click Close.
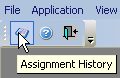
Changing the name of a toolbar command
Use this procedure to change the name of a toolbar command. If you selected Show ScreenTips on Toolbars, this name displays to the user whenever the mouse pointer is passed over or near the command.
| If you change the display text for a custom command using this procedure, you should record the name. This can be done in the Description field on the Custom Menus window. |
-
Right-click on the toolbar and click Customize.
The Customize dialog box opens. -
Do one of the following to display the item’s properties:
-
To change the name of a menu, right-click on the menu name.
-
To change the name of a command under a menu, click on the menu to display the options, and then right-click on the command name.
-
-
In the Name field, change the name.
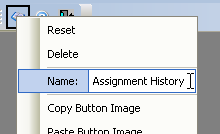
Changing an icon’s image
Toolbar commands can be represented by descriptive text and/or an icon image.
|
To change an icon on the toolbar or to replace the empty icon image ![]() , follow these steps:
, follow these steps:
-
Right-click on the toolbar and click Customize.
The Customize dialog box opens. -
Right-click on the icon you want to change.
A shortcut menu is shown. -
Select the appropriate option.
Copy Button Image
Copies the selected image.
Note: Disabled if an image does not exist for the toolbar command.
Paste Button Image
Pastes the copied image to the current location.
Note: Disabled if an image was not copied.
If you want to copy and paste an existing icon image from a TMW Operations toolbar, follow these steps:
-
Go to the image to copy, right-click to display the shortcut menu, and select Copy Button Image.
-
Go to the location where the copied image is to be pasted, right-click to display the shortcut menu, and select Paste Button Image.
Reset Button Image
Resets the image to its default.
Note: Disabled if an image does not exist for the toolbar command.
Edit Button Image
Displays the Image Editor dialog box, and allows an image to be created or modified. See Using the Image Editor for details.
-
|
Starting in V.2023.6 The Copy Button Image, Paste Button Image, Reset Button Image and Edit Button Image have been removed as options. |
Using the Image Editor
Once a command has been assigned to a toolbar, use the Image Editor to create or modify an existing icon image. This image can either accompany or replace the descriptive text used to identify a toolbar command.
To use the Image Editor, follow these steps:
-
Right-click on the toolbar and click Customize.
The Customize dialog box opens. -
In the toolbar, right-click on the icon to modify.
-
Select Edit Button Image.
The selected icon is shown in the work area.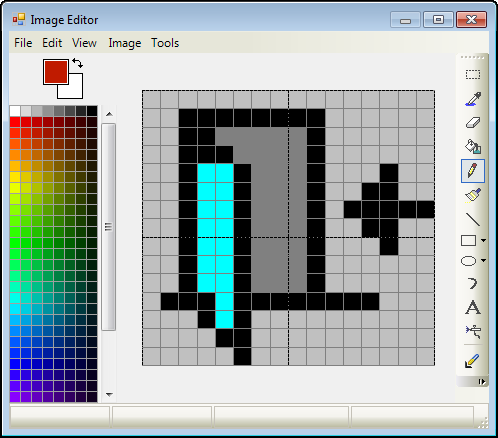
Image Editor menus
The Image Editor includes several menu options that provide tools for creating or editing an image.
-
Image
The imaging tools include rotation, movement, color, and capture options. -
Tools
Includes various eraser, gradient, and brush size options, along with all tools included in the Drawing Tools toolbar. -
File
You can use an existing image.-
Select File > Open.
-
Browse to your image.
-
When you have found your image, select it, and then click Open.
Your image appears in the display pane. -
Select File > Exit.
A window opens.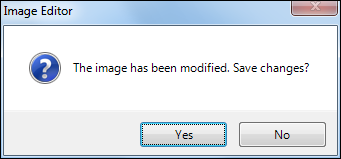
-
Click Yes.
Your image is applied to the menu command.
-
Image Editor toolbars
The Image Editor also includes two toolbars: Drawing Tools and TextTools, which provide drawing and formatting tools when creating or editing an image. Use this procedure to display the Image Editor toolbar(s):
-
On the Image Editor menu bar, right-click to display the shortcut menu.
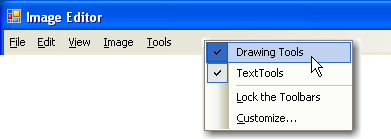
-
Do either of the following:
-
Select Drawing Tools.
This toolbar provides drawing tool options such as fill area, text for callouts, and assorted shapes including line, rectangle, and arc.

-
Select TextTools.
This toolbar provides formatting options such as font, font size, and bold text.

-
-
Use the drawing or text tools as necessary to create or modify your icon.
-
When you have finished the icon image, close the Image Editor.
Note: When entering text, press ENTER before closing the editor.
-
An Image Editor message will prompt you to save the image.
Click Yes to save the image and insert it in the toolbar.
-
Displaying a ScreenTip
ScreenTips provide a brief description or title of the toolbar command, and are displayed whenever the mouse pointer hovers over or near the command.
To enable ScreenTips, follow these steps:
-
Right-click on the toolbar and click Customize.
The Customize dialog box opens. -
Select the Options tab.
-
Select the Show ScreenTips on toolbars checkbox.
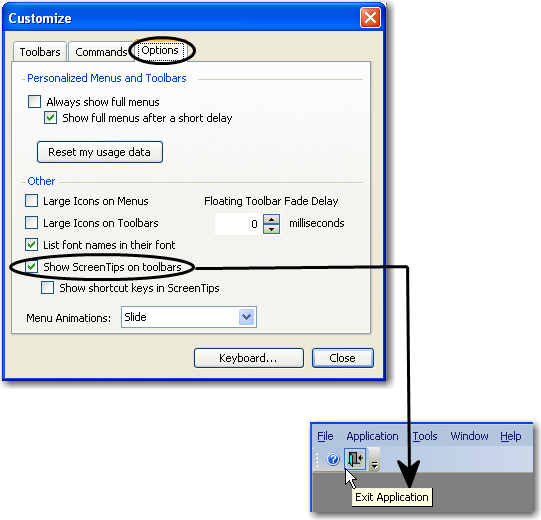
-
Click Close.
Displaying a shortcut key in ScreenTips
If ScreenTips are enabled and a shortcut key has been assigned to a command, then displaying both the shortcut key and ScreenTip provides a quick reference of the assigned shortcut key(s).
To display shortcut keys in ScreenTips, follow these steps:
-
Right-click on the toolbar, and click Customize.
The Customize dialog box opens. -
Select the Options tab.
-
If ScreenTips is not enabled, click the Show ScreenTips on toolbars checkbox to do so. See Specifying a keyboard shortcut for details.
-
Click the Show shortcut keys in ScreenTips checkbox.
The ScreenTip will include the shortcut key the next time it is viewed.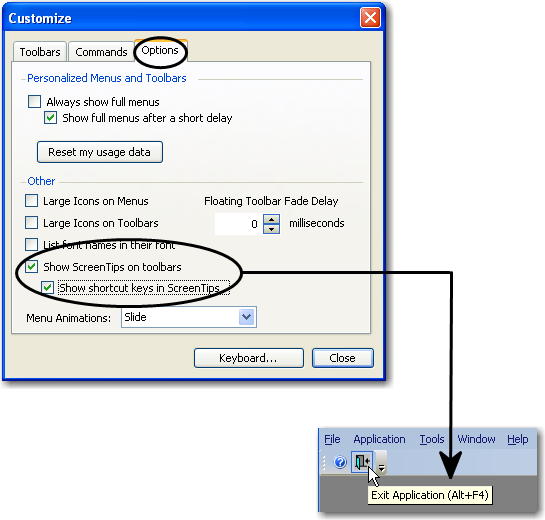
-
Click Close.
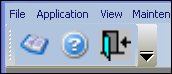
Changing the viewing size of icons on the toolbars
If you want, you can have the application use large icons when toolbars are viewed.
| Icon size | Example |
|---|---|
Standard |
|
Large |
|
-
Right-click on the toolbar and click Customize.
The Customize dialog box opens. -
Select the Options tab.
-
Under Other, select the Large Icons on Toolbars checkbox.
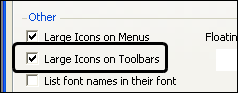
Note: The icon can easily be returned to its default size by again selecting the appropriate checkbox.
-
Click Close.
Managing a toolbar
After the toolbar design is complete, it may become necessary to rename, delete, or reset the toolbar.
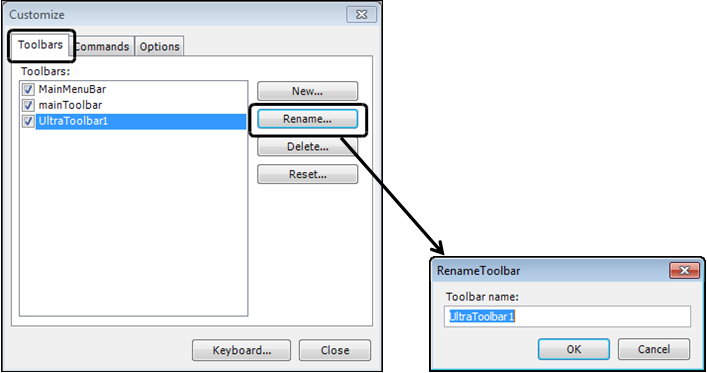
Renaming a toolbar
Use this procedure to rename a toolbar if its title is misleading, was incorrectly named, or contains an error.
-
Right-click on the toolbar and click Customize.
The Customize dialog box opens. -
Select the Toolbars tab, and select the toolbar to be renamed.
-
Click Rename.
-
At the Rename Toolbar dialog box, type the Toolbar name that will replace the original name.
-
Click OK.
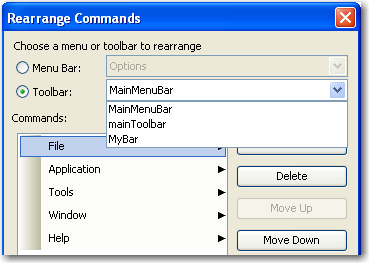
Rearranging the icons on a toolbar
Use this procedure to rearrange the order of commands on the system-created toolbar, the mainToolbar, or on a user-defined toolbar (e.g., MyBar).
-
Right-click on the toolbar and click Customize.
The Customize dialog box opens. -
Select the Commands tab.
-
Click Rearrange Commands.
The Rearrange Commands dialog box opens. -
Click the Toolbar radio button.
-
In the Toolbar drop-down list, do one of the following:
-
Select the system-created toolbar, mainToolbar.
-
Select a user-defined toolbar (e.g., MyBar).
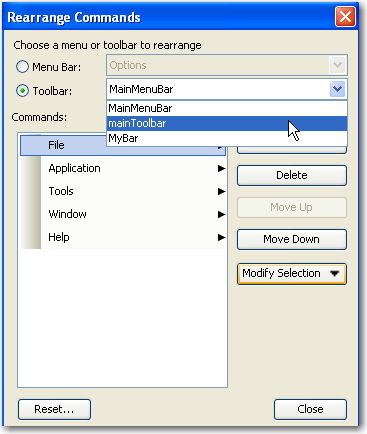
-
-
Click Add, Delete, Move Up, or Move Down to rearrange the toolbar as needed.
-
Click Close.
Beginning a group
Use this procedure to group menu commands within a category on the MainMenuBar or a user-defined toolbar. Once a group is designated, it is identified by a separator bar.
-
Right-click on the toolbar and click Customize.
The Customize dialog box opens. -
Select the Commands tab.
-
Click Rearrange Commands.
The Rearrange Commands dialog box opens. -
Click the Toolbar radio button.
-
In the Toolbar drop-down list, do one of the following:
-
Select the system-created toolbar, mainToolbar.
-
Select a user-defined toolbar (e.g., MyBar).
-
-
In the Commands list, select the command where the group will begin.
Notes:
-
To add a group, at least two commands must be included in the Commands list.
-
Before specifying a group, you might want to rearrange the toolbar to have similar items (i.e., Window, Help, etc.) in the same grouping.
-
-
Click Modify Selection, and select Begin a Group.
A separator bar is inserted above the highlighted command.
-
Click Close.
Note: It may become necessary to remove a group. To do so, select the separator bar, and click Delete.
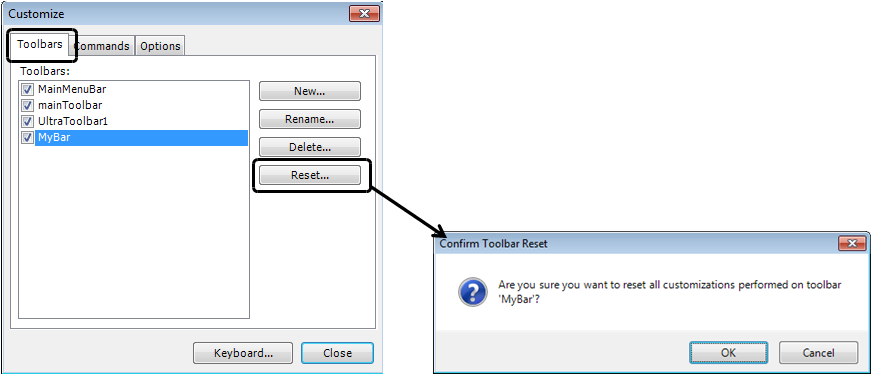
Resetting a toolbar
Use this procedure to remove all of the customizations made to a toolbar and restore the toolbar to its original settings.
-
Right-click on the toolbar and click Customize.
The Customize dialog box opens. -
Select the Toolbars tab, and then select the toolbar to be reset.
-
Click Reset.
-
At the Confirm Toolbar Reset message, click OK to confirm.
Note: If you change your mind and do not want to reset the toolbar, click Cancel.
In the following example, the MyBar toolbar contained the Reports command before being reset. After the MyBar toolbar was reset, Reports was removed from the toolbar. Because Reports was the only command present, the resulting toolbar is now blank.
Deleting an icon from a toolbar
Use this procedure to delete an icon from a toolbar.
-
Right-click on the toolbar and click Customize.
The Customize dialog box opens. -
In TMW Operations, click and drag the icon off the toolbar.

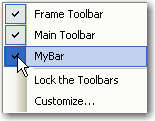
Hiding a toolbar
Use this procedure to hide a user-defined toolbar from view. You cannot hide the system-defined toolbar, MainMenuBar.
-
Right-click on the menu bar to display the shortcut menu.
-
For the toolbar you want to hide, clear the adjacent checkbox.
Deleting a toolbar
Use this procedure to delete an obsolete toolbar.
-
Right-click on the toolbar and click Customize.
The Customize dialog box opens. -
Select the Toolbars tab, and then select the toolbar to be deleted.
-
Click Delete.
-
At the Confirm Toolbar Delete dialog box, click OK to confirm the deletion.
Note: If you change your mind and do not want to delete the toolbar, click Cancel.
Managing a toolbar command
It may be necessary to modify only the toolbar command and not the entire toolbar. For instance, you may want to delete the Reports command, but leave all other toolbar commands intact.
| Customizations to toolbar commands are initiated from the toolbar’s shortcut menu; however, the Customize dialog box must be open in order to activate this shortcut menu. |
Rearranging a toolbar command
Use this procedure to rearrange the order of commands on a system-created toolbar (e.g., mainToolbar) or a user-defined toolbar (e.g., MyBar).
-
Right-click on the toolbar and click Customize.
The Customize dialog box opens. -
Select the Commands tab.
-
Click Rearrange Commands.
-
At the Rearrange Commands dialog box, click the Toolbar radio button.
-
At the Toolbar drop-down list box, do one of the following:
-
Select the system-created toolbar, mainToolbar.
-
Select a user-defined toolbar (e.g., MyBar).
-
-
Click Add, Delete, Move Up, or Move Down to rearrange the toolbar as needed.
-
Click Close.
Resetting a toolbar command
Use this procedure to reset a toolbar command to remove the icon image and any descriptive text from the toolbar command. This option does not clear customizations made for the remaining toolbar commands or for the toolbar itself.
-
Right-click on the toolbar and click Customize.
The Customize dialog box opens. -
Select the Toolbars tab.
-
Right-click on the toolbar command to be reset.
The shortcut menu is displayed. -
Click Reset on the shortcut menu.
In the following example, the Reports command was reset. Its image and text were replaced with the
. Resetting the Reports command had no effect on the Inventory Reports command.
Removing a toolbar command
Use this procedure to delete the selected command, including its icon image or descriptive text, from the toolbar.
-
Right-click on the toolbar and click Customize.
The Customize dialog box opens. -
Right-click on the toolbar command to be deleted.
The shortcut menu is displayed. -
Click Delete on the shortcut menu.
Note: Toolbar commands, other than the currently selected command, are not deleted. If there are no other commands defined, then the toolbar displays as
.