Adding, inserting, and deleting commodities
In the Trip Folder, the Freight tab shows billable stops and information about the commodities associated with those stops. Each line of commodity data is known as a freight detail.
You can add, insert, or delete commodities using:
-
The Freight tab
The Freight tab lists all billable stops. You can add, insert, or delete freight details for any stop. Each commodity is shown in its own row. Therefore, if a stop has multiple commodities, you will see multiple rows for that stop.
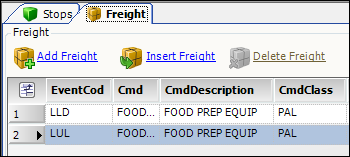
Note: The Freight tab’s sole purpose is to enable you to record commodity information. You cannot use it to add, insert, or delete stops.
-
The Stops tab
By default, freight details are not visible. However, you can click
 Expand to the left of each billable stop to view, add, or delete commodities for that stop.
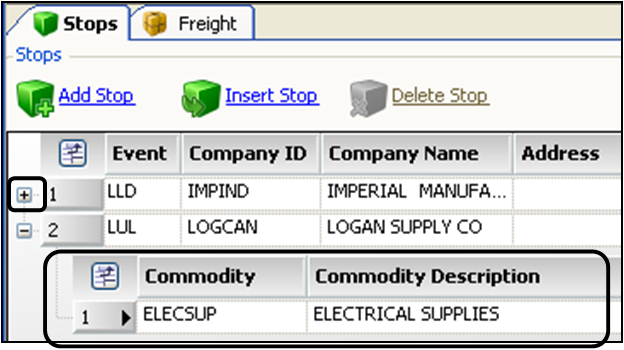
To collapse the freight details, click
 .
.
Sometimes button(s) take on a grayed-out appearance, which means that you cannot use them. For the trip shown in the first illustration, Delete Freight is not available for use because only one commodity is recorded on each stop. You cannot delete the only commodity on a stop.
For both tabs, the same menu commands and toolbar buttons can be used to add and delete freight.
-
Freight-related commands from the Edit menu.
-
Freight-related icons in the toolbar at the top of the window.
-
Keyboard shortcuts.
-
Freight-related commands in the shortcut menu, which can be accessed by right-clicking over a freight detail.
| If you are using commodity-based rates, the system will ignore the pickup event when rating freight detail lines. Therefore, you must record commodity information on the drop event. |
Adding a freight detail
You can add a commodity to any stop using the Trip Folder’s Stops or Freight tabs. The system positions it below the last freight detail for the stop.
-
Do one of the following
-
Select the Freight tab.
-
Select the Stops tab, then select the stop for which you want to add the new commodity.
Note: On the Stops tab, click
to expand the stop, and then select a freight detail for the stop.
-
-
Do one of the following:
-
Click
 Add Freight at the top of the tab, or in the toolbar.
 -
Go to Edit > Add Freight.
-
Press CTRL+INSERT.
-
Right-click on an existing freight detail for the stop, then select Add Freight from the shortcut menu.
Note: Freight details are displayed under a stop detail. Use care to right-click on the freight detail. Right-clicking on a stop opens a shortcut menu containing stop-related commands, rather than freight-related commands.
A new row is added to the bottom of the grid.
-
-
In the CMD field, specify the commodity ID.
-
Enter the quantity in the appropriate field, i.e., weight, volume, or count.
Note: For details about individual fields, see Trip Folder - Freight tab.
-
Select the correct unit of measure from the drop-down list associated with the quantity entered.
-
Save the trip.
Inserting a freight detail
-
You can insert a commodity for any stop on the Trip Folder’s Freight tab.
-
Select the Freight tab.
-
Select the stop to which you want to add the new commodity.
-
Do one of the following:
-
Click
 Insert Freight at the top of the Freight tab, or in the toolbar.
 -
Right-click on an existing freight detail for the stop, and then select Add Freight from the shortcut menu.
Note: Freight details are displayed under a stop detail. Use care to right-click on the freight detail. Right-clicking on a stop opens a shortcut menu containing stop-related commands, rather than freight-related commands.
A new freight detail is inserted under the one you selected. You will see separate rows for each commodity to be delivered at the stop.
-
-
In the CMD field, specify the commodity ID.
-
Enter the quantity in the appropriate field, i.e., weight, volume, or count.
Note: For details about individual fields, see Trip Folder - Freight tab.
-
Select the correct unit of measure from the drop-down list associated with the quantity entered.
-
Click
 Save in the toolbar.
Deleting a freight detail
You can remove a freight detail from a stop using the Trip Folder’s Stops or Freight tabs.
| The system requires at least one freight detail for every billable stop. Even if no one has manually entered one, the system automatically assigns a default freight detail with a commodity ID of UNKNOWN. You can enter commodity information in the default freight detail, but you cannot delete the row. |
-
On either the Freight tab or the Stops tab, click in any field in the row for the commodity to be deleted.
Notes:
-
On the Stops tab, click
to expand the rows, and then select the freight detail you want to remove. -
On the Stops tab you can select multiple freight details for a single stop. Hold down the CTRL key while selecting freight.
-
-
Do one of the following:
-
Click the
 Delete Freight command at the top of the tab, or in the toolbar.
 -
Go to Edit > Delete Freight.
-
Right-click the freight detail you want to remove, and then select Remove Freight from the shortcut menu.
-
Press CTRL+DEL.
The system highlights the selected freight detail and displays a confirmation message.
-
-
Select Yes to complete the deletion, or No to cancel.
-
Click
Save in the toolbar.