Quick Start: How do I enter orders?
A note about Quick Start topics: They are designed for users who want an introduction to Order Maintenance without a lot of detail. To get you up to speed quickly, they provide steps for basic tasks, as well as links to detailed information. TMW Operations is very configurable. Therefore, it is possible that your company’s unique setup will cause the application to work differently than described here. Check with your system administrator for assistance.
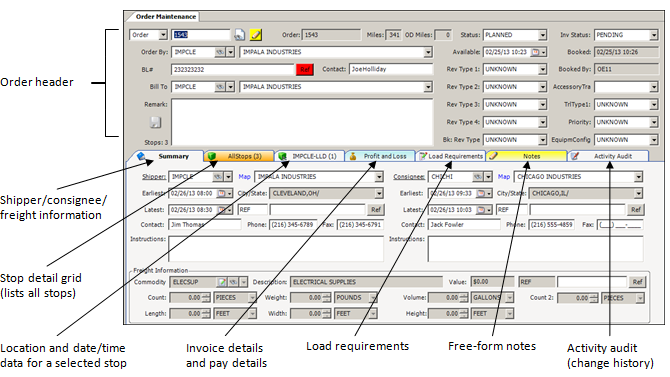
Go to Operations > Order Entry to open the Order Maintenance window. The order header is shown at the top. Fields for shipper, consignee, and commodity information are at the bottom. You use the sub tabs at the bottom of the window to enter additional detail.

Use the following instructions to get up to speed quickly on using the Order Maintenance window.
| For detailed information on Order Maintenance, see Introduction to Order Maintenance. |
Create a new order
-
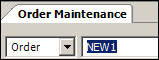
To start a new order, do one of the following:
-
Go to Operations > Order Entry.
The Order Maintenance window opens in order creation mode.
-
If an existing order is already in view on the Order Maintenance window, do one of the following:
-
Click
 New in the toolbar below the main menu.
 -
Press CTRL+N.
-
-
-
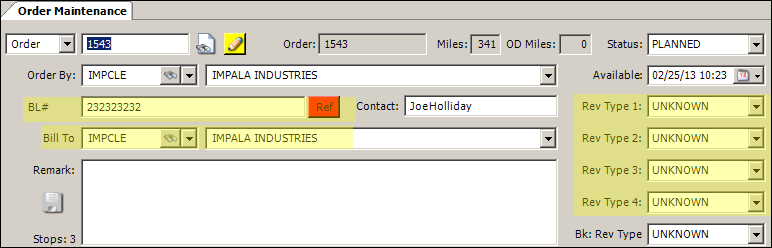
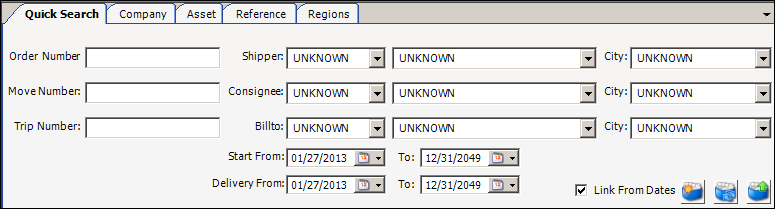
Although not required by default, you typically would make entries in these fields in the order header:
-
Bill To
-
One or more RevType fields
The fields are shaded in this illustration.
-
-
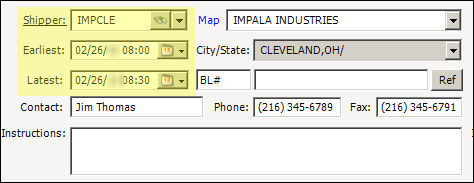
Make the following entries in the Stops grid.
Note: All entries are required except for commodity ID.
Order Maintenance section Enter Shipper
(bottom left of the Summary tab)Shipper: Shipper ID
Earliest: Earliest acceptable pickup date/time
Latest: Latest acceptable pickup date/time
Consignee
(bottom right of the Summary tab)Consignee: Consignee ID
Earliest: Earliest acceptable delivery date/time
Latest: Latest acceptable delivery date/time
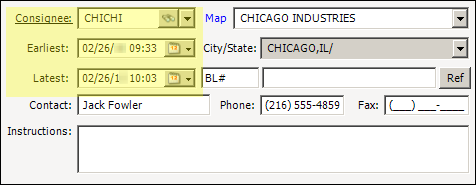
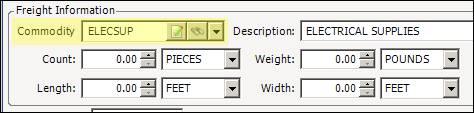
Freight Information (bottom of the Summary tab)
Commodity: Commodity ID
-
To save the order, do one of the following:
-
Click
 Save in the toolbar under the main menu.
 -
Press CTRL+S.
-
For more information, see Basic order entry.
Look up an existing order when you know its ID
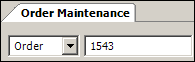
Below the Order Maintenance tab, enter the order number and press ENTER.
Select an order from a list of orders
You can always access the Scroll Orders window by going to Tools > Scrolls > Order Scroll. But the following steps describe a quicker access method that allows you to overlay the Scroll Orders window temporarily on top of the Order Maintenance window. You then can restrict and retrieve a list of orders, select one, and open it in the Order Maintenance window.
-
To the right of the Order ID field, click the
 Scroll Orders button located to the right of the Order ID field.
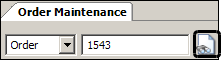
The Scroll Orders window opens.
-
Enter restrictions in the upper area of the window.
Note: To do a new search, click
 Reset (first button in the lower right of the window) to clear all restrictions.
 -
Click
 Retrieve (the middle button).
-
If only only one order matches your restrictions, the system opens the order in the Order Maintenance window.
-
If multiple orders match your restrictions, the system displays the Drag Dropped Orders Queue window. It displays retrieval results.
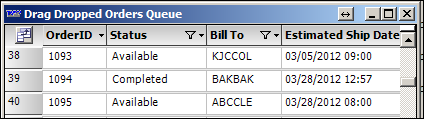
Click on the order you want.
The system opens it in the Order Maintenance window.
-
For more information, see Looking up an order.
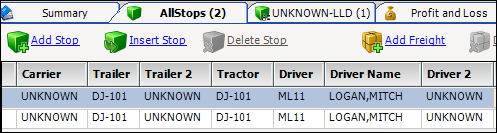
Add, insert, or delete stops
The All Stops tab list all stops on the order. Use the Stop buttons above the grid.
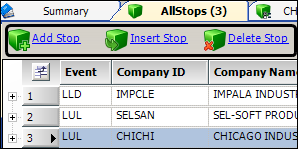
-
To add a stop at the end of the trip, click Add Stop.
-
To insert a stop, select the stop that is to follow the new stop and then click Insert Stop.
-
To delete a stop, select it and click Delete Stop.
Note: The Delete Stop button is grayed out if an order only has two stops.
Add, insert, or delete freight details
On the Summary tab:
You can enter details for the first commodity in the Freight Information box at the bottom of the Summary tab.

On the All Stops tab:
You can use the All Stops tab to enter details for any commodity.
-
Click the
 Expand button to the left of a stop.
The system displays the freight details in nested rows below the stop. The Expand button becomes a
 Collapse button.
-
To add or delete freight details, use the Add Freight and Delete Freight buttons at the top of the grid.
Note: The Delete Freight button is grayed out if a stop only has one freight detail.
-
To hide the freight details for a stop, click the Collapse button to the left of the stop.
| You also can enter freight details on the Single Stop tab, located to the right of the All Stops tab. |
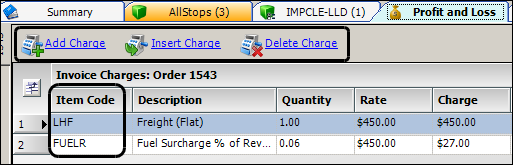
Enter and delete invoice details
Use the Profit and Loss tab.
-
At the top left of the tab, use the buttons above Invoice Charges to add, insert, and delete invoice details.
-
When you create an invoice detail, use the Item Code field to select the charge type.
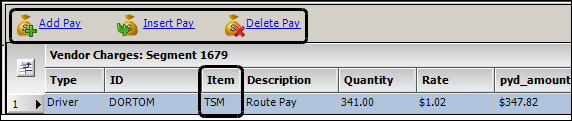
Enter and delete pay details
Use the Profit and Loss tab.
-
At the top right of the tab, use the buttons above Vendor Charges to add, insert, and delete pay details.
-
When you create a pay detail, use the Item field to select the pay type.
Enter or view load requirements for an order
Click the Load Requirements tab. Use the buttons at the top of the tab to add and delete load requirements.

When you add a new load requirement, make entries in these fields:
-
Equip.
Select the type of resource for which the requirement applies. -
Mandatory
Select Must or Should. -
Not
Select have/be or not have/be. -
The name of the requirement column varies based on your entry in the Equip field. Select the requirement in the appropriate field.
-
For a driver: Qualifications
-
For a tractor: Tractor Accessories
-
For a trailer: Trailer Accessories
-
For a carrier: Carrier Qual
-
Enter notes
Use the buttons at the top of the Notes tab to add and delete notes. When you create a note:
-
Use the Type field to specify the record to the note belongs.
-
Use the Urgent field to indicate if the note is an Alert.

Your entries determine the color of the Notes tab.
-
If no notes exist, it is gray.
-
If notes are entered, but none are tagged as an Alert, the tab is yellow.
-
If at least one note is tagged as an Alert, the tab is red.
View reference numbers
-
The order header reference numbers fields are under the Order By field.

-
Stop reference number fields for the first pickup and final drop are on the Summary tab.

-
Stop reference number fields for any stop are on the All Stops tab.
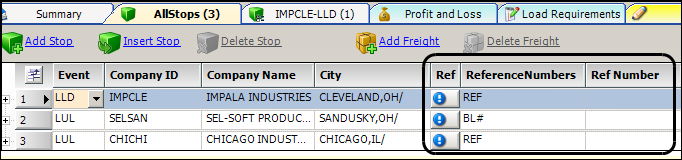
Note: You may need to use the Field Chooser to drag the columns into view.
-
Freight reference number fields for the first commodity are in the Freight Information box at the bottom of the Summary tab.

Note: You can enter reference numbers for any commodity on the Single Stop tab, located to the right of the All Stops tab.
Enter reference numbers
-
Click the Ref button to open the grid.
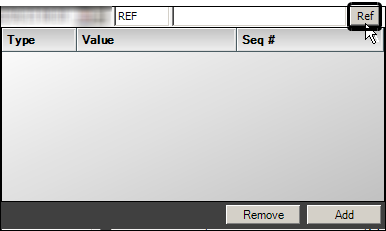
-
Click Add.
The system adds a blank row.

-
Select the reference number type in the Type field.
-
Enter the number itself in the Value field.
-
Repeat Steps 1 - 4 for additional numbers.
The Ref button turns red when there are multiple numbers.
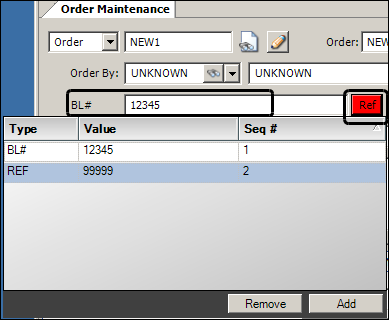
-
To exit the grid, click anywhere outside of it.
View changes to an order
Click the Activity Audit tab.

Note: By default, the system does not log audit data. To activate the audit feature, you must have FingerPrintAudit=Y in the General Info Table.