Color-coding dispatch statuses
Use the Operator condition type to add one or more OR conditions based on an arithmetic operator (such as equal to, greater than, or less than) or on a true condition.
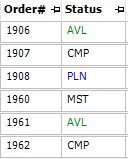
This example illustrates how to set up a conditional format in the Order Scroll window that will change the font color of the entries in the Status column based on the following order statuses:
-
Available orders should display in green.
-
Planned orders should display in blue.
-
All other orders should display in the default color, black.
You must set up multiple Operator conditions, one for each dispatch status for which you want to change the font color: Available and Planned.
| You must retrieve data before setting conditional formatting for a column. |
TMW Operations prior to version 17.10
-
Go to Tools > Scrolls > Order Scroll.
The Order Scroll window opens. -
Retrieve order data.
-
Right-click the Status column header.
-
From the shortcut menu, select Conditional Format.
The Add Condition/Appearance Mappings window opens. -
Click Add Operator Condition.

The window displays elements appropriate for an Operator condition.
-
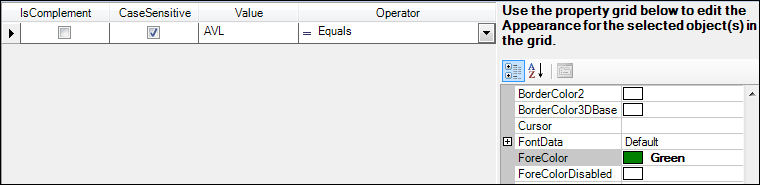
Select the font color for the Available status.
-
In the Value field, type AVL.
-
In the Operator field, select = Equals.
-
In the property grid, locate the ForeColor property.
-
From the Web palette, select Green.
-
-
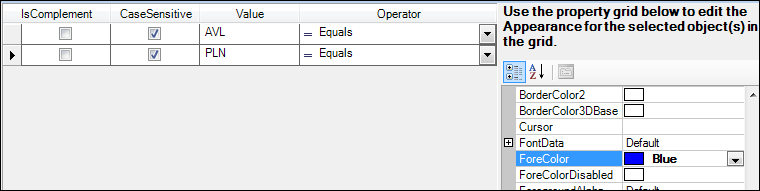
Select the font color for the Planned status.
-
Click Add Operator Condition.
A new row is added. -
In the Value field, type PLN.
-
In the Operator field, select = Equals.
-
In the property grid, locate the ForeColor property.
-
From the Web palette, select Blue.
-
-
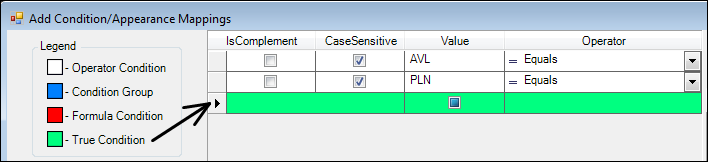
If you want to combine this formatting with centering the entries in the column, do the following:
-
Click Add True Condition.
A new row is added.Note: The rows are color-coded to indicate the type of condition.
-
In the property grid, locate the TextHAlign property and select Center.
-
-
Click OK.
The statuses in the Status column display in the selected colors and, if you added the true condition, are centered within the column.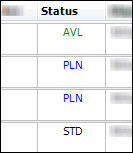
TMW Operations version 17.10 and later
-
Go to Tools > Scrolls > Order Scroll.
The Order Scroll window opens. -
Retrieve order data.
-
Right-click the Status column header.
-
From the shortcut menu, select Conditional Format.
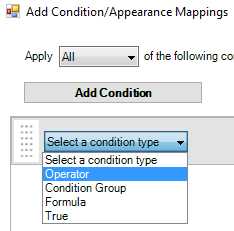
The Add Condition/Appearance Mappings window opens. A single condition row appears in the grid by default. -
In the Select a condition type field, select Operator.
-
In the Operator field, select = Equals if it is not already selected.
-
In the Value field, type AVL.
-
Select the Is Case Sensitive checkbox if it is not already selected.

-
Select the font and fill color for the Available status.
-
Click
 Styles.
 -
Click Custom Style.
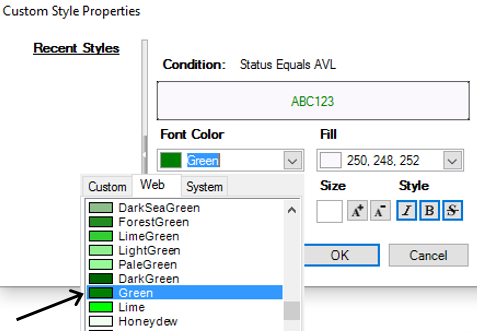
The Custom Style Properties window opens. -
In the Font Color field, change the font color to green. You can do this by typing 0, 255, 0 in the field or by following these steps:
-
Click the arrow in the Font Color field.
A drop-down menu opens. -
Click the Web tab.
-
Select Green.
-
-
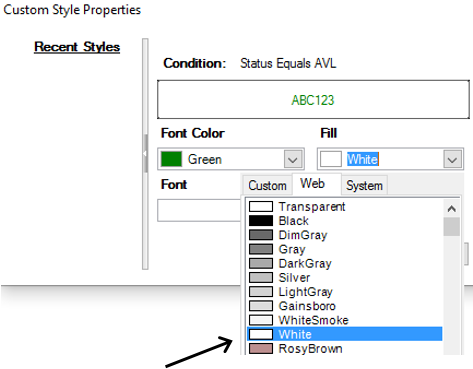
In the Fill field, change the fill color to white. You can do this by typing 255, 255, 255 in the field or by following these steps:
-
Click the arrow in the Fill field.
A drop-down menu opens. -
Click the Web tab.
-
Select White.
-
-
Click OK.
The Custom Style Properties window closes.
-
-
Select the font and fill color for the Planned status.
-
Click Add Condition.
A new condition row appears in the grid. -
In the Select a condition type field, select Operator.
-
In the Operator field, select = Equals if it is not already selected.
-
In the field to the right of the operator button, type PLN.
-
Select the Is Case Sensitive checkbox if it is not already selected.
-
Click
Styles. -
Click Custom Style.
The Custom Style Properties window opens. -
In the Font Color field, change the font color to blue. You can do this by typing 0, 0, 255 in the field or by following these steps:
-
Click the arrow in the Font Color field.
A drop-down menu opens. -
Click the Web tab.
-
Select Blue.
-
-
In the Fill field, change the fill color to white. You can do this by typing 255, 255, 255 in the field or by following these steps:
-
Click the arrow in the Fill field.
A drop-down menu opens. -
Click the Web tab.
-
Select White.
-
-
Click OK.
The Custom Style Properties window closes.
-
-
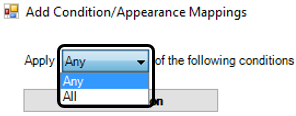
In the Apply field, select Any if it is not already selected. This ensures that if the Status column value is AVL_ or PLN , the cell style will change.
-
Click OK on the Add Condition/Appearance Mappings window.
The statuses in the Status column display in the selected colors.