Assigning trips and resources in the Trip Planner
The Trip Planner allows you to quickly and easily plan trips based on driver schedules. Using the Trip Planner, you can quickly assign trips to scheduled drivers, modify the resources used for each trip, view and edit trip stops, and dispatch the trip.
Assigning trips
Because the Trip Planner shows trips in blocks of time, it is easy to sequence trips and determine the length of a time that a driver will work continuously. The trip time blocks can be thought of as electronic versions of index cards on your desktop. There is one card for each trip. You can move trips around and line up several for a driver so that one trip ends near where the next begins. This allows you to arrange trips in an efficient sequence to minimize your deadhead miles.
Using the Trip Planner, you can plan up to 30 trips for a driver to perform during their shift. Each trip is shown in its own cell in the Assignment Plan pane.
-
Go to Operations > Trip Planner.
-
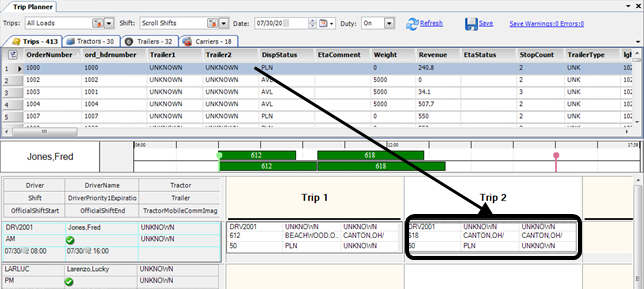
Select a trip in the Trips/Resources pane, and then drag it to the driver’s row in the Assignment Plan pane.
Notes:
-
Trip assignments are not saved until you click Save.
-
The currently selected trip is highlighted in blue.
-
Trips that you assign are highlighted in gray in the Trips/Resources pane until you click Save.
-
-
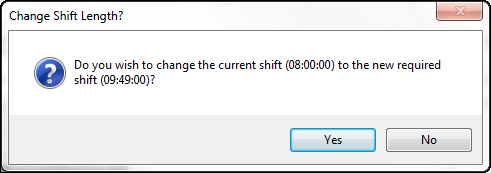
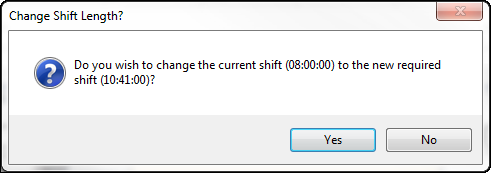
If an assignment extends beyond the driver’s scheduled workday, the system displays the Change Shift Length? message.
Do one of the following:
-
To complete the assignment
Click Yes. The extension of the shift is reflected in the Timeline.
In this example, the driver’s default shift starts at 8:00 and ends at 16:00.

The driver’s extended shift ends at 17:49.

-
To cancel the assignment
To cancel the assignment of the trip and the extending of the driver’s schedule, click No.
-
-
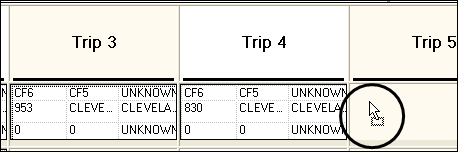
If you want, rearrange the order of a driver’s trips by dragging them to another trip cell on the grid.
This sample shows the mouse pointer dragging Trip 3 to the Trip 5 position. When the trip is dropped into the Trip 5 position the trips switch places on the Timeline, but the Trip 3 position in the Assignment Plan pane remains empty. Trip 4’s position in the Assignment Plan pane is unaffected by the change.
-
To save the trip plan, click Save.
If you decide not to plan the trip after all, drag it back to the Trips grid.
|
Even after saving your trip plan, you can move a trip from one position to another:
|
Viewing and editing stops using Quick Edit
The Quick Edit window allows you view data regarding the stops and events recorded for a planned trip.
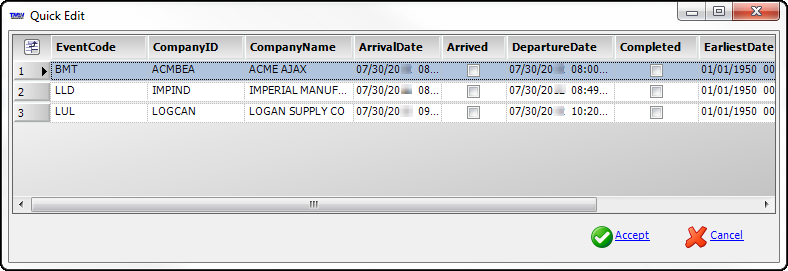
If needed, you can make changes to the dates and times associated with existing stops. You can also mark a stop as Arrived or Completed.
| You must assign a trip to view it in the Quick Edit window. If you want to assign a new trip, see Assigning trips. |
To view and edit stops in the Quick Edit window, follow these steps.
-
Go to Operations > Trip Planner.
-
Right-click on an assigned trip in the Assignment Plan pane and select Quick Edit.
The Quick Edit window opens. -
Make any needed changes to the listed stops.
The individual Quick Edit fields may vary based on system configuration. The most commonly used fields are defined in the table below. They are listed alphabetically.
Field Definition ArrivalDate
Date/time the driver is scheduled to arrive at the stop
Arrived
This checkbox indicates whether the stop’s arrival has occurred.
-
Selected
The arrival is complete -
Cleared
The arrival is not complete
Note: When the arrival at the final stop is set to Completed, the trip’s status changes from Started to Completed.
CompanyID
ID of the company where the stop occurs
This field is read-only.
CompanyName
Name of the company where the stop occurs
This field is read-only.
Completed
This checkbox indicates whether the stop’s departure has occurred.
-
Selected
The departure is complete -
Cleared
The departure is not complete
DepartureDate
Date/time the driver is scheduled to leave the stop
EarliestDate
The earliest date/time that the stop can occur
EventCode
Event type that identifies the primary activity that is to occur at the stop
This field is read-only.
LatestDate
The latest date/time that the event for the stop can occur
StpNumber
A unique system-assigned ID for the stop
This field is read-only.
-
-
When finished, click Accept.
If you decide not to save the changes after all, click Cancel instead.
Setting a trip as the last of a shift
When you designate a trip as the last of a shift, the Trip Planner automatically adds an empty move to the trip to return the truck to its home terminal. The new stop is added to the trip, and the new trip length is reflected in the Timeline.
-
Go to Operations > Trip Planner.
-
Right click on an assigned trip in the Assignment Plan pane and select Set As Last Trip.
Note: Only the final assigned trip in the shift can be set as the last trip.
-
If an assignment extends beyond the driver’s scheduled workday, the system displays the Change Shift Length? message.
Do one of the following:
-
To extend the shift to include the return move, click Yes. The extension of the shift will be reflected in the Timeline.
-
To cancel the addition of the return move to the trip and the extending of the driver’s schedule, click No.
-
Assigning resources
In addition to managing trips and drivers, you can also use the Trip Planner to manage tractors and trailers. You can:
-
Assign tractors and trailers to individual trips or to a driver’s entire shift
-
Replace or remove tractors and trailers from trips and shifts
-
Change drivers for a preplanned route
Assigning a tractor or trailer
Use this procedure to add a tractor/trailer to a driver or assigned trip.
-
Assigning a tractor or trailer to a driver makes it the default for all trips assigned to that driver.
-
Assigning a tractor or trailer to a trip assigns it to that particular trip and all following trips by that driver.
-
Go to Operations > Trip Planner.
-
With trips and resources retrieved, select the Tractors tab.
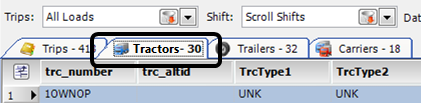
Note: Only active tractors display on the Tractors tab, that is, those that are currently in service. The same is true for trailers shown on the Trailers tab.
-
Find the tractor to be assigned and do one of the following:
-
To assign it to a driver, drag it to the correct driver in the Shift pane.
The tractor is assigned to all trips assigned to the driver. It also shows in the driver’s Shift pane entry. -
To assign it to an assigned trip and all following trips, drag it down to the trip in the Assignment Plan pane.
The tractor is assigned to that trip and all following trips. The tractor in the driver’s Shift pane entry does not change.
-
-
If needed, repeat Steps 1 through 3, selecting the Trailers tab and dragging a trailer to the driver’s row in the Shift pane or trip in the Assignment Plan pane.
-
Click Save.
-
Replacing an assigned tractor or trailer
Use this procedure to assign a different tractor or trailer to a driver or assigned trip.
-
Go to Operations > Trip Planner.
-
With trips and resources retrieved, find the driver or trip needing a different tractor.
-
Select the Tractors tab.
-
Find the new tractor or trailer and do one of the following:
-
To assign it to a driver, drag it down to the driver’s row in the Shift pane.
The new tractor replaces the original tractor on all trips assigned to the driver. It also replaces the tractor in the driver’s Shift pane entry. -
To assign it to an assigned trip and all following trips, drag it down to the trip in the Assignment Plan pane.
The new tractor replaces the original tractor on that trip and all following trips. The tractor in the driver’s Shift pane entry does not change.
-
-
If needed, repeat Steps 2 through 4, selecting the Trailers tab and dragging a trailer to the driver’s row in the Shift pane or the individual trip in the Assignment Plan pane.
-
Click Save.
Removing an assigned tractor or trailer
Use this procedure to remove a tractor or trailer association with a driver or assigned trip, without making a replacement.
-
Go to Operations > Trip Planner.
-
With trips and resources retrieved, find the driver or trip from which you want to remove the association.
-
Select the Tractors tab.
-
Find the UNKNOWN tractor and do one of the following:
-
To remove the driver’s currently assigned tractor, drag it down to the driver’s row in the Shift pane.
The UNKNOWN tractor replaces the original tractor in all trips assigned to the driver. It also replaces the tractor in the driver’s Shift pane entry. -
To remove a trip’s assigned tractor, drag it down to the trip in the Assignment Plan pane.
The UNKNOWN tractor replaces the original tractor on that trip and all following trips. The tractor in the driver’s Shift pane entry does not change.
-
-
If needed, repeat Steps 2 through 4, selecting the Trailers tab and dragging a trailer to the driver’s row in the Shift pane or the trip in the Assignment Plan pane.
-
Click Save.
Changing assigned drivers on a preplanned route
Use the Change Driver feature to switch drivers on a route that has been assigned to a driver but not yet started (status of PLN).
-
Go to Operations > Trip Planner.
-
In the Assignment Plan pane, locate the route assigned to the driver that you want to change.
-
Right-click on the Shift pane and select Change Driver.
The ChangeDriverForm window opens.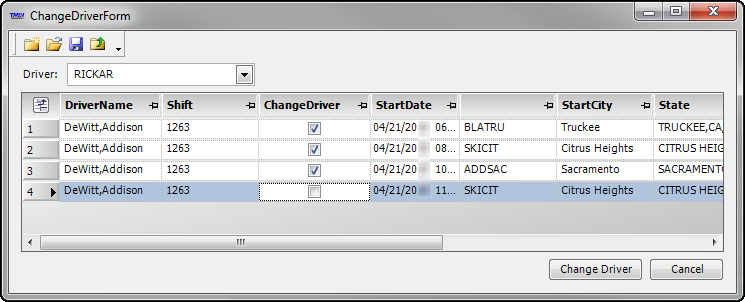
-
In the Driver field, enter the ID of the new driver.
-
By default, the ChangeDriver checkbox is selected for all trips in the route. Clear the checkbox for any order on which you want the original driver to remain.
In the example above, only three of the four trips in this route will be assigned to a new driver. -
Click Change Driver.
A message appears prompting you to save your changes. Click Yes to continue or No to cancel.
The Assignment Plan pane redisplays with the trip(s) assigned to the new driver.
Assigning a max limit to a driver’s loads
First available in TMW Operations V.2023.4
You can limit a driver’s maximum number of loads, orders and or trips to be assigned per day. The system will check the number of loads assigned to the driver for each shift and a save warning message will display if the limit is exceeded. You can still assign the driver to more than the limit if necessary. The default is zero, which is unlimited.
Follow these steps to set up and use this feature:
-
Go to Operations > Tools > Driver Profile.
-
Retrieve a driver who is used for shift based trip dispatch.
-
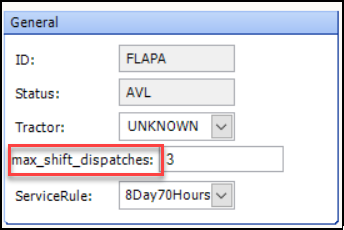
Right-click and select Toggle Quickdesigner and then select Add New Item to add the max_shift_dispatches field to the Driver Profile window in a desired location.
Right-click and Save Layout to Database to save your custom layout.
-
Enter a numeric value in the max_shift_dispatches field (for example 3)
Save the changes to the driver.
The number entered will be the default when a new shift schedule record is generated for the driver. -
Go to Operations > Schedule By Driver > Edit Driver Schedule.
-
Enter the driver id of the driver you had edited in the prior steps and hit the Enter key on your keyboard.
The Edit Driver Schedule window displays any existing shifts for the driver. -
Click the Generate Schedule… button to open the Generate Schedule window.
The Max Trips field will default to the value that was entered in the max_shift_dispatches field in the Driver profile.
Note: You can choose to override the Max Trips field here or leave it as the default value.
-
Click the OK button to generate shift schedule records.
The Edit Driver Schedule window will display the shift schedule records that were created. -
Locate the DriverMaxShiftDispatches field in the grid. The value in the field is set to the Max Trips value from the Generate Schedule window.
You can select a day and alter the numeric value in the field.
Save your changes. -
Go to Operations > Schedule By Terminal.
-
Add the ss_drvmaxshiftdispatches column using the Field Chooser to the grid.
Open schedules for the terminal of the driver you assigned a max dispatch number to. The max number of dispatches are shown for each shift in this column.
Note: You can edit the max dispatches for a shift by changing the value in the column.
Save your changes. -
Go to Operations > Trip Planner.
-
Select from the Trips and Shift fields and Date to narrow down the driver(s) with shift schedule records.
Click the Refresh button. -
Locate the card with a driver who has a max number of shift trips that can be dispatched.
You can add the DriverMaxShiftDispatches field to the driver’s shift card header with Cell Designer (Right-click on the driver’s shift card header and select the Cell Designer menu option).
This will display the maximum number of trips that the driver should have assigned for the current shift day.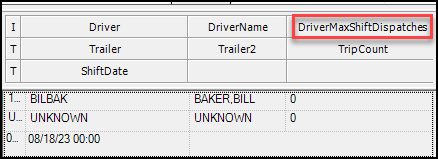
Note: This functionality is also available in the Trip Folder.