Creating a Company Planner board
After you plan a board, you set it up in the Company Planner Setup window.
Starting a new board
To create a new Company Planner board, follow these steps.
-
Go to Operations > Company Planner Setup.
The Company Planner Setup window opens. -
Click
 Add Board.
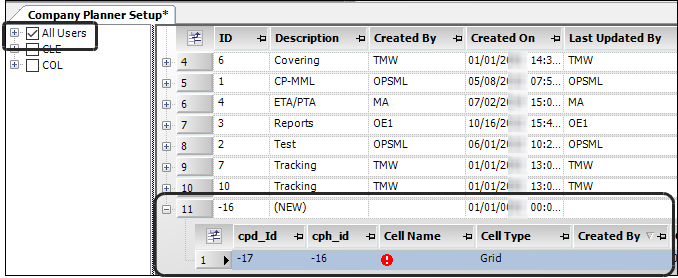
A new row appears in the Boards and Cells pane. By default:-
The Description field shows (NEW).
-
A single cell row is added, with the Cell Type set to Grid.
-
The new board will be available to all users.
-
-
In the Description field, enter a name for the board.
-
In the Cell Options Editor pane at the bottom of the window, do the following:
-
Enter a name in the Cell Name field.
Your entry appears in the Cell Name field in the Boards and Cells pane. If you choose to show the cell name on the board, the system uses your entry.Note: The board you create shows the cells as panes or tabs. The name identifies the pane.
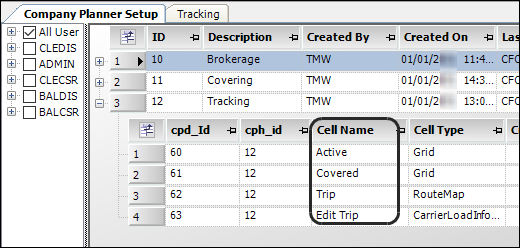
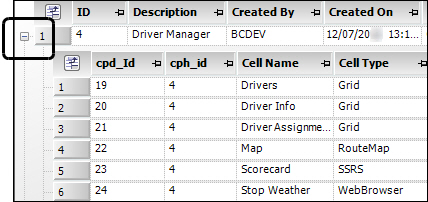
This illustration shows the cells used in the default Tracking board.
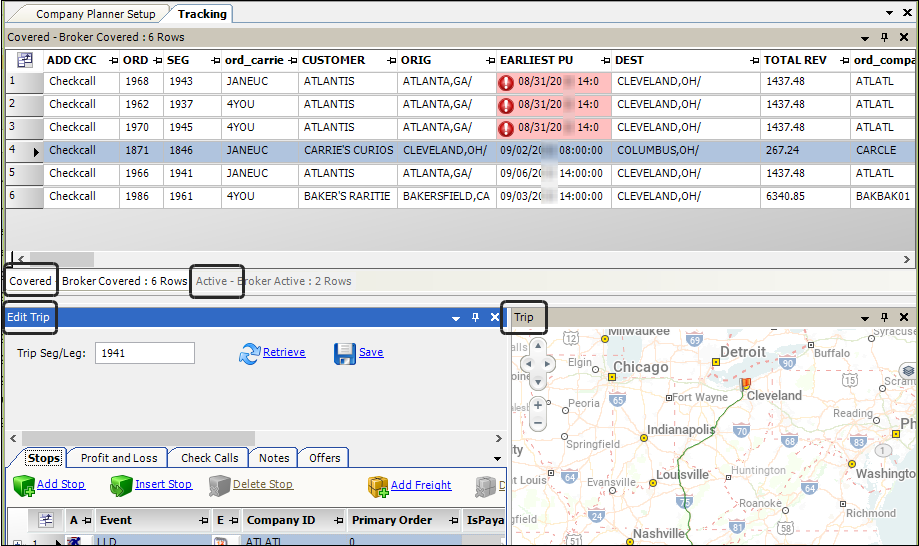
This illustration shows the board containing the cells.
-
If needed, use the Cell Type drop-down list to select a different cell type. What you see in the Cell Options Editor pane depends on the cell type you are using. The cell type controls the tabs that appear and which options can be set. For a detailed list, see Choosing cell types.
-
-
To add additional cells, click
 Add Cell.
A new row appears for each cell under the board in the Boards and Cells pane. -
If needed, you can:
-
Copy a cell
If you need another cell that is the same type as one already in the board, you can copy the original cell.
Note: You can also copy a cell from one board and use it in another board. To do so, copy the cell you need. Drag the copied cell to the board in which you want to use it.
-
In the Boards and Cells pane, expand the board’s list of cells.
-
Select the cell you want to copy.
-
Click
 Copy Cell.
The duplicate cell is added to the list .
-
-
Delete a cell
If you decide you do not need a cell you added to a board, you can delete it.
-
In the Boards and Cells pane, expand the board’s list of cells.
-
Select the cell you want to delete.
-
Click
 Delete Cell.
The cell is removed immediately.
-
-
-
Continue by setting cell options and adding subscriptions.
Setting cell options
What you see in the Cell Options Editor pane depends on the cell type you are using. The cell type controls the tabs that appear, and which options you can set. For a detailed list, see Choosing cell types.
With the board’s cells expanded in the Boards and Cells pane, select the row of the cell for which you want to set options.
Select the needed tab and make entries appropriate for the cell type.
Setting Grid options for Grid cells
When you select the Grid cell type, the Grid Options tab is available.
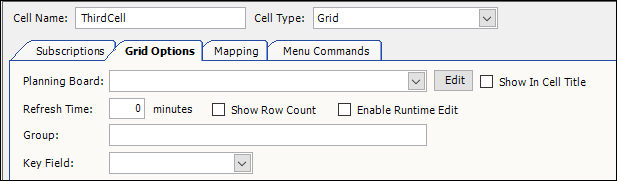
| The Grid Options tab is not available for other types of cells. |
Use this tab to set the following options for a Grid cell.
Required field: *
| Field | Definition |
|---|---|
Planning Board * |
Select the scroll view used in the cell. This is a required field. All Grid cells must identify the planning board view used to populate the cell. You cannot save a board containing a Grid cell if you leave this field blank. |
Edit button |
Opens the Board Setup window. For details, see Defining and managing board views. If a Planning Board scroll is selected and you click Edit, the Board Setup window opens. You can modify the scroll. Warning: Any changes made to the scroll apply everywhere the scroll is used, not just in that particular cell. |
Show in Cell Title |
Select the checkbox to show the board name in the cell title. |
Refresh Time |
Enter the number of minutes at which the data is refreshed. |
Show Row Count |
Select the checkbox to allow the title of the cell to show the number of rows returned. |
Enable Runtime Edit |
Select the checkbox to allow users to access the right-click shortcut menu to set retrieval restrictions. |
Group |
Define a group of grid cells in which only one row in any cell can be selected at any time. If you have a row selected in one cell and select a row in a different cell, the row in the previous cell is no longer selected. |
Key Field |
Select a key (each column in the grid is a unique key). If the user has selected a row or several rows in a grid and a grid refresh occurs, the rows containing the same key will be reselected after the refresh. |
Right-click restrict |
To enable, select the Enable Runtime Edit checkbox. During runtime, this option brings up a scroll editor with restrictions. These restrictions are only temporary and do not save. For example, if the window contains a load scroll and you right-click, the shortcut menu includes the Restrict command. You can restrict the loads to a specific Bill To. This will refresh the grid with the loads for the specified Bill To. This restriction is only for that particular window and is not saved. |
Include TotalMail Menu |
Adds right-click shortcut menu to the grid that allows TotalMail dispatching This would allow the user to dispatch messages/loads to the truck through the in-cab device. Note: Your system must be set up to use TotalMail. You have the |
Setting Mapping options for Grid cells
When you select Grid cell type, the Mapping tab is available.
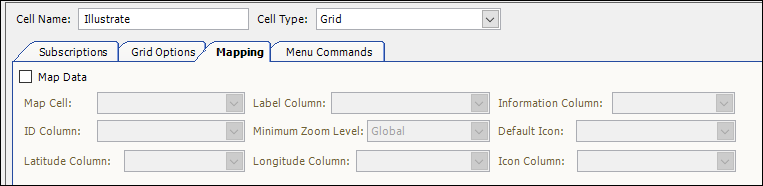
| The Mapping tab is not available for other types of cells. Do not confuse it with the Map Options tab. The Map Options tab applies to Map or Map Route cell types. |
Use this tab to set mapping options relevant to Grid cells.
| Field | Definition |
|---|---|
Map Data |
You must select the checkbox before you can make entries in the rest of the fields. |
Map Cell ID |
Select a cell used in the board that is identified as a Map. The field’s drop-down list shows the cell’s cpd_Id field value. |
ID Column |
Select a column that is a unique identifier. This will key a row to a map point. When a user clicks a map icon, the row can be selected if a key is defined and a subscription is set up. |
Latitude Column |
Select columns that define the latitude of each item. Note: The data can be in degrees or seconds, based on your |
Label Column |
Select the column that will display as a label on the map point. Your selection may appear as a ToolTip. This option varies, depending on which map vendors you use. |
Minimum Zoom Level |
Set the zoom level. Options are:
|
Longitude Column |
Select columns that define the longitude of each item. Note: The data can be in degrees or seconds, based on your CityLatLongUnits General Info Table setting value. |
Information Column |
Select the column that displays when a user clicks a map icon. When you click the map icon, an information window opens for that icon. It shows the information in the column that was selected using this option. For example, suppose that the information column is set to the destination company name. When the use clicks the icon on the map, the name of the destination company appears in the information window. |
Default icon |
Select a default icon to be used for the rows in the scroll. |
Icon Column |
Select a column that will allow each row to determine the icon that is displayed on that map for that row |
Setting Mapping options for Map and RouteMap cells
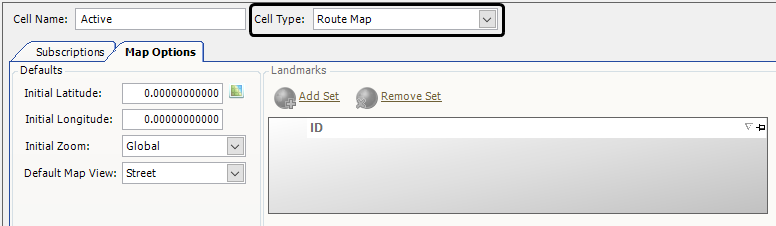
| The Map Options tab is not available for other types of cells. The Map Options tab applies to Map or Map Route cell types. Do not confuse with the Map Options tab. |
Use this tab to set mapping options relevant to Map or RouteMap cells.
| Field | Definition |
|---|---|
Initial Latitude |
Specify the default latitude used when the map cell opens. |
Initial Longitude |
Specify the default longitude used when the map cell opens. |
Initial Zoom |
Specify the default zoom factor used when the map cell opens. |
Default Map View |
Specify the default detail used when the map cell opens. You can have the map show a Satellite, a Street, or a Hybrid view. |
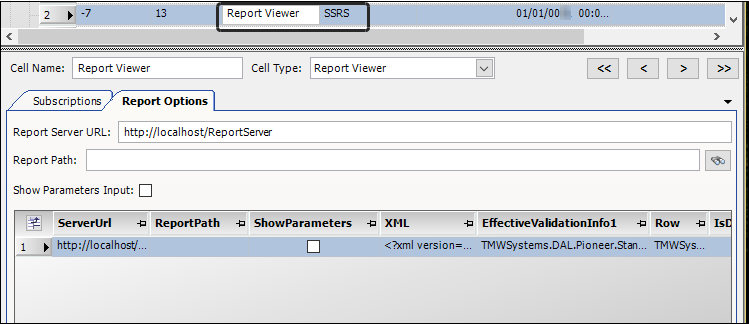
Setting Report options for ReportViewer cells
When you select the ReportViewer cell type, the Report Options tab is available.
|
The Report Options tab is not available for other types of cells. When you select ReportViewer as the cell type in the Cell Options Editor pane, the Boards and Cells pane shows the cell type as SSRS. |
Use this tab to set the following options for a ReportViewer cell.
| Field | Definition |
|---|---|
Report Server URL |
Specify the default latitude used when the report cell opens. Note: The default entry in this field is https://localhost/ReportServer. |
Report Path |
Specify the default path to the report and the report name. |
Show Parameters |
Select the checkbox to show the input parameters in the report cell. Show the parameter names and their sequence after the user browses for a report in the Parameters Grid. Only three additional parameters, corresponding to Arg1, Arg2, and Arg3 are allowed. This makes the parameter sequence important. Note: After you save the report options, select a report from the browser. The parameters appear in the grid in this window. |
Setting SQL options for SQLGrid cells
When you select the SQLGrid cell type, the SQL Options tab is available.
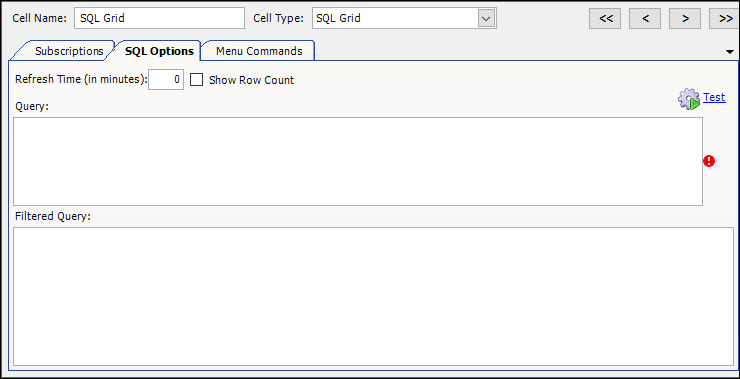
| The SQL Options tab is not available for other types of cells. |
Use this tab to set the following options for a ReportViewer cell.
Required field: *
| Field | Definition |
|---|---|
Refresh Time (in minutes) |
Enter the number of minutes before the data is refreshed. |
Show Row Count |
Select the checkbox to show the number of returned rows in the cell title. |
Query * |
Enter the SQL query to be run, for example:
|
Filter Query * |
Enter the filter query, for example:
{1} is an additional parameter that can be passed through this action. |
To verify that your query retrieves the expected results, click ![]() Test.
Test.
Setting Browser options for WebBrowser cells
When you select the WebBrowser cell type, the Browser Options tab is available.
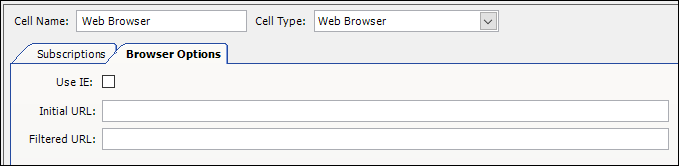
Use this tab to set the following options for a WebBrowser cell.
| Field | Definition |
|---|---|
Use IE |
Select this checkbox to have the application use Internet Explorer as the WebBrowser when opening the website. Note: If you are using a different default browser, such as Chrome or Firefox, this setting will override your default. |
Initial URL |
Enter the URL that is loaded when the cell first loads. For example: https://www.google.com |
Filter URL |
Enter the URL that is loaded when the FilterData action is executed. For example: https://www.google.com/#safe=off&output=search&q={1} Arguments 1, 2, and 3 replace the place holders {1}, {2}, and {3} In the example, {1} is a parameter that can be passed through this action (Arg1). The value chosen in Arg1 will be substituted into {1} in the Filtered URL. |
Adding subscriptions
Use this general process for subscriptions:
-
Decide what should happen when data is automatically retrieved
Add a subscription to every cell that should refresh or perform another action. -
Decide how the cells should change based on user interaction
Add a subscription to each cell that changes based on an event.
| Examples are provided after the steps for adding a subscription. These examples are based on the default Company Planner brokerage boards. |
To add a subscription, follow these steps.
-
Go to Operations > Company Planner Setup.
The Company Planner Setup window opens. -
In the Boards and Cells pane, expand the board to display its cells.
-
Click the cell to which you want to add a subscription.
-
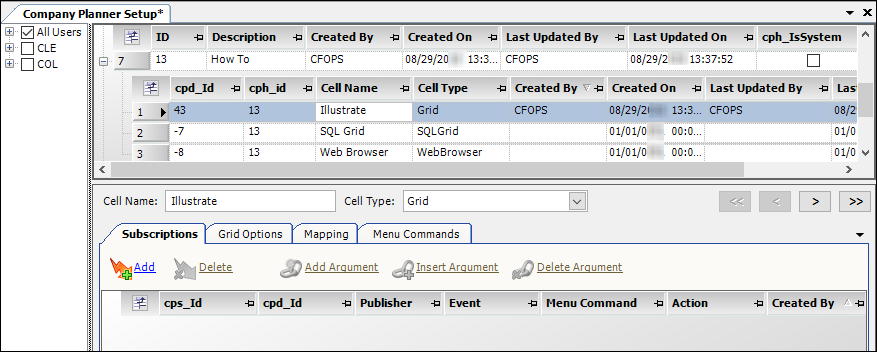
In the Cell Options Editor pane, select the Subscriptions tab.
-
Click
 Add.
Add.
A blank row is added.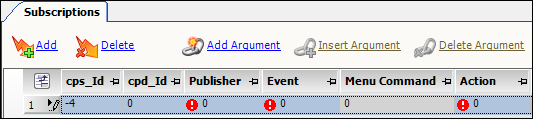
-
Make entries in the following fields:
Field Definition Publisher
Select the cell in which the event occurs.
Note: The field shows the cells in your board in a drop-down list.
Event
Select the needed event.
Notes:
-
Not all event types are available in all cell types. For example, you cannot have a RowClicked event happen in a publisher cell that is a map. The appropriate events, based on the publisher cell type, appear in the Event field drop-down list. For descriptions of the events available in the system, see Understanding publisher events.
-
If you select the CustomMenuCommand event, you must make an entry in the Menu Command field.
Menu Command
Identify the command associated with the CustomMenuCommand event.
Note: You must create the command before you can specify it in a board. For details, see Defining custom commands to add to a menu or toolbar.
Action
Select an action.
Note: Not all action types are available for all cell type/event type combinations. The actions appropriate to your entry in the Event field appear in the Action drop-down list. For descriptions of the available actions, see Understanding subscriber action types.
-
Examples of events and actions are provided to show you how to set up and test them in subscriptions.
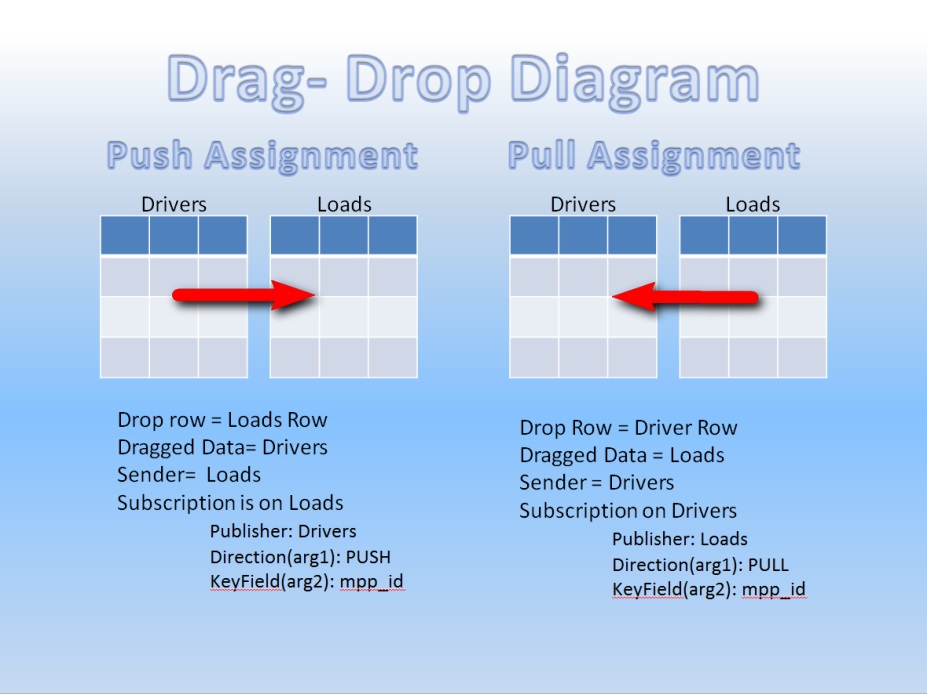
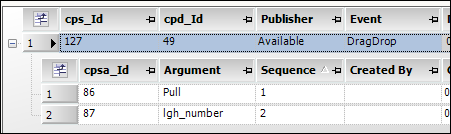
Using the DragDrop event in a subscription
The DragDrop event is fired when the user performs a drag-and-drop operation between two cells. There are two different operations with this event: push and pull. You push assets onto a load and pull loads to the asset. The subscriber to the DragDrop event is always where the rows are being dropped. The publisher is the cell from which the user started the drag process.
To set up this event as a pull:
-
In the Company Planner Setup window, select the board and cell to which you want to add it. For example, select the Brokerage board and the Branches cell.
-
Select the Subscriptions tab.
-
Click
Add Subscription and set the corresponding events, actions, and arguments. For example, on the Subscription tab, set:-
Publisher to Available
-
Event to DragDrop
-
Action to SetBrokerBranch
-
Arg1 to Pull
-
Arg2 to lgh_number
Note: For instructions on adding arguments, see Using arguments.
-
-
Click
 Save.
Save. -
Go to Operations > Company Planner > Brokerage.
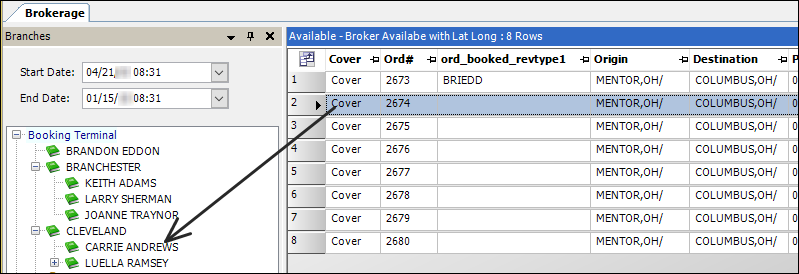
You should be able to:-
Drag a load form the Available cell.
-
Drop it on a branch in the Branches cell.
-
-
The order’s Booking Terminal value is set to that Branch.

To set up this event as a push:
-
In the Company Planner Setup window, select the board and cell to which you want to add it. For example, select the Brokerage board and the Available cell.
-
Click
Add Subscription and set the corresponding events, actions, and arguments. For example, on the Subscription tab, set:-
Publisher to Assets
-
Event to DragDrop
-
Action to AssignCarriersACS
-
Arg1 to Push
-
Arg2 to TrkCarrier
Note: For instructions on adding arguments, see Using arguments.
-
-
Click
Save. -
Go to Operations > Company Planner > Brokerage.
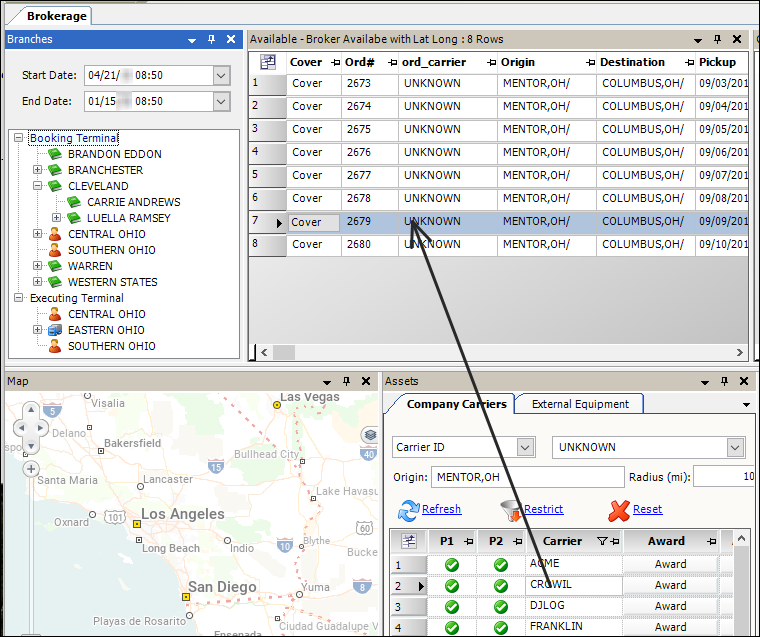
You should be able to:-
Select a carrier in the Assets cell.
-
Drop it on a load in the Available cell.
-
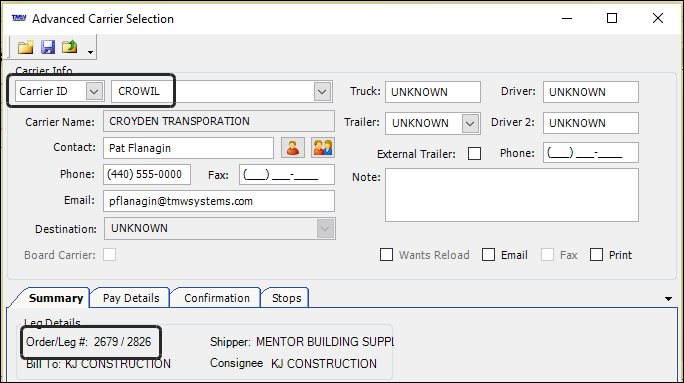
The Advanced Carrier Selection window opens. It shows the carrier you selected assigned to the order you selected.
Using the CheckCallAdded event in a subscription
The CheckCallAdded event is for Brokerage only. It is fired after a check call has been added using a Grid cell. Use it to refresh Brokerage data. To set this up in Company Planner, follow these steps.
-
In the Company Planner Setup window, select a board and the Grid cell type.
For example, select the Tracking board and the Active cell. -
Select the Subscriptions tab.
-
Click
Add.
The Publisher must be a grid. In this case, the publisher and subscriber are the same, so set:-
Publisher to the Cell Name, such as Active
-
Event to CheckCallAdded
-
Action to RefreshData
-
-
Click
Save. -
Go to Operations > Company Planner > Tracking.
-
Select a trip in the Active grid cell.
-
Click the Checkcall button for that trip.
The Check Call/Status Update window opens. The user can add a check call to update a stop in this window. When the change is saved, the check call data is refreshed in the Active grid.
Using the CarrierBidAdded event in a subscription
The CarrierBidAdded event is for Brokerage only. It is fired after the user adds a carrier bid using a BrokerageAssets or Grid cell. Use it to refresh the Brokerage data. This event fires after an AddCarrierBid action takes place.
To set this up in Company Planner:
-
In the Company Planner Setup window, select a board and Grid cell type. For example, select the Brokerage board and its Carrier Load Information cell.
-
Select the Subscriptions tab.
-
Click
Add. -
Set the corresponding events, actions, and arguments. For example, set:
-
Publisher to BrokerageAssets cell, such as Assets
-
Event to CarrierBidAdded
-
Action to RefreshCarrierBids
-
-
Click
Save. -
Go to Operations > Company Planner > Brokerage.
-
In the Assets cell, select the Company Carriers tab.
-
Select a carrier, and click the Add/Edit Offer button. The carrier bids will be refreshed to include this addition in the Carrier Load Information cell.
Using the OpenTripFolder action with a CustomMenuCommand event in a subscription
The OpenTripFolder action opens the Trip Folder and displays the trip the user selects in a grid. This example includes using a menu command in the subscription. You use Menu Commands to define custom menu commands or add row buttons that trigger specific actions. You must define a Menu Command before you can use it in the subscription.
To set this up in Company Planner, follow these steps.
-
In the Company Planner Setup window, select a board and Grid cell type. For example, select the Covering board and its Available cell.
-
Click the Menu Commands tab.
-
Click
 Add.
Add. -
In the Name field, enter the command name you want users to see on the board, such as Trip Folder.
-
If you want the command to appear as a button in a grid row, select the Show Button checkbox. If you leave the checkbox cleared, the command is available only from the right-click shortcut menu.
-
Select the Subscriptions tab.
-
Click
 Add.
Add. -
Set the corresponding events, actions, and arguments. For example, set:
-
Publisher to the same cell, that is, Available
-
Event to CustomMenuCommand
-
Action to OpenTripFolder
-
-
Click
Save. -
Go to Operations > Company Planner > Covering.
-
In the Available cell, right-click on a trip.
A shortcut menu opens. -
Select Trip Folder.
Using the MapLeg action in a subscription
The MapLeg action plots the leg and its last known check call.
To set this up in Company Planner, follow these steps.
-
In the Company Planner Setup window, select a board and the RouteMap cell type.
For example, select the Tracking board and its Trip cell. -
Click
Add. -
Set the corresponding events, actions, and arguments. For example, set:
-
Publisher to Active
-
Event to RowClicked
-
Action to MapLeg
-
-
Click
Save. -
Go to Operations > Company Planner > Tracking.
-
Select the Active tab.
-
Select a trip.
The Trip cell shows the route for the selected trip and the location of its latest check call.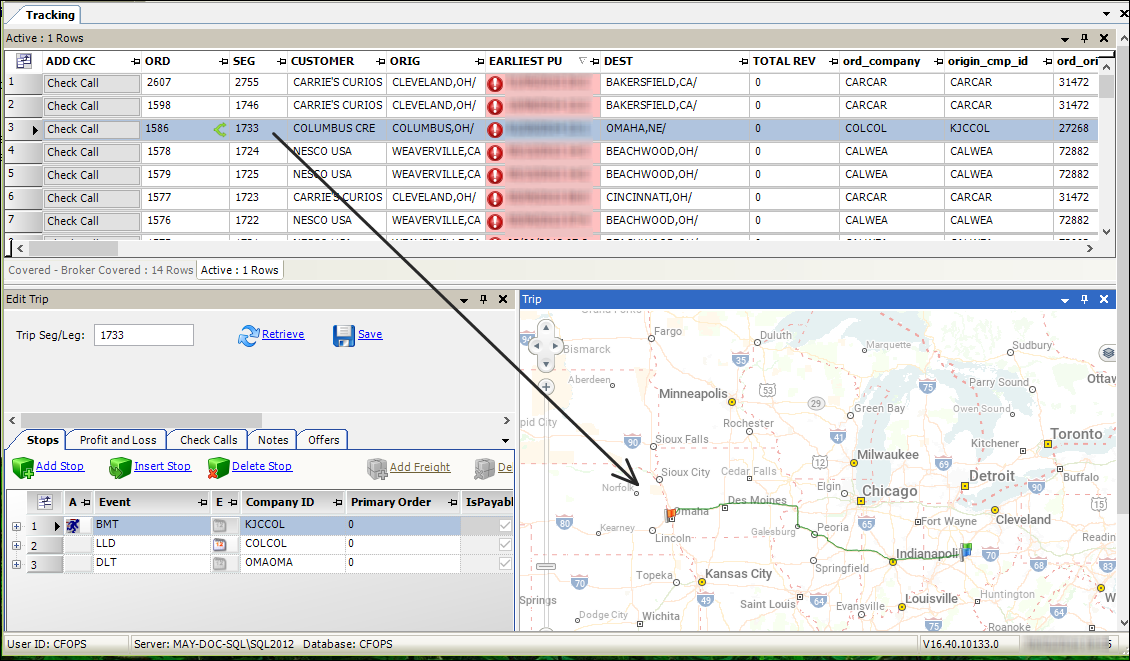
Using arguments
Some events and actions use arguments. Arg1, Arg2, and Arg3 are arguments that are used by some actions and are passed in by the data in the publishing cell. An argument identifies the specific data the system needs to perform the action in the subscriber cell. For example, the Brokerage board’s Covered cell is set up to allow assigning carriers to loads in the ACS window. To perform this task, it must know which trip and which carrier. The subscription that uses the AssignCarrierACS action uses two arguments to identify the database columns containing the required data:
-
Arg1 is set to lgh_number
-
Arg2 is set to ord_carrier

When a subscription includes arguments, it is expandable on the Subscriptions tab.
To add an argument, follow these steps.
-
Go to Operations > Company Planner Setup.
The Company Planner Setup window opens. -
On the Subscriptions tab, select the subscription for which you want to add an argument.
-
Click
 Add Argument.
A child row is added to the subscription. The system sets the sequence for the arguments to the order in which they were added.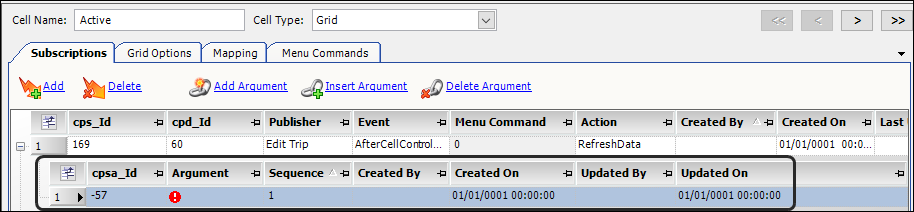
-
In the Argument field, enter the data that must be provided before the action can take place.
Note: When the event type is DragDrop, the argument identifies whether the data is required for the push or pull side of the event. In this example:
-
The first argument tells the system to pull the data.
-
The second argument identifies the data to pull as the trip segment, which is stored as the lgh_number.
-
-
Repeat Steps 2 and 3 as needed.
Notes:
-
If you skipped an argument, you can insert it between existing arguments. Select the argument that will follow the one you need to add, and click
 Insert Argument.
 -
If you added an argument and discover it is not needed, you can delete it. Select it and click
 Delete Argument. The system displays the Delete Argment message. It asks, "Are you sure you wish to delete this subscription argument?" Click Yes to confirm the deletion. Click No to cancel it.
-
-
Click
Save to retain your entries.
Specifying who can use the board
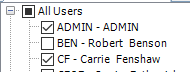
By default, all users have access to a new board. In the Company Planner Setup window, the All Users checkbox is selected automatically.
Selecting a group allows everyone in that group access to the board. If you do not want all members of a group to have access to a board, expand the list of users and clear the checkbox next to the group name. Select the checkbox for each individual who should have access.
When only some members of a group have access, the checkbox next to the group name is filled in, rather than displaying a checkmark.
| While you are in the process of creating a board, you may want to grant access only to yourself. |
If needed, change the users/groups that will have access to the board in the Board Permissions pane.
-
In the Company Planner Setup window, select the board.
-
In the Permissions pane, clear the checkbox next to the group name.
-
Select the checkbox of each user/user group that should have access to the board.
-
Click
Save.
Editing an existing board
To edit a board, you can change cell options and revise subscriptions using the same procedures you followed when creating the board. Additionally, you can:
Copy a board
If you want, you can copy an existing board and change some parts of it to better suit your needs.
-
In the Boards and Cells pane, select the board you want to copy.
-
Click
 Copy Board.
The Copy Board message opens. It asks, "Do you want to copy selected board?" -
Click Yes to proceed.
The new board appears at the bottom of the list. In the Description field, the system appends "Copy of" to the name of the original board.Note: If you decide not to copy the board, click No or Cancel.
Delete a board
If you decide you do not need a board you created, you can delete it.
-
In the Boards and Cells pane, select the board you want to delete.
-
Click
 Delete Board.
The Delete Board message opens. It asks, "Are you sure you want to delete this board?" -
Click Yes to proceed.
The board is removed from the list.