Applying conditional editing
Conditional editing in a data grid causes a field to be read only when certain conditions are met in another field of the same record. For example, in the Trip Folder Stops grid, you might not want a user or user group to be able to edit the Company ID field if a stop is billable.
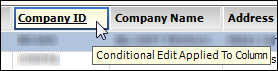
You will be able to identify a column as having conditional editing applied because the column header is underlined.
|
The windows used for conditional editing are:
The Condition Builder and the Sub-Condition Group windows have the same components and functionality.
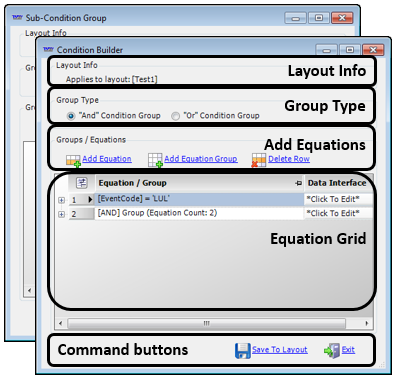
Layout Info |
The Layout Info section displays the name of the saved layout in which you are saving the conditional editing. |
Group Type |
When adding more than one equation or equation group to a condition, you identify whether they should be joined by:
|
Groups / Equations |
Select Add Equation to add an equation to the current condition group. Select Add Equation Group to add an equation group to the current condition group that will contain a subset of equations. Select Delete row to remove an equation or equation group from the current condition group. |
Equation grid |
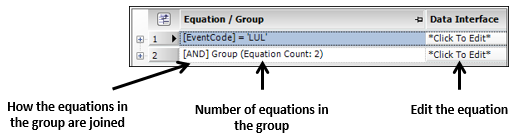
The equation grid displays the equations and equation groups that are contained in the current condition group. For equation groups, the grid identifies the number of equations in the group and how they are joined.
The grid also allows you to edit an existing equation or equation group. |
Command buttons |
Use Save To Layout to save the condition equations to the grid layout identified in the Layout Info section. Use Exit to close the Condition Builder or the Sub-Condition Group window. |
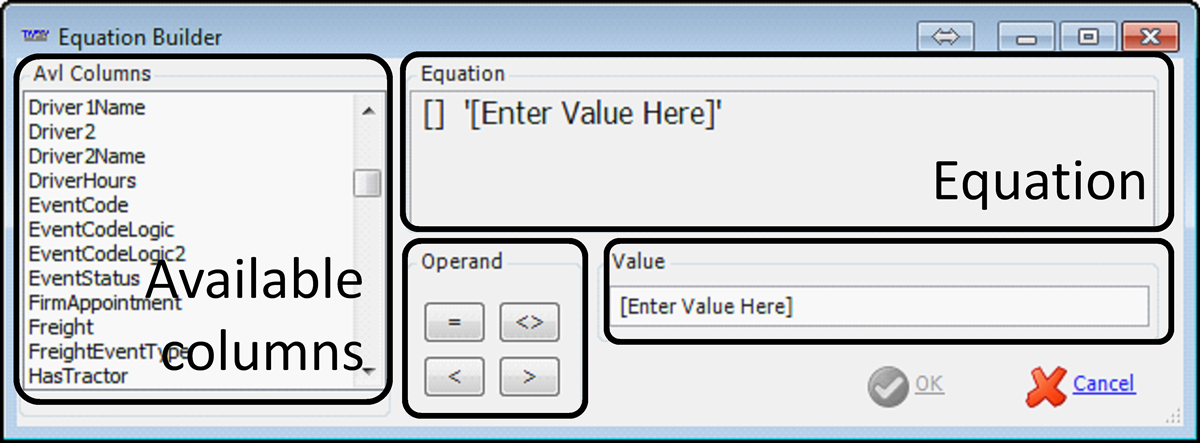
Available Columns |
This panel shows all the columns available from the Field Chooser, whether they are shown on the grid or not. Double-click on the appropriate column. |
Operand |
Select one of the options:
|
Value |
Enter the value that the column entry should be equal to, not equal to, greater than, or less than, to trigger the read-only level of accessibility. |
Equation |
As you build your equation, the Equation panel shows what you have built and whether or not it is valid.
The validity checks only whether all the elements of the equation are selected or entered. |
Enabling conditional editing
To use the conditional editing feature in data grids, you must enable the [.NetMisc]GridConditionalEdit setting in your TTS50.
Adding conditions
You can add conditions to a column in a data grid so that, when the conditions are met, the entry in the column is read only.
Adding a single condition
Use this procedure to add a single condition to a column in a data grid, which will cause an entry in that column to be read only.
-
Retrieve data in the grid.
-
Load the layout in which you want to save the condition.
Note: If you do not have a saved layout you cannot add a condition to one of its columns.
-
Locate the column in which you want to include the read-only condition.
For example, if you want the Company ID to be read-only when the entry in the IsBillable column is true, locate the Company ID column.
-
Right-click on the column header, and select Conditional Edit.
The Condition Builder window opens.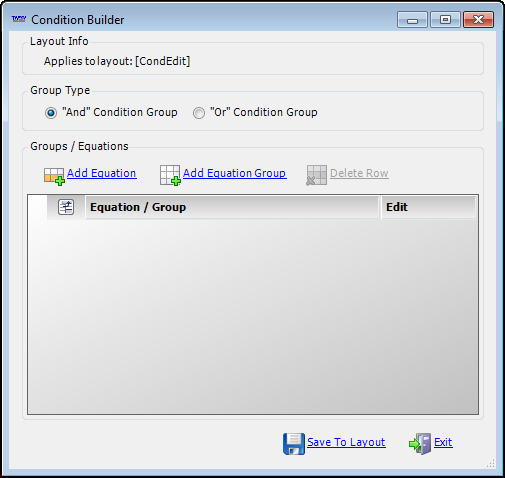
-
Under Layout Info, verify you are adding the condition to the intended grid layout.
Note: The Group Type section of the window does not apply when defining a single condition.
-
Click Add Equation.
The Equation Builder window opens.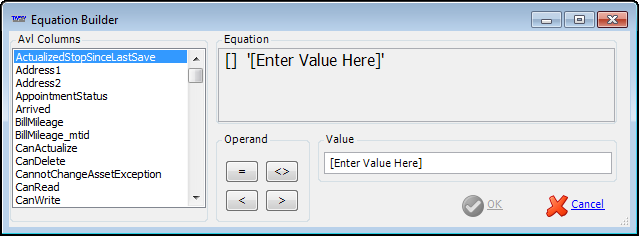
-
Under Avl Columns, locate and double-click on the column on which you want to base the condition.
The column is added to the Equation panel. -
Select the appropriate Operand.
-
In the Value field, enter the value that will trigger the condition.
-
When the Equation panel label indicates the equation is valid, click OK to close the Equation Builder.
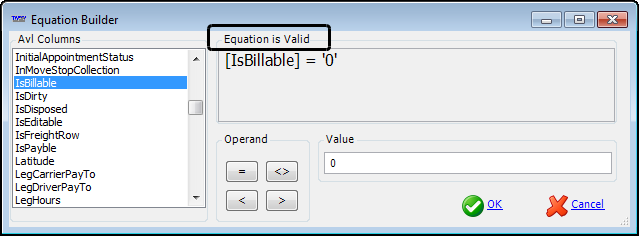
Note: For true/false conditions, enter '1' for true and '0' for false. You must place single quotation marks around the value you enter.
-
Click OK.
-
Click Save To Layout to save the condition.
-
Click Exit to close the Condition Builder.
Note: If you click Exit without clicking Save to Layout, a confirmation window opens. You must save the condition to a layout.
-
Refresh the data in the grid to view and test your results.
Adding an "and/or" condition
When you want to further restrict the condition by adding another equation, you must join them with one of the following types:
-
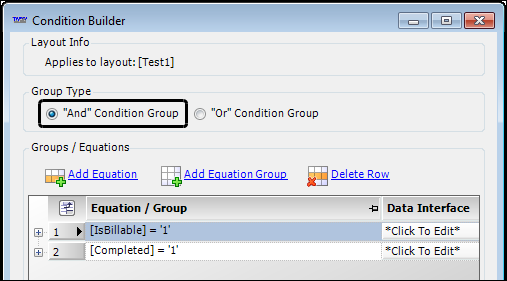
"And" Condition Group
Each equation in the group must be met before the read-only status will be applied.In this example, the stop must be billable and completed before the read-only status will be applied. Both conditions must be met.
-
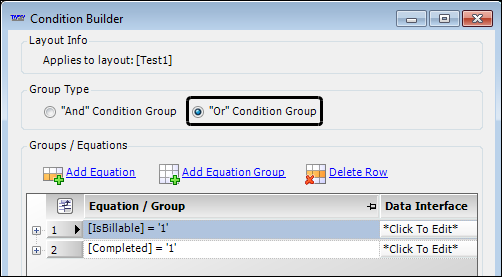
"Or" Condition Group
Any of the equations in the group must be met before the read-only status will be applied.In this example, the stop must be either billable or completed before the read-only status will be applied.
-
Retrieve data in the grid.
-
Load the layout in which you want to save the condition.
Note: If you do not have a saved layout you cannot add a condition to one of its columns.
-
Locate the column in which you want to include the read-only condition.
-
Right-click on the column header, and select Conditional Edit.
The Condition Builder window opens.
-
Under Layout Info, verify you are adding the condition to the intended grid layout.
-
Add the first equation as in Adding a single condition.
-
Under Group Type, select one of the following:
-
"And" Condition Group
Each condition in the group must be met before the read-only status will be applied. -
"Or" Condition Group
Any of the conditions in the group must be met before the read-only status will be applied.
-
-
Click Add Equation.
The Equation Builder window opens. -
Add the next equation as you did for the first.
-
Click OK.
-
Click Save to Layout to save the condition.
-
Repeat these steps to add equations as appropriate.
-
Click Exit to close the Condition Builder.
Note: If you click Exit without clicking Save to Layout, a confirmation window opens. You must save the condition to a layout.
-
Refresh the data in the grid to view and test your results.
Adding a complex condition
You can include more complex conditions by adding sub-groups to an equation.
For example, suppose you want to make the EarliestDate column read only when the following conditions are met:
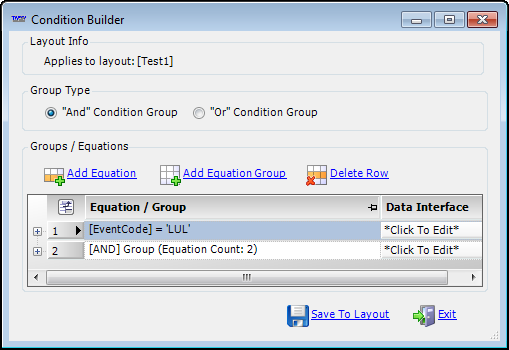
The EventCode is LUL OR the Carrier is GRECAR and the Mileage is greater than 150.
This procedure to add a complex condition includes all the settings for building this example.
-
Retrieve data in the grid.
-
Load the layout in which you want to save the condition.
Note: If you do not have a saved layout you cannot add a condition to one of its columns.
-
Right-click on the column header to include the read-only status, and select Conditional Edit.
For this example, right-click on the Earliest Date column header.
-
Under Layout Info, verify you are adding the condition to the intended grid layout.
-
Define the first equation as you would for a single condition.
For this example, define the equation as follows:
-
Under Group Type, select "And" Condition Group.
-
Define the equation as:
Avl Columns: EventCode
Operand: =
Value: LUL -
Click OK.
-
Click Save To Layout.
-
-
Because the next equation will contain two AND conditions, define it as an Equation Group.
-
Under Group Type, select "Or" Condition Group.
-
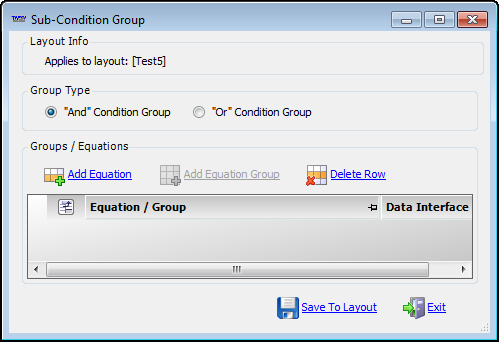
Click Add Equation Group.
The Sub-Condition Group window opens.The Sub-Condition Group window looks and functions the same as the Condition Group window.
Note: If you did not save the first equation to the layout, a message opens to remind you to do so.
-
-
Define the group’s first equation as you would for a single condition.
For this example, define the equation as follows:
-
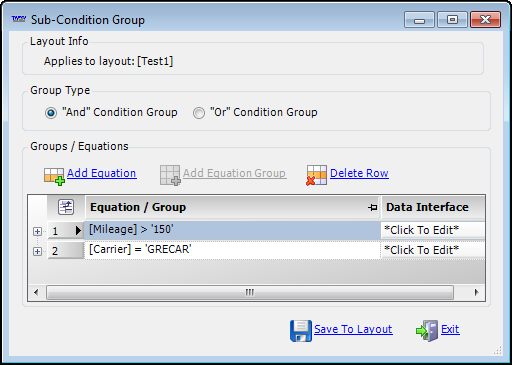
Under Group Type, select "And" Condition Group.
-
Define the equation as:
Avl Columns: Mileage
Operand: >
Value: 150 -
Click OK.
-
Click Save To Layout.
-
-
Define the group’s next equation as you would for a single condition.
For this example, define the equation as follows:
-
Under Group Type, select "And" Condition Group.
-
Define the equation as:
Avl Columns: Carrier
Operand: =
Value: GRECAR -
Click OK.
-
Click Save To Layout.
The completed sub-condition group appears as shown:
-
-
Click Exit.
The completed Condition Builder window appears as shown:
-
Click Save To Layout.
-
Click Exit.
-
To view and test your conditions, refresh the data.
Editing a condition
Use this procedure to modify a condition that was applied to a column.
-
Retrieve data in the grid.
-
Load the layout where you saved the condition.
-
Right-click on the column in which you applied the condition and select Conditional Edit.
The Condition Builder window opens.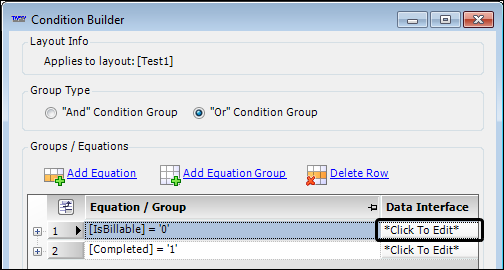
-
On the condition row to change, under Data Interface, click Click To Edit.
The Equation Builder opens. -
Make the appropriate changes.
-
Click OK.
-
Click Save To Layout.
-
Click Exit.
-
To view and test your conditions, refresh the data.
Deleting a condition
Use this procedure to delete one, multiple, or all equations or equation groups within a condition.
-
Retrieve data in the grid.
-
Load the layout where you saved the condition.
-
Right-click on the column in which you applied the condition and select Conditional Edit.
The Condition Builder window opens.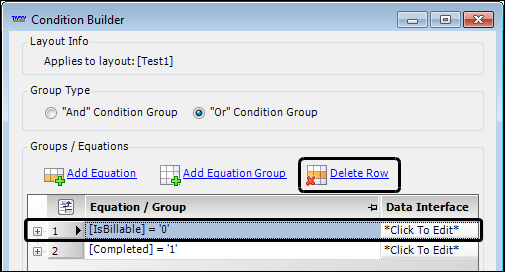
-
Select the equation row to remove.
Note: If you want to remove a row within a condition group, on the group’s row, select Click To Edit, and then select the equation row to remove.
-
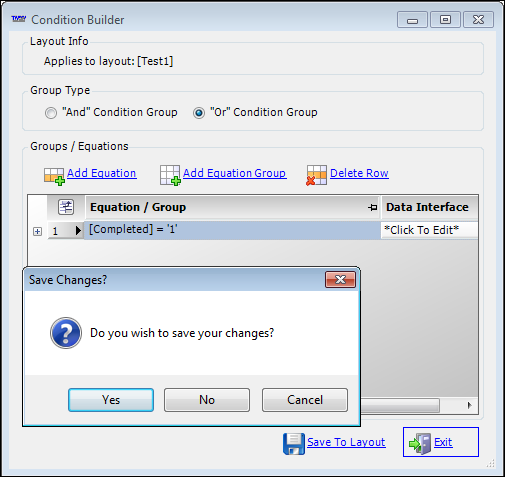
Click Delete Row.
Warning: No confirmation message warns you of the delete. If you deleted the wrong row, click Exit. On the Save Changes? dialog box, click No.
-
If you want to delete all the conditions, repeat Steps 4 and 5 until all condition rows are deleted.
-
Click Save To Layout.
-
Click Exit.
-
To view and test your conditions, refresh the data.
Note: If you deleted all the equations in the condition, the column header should no longer be underlined.