Using geofences
First available in TMW Operations 15.30
A geofence is a virtual border surrounding a geographic location. The latitude and longitude precisely define a location using the Global Positioning System (GPS).
Geofence overview
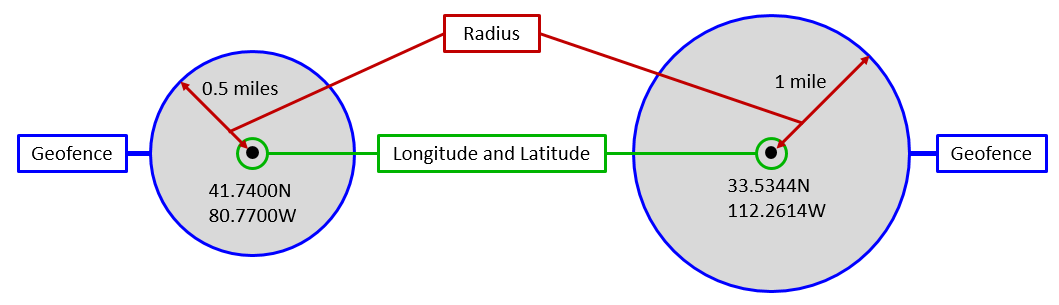
In TMW Operations and TotalMail, a geofence is a circular border surrounding a location identified by its latitude and longitude. With the location as the center of the geofence, a radius determines its size and circumference.
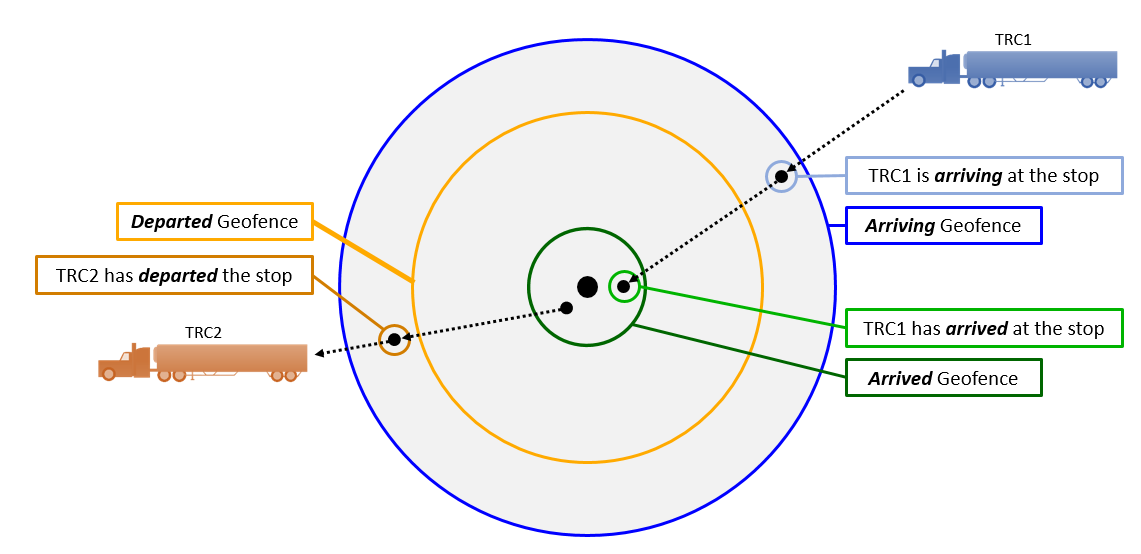
Geofences assist in alerting dispatchers when a resource is near or at a stop location. Geofences tell the system when a truck is arriving, has arrived, or has departed a stop.
To use geofencing, a Mobile Communication Unit (MCU) capable of GPS tracking is placed in the truck. At regular intervals, the MCU sends the truck’s position to the system. The system compares the position of the truck with the geofence. If the truck is within the geofence, the system considers it to have crossed the geofence.
The MCU also allows communication between the driver and the dispatcher. It can send and receive information. Crossing a geofence triggers communications with the driver of the truck.
Three key pieces of data are required to determine when a truck crosses a geofence:
-
The latitude and longitude of the company or stop location
Geofences create a virtual barrier that encircle a company or stop location. This virtual barrier covers a geographic area surrounding the company or stop location. Typically, this information is retrieved from your TMWSuite database.
-
The radius of the geofence relative to the latitude and longitude of a company or stop location
The radius of a geofence determines how large the geographic area surrounding a company is.
-
The current latitude and longitude of the truck with regular continuous updates
The system compares the latitude and longitude of a company or stop location with the current latitude and longitude of a truck. As that truck slips inside the geographic area bordered by the geofence, the truck crosses the geofence. Your MobileComm vendor provides the truck’s current location.
There are three standard types of geofences:
-
Arriving
This geofence identifies when a truck is approaching a company or stop location. Typically, you set up these geofences with a larger radius. They trigger an alert or communication when a truck enters the geofence area. -
Arrived
This geofence identifies when a truck has arrived at a company or stop location. Typically, you set up these geofences with a smaller radius (closer to the location). They trigger an alert or communication when a truck enters the geofence area. -
Departed
This geofence identifies when a truck is leaving a company or stop location. Typically, you set up these geofences with a medium radius. They trigger an alert when a truck leaves the geofence area.
Geofence prerequisites
Requirements will differ based on your setup and MobileComm vendor. These instructions are based on using TotalMail with TMW Operations, and working with an external MobileComm vendor’s system.
When using TMW Operations with TotalMail, you must:
-
Apply the required license to your database
-
Record latitude and longitude values in company profiles
-
Create profiles for tractors, drivers, and trailers in both TMW Operations and TotalMail.
Note: You must link these profiles.
-
Enable geofences in tractor profiles
Geofences and their attributes can be set up in either TMW Operations or TotalMail:
-
To create geofences in TMW Operations, follow the steps in Setting up geofences.
-
To create geofences in TotalMail, follow the steps in
Guide: TotalMail System Administration | Appendix: E. Geofences
Verify you have the required license
To use the geofencing feature, the GEOFENCE SUPPORT license must be applied to your database.
You can verify that the license is applied from within TMW Operations. Go to Help > About. In the About window, click More. A second window opens. It lists licenses in a table. Look for GEOFENCE SUPPORT in the Name column, and verify that the Value column is set to Y. Click Close in the windows.
| If the GEOFENCE SUPPORT license is not listed, contact your Support Team. |
Record latitude and longitude in company profiles
There are three ways you can update a company’s latitude and longitude:
-
Manually recording the latitude and longitude
-
Populating the latitude and longitude in individual profiles
|
If you are using ALK’s PCMiler, you can use the Populate Company Lat/Long feature. Using this feature, you can update longitude and latitude values for multiple companies at one time. For details, see: Guide: TotalMail System Administration | Appendix: E. Geofences | Section: Populating latitude and longitude for multiple companies |
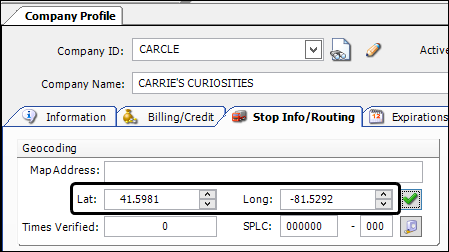
Manually recording the latitude and longitude
You record a company’s latitude and longitude values in its company profile.
-
Go to Tools > Profiles > Company Profile.
The Company Profile window opens. -
Open or create a new company profile.
-
Click the Stop Info/Routing tab.
-
In the Geocoding section, enter the company’s latitude and longitude using the Lat and Long fields.
-
Save the profile.
Populating latitude and longitude in individual profiles
You record a company’s latitude and longitude values in its company profile.
-
Go to Tools > Profiles > Company Profile.
The Company Profile window opens. -
Open or create a new company profile.
-
Click the Stop Info/Routing tab.
-
Click
 Verify to have the system fill in the Lat and Long fields.
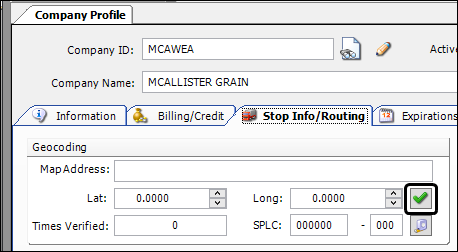
-
Save the profile.
Enable geofences in tractor profiles
You enable geofences for trucks in their tractor profiles. To enable geofences, follow these steps:
-
Go to Tools > Profiles > Tractor Profile.
The Tractor Profile window opens. -
Open an existing tractor profile or create a new one.
-
If needed, click the Information tab.
-
In the Use Geo-fencing field, select the needed option.
-
Yes
Use TMW Operations, TotalMail, and MobileComm vendor geofences. -
No
Do not use geofences. -
AAD
Use geofences set up in TotalMail, specifically for the MobileComm vendor AA&D. Use this option when interfacing with multiple MobileComm vendors and you want geofences set up in TotalMail to take precedence. -
MobileComm
Use geofences set up in the MobileComm vendor’s system. Use this option when interfacing with multiple MobileComm vendors and you want geofences set up in the MobileComm vendor’s system to take precedence.
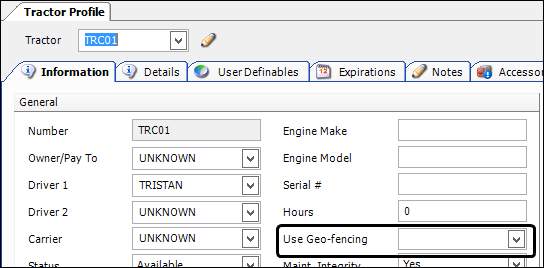
+ Note: If the Use Geo-fencing field is blank, the default is No.
-
-
Save the profile.
Verify trucks have profiles in TotalMail and TMW Operations
If profiles exist in TotalMail but not in TMW Operations, you can create the profiles in TMW Operations and link them to the TotalMail profiles. You link profiles in the TotalMail Configuration window.
To link profiles, follow these steps:
-
Create the profiles in TMW Operations.
-
In TotalMail Configuration, select the needed truck, driver, or trailer profile.
-
Double-click on the profile.
-
Enter the asset’s TMWSuite profile ID using the Dispatch System [Resource Type] ID field:
-
Type the ID.
-
Click
 and select the correct TMWSuite ID from the list.

-
Setting up geofences
You can set up geofence parameters at four levels:
-
A system-wide geofence applies to all companies and events.
-
A company geofence applies to all events for a specific company.
-
An event code geofence applies to a specific event for all companies.
-
A company/event code geofence applies to a specific company and event code.
You can set up geofences in TMW Operations or TotalMail. Regardless of where you perform the setup, you can use any standard TMW event code as a geofence parameter. This table provides a list of those event codes.
| TMW event codes | ||
|---|---|---|
|
|
|
|
You can also set up geofences in your mobile communications vendor’s application instead of in TMW Operations or TotalMail. Contact your MobileComm vendor for instructions. To set up geofences in TotalMail, see: Guide: TotalMail System Administrator | Appendix: E. Geofences | Section: Setting up geofences in TotalMail |
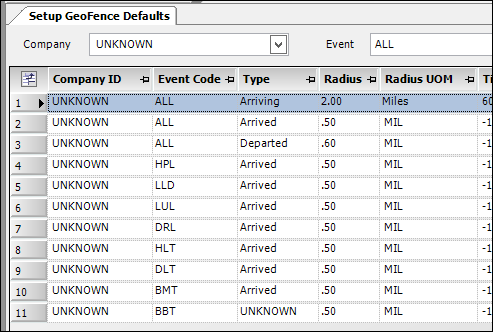
You set up geofences using the Setup GeoFence Defaults window. To access it, go to Tools > Tools Maintenance > GeoFence Defaults.
| Only users with system administrator rights can create/edit geofences in TMW Operations. Other users can access the window to view existing geofences, but editing options are not functional for them. |
The system chooses the most specific criteria when applying a geofence. Three default geofences are available, one each for the Arriving, Arrived, and Departed situations. They have the following values:
| Company ID | Event Code | Type |
|---|---|---|
UNKNOWN |
ALL |
Arriving |
UNKNOWN |
ALL |
Arrived |
UNKNOWN |
ALL |
Departed |
The system applies these geofences when there are no geofences that specify a company ID or an event code.
If you want, you can change or delete the default geofences. You can also add additional default geofences.
-
You can create geofences for a specific event code.
This example shows geofences for the Live Load event that apply to all companies. A separate geofence is set up for each geofence type.
Company ID Event Code Type UNKNOWN
LLD
Arriving
UNKNOWN
LLD
Arrived
UNKNOWN
LLD
Departed
-
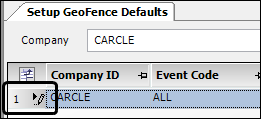
You can create geofences for a specific company.
This example shows geofences for one company that apply to all event codes. A separate geofence is set up for each geofence type.
Company ID Event Code Type SUPSHA
ALL
Arriving
SUPSHA
ALL
Arrived
SUPSHA
ALL
Departed
To enter a geofence record, follow these steps:
-
Go to Tools > Tools Maintenance > GeoFence Defaults.
The Setup GeoFence Defaults window opens.Note: Any existing geofence records not linked to a specific company show when you first open the window. This happens because the default value in the Company field is UNKNOWN and the default value in the Event field is ALL.
-
To locate geofence records for a specific company and/or event:
-
Use the Company and Event fields to select your search criteria.
-
Click
 Retrieve.
The grid results are limited to your selected criteria
-
-
To add a new record, do one of the following:
-
Click
 Add to add a new record to the end of the list.
 -
Click
 Insert to add a new record above the currently selected one.
-
-
Make entries directly in the grid to edit the geofence record. Basic geofence setup includes these columns:
Field Definition Company ID
If the geofence applies to a specific company, select the company code.
Note: If the geofence applies to all companies, leave the field set to UNKNOWN.
Event Code
Select the event code to which the geofence applies.
Notes:
-
If a geofence applies to all trip events, select All - All Events.
-
All standard TMWSuite event codes are available as options.
Type
Specify the situation to which the geofence applies. Options are:
-
Arriving
-
Arrived
-
Departed
Note: Because geofences work together, you should create an Arriving, Arrived, and a Departed geofence for each company ID/ event code combination.
For example, for the Begin Empty event code, you would create three geofences, where:
Event Code = BMT and Type = Arriving
Event Code = BMT and Type = Arrived
Event Code = BMT and Type = Departed
Radius
Enter the size of the geofence.
Notes:
-
The Departed geofence should be larger than the Arrived radius. For example, the Arrived geofence could be .5 mile, and the Departed geofence 1.0 mile.
-
To specify that no geofence will be used, enter -1.
Radius UOM
Specify whether the radius is measured in miles, kilometers, meters, yards, or feet.
-
-
Click
 Save.
Save.Note: If you enter a record in error and want to remove it, select its row and click
 Delete Item.
To select the record, click on its row number.
The Delete Row message opens. It identifies the number of rows you selected for deletion. Click Yes to continue the deletion. Click No to cancel it.