Fixing views to include required columns
If you log into TMW Operations and see a red Help menu background, it indicates that one or more columns required by a scroll window or dispatch board view are not included in the view. Adjustments must be made to the view.
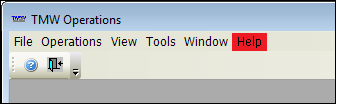
What causes a red Help menu background?
Frequently, a new version of software includes new database columns, some of which can be required by a view. It is also possible for a column previously available in a database to become required by a view. Normally, columns are added automatically to applicable system default views (the views that come pre-loaded with the software.) If custom views exist, the new columns are not added automatically to them; however, the Field Chooser can be used to bring the columns into view.
After a fresh installation of TMW Operations, the presence of a red Help menu background may indicate that Trimble opted not to add these new required columns to views automatically during the installation process. It can also indicate that a client has made changes to columns or views at some point that have resulted in a required column not being included in a view.
In both cases, the required columns must be added to views:
-
Some clients may want their database administrators to handle the additions manually using SQL.
-
Other clients may prefer to add the columns by means of a new Planning Board Conflict tab, which can be used to apply automatic fixes for most views.
As part of the process, the columns can also be made visible automatically in the Field Chooser.
Note: Some views must be fixed manually by Trimble staff or a database administrator.
| If you observe a recurring red Help menu background in TMW Operations that is not clearly the result of a new installation or software update, please contact Trimble Support to determine the cause. |
| Do not use TMW Operations until all default and custom views are updated with the new columns. Contact Trimble Support for questions about manual and automatic view updates. |
Understanding the Planning Board Conflicts tab
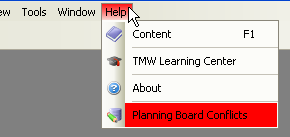
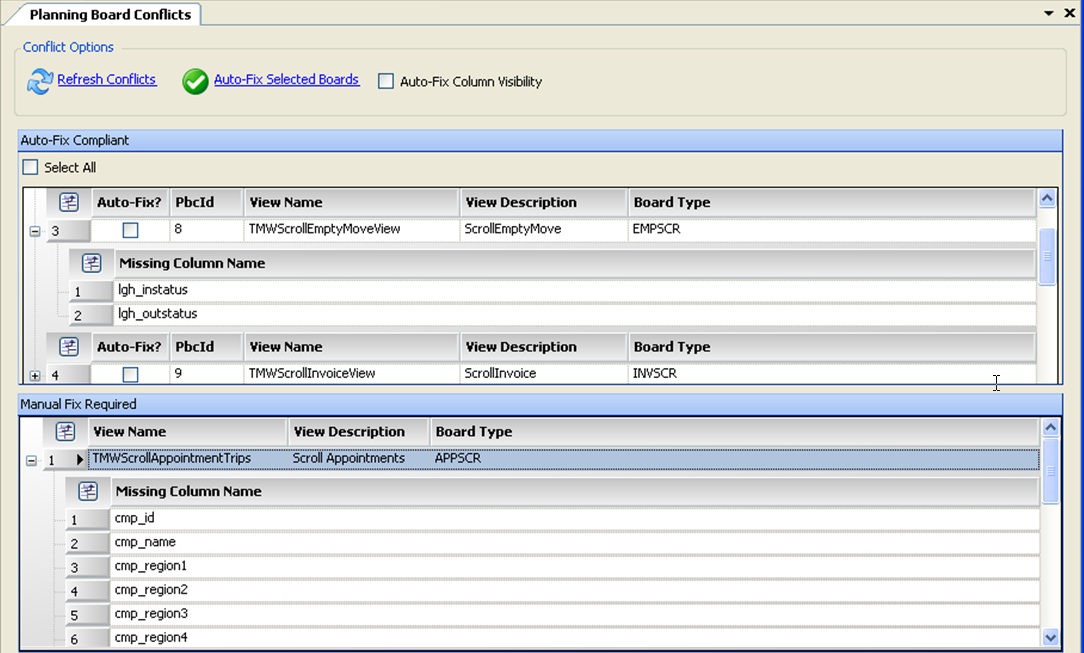
The Planning Board Conflicts tab is accessed by selecting Help > Planning Board Conflicts. It is shown here with sample data.
-
The Auto-Fix Compliant grid is located in the top half of the window. It lists all default and custom views that can be updated using the Planning Board Conflicts tab.
-
The Manual Fix Required grid is located at the bottom of the window. It displays the names of views that cannot be updated using the Planning Board Conflicts tab. You must contact your Trimble Support Team for assistance with updating views listed in the Manual Fix Required grid.
-
Each row in the grids represents a view. Click
 Expand at the far left of a view name to see the columns that need to be added to the view.
Command and checkbox definitions
Refresh Conflicts |
When you click the Auto-Fix Selected Boards command, selected views are fixed and removed from the Auto-Fix Compliant grid, after which the grid updates. You can also click the Refresh Conflicts command to update the Planning Board Conflicts tab. |
Auto-Fix Selected Boards |
Clicking this command adds missing columns to the views selected by the Auto-Fix? checkboxes in the Auto-Fix Compliant grid. |
Auto-Fix Column Visibility |
If the Auto-Fix Column Visibility checkbox is selected when you click Auto-Fix Selected Boards, the new columns are added to a view’s Field Chooser. |
Select All |
Selects or clears all individual checkboxes in the Auto-Fix Compliant grid’s Auto Fix? column. |
Auto-Fix? |
checkboxes in the Auto-Fix column select individual views to be fixed by the Auto-Fix Selected Boards command. |
|
Automatically fixing a view to include required columns
Follow these steps to automatically update a view.
| This procedure cannot be applied to views listed in the Manual Fix Required grid. Before working with these views, contact Trimble Support for assistance. |
-
Go to Help > Planning Board Conflicts.
The Planning Board Conflicts tab opens.

-
In the Auto-Fix Compliant grid, scroll to the view(s) you want to update, and select their Auto-Fix? checkboxes.
Notes:
-
To select all views, click the Select All checkbox.
-
To list the columns that will be added to a view, click
Expand at the far left of the view’s row.
-
-
To automatically make newly added columns visible in the Field Chooser for the view(s) selected in Step 2, select the Auto-Fix Column Visibility checkbox.
Note: All views selected in Step 2 will be affected by the Auto-Fix Column Visibility setting. To make column names visible in some views and hide them in others, perform this procedure twice: once with the Auto-Fix Column Visibility checkbox selected for one set of views, and again with it cleared for the other set of views.
-
Click the Auto-Fix Selected Boards command.
A confirmation, similar to this example, appears.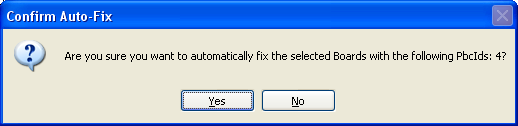
-
Click Yes.
The views you selected in Step 2 will be updated, and their names will be removed from the Auto-Fix Compliant grid.
-
As a final check for any remaining planning board conflicts, click the Refresh Conflicts command.
If all default views listed in the Auto-Fix Compliant grid have been properly updated, the grid should now be empty.
-
If any views are listed in the Manual Fix Required grid, contact Trimble Support for assistance.
When all views have been fixed successfully, no views are listed in the Planning Board Conflicts tab, and the red Help menu background is removed.