Using rules to restrict field values
First available in TMW Operations: 15.10.073
You can create rules to restrict the value that can be saved in a field. You can require that a field contain certain information or not be left blank. For example, you can create rules that require fields to:
-
Always contain data, such as in a contact information field for a company or driver
-
Contain values other than UNKNOWN, such as in a RevType field
-
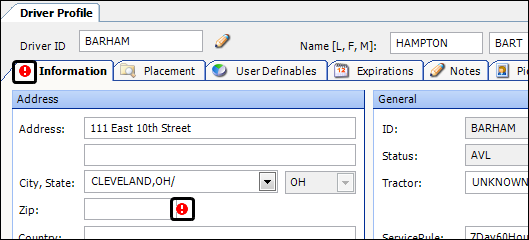
Contain a specific number of characters, such as five digits in a ZIP Code field
Rules for field values are checked when field data is added and each time an attempt is made to save information in a window. This process is called field-level validation.
A user cannot save an entry in a field that does not satisfy the validation rules assigned to the field. Fields that have validation rules applied to them are identified by a warning icon ![]() of a red circle with an exclamation mark. The icon appears next to the field and in the tab header. The warning icon is visible until the field contents satisfy the validation rule.
of a red circle with an exclamation mark. The icon appears next to the field and in the tab header. The warning icon is visible until the field contents satisfy the validation rule.
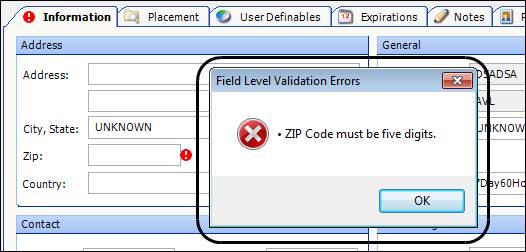
When a user attempts to save data without meeting all of the requirements for the fields in that window, an error message appears. You can specify the contents of the error message that appears when validation criteria are not met.
Managing field-level validation settings
Multiple settings manage field-level validation. You can use these settings to block the feature, prevent users from viewing field-level validation rules, and manage how validation errors appear.
Disabling field-level validation
By default, field-level validation is enabled. You can use [Misc]BlockFieldValidation in your TTS50 to block field-level validation.
Allowing users to view rules for fields in a window
Only system administrators can create field-level validation rules. However, by default, all users can view a list of rules that have been created for the fields in a window. You can change this using the [Misc]ShowFieldValidationFormForNonSA setting in your TTS50.
Specifying how validation errors appear
By default, when the contents of a field do not satisfy a validation rule, you can hover over the ![]() warning icon next to the field to view a ToolTip containing an error message. This error text also appears in a message box when you attempt to save information to a field that does not satisfy a validation rule. With these settings, you can determine if the error message that was specified when the rule was created appears in the message box or if a more detailed message appears. You also can choose to show no error message box.
warning icon next to the field to view a ToolTip containing an error message. This error text also appears in a message box when you attempt to save information to a field that does not satisfy a validation rule. With these settings, you can determine if the error message that was specified when the rule was created appears in the message box or if a more detailed message appears. You also can choose to show no error message box.
Two settings in the [Misc] section of your TTS50 control the behavior of error message boxes.
-
The
[Misc]ShowFieldValidationErrorsInMsgBoxsetting determines if the error text that was specified when the rule was created appears in a message box when the contents of a field cannot be saved. -
The
[Misc]ShowFieldValidationDetailErrorsInMsgBoxsetting determines if detailed error text appears in a message box when the contents of a field cannot be saved.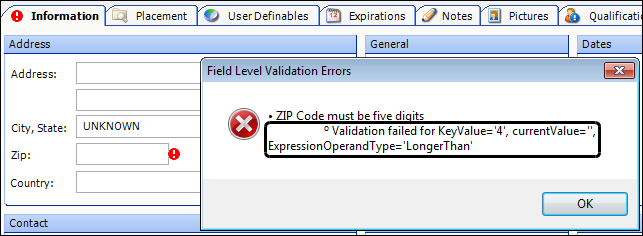
Overview of the windows used to create validation rules
When you create rules to restrict field values, you use these windows.
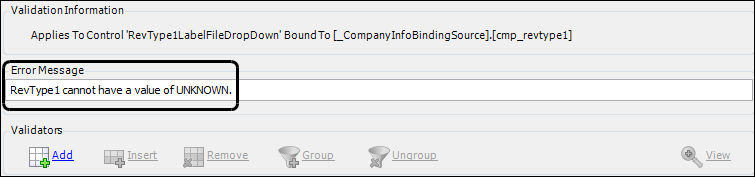
Field Level Validation Editor window
The Field Level Validation Editor window is the starting point for creating a validation rule.
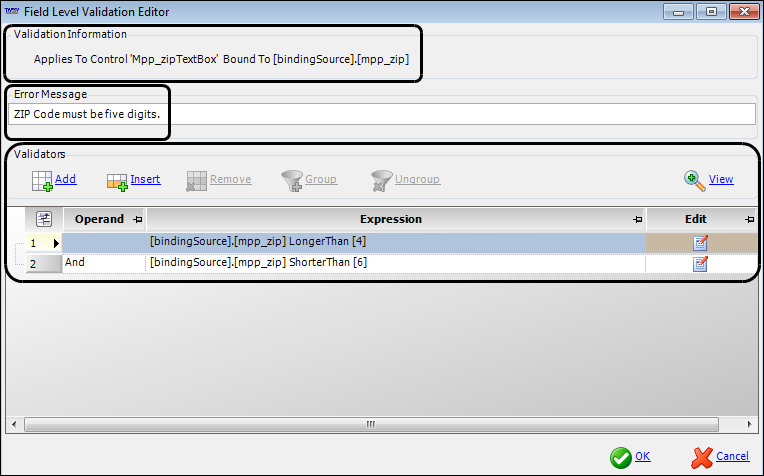
The window consists of three sections:
Validation Information |
This section shows the name of the field to which the validation rule applies. |
Error Message |
Enter the contents of the error message that will display when the validation rule is not met. |
Validators |
This section contains the buttons for the action you would like to take. You can add, insert, remove, group, or ungroup rules. This section also displays the list of rules for the field in a grid. To modify a rule, click Edit in its row. |
Field Validation Builder window
The Field Validation Builder window contains the elements you use to build an expression for the validation rule.
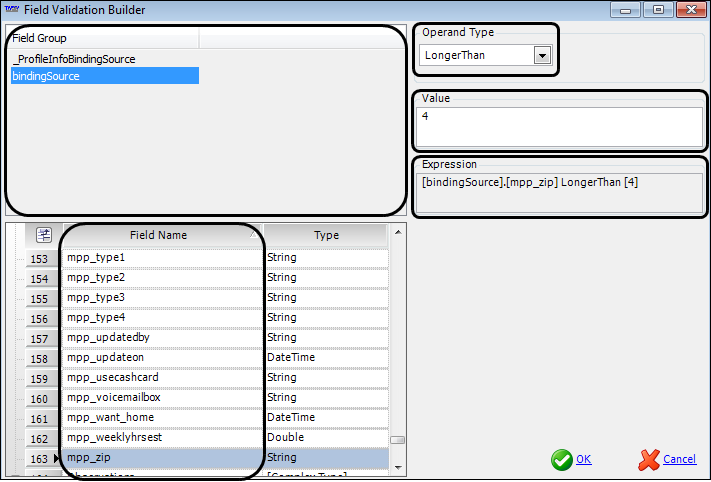
Field Group |
Select the group to which the field belongs. |
Field Name |
From this column, select the name of the field. Note: Field names usually represent the name of the column in a database table. |
Operand Type |
Select the operand type for the expression. Note: The availability of certain operands depends on the selected field type. Some operands are not available for all field types. Available operand types:
|
Value |
Enter the specified value. |
Expression |
This read-only field shows the expression string for the rule. Notes:
|
Adding a single validation rule to a field
You can create rules to restrict the value that can be saved in a field. You can require that a field contain certain information or not be left blank.
A validation rule is saved as part of the window layout that contains the field. You assign a rule to a field using QuickDesigner.
|
This example shows how to create a rule to require a RevType field to have a value other than UNKNOWN.
To add a single rule to a field, follow these steps:
-
Go to Tools > Profiles > Company Profile.
The Company Profile window opens. -
In the Company ID field, enter a company ID and click
 Open or press ENTER.
The company’s profile information populates the window’s fields. -
In the Revenue Classes section, right-click the RevType1 field.
A shortcut menu appears. -
Select Show Field Level Validations.
The Field Level Validation Editor window opens.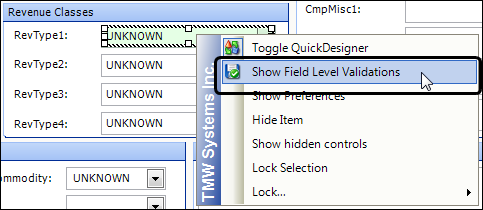
-
In the Error Message field, enter the text of the message you want to appear when the contents of the field cannot be saved.
-
Click
 Add.
Add.
A new row is added in the Validators grid.
-
In the row for the new rule, click
 Edit.
Edit.
The Field Validation Builder window opens. -
Make the appropriate selections to build an expression for the field’s validation rule.
Note: For detailed field descriptions, see Field Validation Builder window.
-
In the Field Group section, select _CompanyInfoBindingSource.
-
In the Field Name column, select cmp_revtype1.
-
In the Operand Type field, select NotEqual.
-
In the Value field, enter UNKNOWN.
-
-
When all of the appropriate selections have been made to create the expression string, the rule syntax appears in the Expression field.

-
Click
 OK.
OK.
The expression string is added to the Field Level Validation Editor window.
-
Click
OK to close the Field Level Validation Editor Window. -
In the Company Profile window, toggle out of QuickDesigner.
Adding multiple validation rules to a field
You can create rules to restrict the value that can be saved in a field. You can require that a field contain certain information or not be left blank. You may need to create multiple rules to restrict a field value.
For example, you can require a ZIP Code field to have a value that consists of five digits. You must create two rules: one rule that requires the value to be more than four digits and a second rule that requires the value to be fewer than six digits.
Validation rules are saved as part of the window layout that contains the field. You assign rules to a field using QuickDesigner.
|
This example shows how to create multiple rules to require a ZIP Code field to have a value that consists of five digits.
To add multiple rules to a field, follow these steps:
-
Go to Tools > Profiles > Driver Profile.
The Driver Profile window opens. -
In the Driver ID field, enter a driver ID and click
Open or press ENTER.
The driver’s profile information populates the window’s fields. -
Right-click in the Zip field.
A shortcut menu appears. -
Select Show Field Level Validations.
The Field Level Validation Editor window opens.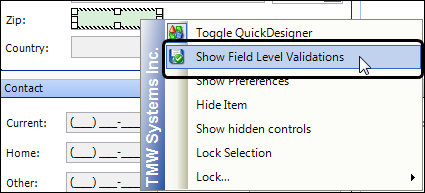
-
In the Error Message field, enter the text of the message you want to appear when the contents of the field cannot be saved.

-
Click
Add to add the first rule.
A new row is added in the Validators section. -
In the row for the new rule, click
Edit.
The Field Validation Builder window opens. -
Make the appropriate selections to build an expression for the field’s validation rule.
Note: For detailed field descriptions, see Field Validation Builder window.
-
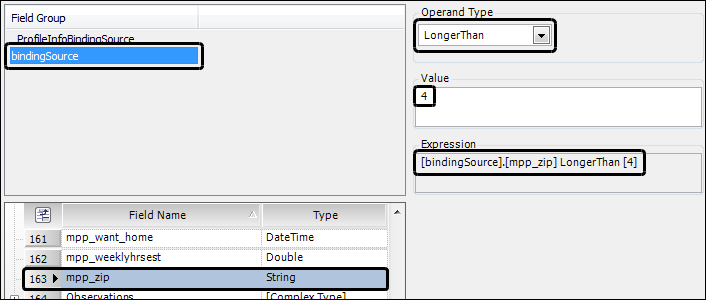
In the Field Group section, select bindingSource.
-
In the Field Name column, select mpp_zip.
-
In the Operand field, select LongerThan.
-
In the Value field, enter 4.
When all of the appropriate selections have been made to create the expression string, the rule syntax appears in the Expression field.
-
-
Click
OK.
The first expression string is added to the Field Level Validation Editor window.
-
Click
Add to add the second rule.
A second row is added in the Validators grid.
Note: To add a new row above the row currently selected, click
 Insert.
 -
In the row for the new rule, click
Edit.
The Field Validation Builder window opens. -
Make the appropriate selections to build an expression for the second rule.
-
In the Field Group section, select bindingSource.
-
In the Field Name column, scroll down and select mmp_zip.
-
In the Operand Type field, select ShorterThan.
-
In the Value field, enter 6.
-
-
Click
OK.
The second expression string is added to the Field Level Validation Editor window.
Note: In the Operand column, And is selected by default, which is appropriate for this example. If you wanted either one of the expressions to be validated instead of both, you would select the Or operand.
-
Click
OK to close the Field Level Validation Editor Window. -
In the Driver Profile window, toggle out of QuickDesigner.
Grouping validation rules for a field
You can create rules to restrict the value that can be saved in a field. You can require that a field contain certain information or not be left blank.
Grouping rules allows you to create and combine complex expressions to restrict a field value. Like mathematical operations, you can group multiple rules to control how they are combined and the order in which they are validated.
For example, suppose your company has a driver with the ID of SMITH. When this driver is assigned as the primary driver to a trip, you want to require that a secondary driver also be assigned to the trip. But if this driver is not assigned as the primary driver to the trip, then no secondary driver is required.
You can create a group of rules that will require the Driver 2 field in the Trip Folder window to have an entry when the system detects the SMITH driver ID in the Driver 1 field. If the system finds that the ID does not appear in the Driver 1 field, it will not require an entry in the Driver 2 field.

For the contents of the Driver 2 field to be valid in the Trip Folder window, you must set up three rules. Two of these rules will be grouped.

Validation rules are saved as part of the window layout that contains the field. You assign rules to fields using QuickDesigner.
|
This example shows how to require a secondary driver ID to be assigned to a trip if the trip’s primary driver ID is SMITH.
To group rules for a field, follow these steps:
-
Go to Operations > Trip Folder.
The Trip Folder window opens. -
Right-click in the Driver 2 field.
A shortcut menu appears. -
Select Show Field Level Validations.
The Field Level Validation Editor window opens.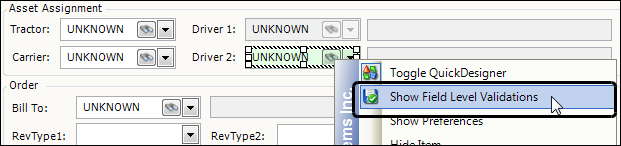
-
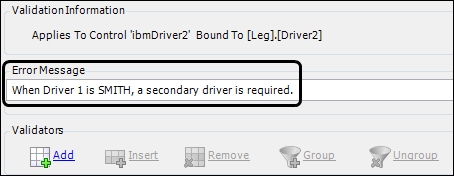
In the Error Message field, enter the text of the message you want to appear when the contents of the field cannot be saved.
-
Add the first group of rules to specify that if the ID in the Driver 1 field is SMITH, then the contents of the Driver 2 field cannot equal UNKNOWN.
-
Click
Add to add the first rule.
A new row is added in the Validators section. -
In the row for the new rule, click
Edit.
The Field Validation Builder window opens. -
Make the appropriate selections to build an expression for the field’s validation rule.
Note: For detailed field descriptions, see Field Validation Builder window.
-
In the Field Group section, select Order.
Note: Order is the group to which the Driver field belongs. Though this group of rules will govern the contents of the Driver 2 field, the first rule in the group is dependent on the contents of the Driver 1 field.
-
In the Field Name column, select Driver.
Note: Though this group of rules will govern the contents of the Driver 2 field, the first rule in the group is dependent on the contents of the Driver 1 field.
-
In the Operand Type field, select Equal.
-
In the Value field, enter SMITH.
When all of the appropriate selections have been made to create the expression string, the rule syntax appears in the Expression field.
-
-
Click
OK.
The first expression string is added to the Field Level Validation Editor window.
-
Click
Add to add the second rule.
A second row is added in the Validators section.
Note: To add a new row above the row currently selected, click
Insert. -
In the row for the new rule, click
Edit.
The Field Validation Builder window opens. -
Make the appropriate selections to build an expression for the second rule.
Note: For detailed field descriptions, see Field Validation Builder window.
-
In the Field Group section, select Order.
-
In the Field Name column, scroll down and select Driver 2.
-
In the Operand Type field, select NotEqual.
-
In the Value field, enter UNKNOWN.
-
-
Click
OK.
The second expression string is added to the Field Level Validation Editor window.
-
-
Holding the SHIFT key, select the first and second rows, then click
 Group.
The first two rules have been grouped. The rules in this group will be validated together, separate from any other rules.Notes:
-
To ungroup rules, click the row containing the group, then click
 *Ungroup.
 -
Groups can contain other groups. Groups can be nested up to five levels, but each level can have an unlimited number of groups.
-
Click
 Expand to the left of the row containing the group to view its contents.
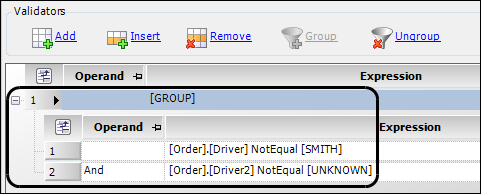
-
-
Click
Add to add the third rule, which specifies that the ID in the Driver field can be something other than SMITH.
A third row is added in the Validators grid.
-
In the Operand column, select Or.

-
In the row for the new rule, click
Edit.
The Field Validation Builder window opens. -
Make the appropriate selections to build an expression for the third rule.
Note: For detailed field descriptions, see Field Validation Builder window.
-
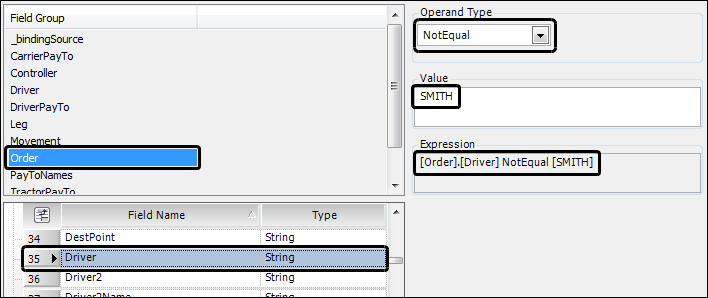
In the Field Group section, select Order.
-
In the Field Name column, scroll down and select Driver.
-
In the Operand Type field, select NotEqual.
-
In the Value field, enter SMITH.
-
-
Click
OK.
The third expression string is added to the Field Level Validation Editor window.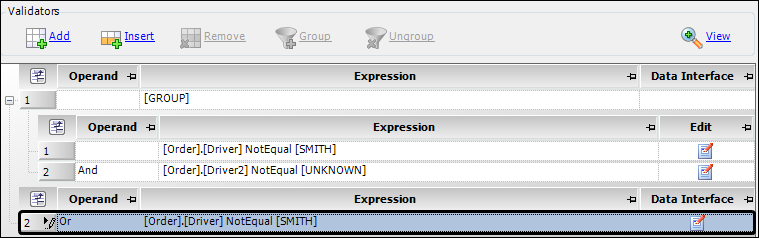
-
Click
OK to close the Field Level Validation Editor Window. -
In the Trip Folder window, toggle out of QuickDesigner.
Editing validation rules
You can adjust any component of a validation rule for a field. You can change any of the components of the rule’s expression, including the field name and any operands and values. You also can edit the error message that appears when the contents of the field do not satisfy the rule.
| Only system administrators can edit validation rules. |
To edit a validation rule for a field, follow these steps:
-
Go to the window containing the field with the validation rule you want to edit.
Note: For details about how to view a list of fields in a window that have been assigned validation rules, see Viewing validation rules for fields in a window.
-
Right-click in the field.
A shortcut menu appears. -
Select Show Field Level Validations.
The Field Level Validation Editor window opens. -
If you want to change the error message that appears when the validation rule is not satisfied, change the text in the Error Message field.
-
Edit or add a rule:
-
If you want to change any of the expressions for the rule, in the row for the rule you want to change, click
Edit.
The Field Validation Builder window opens. -
If you want to add a new rule, click
Add or Insert.
-
-
Use the window elements to edit the rule, as necessary.
Note: For detailed field descriptions, see Field Validation Builder window.
-
Click
OK.
The edited rule appears in the Field Level Validation Editor window. -
Change any additional rules, as necessary.
-
Click
OK to close the Field Level Validation Editor Window.
Removing validation rules
You can remove a validation rule that has been assigned to a field.
| Only system administrators can remove validation rules. |
To remove a validation rule, follow these steps:
-
Go to the window containing the field with the validation rule you want to remove.
Note: For details about viewing a list of fields that have been assigned validation rules, see Viewing validation rules for fields in a window.
-
Right-click the field.
A shortcut menu appears. -
Select Show Field Level Validations.
The Field Level Validation Editor window opens. -
In the Validators section, click the row containing the rule you want to remove.

-
Click
 Remove.
The row containing the rule you selected is deleted. -
When you have completed removing the rules you no longer want to be associated with the field, click
OK.
The Field Level Validation Editor window closes.
Viewing validation rules for fields in a window
By default, any user can view a list of rules that have been created for any fields in a window.
When [Misc]ShowFieldValidationFormForNonSA=N, users who are not system administrators cannot view field validation rules for the fields in a window.
|
To view a list of field validation rules for the fields in a window, follow these steps:
-
Go to the window for which you want to view field validation rules.
-
Right-click in the body of the window.
A shortcut menu appears. -
Select Show Field Level Validations.
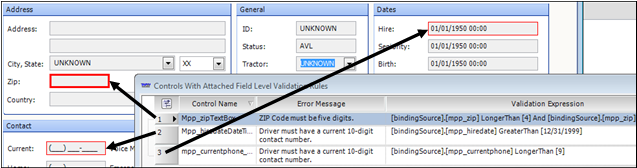
The Controls With Attached Field Level Validation Rules window opens.Fields in the underlying window that have been assigned validation rules are outlined in red. Clicking a rule in the list will outline the corresponding field with a bold red line.
-
Review the validation rules for the fields in the window.
Control Name
The name of the field to which the rule is attached.
Error Message
The text specified to appear when the contents of the field cannot be saved. This message was added when the rule was created.
Validation Expression
The contents of the rule for the field. This expression can consist of multiple or groups of rules that have been combined to create a rule.
-
Click
OK to close the Controls With Attached Field Level Validation Rules window.