Verifying carrier profiles are set up for brokerage
Before using the brokerage features, carrier profiles must be set up to provide all the required information.
Verifying the carrier exists in your system
To verify whether a carrier is listed in your system, follow these steps.
-
Go to Tools > Scrolls > Carrier Scroll.
-
Enter the carrier’s information into the fields on the Quick Search tab.
-
Click Retrieve.
Any search results will appear in the Results section of the window.Note: If you need to include a new carrier in your system, you must first create a new Pay To and Carrier profile for the carrier.
 See it in action: Creating carrier profiles
Adding a board carrier’s assets
An inside carrier is called a board carrier because the activities of its resources (drivers, tractors, trailers) are tracked on the Planning Worksheet. When you set up the profile for a board carrier, you can add information about each driver, tractor, and trailer associated with it.
To track the activities of a carrier’s resources in the Planning Worksheet, follow these steps.
-
Open the carrier record in the Carrier Profile window.
-
On the Additional Info tab, select the Board checkbox.
The Board Assets tab is added to the Carrier Profile.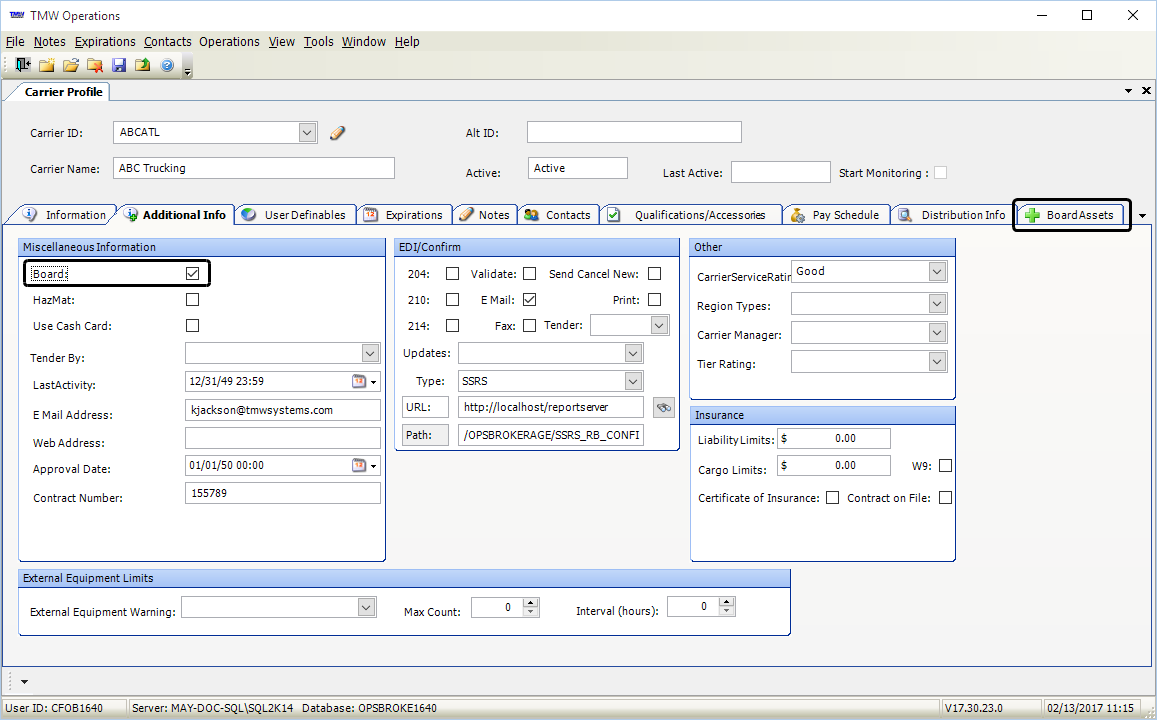
-
Select the Board Assets tab.
You will use the Drivers, Tractors, and Trailers sub tabs to add a record for each carrier asset.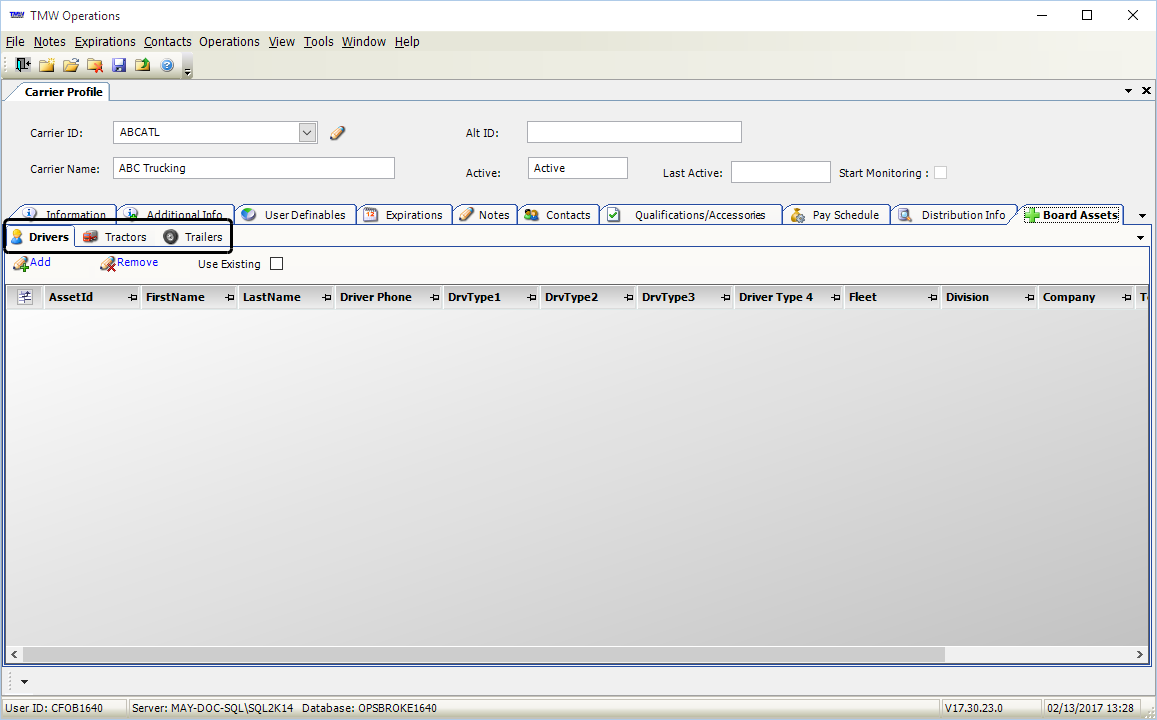
Adding drivers
To add a driver, follow these steps.
-
Click the Drivers tab.
-
To add a driver from your TMW database, select the Use Existing checkbox.
Note: If you select this checkbox, it is also selected on the Tractors and Trailers tabs.
-
Click Add.
-
Complete the driver information as needed.
If you are using a driver from your TMW database, the information from the driver profile appears in each field.
Field Description AssetID
Driver’s unique ID
If the Use Existing checkbox is selected, select a driver from the drop-down list.
FirstName
Driver’s first name
LastName
Driver’s last name
Driver’s area code and phone number
When the driver is assigned to an order, the phone number appears in the Advanced Carrier Selection window.
DrvType1-4
Select the appropriate driver classification for each field.
FLEET
Fleet to which the driver is assigned
Division
Company division to which the driver is assigned
Company
Company to which the driver is assigned
Terminal
Terminal location to which the driver is assigned
ActgType
Select the accounting system used to pay the driver. The options are:
-
None (default)
Used when an entity is never paid directlyIf you pay the carrier instead of the driver, use this option.
-
Payroll
Used for company driversDo not use this option for a carrier’s drivers.
-
Accts Payable
Used if the driver is an owner/operator and you plan to pay owner/operators as drivers rather than as tractors.If you pay the driver instead of the carrier, use this option.
Note: If the carrier’s driver is treated as an owner/operator, you should set up a Pay To profile for him/her before you set up the driver profile.
-
-
Click Save.
Adding tractors
To add a tractor, follow these steps.
-
Click the Tractors tab.
-
To add a tractor from your TMW database, select the Use Existing checkbox.
Note: If you select this checkbox, it is also selected on the Drivers and Trailers tabs.
-
Click Add.
-
Complete the tractor information as needed.
If you are using a tractor from your TMW database, the information from the tractor profile appears in each field.
Field Definition AssetId
Tractor’s unique ID
If the Use Existing checkbox is selected, select a tractor from the drop-down list.
Make
Name of the engine manufacturer
Model
Engine model
Company
Name of the company that should receive payment for trips hauled by the tractor
Driver1
ID of the driver assigned to the tractor
Driver2 (Team)
ID of the second driver assigned to the tractor
TrcType1-4
Select the appropriate tractor classification for each field.
Division
Company division to which the tractor is assigned
FLEET
Fleet to which the tractor is assigned
ActgType
Indicates the method of reimbursement for trips that the tractor hauled. The options are:
-
None (default)
Used when an entity is never paid directlyIf you pay the carrier instead of the tractor, use this option.
-
Payroll
Do not use this option for a carrier’s tractors. -
Accts Payable
Used if the tractor belongs to an owner/operator and you plan to pay owner/operators as tractors rather than as drivers.If you pay the tractor instead of the carrier, use this option.
-
-
Click Save.
Adding trailers
To add a trailer, follow these steps.
-
Click the Trailers tab.
-
To add a trailer from your TMW database, select the Use Existing checkbox.
Note: If you select this checkbox, it is also selected in the Drivers and Tractors tabs.
-
Click Add.
-
Complete the trailer information as needed.
If you are using a trailer from your TMW database, the information from the trailer profile appears in each field.
Field Definition AssetId
Trailer’s unique ID
If the Use Existing checkbox is selected, select a tractor from the drop-down list.
TrailerNumber
Trailer’s serial number
SCAC
Trailer’s Standard Carrier Alpha Code
Make
Name of the trailer manufacturer
Model
Name of the trailer’s structural design
TrlType1-4
Select the appropriate trailer classification for each field.
Company
Company to which the trailer is assigned
FLEET
Fleet to which the trailer is assigned
Division
Company division to which the trailer is assigned
Terminal
Terminal location to which the trailer is assigned
ActgType
Indicates the method of reimbursement for trips in which the trailer was involved. The options are:
-
None (default)
Payment is never made to the trailerIf you pay the carrier instead of the trailer, use this option.
-
Payroll
Do not use this option for a carrier’s trailers. -
Accts Payable
Used if the trailer belongs to an owner/operator and you plan to pay owner/operators as trailers rather than as drivers.If you pay the trailer instead of the carrier, use this option.
-
-
Click Save.
Verifying the carrier’s profile is complete
To use a carrier with the brokerage features, its profile must:
-
Provide valid contact information, including a valid e-mail address
-
Specify an overall service rating
-
Provide valid insurance information
-
Be set up to receive load confirmations
Review each carrier profile to verify it is complete.
-
Go to Tools > Profiles > Carrier Profile.
-
In the Carrier ID field, enter the carrier’s ID.
-
Press TAB to display the carrier information.
-
Check the following:
-
If you made any entries, click Save.
Contact information
Carriers must have contact information, including a valid e-mail address. When you assign a carrier to an order, the system uses the contact information to send the load confirmation.
In the Contact Information section on the Information tab, verify the information is complete, including a valid address in the E-mail field.
If an e-mail address is missing or incorrect, click ![]() Contact and complete the Email Address field.
Contact and complete the Email Address field.
Insurance information
On the Additional Info tab, review the entries in the Insurance section.
| Field | Definition |
|---|---|
Liability Limits |
Verify the carrier’s total liability coverage is recorded. The maximum value you can enter is $999,999,999. |
Cargo Limits |
Verify the carrier’s liability coverage for cargo is recorded. The maximum value you can enter is $999,999,999. Note: By default, when you assign a carrier to a trip, the system compares the order’s freight value with the cargo limits in the carrier’s profile. If the cargo limits value is less than the order’s freight value, you cannot save the assignment. You record the order’s freight value in the Order Maintenance window. You use the Value field in the Freight Information section. |
Certificate of Insurance |
In the Insurance section, verify the option for whether the carrier has a certificate of insurance on file. The options are:
|
Load confirmation information
The system e-mails SSRS reports as load confirmations. In addition to a valid e-mail address, you must also flag the carrier as receiving SSRS reports.
+ On the Additional Info tab, verify the entries in the EDI/Confirm section.
| Field | Definition |
|---|---|
The checkbox is selected. |
|
Type |
The SSRS option is selected. |
URL |
Your company’s report server URL appears. For example, your report server would appear in the following format: https://<ReportServer location>/reportserver. Note: By default, the field shows the location specified by the |
Path |
The location and name of the report are recorded. For example, the path to your report would appear in the following format: /XXXX/SSRS_RB_CONFIRM_01. |
For additional information, see Setting up load confirmations.
Overall service rating
On the Additional Info tab, verify the applicable carrier rating is selected in the CarrierServiceRating field.
Your company defines service rating options in the CarrierServiceRating label. For more information, see Adding a new user-defined label option.