Retrieving trips and resources in the Trip Planner
The Trip Planner allows you to look up multiple trips at one time and assign trips to resources. Record retrieval occurs in the Trips/Resources pane in the upper portion of the window. Trips and resources are listed in grids.
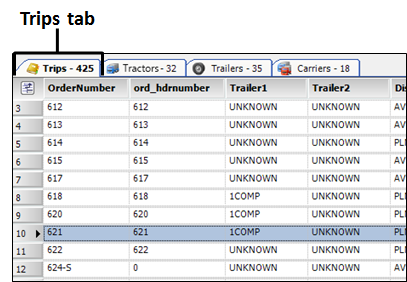
Grids used for retrieving trips
The Trips grid lists outbound trip segments that are ready for dispatch. This window can be considered a to-do list. Usually, it displays the trips that have not yet begun. A line of data is displayed for each trip segment listed.
Access the Trips grid by selecting the Trips tab.
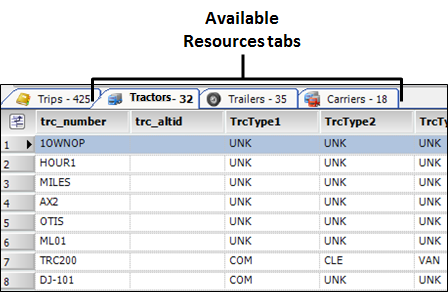
Grids used for retrieving resources
The Available Resources grids are used to determine which resources are (or will be) available for dispatch in particular locations. There is a separate grid for each resource type: tractor, trailer, and carrier. The data shown reflects information that is stored on the resources' profiles.
| The Carrier grid is reserved for future functionality. |
Access Available Resources grids by selecting an Available Resource tab.
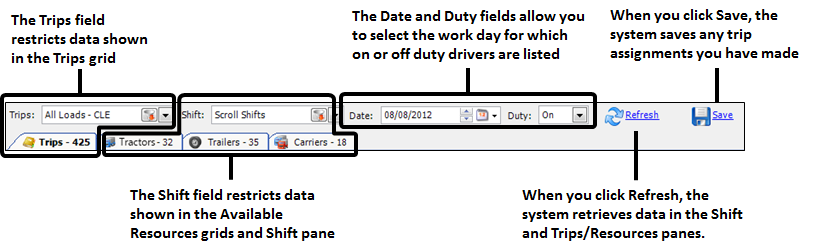
Setting restrictions for retrieving trips and drivers
On the Trip Planner, record retrieval is determined by entries in the restriction bar located above the Trips and Available Resources tabs:
Restriction by views
Because most dispatchers are responsible for specific load types, resources, and/or geographic areas, the listing of information in the Trips grid, Available Resources grids, and Shift pane can be customized using views. A view is a set of restrictions that serves as a filter to narrow down the number of records listed in a planning board grid.
Typically, a specific view is defined for each dispatcher or dispatch group. When a dispatcher looks up available trips and available resources, the system automatically displays the records that match the view assigned to his group, or that is assigned specifically to him.
Each view is assigned a user-defined name, which reflects the intended usage of that view. Frequently views are set up for a company’s terminals. For example, if your company has terminals in Baltimore and Pittsburgh, you could set up a view named Baltimore and a view named Pittsburgh.
| System administrators set up the views used in planning boards. For more information on managing views, see Understanding planning board views. |
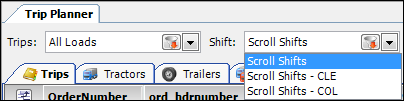
There are two view-related fields in the restriction bar:
-
Trips: Restricts records in the Trips grid. The options listed in the drop-down are called outbound views.
-
Shift: Restricts records in the Available Resources grids and the Shift pane. The options listed in the drop-down are called shift views.
Restriction by date
Your entry in the Date field selects the date for which you will be scheduling trips. By default, the Date field displays the current date, but you can change the entry if needed.
Restriction by driver On or Off Duty
The Duty field is located to the right of the Date field. It allows you to specify the work shift for which you want to see drivers. By default, this field is set to On. An entry of On limits the list of drivers to those who are on duty on the day specified in the Date field.
By default, three options are available in the Duty field: On, Off, and All.

The options refer to the shift status assigned to the drivers during setup of their work schedules.
-
On = those drivers assigned a ShiftStatus of ON.
-
Off = those drivers assigned a ShiftStatus of OFF.
-
ALL = those drivers assigned either a ShiftStatus of ON or OFF.
These options are system codes, which means they come pre-loaded with the system. If you want to use additional statuses, like On Call or Disability, you can add them using the ShiftStatus label in the Edit User Definable Fields window.
You also must use the [FuelDispatch]AdditionalOnDutyStatus setting in your TTS50 to indicate whether user-defined status(es) should be flagged as ON or OFF.
Filtering trips for drivers
On the Trip Planner, you can filter the list of drivers based on their assigned trips. In the window header, click Shift Trips. The Shift Trips Restrictions window opens. Here, you can filter drivers by:
-
Shift Information
-
Pickup Information
-
Drop Information
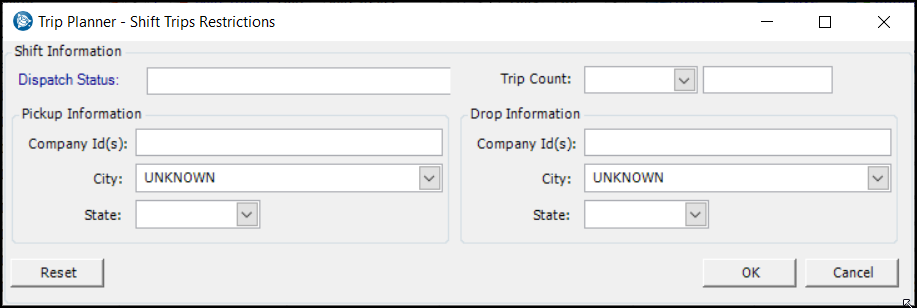
-
Make entries in the needed fields:
Field Definitions
Field |
Definition |
Dispatch Status |
Select the driver’s status from the drop-down list. |
Trip Count |
First available in V.2022.2
|
Pickup Information |
|
Company Id(s) City State |
Enter the company’s ID Enter the company’s city location Enter the company’s state location |
Drop Information |
|
Company Id(s) City State |
Enter the company’s ID Enter the company’s city location Enter the company’s state location |
-
Select the OK button. The window will close.
-
Select the Refresh button in the header of the Trip Planner.
This will return the results you set the filter for.
Starting with V.2022.2, the Trip Count field has been added to the Shift Pane. It shows the number of trips assigned to the driver. Use Cell Designer to add it.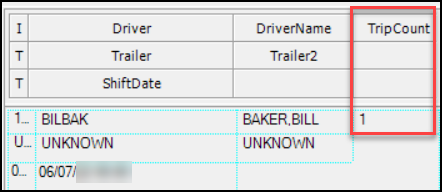 |
Optimize drivers with a preassigned load
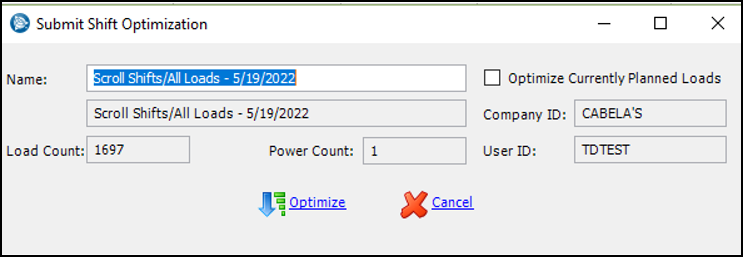
Once you have filtered driver’s trips in the Shift Trips Restriction window, you can send these trips to be optimized in the Submit Shift Optimization window. The data is sent to the Optimization service. The service determines the most efficient driver/tractor for the trip based on the criteria you specify.
To optimize your filtered trips:
-
In the Trip Planner header, click the Optimize button.
The Submit Shift Optimization window opens. The data is pre-populated with the trip you had filtered/restricted. The window will display the Name, Load Count, Power Count, Company Id and User Id that will be submitted along with a list of trips (leg numbers) and drivers (mpp_id). The Name can be helpful in finding the optimization solution later once results are returned.
-
Click the Optimize button to submit the trips for optimization.
If the optimization was successful you will receive a "Verify Optimization processes" submission success message.
| The Optimization button and optimization solutions are available if you are licensed for the Match Advice Interface. Please contact Trimble Sales for more information. |
Reviewing Optimization Results
To review optimization results you use the Scroll Optimization Solutions window. You can add this window option to any of the toolbar menus using the Customize window.
To locate this option in the Customize window follow these steps:
-
Right-click on the menu bar to customize.
-
Click Customize to open the Customize dialog box.
-
Click the Commands tab.
Locate the Scroll Optimization Solutions option in the Commands list to add to a ToolsMenu of your choice.
For more information see Customizing menus.
The Scroll Optimization Solutions window will allow for retrieval of any optimization result for the selected transaction date that was submitted by the user who is currently logged into the TMW Operations application.
In the illustration example, the Name column displays the name that was submitted when the optimization was first sent. The Status column indicates whether the optimization is completed (End).
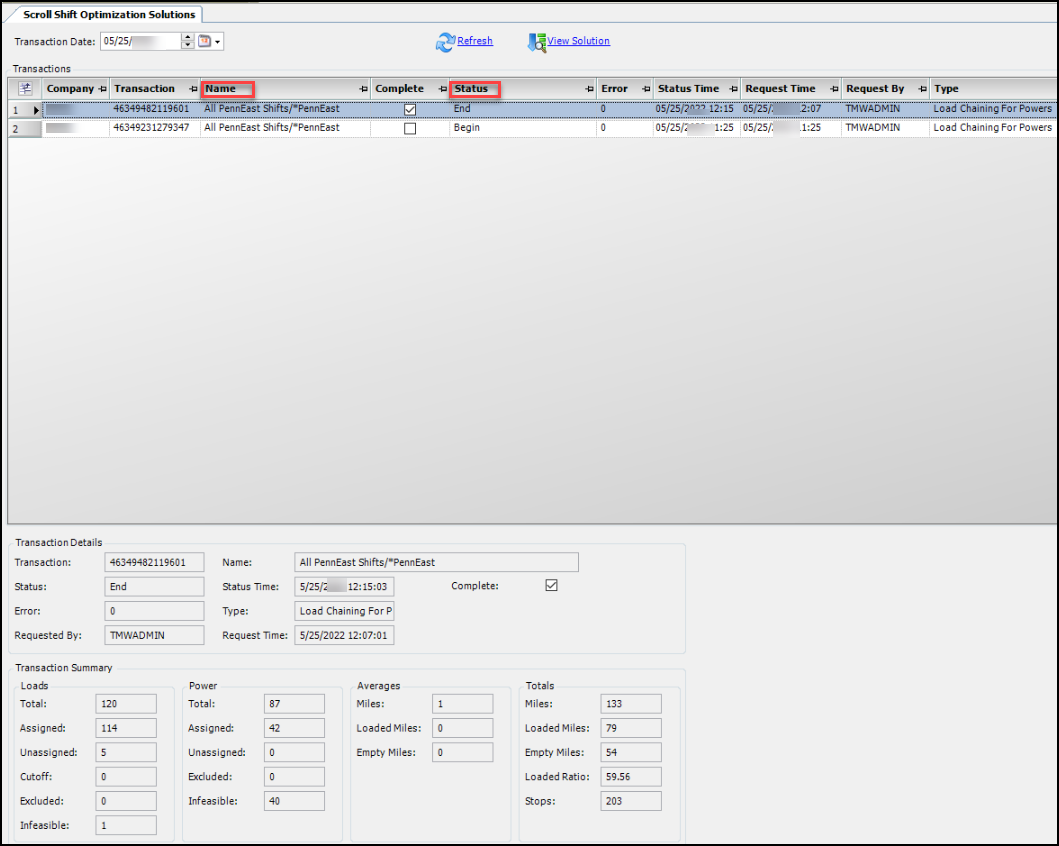
To review the solution:
-
Select the row to be reviewed.
-
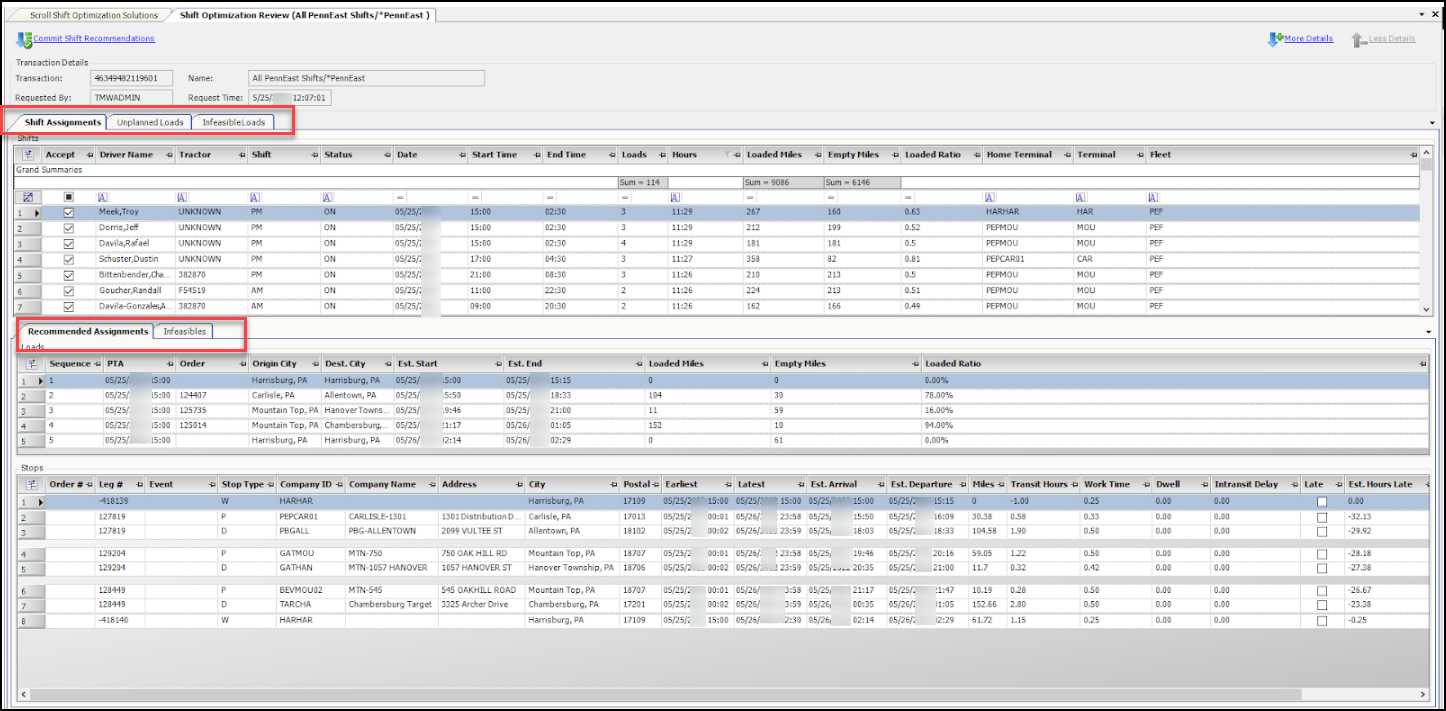
Click the View Solution button. The Shift Optimization Review window will open. You can review Grand Summary data in the Shift Assignments, Unplanned Loads and Infeasible Loads tabs. You can review Loads recommendations in the Recommended Assignments and Infeasibles tabs.
Retrieving trips and drivers
Use this procedure to retrieve available trips and drivers:
-
Go to Operations > Trip Planner.

-
If appropriate, select a different Trips or Shift view.
Note: You can create temporary outbound or shift views. For more information, see:
-
Set the Date for which you want to plan trips.
-
If needed, change the selection in the Duty field.
By default, On Duty is selected. -
Click Refresh.
The window displays the records that match the restrictions you have set.
Temporarily modifying a shift view
The Trip Planner is for trucking companies that have standard shifts for each of their terminals. The shift schedules include regular days that a driver is on or off duty. When you schedule and track trips in the Trip Planner, the data grids that display the trips and resources are controlled by planning board views.
Views determine the database columns that are included. They also restrict the number of records that are displayed.
A shift view controls the data displayed in the Tractor and Trailer tabs, as well as the Driver Shift pane. In the Trip Planner, you select a view from the Shift field. The default planning board view in the Shift field is Scroll Shifts.
![]()
To change the restriction set on a shift view, follow these steps.
-
In the Shift drop-down list, select a view.
-
Click
 Restrict.
The Trip Planner - Shift Restrictions window opens.The restrictions for each resource type are available on individual tabs and sub tabs. The restrictions are the same as those for the resource scroll windows.
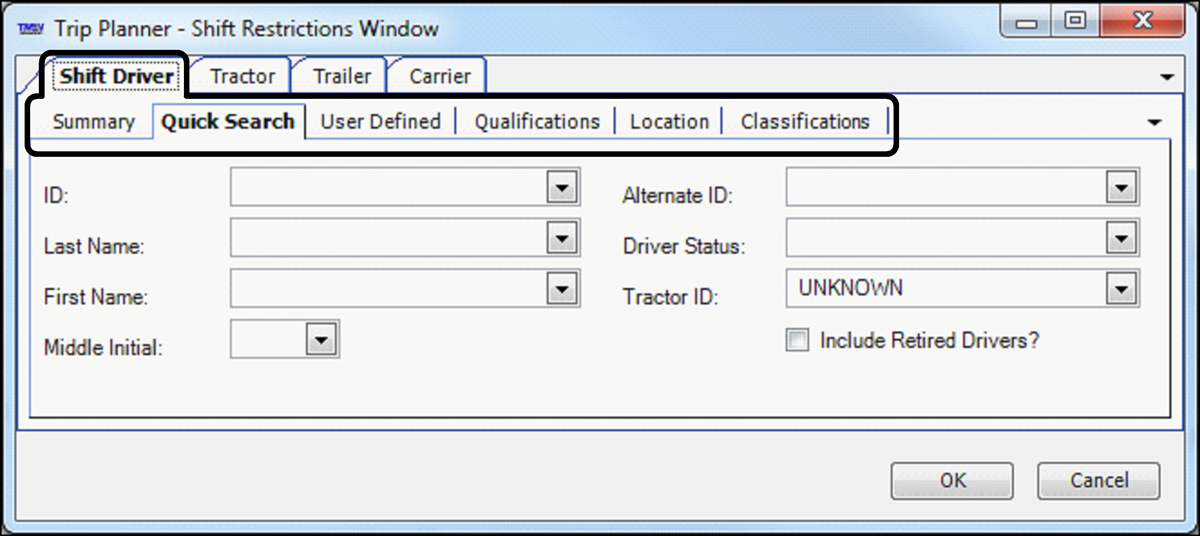
Note: If the selected view already contains restrictions, those will be visible in the sub tabs of the resource’s tab.
-
In the Trip Planner - Shift Restrictions window, modify fields as needed.
The restrictions are the same as those for the resource scroll windows. For field definitions, see:
-
To accept the modified restriction set, click OK. The view is shown in the Shift drop-down list as <Custom>.
-
To apply the revised view, click
 Retrieve.
The modified view remains in effect until you exit the Trip Planner or select another view.
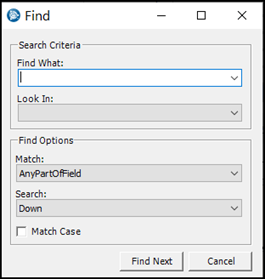
Using the Find window to look up resources and shift information
After retrieving trips and drivers in the Trip Planner, you may want to find a particular resource.
-
To open the Find window, do one of the following:
-
Right-click on any Shift pane column heading.
The Look In field defaults to the field you selected before opening the Find window.
-
With your pointer anywhere in the Assignment Plan pane, press CTRL+SHIFT+F.
The Look In field is blank.
-
-
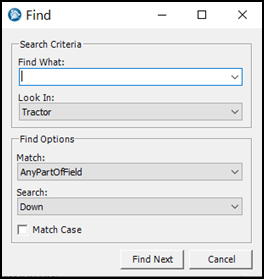
Make entries to define your search.
Search Criteria
-
Find What: Enter what you want to find. Your entry can be a complete or partial identifier. You can enter only one (1) identifier.
-
Look In: Select where you want to search. Options depend on how you access the window.
-
If you opened it from the Shift pane, it defaults to the field you were on when you opened it. You can set it to All Columns.
-
If you opened it from the Assignment Plan pane using the keyboard shortcut, All Columns is the only option.
-
Find Options
-
Match: Select how you want to search.
-
AnyPartOfField
-
WholeField
-
StartOfField
-
-
Search: Select the direction you want to search.
-
Down
-
Up
-
-
MatchCase: Select the checkbox to apply.
-
-
Click Find Next. The first match is shown in the Assignment Plan pane.
-
Click Find Next to go through all the matches.
Using the expanded Find window to look up resources and shift information
First available in V.2021.1
Once you have retrieved trips in the Trip Planner, you can search for multiple resources.
To access the expanded Find search window,
click ![]() Find in the Trip Planner header.
Find in the Trip Planner header.
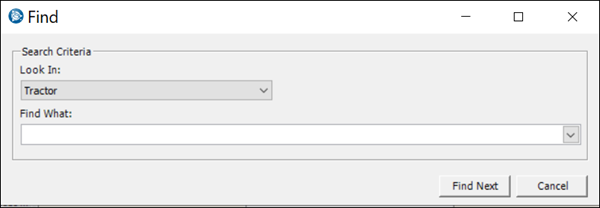
The Look In field has a drop-down list for you to pick where you want to look.
You can look in the these fields:
-
Tractor
-
Fleet
-
Driver
-
DriverName
-
Trailer
After you make a selection, expand the Find What field to see the Value list. It shows all the entities from the Shift pane that match the type you selected.
The system helps you form your search based on the data in the Shift pane. You can search for a single resource or multiple resources.
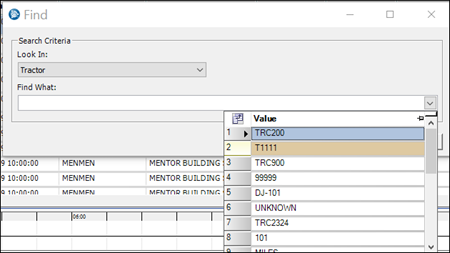
Looking up a single resource
-
Click
 Find in the Trip Planner header.
 -
Make a selection in the Look In field.
-
Expand the Find What field to view the Value list.
In this example, the Look In field is set to Tractor. The Value list shows all the tractors that have been retrieved for the shift.
-
Click on an ID in the Value list.
It appears in the Find What field.

-
Click Find Next.
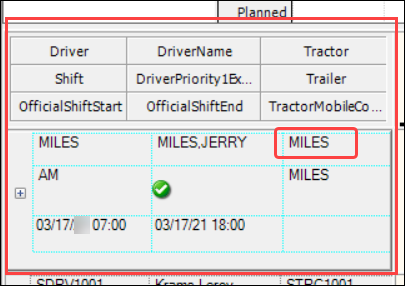
The result of your search is highlighted in the Trip Planner’s Shift pane.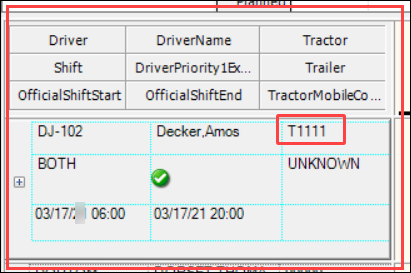
The associated trip assignments appear in the Timeline pane.
If you typed a search term in in the Find What field that does not match any item in the selected entity type, the the Not Found pop-up window opens. It states, "The search item 'xxx' was not found." Click OK to close it.
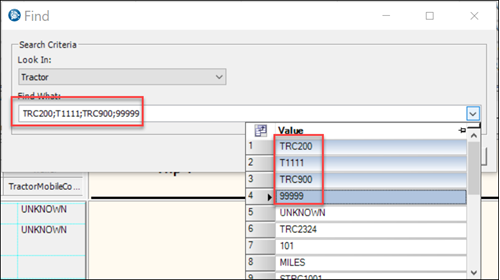
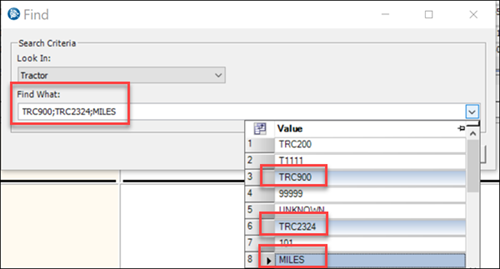
Looking up more than one resource
To look for multiple entities, you can enter a string of IDs in the Find What field. You must separate your entries with a semicolon (;).
-
Click
Find in the Trip Planner header. -
Make a selection in the Look In field.
-
Expand the Find What field to view the Value list.
-
Select an entry in the Value list.
Your selection appears in the Find What field as the first search criteria.
-
Do one of the following:
-
To select entries from adjacent rows in the Value list, press SHIFT and select the last value you want to use.
-
To select entries from nonadjacent rows, press CTRL and select more items in the Value list.
The system adds the new entries. It separates them with a semicolon. You can add as many entries as you need to build your search. Your entries must be of the same type. If you want to type your entries, be sure to separate them with a semicolon (;).
-
-
Click Find Next.
The first matching item is found and highlighted in the Shift pane. Click Find Next again to display the next match until you have reviewed all matches.
How driver schedules affect the retrieval of drivers
Individual driver schedules tell the system whether the driver is on or off duty for the selected date. The driver can only appear in the Shift pane of the Trip Planner if he/she has a schedule and is on duty.
If a driver name does not appear in the Shift pane of the Trip Planner it is because the driver does not have a schedule, or the schedule shows the driver is Off Duty.
When driver schedules are generated for a driver for the first time, the driver is ordinarily assigned a default template, and the schedule is generated to have a specific end date. However, when that end date is passed and available drivers are retrieved on the Trip Planner, the system will do one of the following to automatically generate the work schedule for the day. If the driver is:
-
Assigned a default template
The system will use the driver’s default template to generate the day’s schedule. -
Not assigned a default template
The system will use the driver’s previous shift schedule, if one exists, to generate the day’s schedule.
For more information on driver schedules, see Assigning a driver to a schedule.
| The system does not reference expirations when retrieving drivers, so a driver with an active Priority 1 expiration could appear on the Trip Planner as available for assignment. Even though the system will prevent a dispatcher from starting a trip for a driver with a required expiration, you may want to change the driver’s shift status to Off Duty to prevent him from being included in the list of available drivers. For more information on expirations, see What are expirations?. |