Working with columns
You can manage a grid’s columns by splitting the grid, reordering the columns, resizing the columns and rows, displaying, and hiding columns. Changes you make to the display remain in effect only until you close the window. To keep them, save the modified layout.
Pinning columns
If there are columns you want to remain in view while you scroll through a data grid, you can anchor them to the left side. This creates pinned and unpinned areas in a similar way that Microsoft Excel freezes columns.
When a column is pinned, its push pin is vertical. When a column is not pinned, its push pin is horizontal.
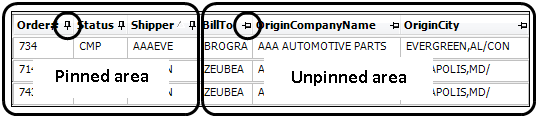
Columns are pinned in the order you clicked their push pins.

-
Locate the column or columns you want to pin.
-
Click the horizontal
 push pin next to the column header.
The column moves to the left. -
If you want to anchor more columns to the pinned area, you can:
-
Click an unpinned column’s push pin.
-
Drag an unpinned column header to the left of the last pinned column.
-
-
If you want to rearrange the order in which the columns are pinned, you can drag them to the new position.
-
If you want to unpin a column, you can:
-
Click the vertical
 push pin next to the column header.
Note: Unpinned columns do not return to their previous location. They will move to the right of the pinned area.
-
Drag the column header out of the pinned area.
-
Splitting the grid
Use this procedure to split the grid into two vertical or horizontal panes, each with its own set of vertical and horizontal scroll bars. This allows you to view different areas of the data grid at the same time.
-
Point to the split box:
-
The split box in the lower-left corner of the data grid will split the grid vertically:

-
The split box in the upper-right corner of the data grid will split the grid horizontally:

Note: If you do not see the split boxes, you cannot split the grid.
-
-
When the pointer changes to a split pointer
 or
or  , drag the split box down or to the right to the position you want.
 -
To add another split, click and drag the split boxes as many times as are necessary to give you the needed view.
This illustration shows multiple vertical splits.

This illustration shows multiple horizontal splits.

-
To remove a split, click and drag the split to its original location at the left or top.
Reordering columns
To move the columns around, click and drag the column heading to the new location.
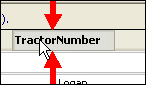
The arrows indicate where the column will be located.
Resizing columns
To change the width of a column, follow these steps.
-
Position your cursor to the right of the column header you want to change.
-
When the pointer changes to
, click and drag the column edge left or right to the position you want.
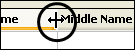
Note: You can also double-click the boundary to the right of a selected column heading to change the width to fit the contents.
Resizing rows
To change the height of a row, follow these steps.
-
Position your cursor beneath the row number of the row you want to change.
-
When the pointer changes to
, click and drag the line up or down to the position you want.

Displaying and hiding columns with Field Chooser
To display or hide columns, you must have access to Field Chooser. The icon is located in the upper-left corner of the data grid.
![]()
To choose which fields display as columns and which are hidden, follow these steps.
-
Click the
 Field Chooser icon.
All available fields are listed in alphabetical order by the current column name, followed by the database field name.

-
If the grid contains nested data rows, do one of the following.
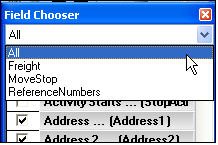
Note: The available fields are listed as members of a group of fields.
This illustration shows nested data rows.
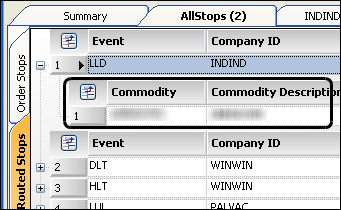
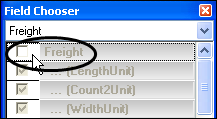
This illustration shows Field Chooser groups represented in the grid:
-
To limit the list of fields, select the group from the drop-down member list.
-
To hide the entire nested row, clear the checkbox next to its name.
-
-
To display a field, do one of the following:
-
Click and drag a field from the Field Chooser window
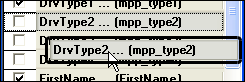
to a location in the grid.
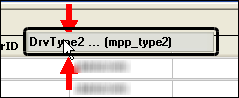
The arrows indicate where the column will be located.
-
Select the checkbox next to the field to display it as a column in the grid.
-
-
To hide a field, do one of the following:
-
Click and drag the column heading from the grid to anywhere outside the grid.
-
Clear the checkbox next to the field to hide it from appearing as a column in the grid.
-
-
When finished, close the Field Chooser window.