Manually creating 214 data for an updated order
A 214 is an outbound document that informs the shipper or consignee of the order’s status. If you are licensed for the EDI 214 Shipment Status SmartLink add-on, you can modify orders linked to a Bill To that is set up for the EDI 214 service. When you modify an order, you can manually create 214 data for the updated order from the Planning Worksheet or Trip Folder and store it in the TMW Operations database.
-
To select the order for which you want to create a 214, do one of the following:
-
In the Trip Folder, open the order.
-
In the Planning Worksheet, click the
 EDI tab at the right side of the window. Retrieve your trips and select an order.
-
-
Go to Edit > EDI > Create EDI 214.
The Create EDI 214 window opens. The Stops Information grid at the top of the window lists the stops on the trip.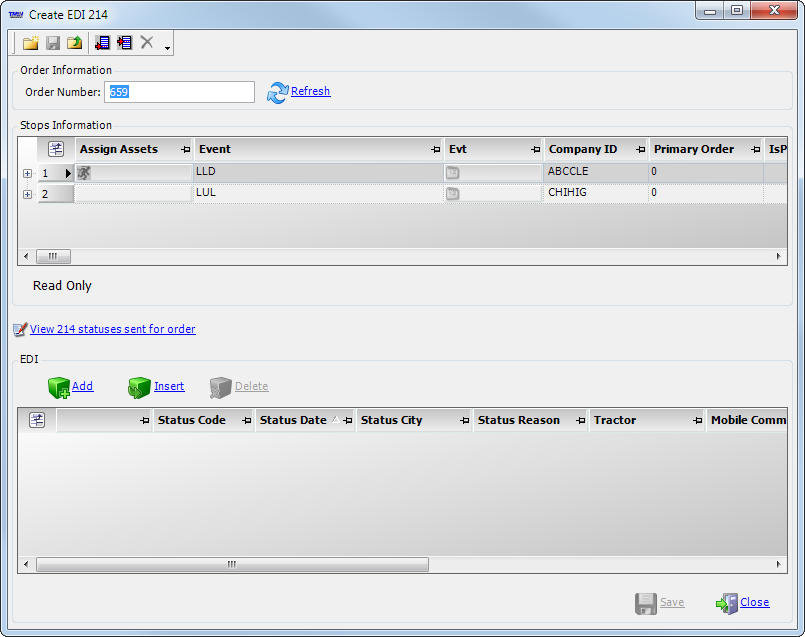
-
Click on the stop for which you are creating the 214.
-
Click
 Add to add information about that stop to the 214.
The 214 fields for the stop appear at the bottom of the window.
-
Complete these fields.
Required field: *
Field Definition EDI Company ID
Defaults to BillTo
If the EDI Notification Method field in the EDI Codes Maintenance window is set to BillTo based, BillTo is the only option.
If the EDI Notification Method field is set to Company based, select another company type, if necessary:
-
BillTo
-
Shipper
-
Consignee
-
OrderBy
-
Selected Stop
Status Code *
Select the EDI status that the trading partner requires for the stop. This information is required.
If the EDI Notification Method field is set to BillTo based, the status codes come from the EDI214Status label in TMWSuite System Administration.
If the EDI Notification Method field is set to Company based, the status codes come from the Auto 214 tab of the EDI Codes Maintenance window.
Note: For more details, see:
Guide: General EDI Guide | Chapter: Working with EDI 214 Status Updates | Section: Setting up activities to trigger an Auto-214
Status Date *
Defaults to the current date/time
If necessary, enter another date/time for the event.
Status City *
Defaults to the city/state for the selected stop
If necessary, enter the city/state for the event.
Status Reason
Select the appropriate status
By default, the available options come from the EDI214Reason label in System Administration.
First Available In: TMW Operations: 3.125.52.325
If you want, you can use the ManualEDIUseReasonLate General Info Table setting to change the source for the status reason codes. If String1 is set to Y, the available options come from the ReasonLate label.
This also determines the source of the EDI code recorded in each 214.
-
If the Status Reason matches a reason code recorded for the trading partner, the EDI code for that reason code is used in the 214.
Note: You record reason codes for trading partners in the EDI Codes Maintenance window. The window is available in the File Maintenance application.
In this example, the Status Reason field is set to Normal Status.

This matches the trading partner’s Normal Status reason code in the EDI Codes Maintenance window. The EDI code for Normal Status is NRC.
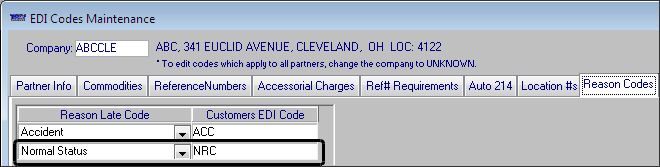
Therefore, the NRC status reason code is used in the 214.
-
If no matching codes are recorded for the trading partner, the value in the Abbr field of the ReasonLate label is used in the 214.
Tractor*
Defaults to the ID of the assigned tractor. If necessary, select another tractor
Mobile Comm#
Applicable only if you are using TotalMail. Enter the ID number of tractor’s MobileComm unit.
Trailer*
Defaults to the ID of the assigned trailer
If necessary, select another trailer.
Trailer Owner
Applicable only if you are using TotalMail
Enter the ID code for the Bill To or trailer owner.
Stop#*
Stop number of the selected stop
Wgt*
Displays the total weight from the order header
If necessary, enter a different weight for the stop.
Qty
Displays the total count from the order header
If necessary, enter a different quantity for the stop.
Reference#
Displays the reference number from the stop detail
-
-
Click
 Save.
Save. -
Click
 Close.
Reviewing pending or previous 214 transactions sent for an order
From the Create EDI 214 window, you can review all pending manual 214s or prior manual and Auto-214s that have been transferred for an order.
-
To select the order for which you want to review a 214, do one of the following:
-
In the Trip Folder, open the order.
-
In the Planning Worksheet, click the
EDI tab at the right side of the window. Retrieve your trips and select the order.
-
-
Go to Edit > EDI > Create EDI 214.
The Create EDI 214 window opens. -
Click
 View 214 statuses sent for order.
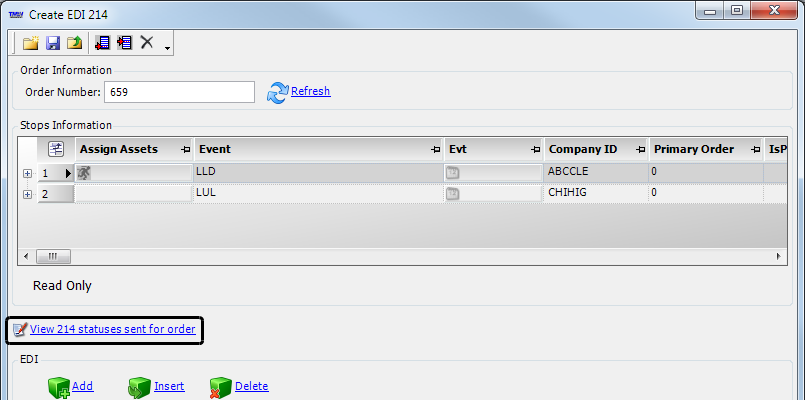
-
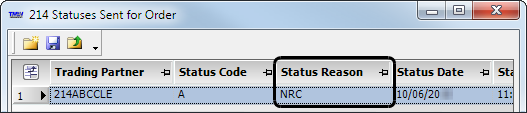
The 214 Statuses Sent for Order window displays the details for all previous 214s that have been sent, both manually and automatically, for the order.
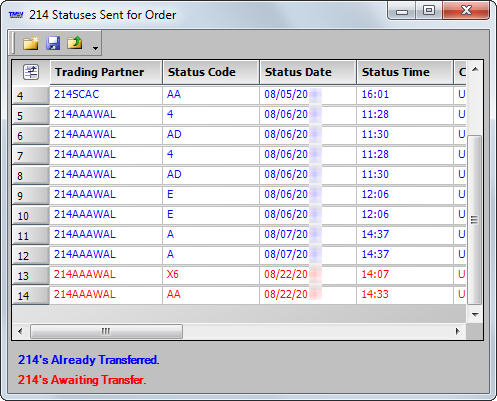
Note: Blue text identifies 214s that have been transferred. Red text identifies 214s that are pending.
Field Definition Trading Partner
Company ID of the trading partner for the selected stop
Status Code
EDI status that the trading partner requires for the stop
Note: The EDI status is specified in the Edi Status field in the EDI Codes Maintenance window. The field is on the Auto 214 tab.
Status Date
Date the status was recorded
Status Time
Time the status was recorded
City/State
City/state for the stop location
Stop
Stop number for the status city/state
Date Transferred
If the 214 has been transferred, displays the date/time of the transfer
Pending
-
F
The 214 is not pending. -
T
The 214 is pending.
Status Reason
Select the appropriate status
By default, the available options come from the EDI214Reason label in System Administration.
If you want, you can use the ManualEDIUseReasonLate General Info Table setting to change the source for the status reason codes. If String1 is set to Y, the available options come from the ReasonLate label.
This also determines the source of the EDI code recorded in each 214.
-
If the Status Reason matches a reason code recorded for the trading partner, the EDI code for that reason code is used in the 214.
Note: You record reason codes for trading partners in the EDI Codes Maintenance window. The window is available in the File Maintenance application.
-
If no matching codes exist in the EDI Codes Maintenance window, the value in the Abbr field of the ReasonLate label is used in the 214.
997 Status
If the 214 has been transferred, indicates whether a 997 Functional Acknowledgement for the 214 has been accepted (A) or rejected ®
A 997 Functional Acknowledgement is required for all transmissions that include financial data.
Note: This feature is available when you have the license for the 997 processor, which is sold separately from the base system. For more information, contact your TMW EDI Support representative.
824 Status
If the 214 has been transferred, indicates whether an 824 Application Advice document was created to notify trading partners of errors in EDI documents they have sent, most often invoices
-
-
Click
 Close to exit the 214 Statuses Sent for Order window.
 -
Close the Create EDI 214 window.