Creating and maintaining schedule templates
Generally, companies have standard shifts for each of their terminals that include regular days that a driver is on or off duty. In TMW Operations, you can set up shift templates, or predefined forms, based on the seven days of the week or on a specific number of days, such as a 10-day rotating schedule. Use these procedures to create schedule templates for your terminals. You can set up one template per shift. If you want, you can have multiple terminals use the same templates.
You can create two types of schedule templates:
Weekly Schedule
Use a weekly schedule when drivers always work on the same days of the week. For example, if you have a shift that works Monday through Friday, you would create a weekly schedule template. The on and off days are the same from week to week. See Creating a weekly schedule template.
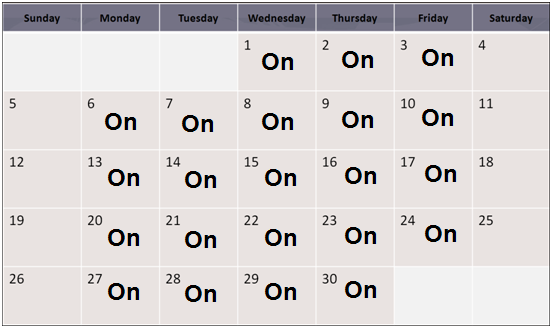
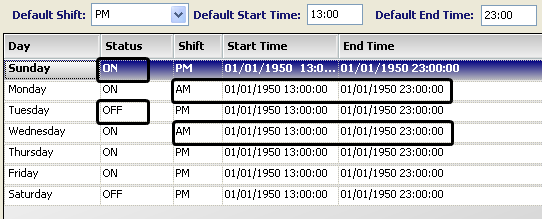
This sample calendar illustrates a driver’s schedule that was generated from a weekly schedule template. It was set up to have drivers work Monday through Friday. The start date for the schedule can be any day of the week.
Rotating Schedule
A rotating schedule allows you to define a frequency pattern based on a changing number of days versus set days of the week. See Creating a rotating schedule template.
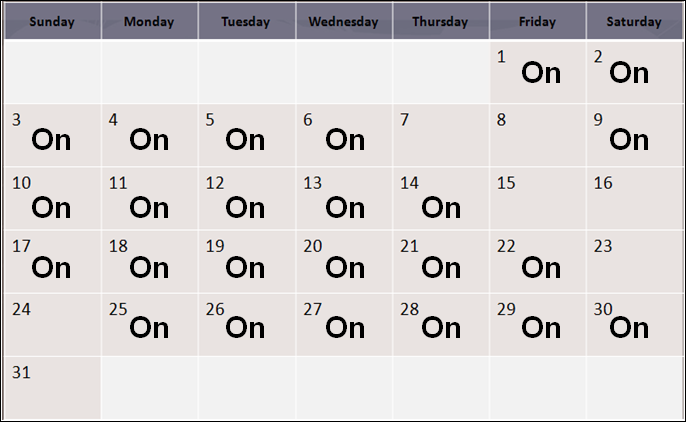
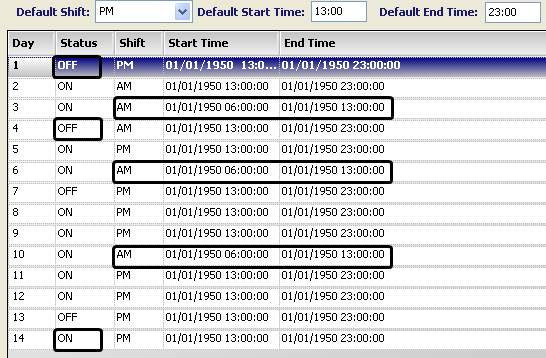
This sample calendar illustrates a driver’s schedule that was generated from an eight-day rotating schedule template. It was set up to work six days and be off two days. The start date for the schedule was the first day of the month.
Creating a weekly schedule template
Use this procedure to create weekly schedule templates, based on the seven days of the week, for each of your terminals. You will then use the templates to generate individual driver schedules. At least one schedule template must be created for each terminal location.
-
Go to Operations > Shift Templates.
The Edit Schedule Templates window displays. -
Click
 New.
New.
The fields become enabled.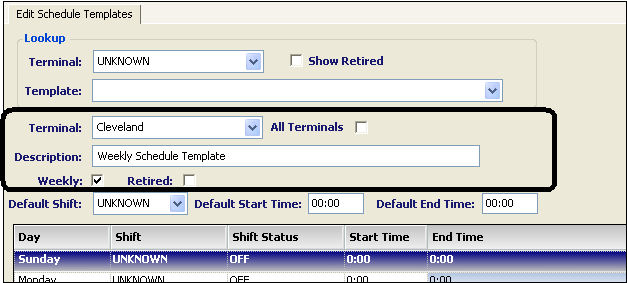
-
To indicate this is a weekly schedule template, verify the Weekly checkbox is selected.
-
Complete the fields in the template header as appropriate.
Required field: *
Field Description Terminal
Terminal location for which you are creating the template
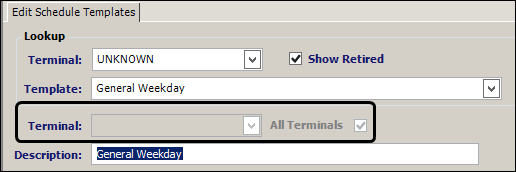
All Terminals
Select this checkbox if you want this new template to be available to all terminals. It is recommended that you identify the template as such in the Description field.
Note: If you modify the template, your changes will apply to all terminals using it.
Description *
Brief definition that identifies the schedule template
This description displays in the list of templates for a terminal.
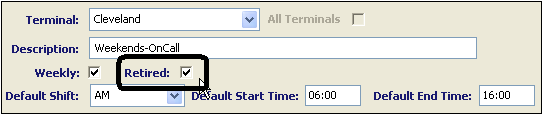
Retired
Indicates whether a schedule template is available for use.
Also see Retiring a schedule template.
Note: If you expect to take more than one session to create the template, and to avoid its premature use, you might want to select the checkbox until you are finished creating it.
-
Enter or make selections in the default fields for shift, start, and end time.
The detail lines auto-fill with your entries.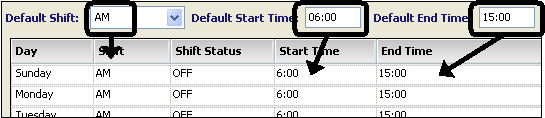
Field Description Default Shift
Determines if the schedule will be created for AM or PM.
Default Start/End Times
Determines the schedule’s regular start and end time.
-
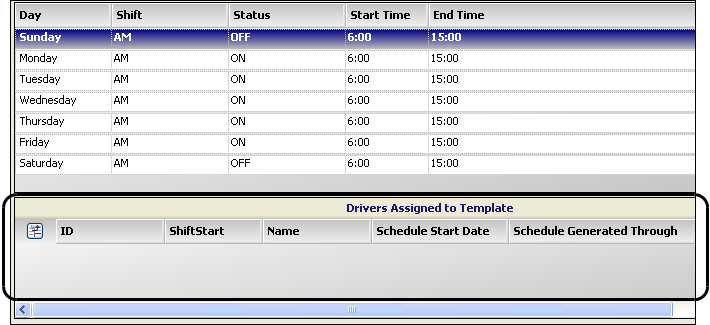
Set the status for each day by choosing ON or OFF.
By default, the Shift Status field is set to OFF.Note: The system administrator might have added other statuses to the list, such as On Call. Check with your administrator about which statuses are interpreted as on and which as off. See
[FuelDispatch]AdditionalOnDutyStatus. -
The template detail section shows details of the template in a grid. Change the Shift, Start Time, and End Time field entries for specific days as needed.
Field Description Day
Days of the week listed Sunday to Saturday
Note: You cannot add days to or delete days from the schedule.
Shift
Identifies the shift as morning or afternoon for the day.
Status
Represents the schedule template’s ON and OFF days.
Note: By default, the Status field is set to OFF.
Start Time
Time when the shift begins
End Time
Time when the shift ends
-
Click
 Save.
Save.
Creating a rotating schedule template
Use this procedure to create rotating schedule templates, based on a set number of days, for each of your terminals. You will then use the templates to generate individual driver schedules. At least one schedule template must be created for each terminal location.
-
Go to Operations > Shift Templates.
The Edit Schedule Templates window displays. -
Click
New.
The fields become enabled.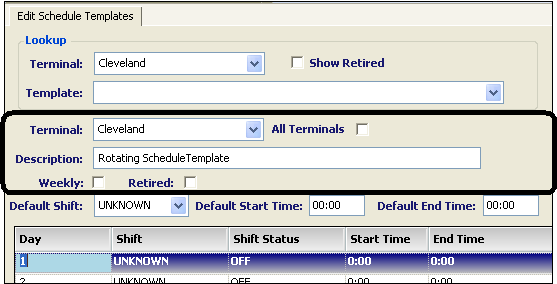
-
To indicate this is a rotation schedule template, clear the Weekly checkbox.
-
Complete the fields in the template header as appropriate.
Required field: *
Field Definition Terminal
Terminal location for which you are creating the template
All Terminals
Select this checkbox if you want this new template to be available to all terminals. It is recommended that you identify the template as such in the Description field.
Description *
Brief definition that identifies the schedule template
Retired
Indicates whether a schedule template is available for use.
Also see Retiring a schedule template.
If you expect to take more than one session to create the template, and to avoid its premature use, you might want to select the checkbox until you are finished creating it.
-
Enter or make selections in the default fields for shift, start, and end time.
The detail lines auto fill with your entries.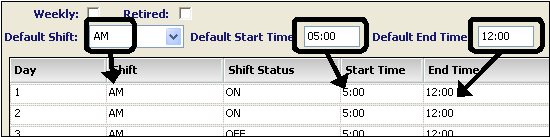
Field Definition Default Shift
Determines if the schedule will be created for AM or PM.
Default Start/End Times
Determines the schedule’s regular start and end time.
-
Add or remove rows as appropriate.
-
To add a new row at the end of the list, click
 Add.
Add. -
To insert a new row above your cursor location, click
 Insert Item.
 -
To remove a row at the cursor location, click
 Delete Item.
-
-
Set the status for each day, by choosing ON or OFF.
By default, the status field is set to OFF.Note: The system administrator might have added other statuses to the list, such as On Call. Check with your administrator about which statuses are interpreted as on and which as off. See
[FuelDispatch]AdditionalOnDutyStatus. -
The template detail section shows details of the template in a grid. Change the Shift, Start Time, and End Time field entries for specific days as needed.
Field Definition Day
Numbered list of days
Note: By default seven days are added to the detail area. Use the add, insert and delete buttons to add or remove days.
Shift
Identifies the shift as morning or afternoon for the day.
Status
Represents the schedule template ON and OFF days.
Note: By default, the Status field is set to OFF.
Start Time
Time when the shift begins
End Time
Time when the shift ends
-
Click
Save.
Changing a template before generating driver schedules
Use this procedure to make changes to an existing schedule template from which no driver schedules were generated.
-
Go to Operations > Shift Templates.
The Edit Schedule Templates window displays. -
Locate the template you want to change.
-
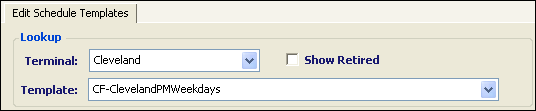
In the Lookup group, select the terminal to which the template belongs.
-
If you want to include retired templates in the list of templates, select the Show Retired checkbox.
-
Select the template.
-
-
Click
 Open.
Open.
The template displays.Note: Be aware that if the All Terminals checkbox is selected, the template was designed for all terminal locations to use.
-
Verify no drivers are listed in the Drivers Assigned to Template list.
-
Make your changes to the template.
Note: To retain your changes accurately, be sure to press TAB, or click in another field before saving.
You can:
-
Change the terminal.
-
Change the description.
-
Change the default shift, start, or end times.
-
Change to weekly or rotating.
-
Change a day’s status, shift, start, and end times.
-
-
Click
Save.
Changing a template after generating driver schedules
Use this procedure to make changes to an existing schedule template from which driver schedules were generated.
| Be aware that when you modify a schedule template, ALL driver schedules that were generated from that template must be regenerated using the updated template. If you do not regenerate your drivers' schedules, the system will not recognize their revised schedule. |
-
Go to Operations > Shift Templates.
The Edit Schedule Templates window displays. -
Locate the template you want to change.
-
In the Lookup group, select the terminal to which the template belongs.
-
Select the template.
-
-
Click
Open.
The template displays.Note: Be aware that if the All Terminals checkbox is selected, the template was designed for all terminal locations to use.
-
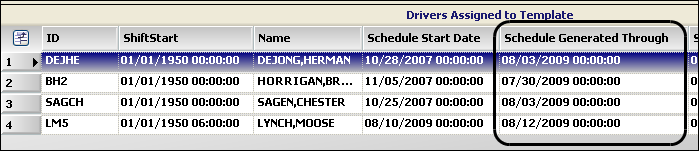
Make note of the drivers listed in the Drivers Assigned to Template list.
Note: If any dates in the Generated Through column extend beyond today, and you want the updated template to be used, you must generate schedules for those drivers and dates.
-
Make your changes to the template.
Note: To retain your changes accurately, be sure to press TAB, or click in another field before saving.
You can:
-
Change the terminal.
-
Change the description.
-
Change the default shift, start, or end times.
-
Change to weekly or rotating.
-
Change a day’s status, shift, start, and end times.
-
-
Click
Save.
Viewing drivers assigned to templates
Use this procedure to view a list of drivers who are assigned to a template as their default. Drivers are associated with a template once their work schedules are generated using that template.
| A driver cannot be associated with multiple templates for one shift. |
-
Go to Operations > Shift Templates.
The Edit Schedule Templates window displays. -
Locate the template.
-
In the Lookup group, select the terminal to which the template belongs.
-
If you want to include retired templates in the list of templates shown, select the Show Retired checkbox.
Note: You cannot use retired templates to generate new schedules or regenerate existing schedules for a driver. You might want to select this option to verify that no drivers are assigned to retired templates.
-
Select the template.
-
-
Click
Open.
The template details display. -
View the list in the driver schedule details grid.
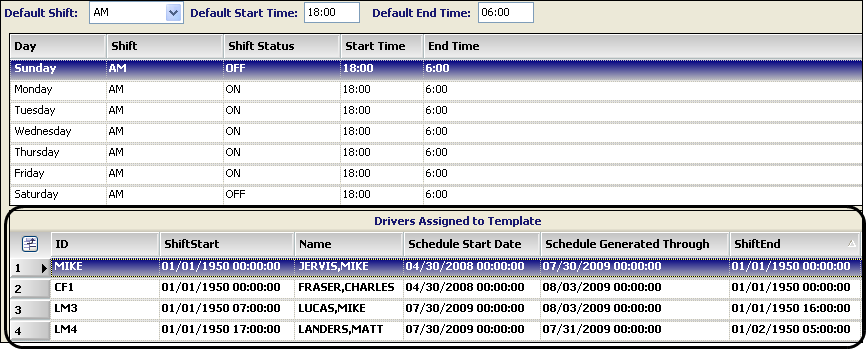
Along with the driver’s ID and name, these columns are available.
Field Definition Shift Start / End
Driver’s shift start and end times, if different from those on the schedule template
Ordinarily, these times display 01/01/1950 00:00, indicating they are the same as the default times from the template used to generate the schedule.
If the schedule was generated without using the template’s default times, and times were entered for the driver manually, these times are displayed. You can easily spot which driver schedules vary from the norm.
Schedule Start Date
Date on which the current schedule was generated from the template manually
Generated Through
Date on which the current schedule is expected to end
After this date, the driver’s schedule is automatically generated by the system when it retrieves the driver on the Trip Planner.
-
If you want, double-click on a driver row to open that driver’s information in the Edit Driver Schedule window.
Retiring a schedule template
Use this procedure when you no longer want to have a schedule template available for use. You can also use this procedure to bring a template out of retirement.
|

-
Go to Operations > Shift Templates.
The Edit Schedule Templates window displays. -
Locate the template you want to retire.
.-
In the Lookup group, select the terminal to which the template belongs.
-
Select the template.
-
-
Click
Open.
The template displays. -
Verify no drivers are listed in the Drivers Assigned to Template list.
Note: If drivers are listed, exit the window and generate new schedules for them, using an active template.
-
Select the Retired checkbox.
Note: To bring a template out of retirement, clear the checkbox.
-
Click
Save.Note: The system will not display a warning message if any drivers are still assigned to the retired template.
-
If you want, verify the template has been marked as retired.
-
In the Lookup group, select the terminal to which the template belongs.
-
Select the Show Retired checkbox.
-
From the template list, locate the template you just retired.

-