Processing Inbound 204 load tender messages
You can accept, decline, or view details for an order in the Planning Worksheet’s EDI grid or in the Trip Folder. If you are licensed for the EDI 204/990 Load Tender SmartLink add-on, the system generates 990s automatically based on the decision you make for each load tender.
Understanding the Planning Worksheet’s EDI grid
TMW Operations imports load tenders from the Data Exchange application. The load tenders display as new orders in the Planning Worksheet’s EDI grid.
To display the grid, click the ![]() EDI tab at the right side of the Planning Worksheet.
EDI tab at the right side of the Planning Worksheet.
To display the available load tenders, specify a date range at the top of the grid and click Retrieve.
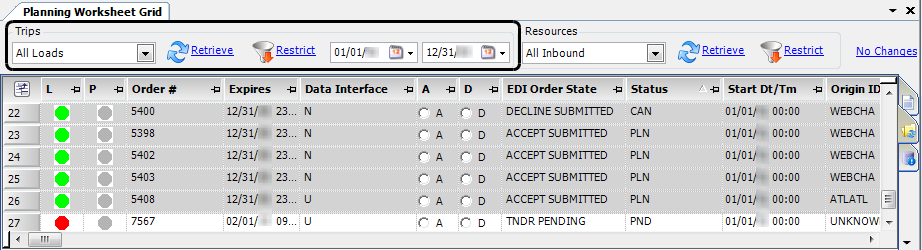
The following columns are available only in the EDI grid.
| Field | Definition |
|---|---|
Expires |
Identifies the Respond By Date from the 204 flat file This is the date/time the load tender must be acknowledged by either accepting or rejecting it. This date/time is used as a basis for activating the Warning and Critical indicators in the L column. Note: If the 204 flat file does not contain the Respond By Date, the date/time defaults to a generic date/time, and the Warning and Critical indicators will not function. |
Data Interface (ord_edipurpose) |
Defines which type of tender has been imported. Options are:
|
A / D |
Select the appropriate radio button to accept or decline the load.
|
EDI Order State |
Current EDI status of the load tender If the EDI status includes the word PENDING, the order has been imported, but no decision has been made to accept or decline it. If the EDI status includes the word SUBMITTED, a decision has been made and a TMW Operations order is now available.
|
EDI Order State |
|
Status |
Order status |
Setting up views for the EDI grid
When the Data Exchange application imports loads into TMW Operations, they become orders with the Pending status in the TMW Operations database. To view pending orders in the EDI grid, you need to modify the view(s) used with it.
-
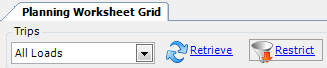
To modify the view for the current session in the Planning Worksheet, click Restrict next to the Trips views list.
The Trip Board Definition window opens.
-
In the Dispatch Status field, add PND.

-
Click OK to save your changes.
Note: When orders have the Pending status, you cannot drag and drop resources to them in the EDI grid.
Controlling the orders shown on the EDI grid
You can use the LTSLWrkshtOverrides General Info Table setting to specify which loads appear in the EDI grid. For example, to display only loads that must be accepted or declined, set String1 to Y and String2 to N. Processed loads with the EDI status of ACCEPT SUBMITTED or DECLINE SUBMITTED are removed from the grid.
Accepting and declining load tenders
In the Planning Worksheet’s EDI grid, original load tenders display the TNDR PENDING EDI status until you make a decision. In the EDI grid, you can:
-
Accept or reject a load as an order
-
Accept a load and assign a carrier to it
You can also accept or reject a load in the Trip Folder.
Accepting or declining load tenders in the Planning Worksheet
You can accept and decline loads with the EDI status of TNDR PENDING directly from the Planning Worksheet’s EDI grid. You then process those loads from the EDI grid. If you are licensed for the EDI 204/990 Load Tender SmartLink add-on, that application returns a 990 to the customer, indicating whether the order was accepted or declined.
| You may find the Sort Trips Closest to Power feature useful when determining which trips in the Planning Worksheet to accept or decline. For details, see Sorting trips closest to power. |
Accepting load tenders
You can use the following methods to accept one or more loads with the TNDR PENDING status.
-
To accept a single load, select the A radio button in the A column.
-
To accept multiple loads, hold CTRL and click in the left column for each load. Right-click in the grid and select Accept EDI Order from the shortcut menu.

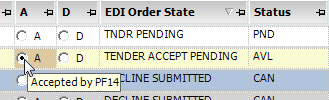
The system updates the load tender status to TENDER ACCEPT PENDING.
To undo your decision for an order and return the status to TNDR PENDING, select the A radio button.
Accepting a load tender and assigning a carrier
You can accept a load with the TNDR PENDING status and assign a carrier to it at the same time.
To accept a load and assign a carrier, follow these steps:
-
Right-click in a row with TNDR PENDING in the EDI Order Status field and PND in the Status column.

-
In the shortcut menu, select Accept EDI Order and Assign Carrier.
The Assign Carrier to EDI Orders window opens.
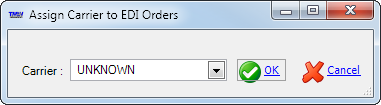
-
In the Carrier field, enter the carrier name.
-
Click OK.
The system assigns the carrier and sets the order status to Planned.
Note: You can assign only carriers to the loads. You cannot assign drivers, tractors, or trailers.
Declining load tenders
Use the following methods to decline one or more loads with the TNDR PENDING status.
-
To decline a single load, select the D radio button in the D column.
-
To decline multiple loads, hold CTRL and click in the left column for each load. Right-click in the grid and select Decline EDI Order from the shortcut menu.

The system updates the load tender status to TENDER DECLINE PENDING.
To undo your decision and return the status to TNDR PENDING, select the D radio button.
Processing loads in the Planning Worksheet’s EDI grid
When you process loads in the Planning Worksheet’s EDI grid, the Load Tender SmartLink application returns a 990 to the customer. The 990 indicates whether each order was accepted or declined.
To process loads in the EDI grid, follow these steps:
-
Hold CTRL and click the left column for each TENDER ACCEPT PENDING and TENDER DECLINE PENDING load you want to process.

-
Right-click in one of the selected rows.
-
From the shortcut menu, select one of these options:
-
Process EDI A/Ds
If you were not the user who accepted/declined, you must select this option for processing to occur. Selecting this option will process the loads regardless of who accepted or declined the loads. -
Process EDI A/Ds for USERID
Select this option only if you accepted/declined the loads. Any loads that you did not accept/decline will not be processed.Note: To view a ToolTip showing the ID of the user who accepted/declined a load, place your cursor over the selected radio button.
-
-
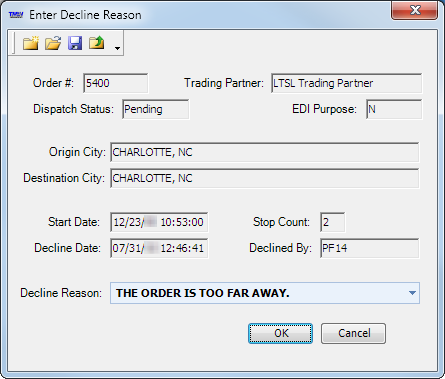
If you declined a load, the Enter Decline Reason window opens.
In the Decline Reason field, select a reason. Click OK to continue.
The system processes each load.
-
For loads that you accept, the EDI Order State changes to ACCEPT SUBMITTED.
-
For loads that you decline, the EDI Order State changes to DECLINE SUBMITTED.
|
Changing an order’s Booked By to the user who accepted the order
When a user creates an order in TMW Operations, the system assigns that user’s ID as the Booked By ID. By default, when the Data Exchange application imports a 204 for the order, DX is recorded in the Booked By (ord_bookedby) column of the EDI grid.

If you want, you can use the EDIBookedByAccept General Info Table setting to update the Booked By to the ID of the user who processes the load in the EDI grid.
Accepting or declining loads in the Trip Folder
You can also make decisions about load tenders from the Trip Folder. Once you make a decision, the system automatically generates the 990.
To accept and decline loads in the Trip Folder, follow these steps:
-
In the Planning Worksheet’s EDI grid, double-click a single load. The order opens in the Trip Folder.
-
In the Freight Detail or Stop Detail grid, right-click to display the shortcut menu.
-
Select Accept Load or Decline Load.
Updating an order with a load tender
When the Data Exchange application imports orders into TMW Operations, the SID identifier determines if the load is a new order or an update. If the SID number exists, the system adds the number to the order’s Reference # field and imports the load as an update.
The EDI status for the load changes to either TENDER UPDATE PENDING or USER UPDATE PENDING, depending on whether the order can be updated automatically.
|
Creating new companies and matches
When the system processes an accepted load, it looks at all companies on the 204. If a company in the 204 does not exist in the EDI companies table or your TMW Operations database, the Select Company window opens. The Company section at the top of the window displays information about the company found in the 204 flat file.
You can use the information in the window to do one of the following:
-
Match the information to a company in your TMW Operations database
-
Create a new TMW Operations company
If you click Cancel in the Select Company window, you will cancel the accept process for that order.
| The window displays for each company on a load tender that does not exist in your EDI table or TMW Operations database. This means that you may need to repeat the process of matching companies or creating new companies for other companies on a load tender. |
Matching companies by company name
If the EDI company is new, you can use the Select Company window to match it to a company in your TMW Operations database.
To match the company to a company in your database, follow these steps:
-
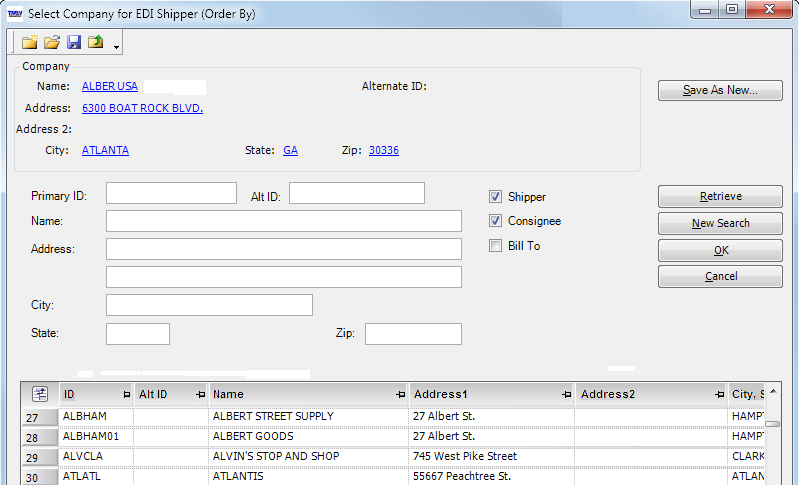
To display a list of companies that closely match the EDI company, click New Search.
-
Click Retrieve.
-
Select the matching TMW Operations company from the list at the bottom of the window.
-
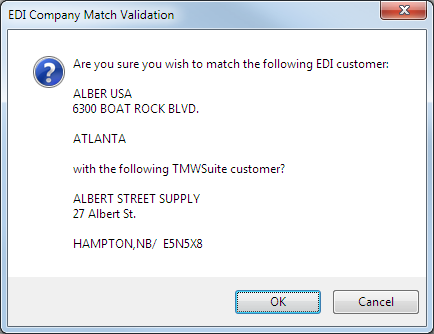
To confirm the match, click OK.
The EDI Company Match Validation window asks you to confirm your selection.
-
To validate the match, click OK.
If the company is incorrect, click Cancel.
-
Repeat Steps 1-5 for each new company.
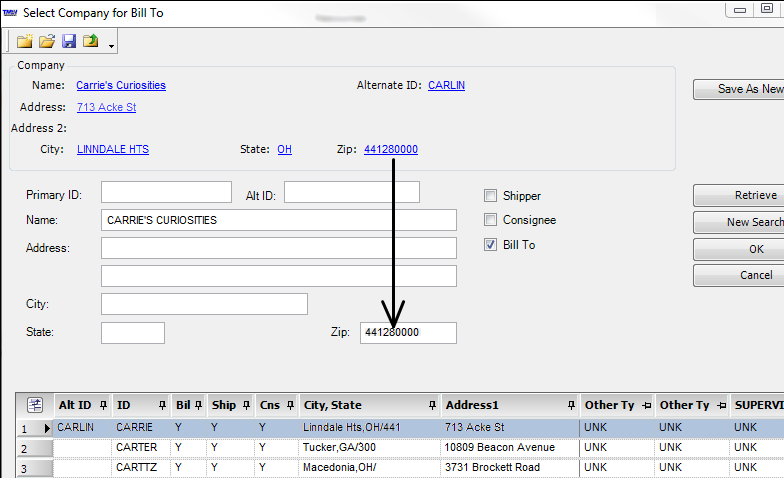
Matching companies by alternate ID or address
By default, the Select Company window matches by company name. You can also search by one or more of the following:
-
Alternate ID
-
Address1
-
Address2
-
City
-
State
-
ZIP Code/postal code
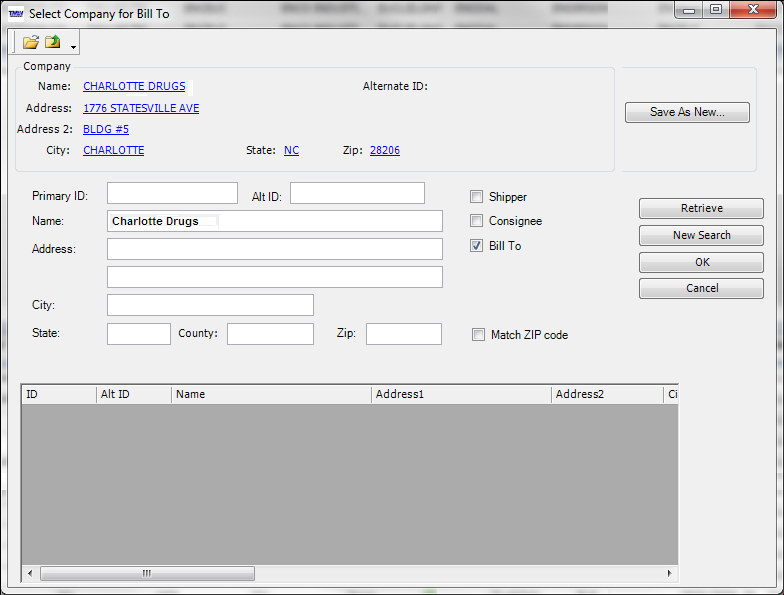
The application copies this information from the 204 file to the Company section at the top of the window, with each populated field displaying as a hyperlink. You click a hyperlink to transfer that information to the corresponding search field.
In this example, we clicked the hyperlink in the Zip field to search by the company’s ZIP Code.
|
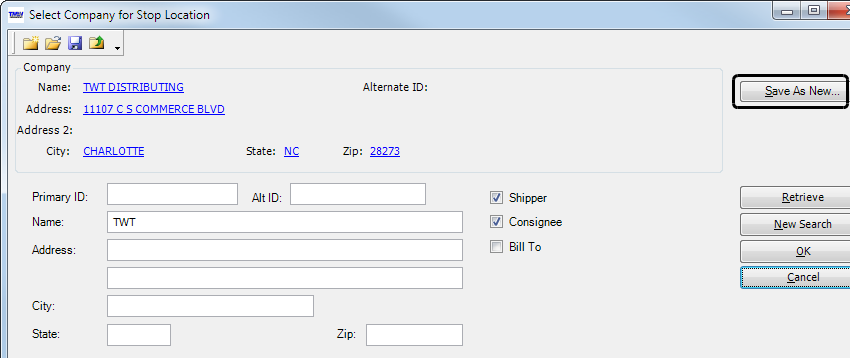
Creating a new company
If a company name cannot be matched to a company in your TMW Operations database, you can add it as a new company profile.
To create a new company, follow these steps:
-
When the Select Company window opens with the 204 company data displayed, click Save As New.
-
The system completes the company data fields based on the information in the 204. Update the data as necessary.
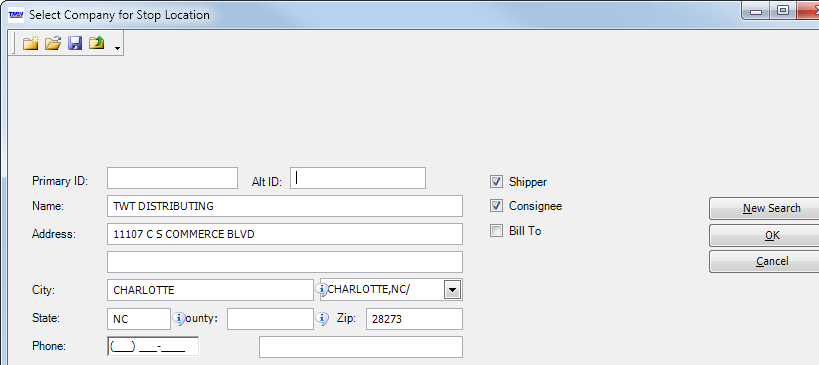
-
By default, the system generates a six-character ID code when creating a new company ID. If necessary, you can add a unique identification code in the Primary ID field.
-
Click OK to save the company as a new TMW Operations company profile. A message indicates that the system has created a new company.
Viewing EDI details
The Details window allows you to view the history and details of each 204 and 990 flat file associated with an order. The Details window allows you to:
-
View who was responsible for all EDI 204 and 990 related activities in the history log.
-
Review all inbound 204s received for the selected order.
-
View updates and changes to the order using the Overlay document feature.
-
Review all outbound 990s exported for the selected order.
To access the Details window, follow these steps:
-
Select an order in the Planning Worksheet’s EDI grid.
-
Right-click and select View EDI Details from the shortcut menu.
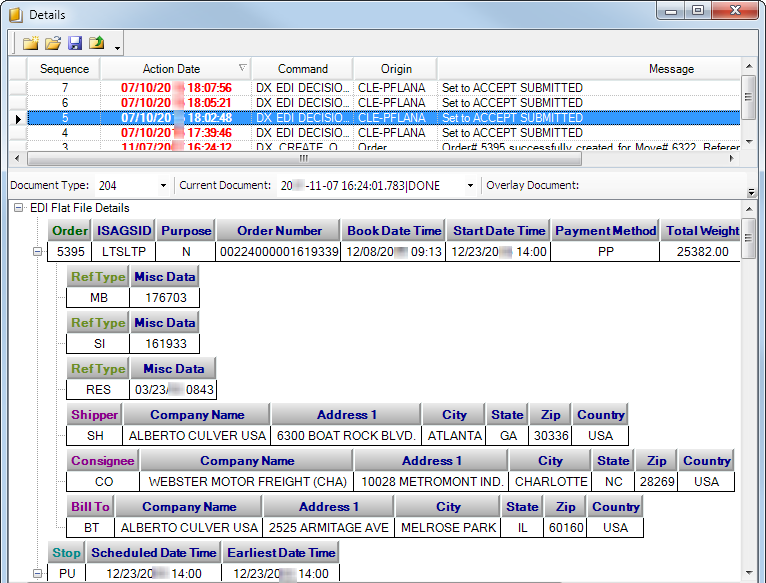
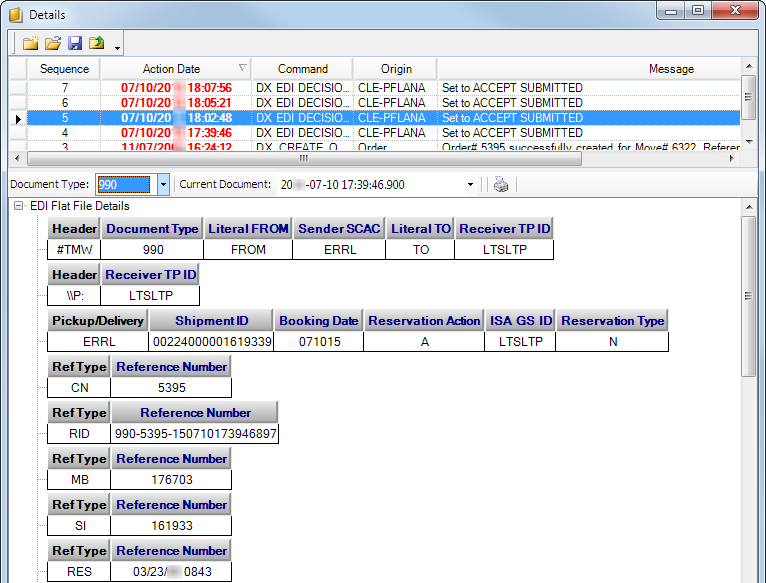
The window is divided into two sections: a history log at the top, and the EDI flat file at the bottom. The following illustrations show samples of 204 and 990 flat files for the same order.
Sample 204:
Sample 990:
Viewing 204 updates
The Details window allows you to view the changes made to an order from an update 204. Red highlighting allows you to examine each update.
To view 204 updates, follow these steps:
-
In the Planning Worksheet’s EDI grid, right-click on a 204 load tender.
-
In the shortcut menu, click View EDI Details.
-
In the Overlay Document field, select a document different from the one listed in the Current Document field.

The following illustration shows changes made to freight quantity, weight, and volume.
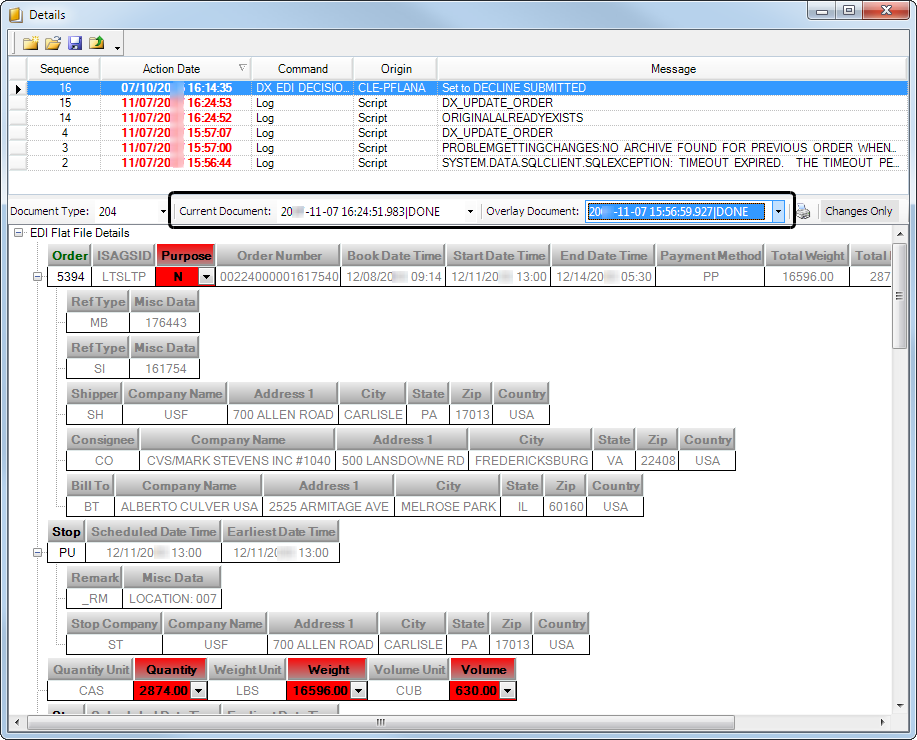
The colors indicate how the two versions differ.
-
Red
Values changed. Click the drop-down arrow to see the original value. -
Green
Fields or records that have been added in the Current Document, and do not exist in the Overlay Document. -
White
Fields or records that have been removed in the Current Document, and do exist in the Overlay Document. The text appears with a strikeout line over it.
-
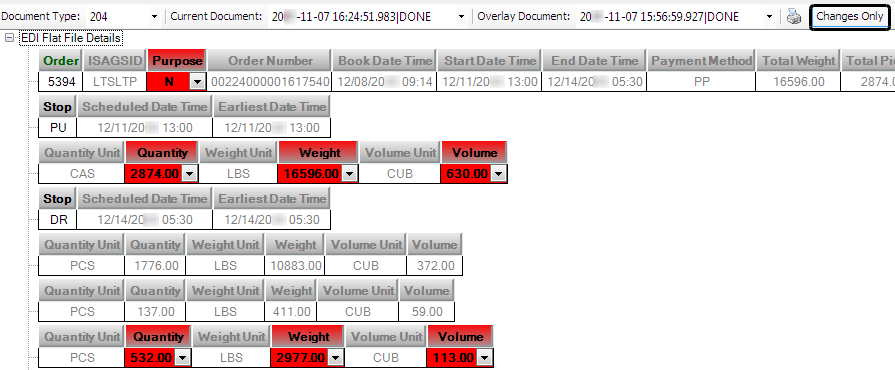
-
To view a summary of only the changes made, click Changes Only.
Processing 990s
Creating and processing 990s happens behind the scenes. The DX 990 Service scans the 990 database table for new data based on the settings specified in the DX Service tab of the DX Configuration window.
The main requirements for processing 990s are that the trading partner is set up to receive 990s and the DX 990 Service must be running.
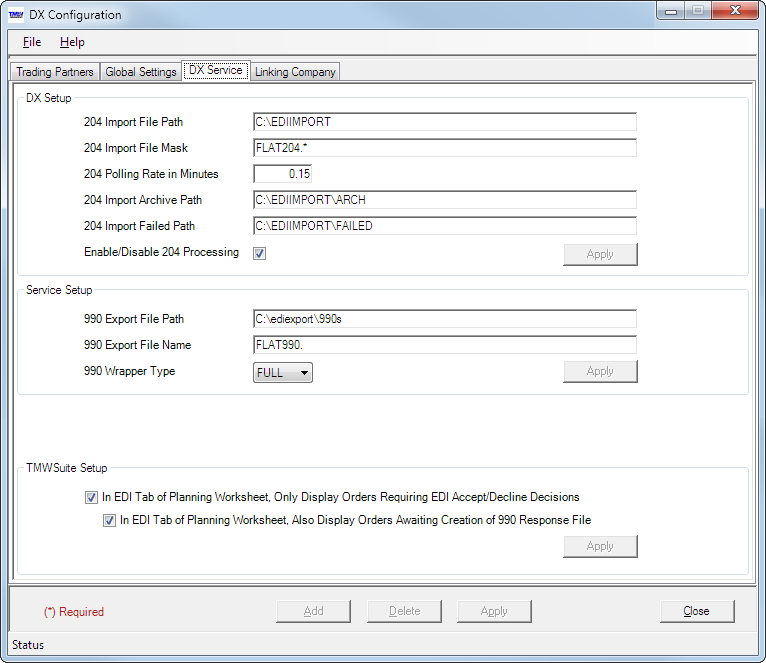
Once the service finds 990 data, it extracts it and creates a text file in the specified 990 export directory.
|
You access the DX Configuration window through the LTSL2 Configuration Utility menu option in your Windows Start menu. For details, see: Guide: EDI Load Tender SmartLink 2.0 | Chapter: LTSL 2 Configuration Utility | Section: Setting up 990 Service connections for 990 flat files |
Auto assign trailer when processing EDI 204’s
First available in V.2022.4
When processing EDI 204’s, a trailer can be automatically assigned to an order when a valid trailer id is included in the flat 204 file.
To enable the functionality of auto assigning a trailer when processing EDI 204’s, you use these settings:
-
AssignTrailerFromReferenceNumber -
LTSLGlobalTrailerIdQualifier
The AssignTrailerFromReferenceNumber is a trading partner setting. It will enable functionality for the Trading Partner being edited. It is available in the Interface Settings application in the LTSL2 Configuration Window. When this option is checked in the Dynamic Setting Name column, the Trailer ID Qualifier field will be made editable. You can select the Reference Number Type qualifier that will map to the trailer id that is included on the flat 204 file.
This illustration shows an example of the fields displayed:
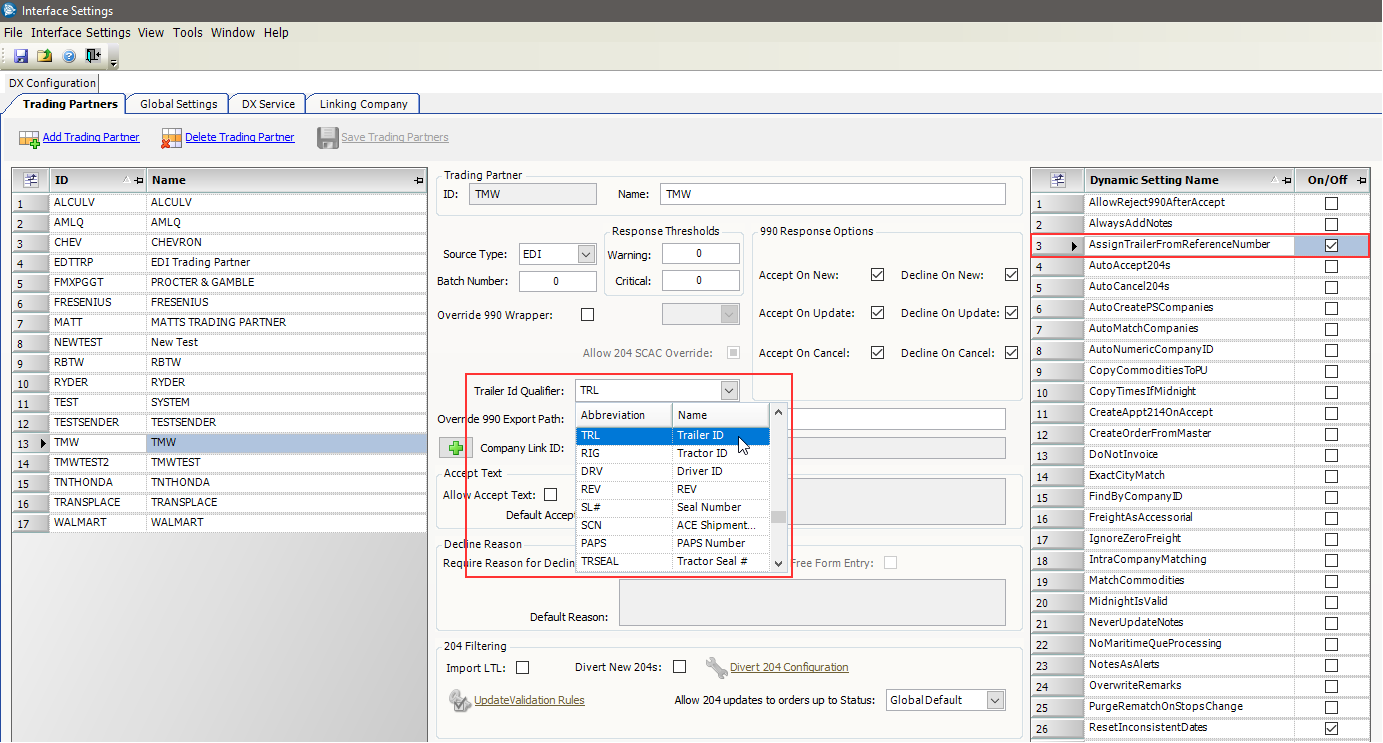
The LTSLGlobalTrailerIdQualifier is a General Info Table setting. It will allow for a default Trailer Id qualifier to be specified and used when none is set at the Trading Partner level. The setting can be edited on the DX Service tab in Interface Settings. It is only used when the AssignTrailerFromReferenceNumber is enabled.
Note: There is a 3 character limitation for the Misc Data Type in the flat 204 file. The EDI Code column should be populated with the EDI code value for the corresponding reference number qualifier in the Edit User Definable Fields screen in Interface Settings.
EDI 204 Import process
For a trailer to be auto assigned during the EDI 204 order import, the order must be in an available status. The trailer will be assigned during the 204 import if the trading partner is set up to auto accept a trailer or the trailer will be assigned during the EDI acceptance process, which occurs from the EDI Planning Worksheet.
For example, if you set the Trailer Id Qualifier to TRL for the Trading Partner and also checked the Dynamic Setting Name AutoAccept204s in Interface Settings, the trailer can be auto assigned upon import. The status of the order in TMW Operations Trip Folder will display the trailer number and Available.
When the flat 204 file is imported using TMW Data Exchange, the trailer will be assigned to the order if the trailer in the system is valid and the order is in available status.
Log messages will display in the Log tab and show the results of Trailer Auto Assignment.
This illustration shows an example of a successful trailer assignment to an available EDI created order:
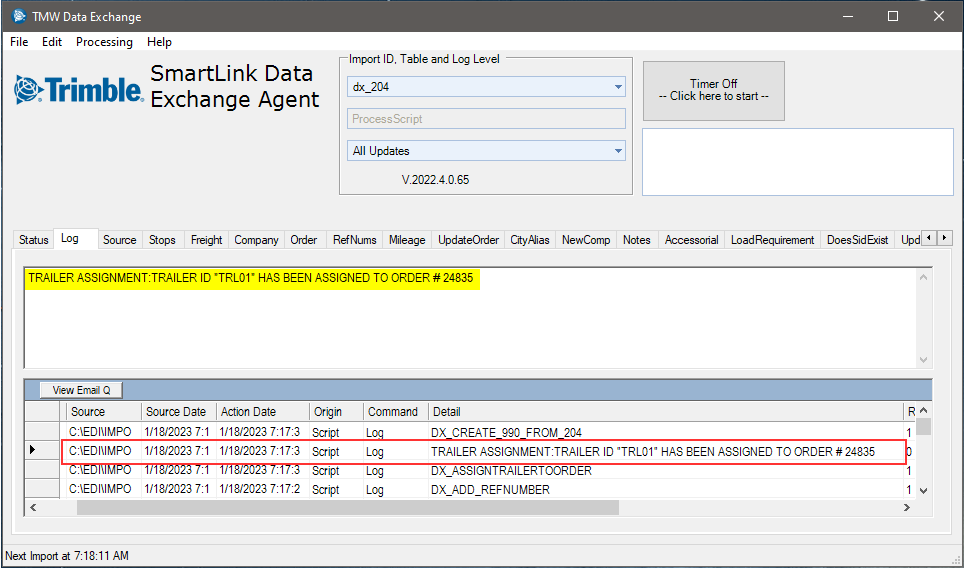
Note: If a trailer cannot be auto assigned to an order, a message in the Log tab will provide a reason.
Trailer Auto Assignment from EDI Planning Worksheet
When a LTSL2 Trading Partner is configured to assign a trailer during the EDI 204 import process and the order is not auto accepted, the trailer can be assigned when the EDI order is accepted in the Planning Worksheet. This will allow for trailers to be auto assigned when a trading partner is not set up to auto accept a trailer or if something prevents the EDI order from being auto accepted during the import, such as an unmatched company.
For example, if a trading partner is configured to auto assign trailers but is not configured to auto accept 204s. The EDI order is imported and created in a pending status. The trailer is not automatically assigned due to the order not being available. The status of the order in TMW Operations Trip Folder will display with no trailer assigned and a Pending status.
To process the pending order from the Planning Worksheet, follow these steps:
-
Go to TMW Operations > Planning Worksheet
-
Select EDI Pending under the Trips drop-down
-
Select the pending order and right-click select Process EDI A/Ds
This illustration shows an example of selecting the menu:
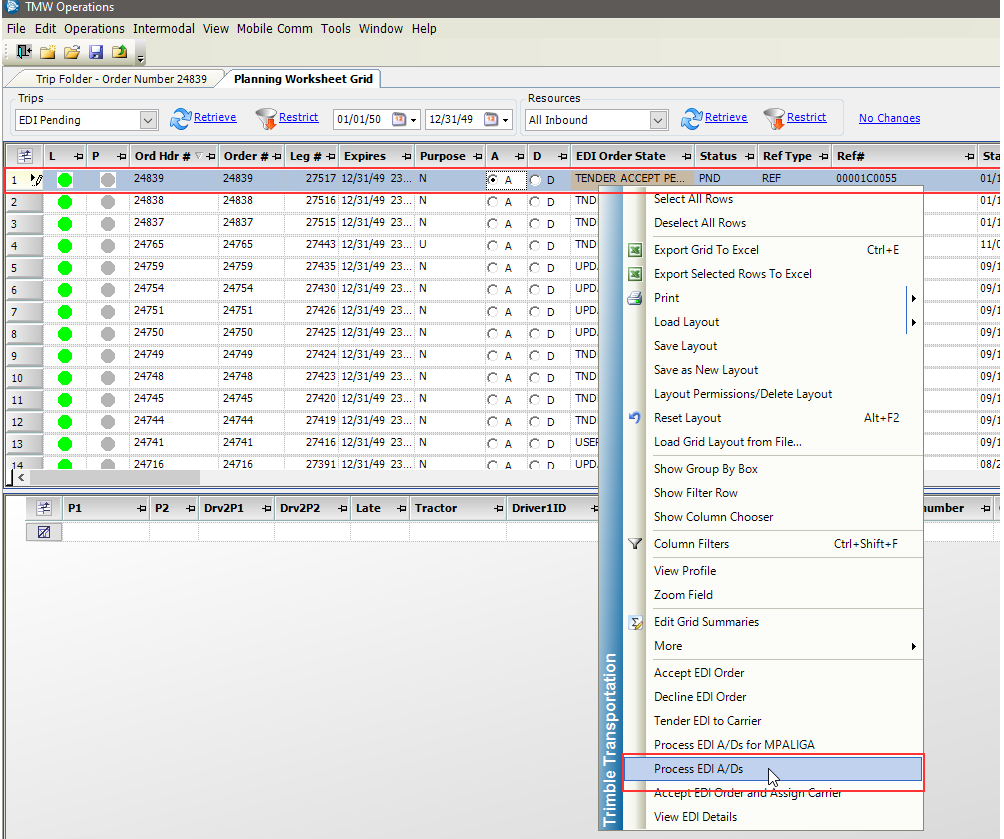
After the EDI acceptance has been processed, the trailer will be assigned.
Note: The EDI Details window can be used to show the history of the trailer assignment attempts. To access, right-click and select View EDI Details from the shortcut menu.
Preventing timeout issues when loading EDI 204 trips
First available in V.2019.3
The Planning Worksheet uses the value in the [Misc]PlanningBoardQueryTimeout INI setting to determine how long it runs while retrieving trips.
The default timeout for all tabs is 60 seconds and that can now be changed by adding the entry to the Misc section of your TTS50.
| If the Planning Worksheet times out when retrieving EDI trips after a user clicked on the Planning Worksheet’s Retrieve button, the system does not display an error message. Instead, you must verify the information on the Planning Worksheet is updating correctly. If it is not, increase the time. |