Entering stops
In the Order Maintenance window, you can use any of the first three tabs below the order header to enter stop information. Listed from left to right, they are the Summary tab, the All Stops tab, and the Stop Detail tab.
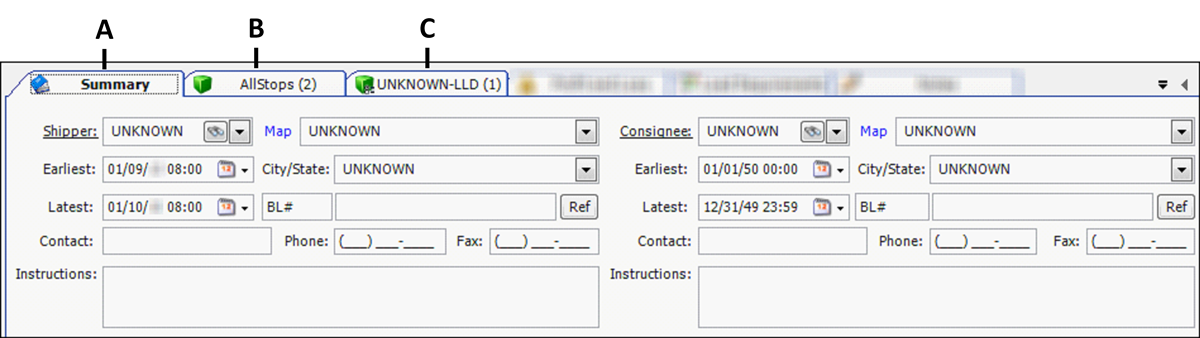
The letters in this table correspond to the callouts in the illustration:
A |
The Summary tab is used to record information for the initial pickup and final drop. |
B |
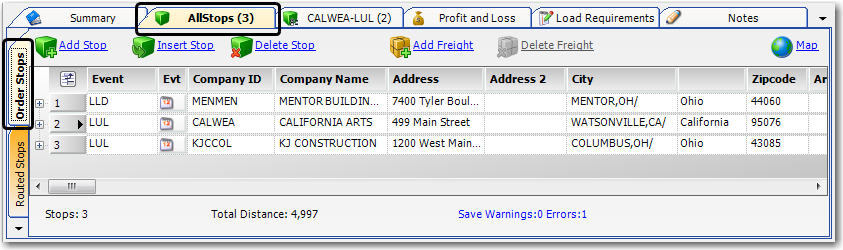
On the All Stops tab, you can view, enter, and edit information for all stops and commodities. The total number of stops for the order is shown in parentheses. |
C |
Before you enter shipper information for a new order, you see UNKNOWN in the Stop Detail tab. Later, when you click on a stop for which you have entered data, the tab shows the company ID and the event code for the stop. In parentheses, it shows a sequence number that identifies where that stop falls on the trip. |
Summary tab
On the Summary tab, you can quickly record information for the first pickup and last drop.
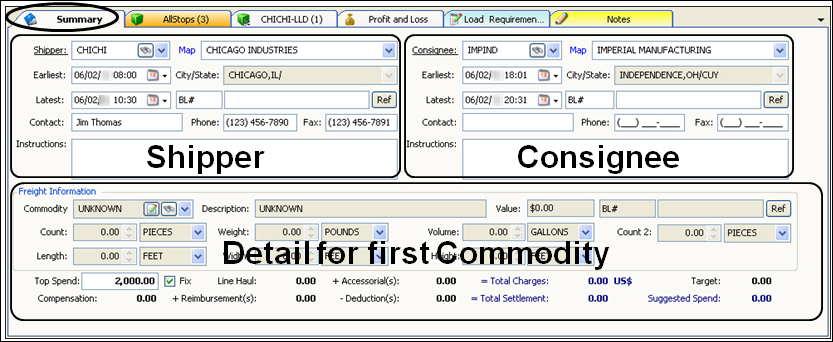
On the Summary tab:
-
You cannot add or delete stops.
-
You cannot delete freight.
All Stops tab
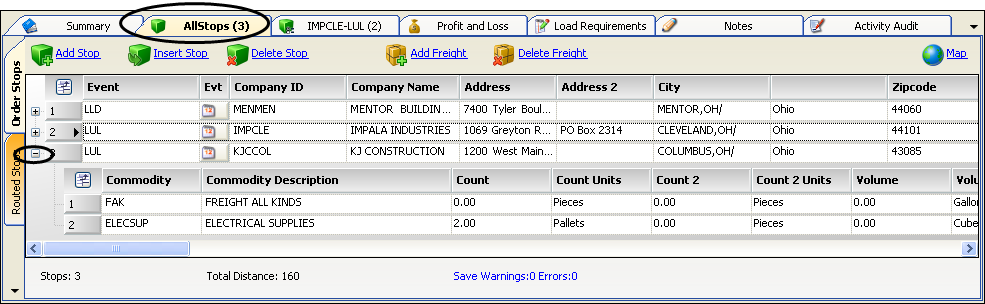
The AllStops tab includes the Order Stops and Routed Stops sub tabs.
-
The Order Stops sub tab displays stop information for all billable stops in a grid format. This sub tab:
-
Displays more stop and freight data than the Summary or Stop Detail tab.
-
Allows you to add or delete stops and freight details. This is the only tab on which you can do so.
-
Allows you to copy freight details.
-
-
The Routed Stops sub tab displays stop information for all billable and non-billable stops. Orange shading on the tab indicates that stops have been added to the trip. Information on this sub tab is read-only.
By default, the freight information in both sub tabs is hidden. To view this information you must expand the information displayed for the stop by clicking the Expand + icon that is displayed at the beginning of the stop’s row.
In this illustration, freight details for two commodities are shown for the third stop. A Collapse - icon (circled below) is displayed to the left of the third stop. Click the icon to hide the freight information.
Stop Detail tab
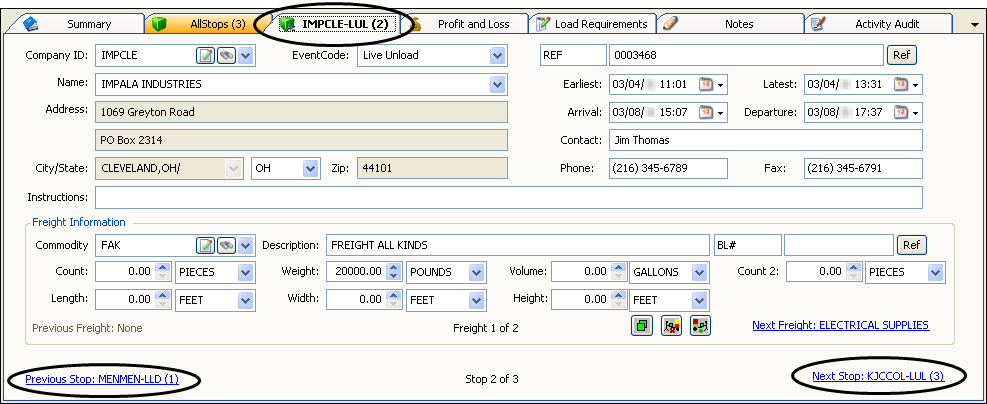
On the Stop Detail tab, you can enter freight details for a single stop. To toggle to data for the previous stop or the next stop on the order, you can click the Previous Stop and Next Stop links (circled below).
On this tab, you cannot add or delete stops. However, you can:
-
Record more than one commodity per stop.
-
Copy freight data from one stop to another stop.
Although this help file uses the name Stop Detail for this tab, the tab does not have a set name. Instead, it shows the company ID of the selected stop, followed by a dash, the stop’s event code, and a sequence number in parentheses that identifies where the stop falls in the trip.
For example, in the illustration shown above, the tab shows IMPCLE-LUL (2). This means the data displayed is for the second stop, which is a Live Unload at a company with the ID of IMPCLE.
Feature comparison of Stop tabs
In the Order Maintenance window, the Summary tab, Order Stops sub tab of the All Stops tab, and Stop Detail tab display freight and stop information. The functionality that is available on each of these tabs is listed in the table below.
| Functionality | Summary | All Stops-Order Stops | Stop Detail |
|---|---|---|---|
All stop and freight-related fields are available. |
No |
Yes |
No |
Can enter stop and freight data for all stops. |
No First pickup and last drop only. |
Yes |
Yes You must use hyperlinks to move from one stop detail to the next. |
Freight data entered for initial pickup is copied to the final drop. |
Yes |
No |
No |
Can record more than one commodity for a stop. |
No |
Yes |
Yes |
All stop and commodity fields can be viewed without scrolling. |
Yes |
No You can use Field Chooser to reduce the number of columns. |
Yes |
Can copy freight data from one stop to another stop. |
No |
No |
Yes |
Can view all stops at the same time. |
No First pickup and last drop only. |
Yes Displays all billable stops. Non-billable stops appear on the Routed Stops sub tab. |
No You must select a specific stop. |
Can add and delete stops. |
No |
Yes |
No |
Definitions for stop related fields
The Summary, AllStops, and Stop Detail tabs of the Order Maintenance window all show information for stops and freight. However, each tab has unique characteristics:
-
The Summary tab shows fields for the shipper, consignee, and the first commodity. The number of fields is limited. You cannot enter additional stops or freight details.
-
The All Stops tab includes the Order Stops and Routed Stops sub tabs. Both sub tabs show information in grid form. Because it is a grid, it allows you to see many columns. In the Order Stops sub tab, you can add, enter, and delete data for multiple stops and freight details.
-
The Stop Detail tab shows fields for a specific stop. The number of fields is limited. You cannot enter additional stops, but you can add, copy, and delete freight details for a stop.
Common fields
This table lists, in alphabetical order, definitions for fields that are available on all three tabs. Despite the tabs' differences, the definitions of the fields they display are the same.
Required field: *
City/State |
The city and state/province of the company at which this stop occurs. |
Consignee * |
The ID of the company at which the order’s last drop stop occurs. |
Contact |
The contact person of this stop company. |
Earliest * |
The earliest date/time scheduled for this stop to occur. |
Fax |
The stop company’s fax number. |
Instructions |
Free-form instructions pertaining to the stop at this company’s location. Note: On the Order Stops and Routed Stops sub tabs of the All Stops tab, this information displays in the Comment field. |
Latest * |
The latest date/time scheduled for this stop to occur. |
Map (link) |
To view the company’s location on a map, click the Map link that displays between the company ID and the company name fields.
Note: To use the mapping feature, you must have ALK Technologies' PC*MILER|Streets. |
Phone |
The stop company’s telephone number. |
Ref (button) |
Opens a dialog box in which reference numbers pertaining to this stop can be can added, edited, or deleted. |
reference number fields |
Two unnamed fields used to record reference numbers for this stop:
|
Shipper * |
The ID of the company at which the order’s first pickup stop occurs. |
AllStops tab
This table lists, in alphabetical order, definitions for fields that are available only on the Order Stops and Routed Stops sub tabs of the AllStops tab.
Address |
The first line of the stop’s street address. |
Address 2 |
The second line of the stop’s street address. |
Arrival Date |
Date and time the driver is scheduled to arrive at the stop. |
Arrived |
This checkbox indicates whether the driver has arrived at the stop.
|
Arrived Late Reason |
The reason for a late arrival at a stop. The options available in the drop-down come from the ReasonLate label. |
Bill Mileage |
The billable miles from the previous stop to this stop. |
Carrier |
The ID of the Carrier assigned to the trip. |
Comment |
The free-form comments that are recorded in the Instructions field on the Summary tab. |
Company ID |
The ID of the company at which the stop is to take place. |
Company Name |
The name of the stop company. |
Completed |
This checkbox indicates whether the stop’s event is completed.
|
Depart Late Reason |
The reason for a late departure from a stop. The options available in the drop-down come from the ReasonLate label. |
Departure Date |
Date and time the driver is scheduled to leave the stop. |
Driver |
The ID of the primary driver assigned to the trip. |
Driver 2 |
The ID of the secondary driver assigned to the trip. |
Driver Name |
The name of the primary driver assigned to the trip. |
Event |
An event code identifies the type of activity that is to occur at the stop location. These codes are used by the system to determine:
|
Evt (button) |
Click this button to display the Ancillary Events window, which allows you to record additional events that need to be performed at the stop, for example, a check call. Note: The Evt button does not appear on the Routed Stops sub tab. |
Is Billable |
The checkbox specifies whether the stop is billable. When the checkbox is:
Note: If an event is marked Billable in the event code table, you will be able to manually change the status of a stop with that event code to non-billable. However, if the event is marked Non-Billable in the event code table, you will not be able to change the status of a stop with that event code to billable. For details, see Editing event codes. |
state |
An unnamed field that displays the state/province where the stop is to occur. This field is automatically populated when you enter the company ID. |
Tractor |
The ID of the tractor assigned to the trip. |
Trailer |
The primary trailer. |
Trailer 2 |
The secondary trailer. |
Zip Code |
The ZIP Code where the stop is to occur. |
Entering the company ID for a stop
On the Order Maintenance window, there are multiple ways for you to enter the proper company ID for a stop.
When you know the company ID
As you begin to type an ID, the system tries to match your entry with the IDs on file. Immediately under your entry, it automatically displays a list of companies having IDs that begin with the letter or combination of letters you have typed. This automatic search for the proper ID is what is known as the instant best match feature.
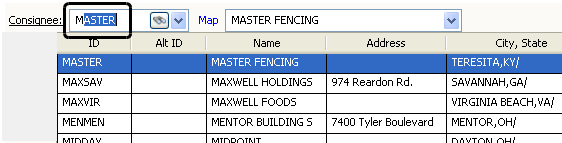
For example, suppose you type MAS in a company ID field. As you begin to type, the system will check the characters you enter with all company IDs that begin with the letters 'MAS'. Each time you type a character, the system continues to search the company table to locate a match. It reduces the list shown below to those that match what you have entered so far. If you get to the point where no other IDs match, the system will not allow you to type any further. When the system displays the item that you want, select it and exit the field.
If all selections cannot be shown at one time in the list, a scrollbar displays on the right. To scroll additional selections into view, click on the scrollbar, or use the DOWN ARROW or UP ARROW keys.
When you want to search for the company
Do one of the following:
-
Click on the View Scroll
 button, which is the second button to the right of the company ID field.
 -
Right-click in the Company field and select View Scroll.
The system displays the Scroll Companies window. It has four tabs, each of which you can use to enter search criteria.
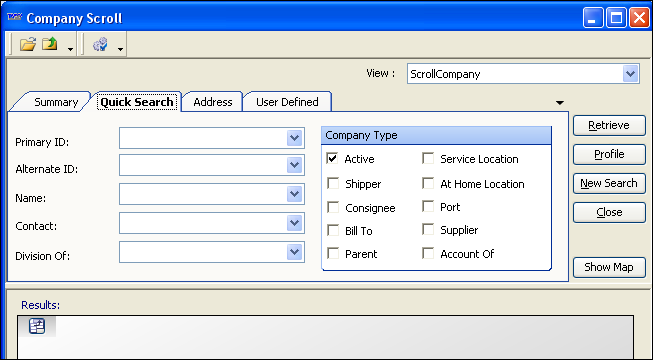
After you enter restrictions, click the Retrieve button. The system displays a list of matching records in the lower half of the window. To select a company, double-click on it. The system closes the Company Scroll window and inserts the ID of the selected company in the company ID field.
Adding and inserting stops
In Order Maintenance, the Order Stops sub tab of the All Stops tab is the only place where you can add or insert stops.
-
When you add a stop, the stop is appended to the end of the trip.
-
When you insert a stop, the stop is placed before the currently selected stop.
The Order Stops sub tab of the All Stops tab displays data in a grid format.
With the order displayed in the Order Maintenance window, follow these steps:
-
Click the AllStops tab.
-
If necessary, click the Order Stops sub tab.
-
To add a new stop, do one of the following:
-
Click
 Add Stop at the top of the All Stops tab.
 -
Click
 Add Stop in the toolbar.
 -
Right-click anywhere on the Stops grid (except for the column headings) and select Add Stop from the shortcut menu.
-
Go to Edit > Add Stop.
-
-
To insert a new stop before an existing stop, use one of these methods:
-
Right-click the stop that is to follow the new stop and select Insert Stop.
-
Select the stop that is to follow the new stop and then do one of the following:
-
Click
 Insert Stop at the top of the AllStops tab.
 -
Go to Edit > Insert Stop.
-
Click
 Insert Stop button in the toolbar.
 -
Press CTRL+INS.
-
-
-
Enter stop information for the new stop. See Definitions for stop related fields.
-
Save the trip.
For details on entering commodity information for a stop, see Entering freight details.
Deleting stops
In Order Maintenance, the Order Stops sub tab of the AllStops tab is the only place where you can delete stops. The tab displays data in grid format.
| You cannot delete a stop if an order has only one pickup and one delivery. |
With the order displayed in the Order Maintenance window, follow these steps:
-
Click the AllStops tab.
-
If necessary, click the Order Stops sub tab.
-
Use one of the following methods:
-
Right-click the stop to delete, and select Remove Stop.
-
Click the stop to delete and then do one of these:
-
Click
 Delete Stop at the top of the AllStops tab.
 -
Click
 Delete on the toolbar.
 -
Press SHIFT+DELETE.
-
-
-
Click Yes to complete the deletion.
-
Save the trip.