Setting up detention tracking
To set up your system for automatic detention tracking, follow these steps:
-
In SQL Server Management Studio, schedule a recurring job to check for detention.
-
If desired, set up detention notification alerts using TotalMail or another program.
For details, see:
Guide: Detention Tracking Guide | Chapter: Using detention alerts
-
Record company-specific detention parameters.
Setting the default detention start time
The Det_StartFromValue General Info Table setting determines the default time the system will use to start detention tracking. This value is used only if there is no value in the Start from field for the order’s Bill To and/or stop company.
If you configure this setting to start detention tracking from the departure date or latest date, you can use the Det_UseLatestStopTimeAlways General Info Table setting to further customize the exact start date.
Setting global default tolerances for yellow alerts
Two General Info table settings allow you to specify yellow detention alert tolerances for pickups and deliveries:
The system uses these global defaults when both of the following conditions are true:
-
No values exist in the Minutes to Alert fields in the company profile for the Bill To company.
-
No values exist in the Minutes to Alert fields in the company profile for the stop company.
Setting global default tolerances for red alerts
Two General Info table settings allow you to specify red detention alert tolerances for pickups and deliveries:
The system will use these global defaults when both of the following conditions are true:
-
No values exist in the Minutes to Detention fields in the company profile for the Bill To company.
-
No values exist in the Minutes to Detention fields in the company profile for the stop company.
Recording a company’s detention alert information
You record a company’s detention preferences in its profile. The required fields are on the Stop Info/Routing tab, in the Detention section.
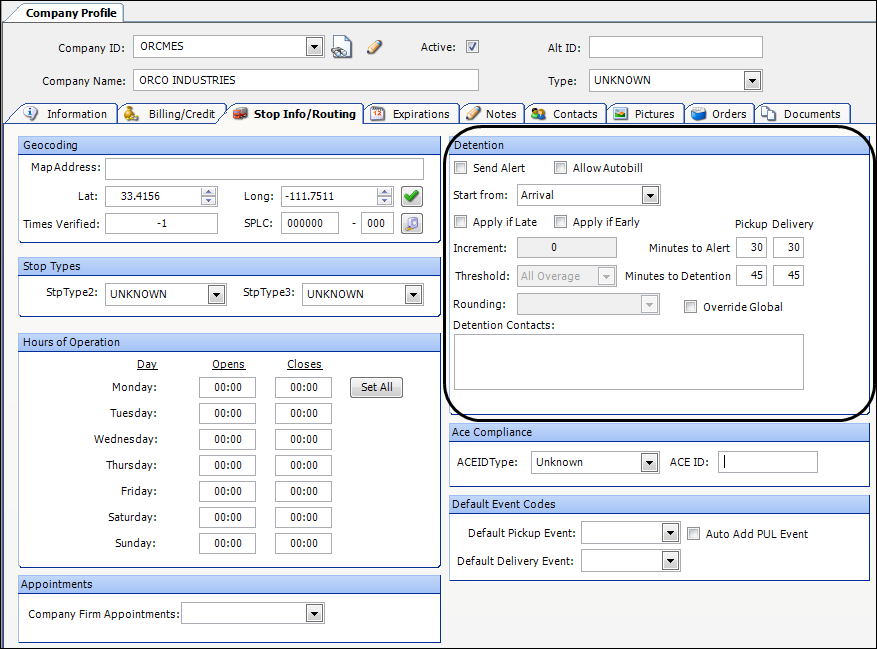
You can do any of the following:
-
Record who will receive detention alert messages
-
Specify when the detention clock starts
-
Determine whether the system will track detention in cases where the driver is early and/or late
-
Specify tolerances for yellow and red alerts
Identifying alert message recipients
If you have set up your system to send alerts using TotalMail or a similar program, you can turn on that functionality for a particular company.
-
Select the Send Alert checkbox.
-
In the Detention Contacts field, enter TotalMail IDs or e-mail addresses, separated by semicolons.
-
Click
 Save.
Save.Note: For details, see:
Guide: Detention Tracking Guide | Chapter: Using detention alerts
Specifying when the detention clock starts
In the Start from field, choose the date/time at which the system will start tracking detention. The options are:
-
Arrival
Start tracking detention from the time the driver’s arrival at the stop is actualized. -
Earliest
Start tracking detention from the later of these two times:-
The time the driver’s arrival at the stop is actualized
-
The earliest time recorded for the stop
-
-
Scheduled (appointment)
Start tracking detention from the later of these two times:-
The time the driver’s arrival at the stop is actualized
-
The earliest arrival time recorded for the most recent scheduled appointment
This is the value in the Earliest field on the Appointment Scheduler window. If no scheduled appointment exists, the system uses the original earliest time recorded for the stop.
-
-
Latest
Start tracking detention from the later of these two times:-
The time the driver’s departure from the stop is actualized
-
The latest time recorded for the stop
Note: When you use this option and you have a String1 field value of Y for the
Det_UseLatestStopTimeAlwayssetting, detention tracking starts from the value in the Latest Date/Time field. This happens even if the driver’s actual departure time is later.
-
Tracking detention when the driver is early
The Apply if Early checkbox allows you to track detention if a driver arrives at a stop earlier than expected. The time at which this type of detention tracking begins differs depending on the value in the Start from field.
-
Arrival
The checkbox is not used. -
Earliest or Latest
Detention alerts are enabled if the driver’s arrival time is earlier than the time recorded in the Earliest Date/Time field for the stop. -
Scheduled Appointment
Detention alerts are enabled if the driver’s arrival time is earlier than the earliest time recorded for the scheduled appointment. If there is no appointment scheduled, the system uses the time recorded in the Earliest Date/Time field for the stop.
|
The system uses the value from the stop company’s profile if the Apply if Early checkbox is:
|
Tracking detention when the driver is late
The Apply if Late checkbox allows you to track detention if a driver arrives at a stop later than expected. The time at which this type of detention tracking begins differs depending on the value in the Start from field.
-
Arrival or Earliest
The system begins detention from the value in the Arrival Date/Time field. -
Scheduled Appointment
Detention alerts are enabled if the driver’s arrival time is later than the latest time recorded for the scheduled appointment. This is the value in the Latest field on the Appointment Scheduler window. If there is no appointment scheduled, the system uses the time recorded in the Latest Date/Time field for the stop. -
Latest
The checkbox is not used.
| If the Apply if Late checkbox is cleared in the Bill To company’s profile but selected in the stop company’s profile, the system uses the value from the stop company’s profile. |
Specifying tolerances for yellow and red alerts
Use the Minutes to Alert fields to specify the number of minutes before a yellow alert. Use the Minutes to Detention fields to specify the number of minutes before red alerts are triggered. You can record separate times for pickup and delivery stops. If there are values in these fields, they override your global tolerance settings in the General Information Table.