Working with pickup and delivery dates/times
Fields in Order Maintenance and the Trip Folder display the earliest and latest allowable dates/times for a freight pickup and drop. As you enter the order details, plan it, and complete it, some of these fields must be updated to show the actual date and time an event occurs. Dates and times can be updated:
-
By the system, according to setup options in your TTS50.
-
By you, entering numbers directly or using keyboard shortcuts.
Viewing dates/times in Order Maintenance
In Order Maintenance, you can view and manage earliest and latest dates/times in several field locations. If you edit a date or time in one of these fields, the information is updated elsewhere in a corresponding field or tab.
| Some columns shown in the following illustrations have been moved to simplify viewing. Your windows can differ. You can modify most grids using the Field Chooser. See Using data grids for details. |
On the Summary tab
The Order Maintenance Summary tab displays the earliest and latest date/time for the shipper and consignee.

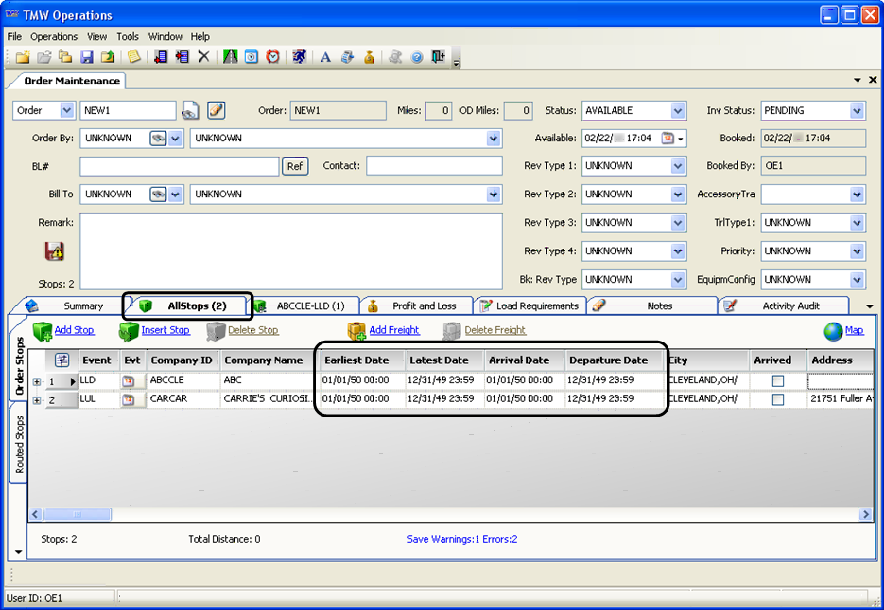
On the AllStops tab
The Order Maintenance AllStops tab displays the Earliest Date and Latest Date columns for trip events. Initially, the system copies an event’s earliest and latest date/time to the Arrival and Departure columns for that event.
On the Stops Detail tab
The Stops Detail tab is located next to the Order Maintenance AllStops tab. If you select an event in the AllStops tab, the company’s ID and the event appear as the title of the Stops Detail tab.
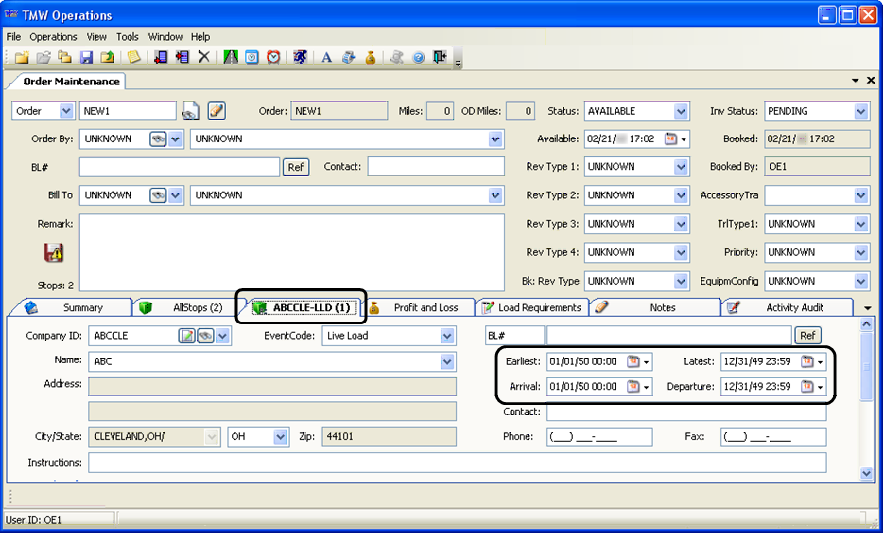
The View/Edit current AllStops Detail tab displays details about the selected company, including the Earliest and Latest fields, and the Arrival and Departure fields. Initially, the system copies the Earliest and Latest dates and times to the Arrival and Departure fields.
Viewing dates/times in the Trip Folder
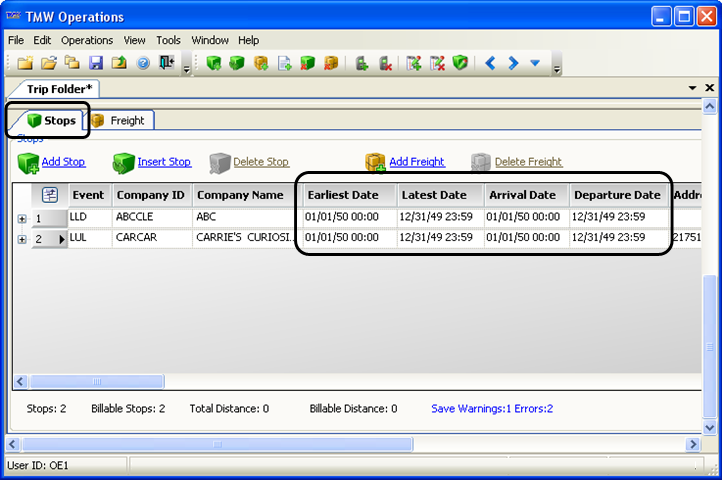
The Trip Folder Stops tab displays the Earliest Date and Latest Date columns for trip events. Initially, the system copies the dates and times to the Arrival Date and Departure Date columns for each event.
| Some columns shown in the following illustration have been moved to simplify viewing. Your windows can differ. You can modify most grids using the Field Chooser. See Using data grids for details. |
Setting up default values for order dates/times
When you create a new order, the system enters a default date and time for the earliest and latest allowable pickup or delivery, and related fields, such as the Arrival and Departure fields.
These defaults depend on system settings. Regardless of the settings, you can edit dates and times as needed during the progress and completion of an order.
-
For the earliest pickup, the system can enter 01/01/50 00:00. This is the genesis date of January 1, 1950, and represents the earliest date allowed in TMW Operations.
-
For the latest pickup, the system can enter 12/31/49 23:59. This is the apocalypse date of December 31, 2049, and represents the latest date allowed in TMW Operations.
-
For both the earliest and latest pickup, the system can enter a date based on the current date, and a specific time on that date.
-
When you add a consignee and resources to an order, the system can recalculate the earliest and latest delivery based on mileage and the driver(s) assigned to the trip.
-
For pickups, deliveries, and related date and time fields, you can manually enter a date or time in a field.
The date and time the system enters is controlled through settings in your TTS50.
Setting default earliest and latest values for the initial pickup
Two settings in the [Order] section of your TTS50 are used for this purpose. Both settings consist of a date parameter and a time parameter, separated by a comma:
-
InitEarlyPckUpDt=date,time
Automatically enters the default earliest date and time allowed for the pickup. -
InitLatPckupDt=date,time
Automatically enters the default latest date and time allowed for the pickup.
where:
date |
Specifies how the system sets the default date. -1=yesterday, 0 (zero)=today, 1=tomorrow, 2=two days from now, etc. |
time |
Specifies how the system sets the default time. hh:mm sets the time on the day specified by date. The setting must be in 24-hour format (00:00 to 23:59). |
|
Using earliest and latest times to set arrival and departure times
You can set up the system to fill in the Arrival Date and Departure Date fields based on the values you enter in the Earliest Date and Latest Date fields. Use the following General Info Table settings:
-
When you enter a date and time in the Earliest Date field for a stop not marked as Arrived, the system copies the entry to the stop’s Arrival Date field. This applies to the arrival date on both the Order Maintenance AllStops tab and the Trip Folder Stops tab. You can still modify the Arrival Date field manually.
-
When you enter a date and time in the Latest Date field for a stop not marked as Completed, the system copies the entry to the stop’s Departure Date field. This applies to the departure date on both the Order Maintenance AllStops tab and the Trip Folder Stops tab. You can still modify the Departure Date field manually.
| The preferred setup uses the same option for both settings. But, it is not required. |
Calculating subsequent stop times based on distance
You can set up the system to update the earliest and latest fields for subsequent stops automatically, based on distance and average miles-per-hour. The dates and times are calculated when you specify the shipper and consignee on a new order. This function uses two settings in your TTS50:
-
[Operations]MileageDateTime=YesThis setting activates the feature.
-
This setting assigns an average speed used in calculations. The default is 45 miles per hour.
The system calculates travel time by dividing the total traveled mileage by the average speed. For example, the mileage between Chicago, IL, and Pittsburgh, PA, is 460 miles. Using the default of 45 mph, the system calculates that the trip will take 10 hours and 13 minutes (460/45=10.222). The system adjusts the drop’s earliest and latest dates/times accordingly.
Specifying a default for how soon a new trip must start
The [Order]Ordervalidatecheckdays setting in your TTS50 specifies the number of days within which the initial stop on an order must occur after the order is saved. The default value for this setting is 30.
If the start date of an order exceeds the specified number of days, the system displays a warning when you first save the order.
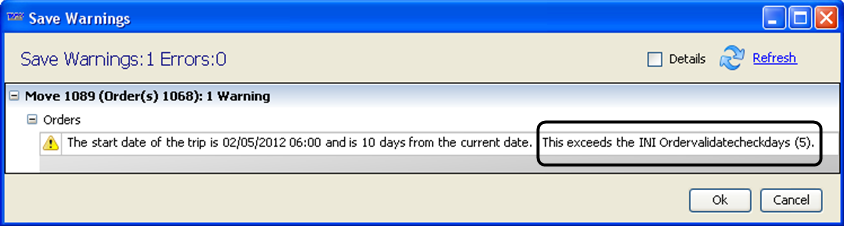
Even if you choose not to correct the dates, the order will be saved.
Specifying a default maximum trip duration
The [Operations]MaxTripDays setting in your TTS50 specifies the number of days a trip can last. If the number of days between the order’s start date (date of the initial pickup) and end date (date of the final drop) exceeds the specified number of days, the system displays a warning when you first save the order.
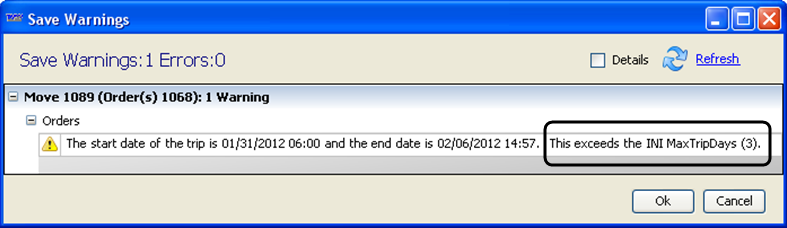
Even if you choose not to correct the dates, the order will be saved.
How travel time settings affect pickup/delivery times
The following settings affect travel time. Default values for most of these settings can add a significant number of minutes to a trip, which will affect the projected earliest and latest drop times.
The following setting is located in the [FuelDispatch] section of your TTS50:
-
DefaultLoadUnloadDwellTimeMinutes
Specifies the default dwell time used at a stop. The default is 30.
The following settings are located in the [Operations] section of your TTS50:
-
AdditionalDriveTime
Specifies the number of minutes a DOT-mandated break will last during the course of a trip. It is used to calculate realistic ETAs. The default is 600. -
DriveTime
Maximum number of driving minutes between breaks for a single driver. The default is 660. -
OnDutyTime
Maximum accumulated on-duty minutes between breaks; that is, the time spent doing work, including driving. The default is 840. -
DefaultZeroMileTime
Default number of minutes to apply for stops with no mileage between them. Typically, these are stops that occur at the same location, or for which mileage has not been found. The default is 1. -
DefaultLoadTime
Number of on-duty minutes required for any pickup or drop event, that is, the time spent loading or unloading, etc. The default is 120. -
TeamTime
Maximum accumulated driving minutes allowed between a team’s breaks. The default is 1320. -
TeamBreakTime
Number of minutes allowed for team’s break. The default is 300. -
DefaultNoFTime
Number of minutes of travel time to assume between stops for which mileages have not been found. The default is 1. -
SingleOrTeam
Specifies whether the system assumes a single driver or a team when calculating dates/times for trips for which resource assignments have not been made. The options are single (default) and team.
Setting arrival/departure times to shipper and consignee hours of operation
First available in TMW Operations 15.10
You can set up the system to use the stop company’s hours of operation for arrival and departure times. This feature is available in:
-
The Summary and AllStops tabs in Order Maintenance
-
The Stops tab in Trip Folder
To use the feature, you must:
-
Activate and set up the feature using system settings
-
Record hours of operation in company profiles
Multiple INI settings are required to have the stop company’s hours of operation set the arrival/departure times for the stop.
You must include the following settings in your TTS50:
-
xref:ConfigurationSettings:ConfigurationINI.adoc#AutoSetDeparture[
[DateTimeChecks]AutoSetDeparture=Yes -
xref:ConfigurationSettings:ConfigurationINI.adoc#AutoRecalcTimes[
[Dispatch]AutoRecalcTimes=Y
These settings must retain their default values, which are:
-
xref:ConfigurationSettings:ConfigurationINI.adoc#MTHoursDateTime[
[Operations]MTHoursDateTime=No -
xref:ConfigurationSettings:ConfigurationINI.adoc#UseCompanyHoursWindow[
[Operations]UseCompanyHoursWindow=No
Recording a company’s hours of operation
To record hours of operation in a company’s profile, follow these steps:
-
Go to Tools > Profiles > Company Profile.
The Company Profile window opens. -
Open an existing company profile.
-
Select the Stop Info/Routing tab.
The
 warning icon appears for each field for which there is no value recorded in the database. If you choose not to enter company hours, you can still save the profile.
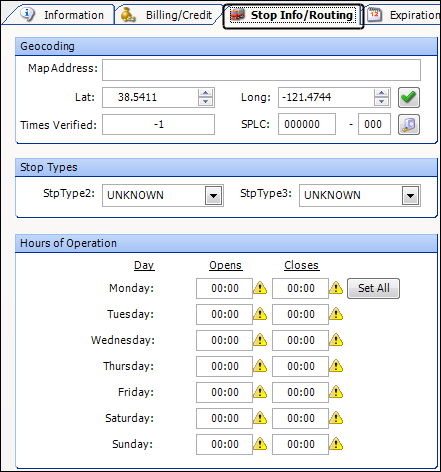
-
In the Hours of Operation section, do one of the following:
-
To fill all fields with the same opening and closing times
-
Double-click inside the Opens field for Monday.
-
Enter the opening time in 24-hour format.
-
Press TAB to move the cursor to the Closes field for Monday.
-
Enter the closing time in 24-hour format.
-
Click Set All.
The system populates the remaining fields with the times you specified. If you like, you can edit individual fields.
-
-
To edit individual fields
-
Double-click inside an Opens or Closes field you want to modify.
-
Enter the opening or closing time in 24-hour format.
-
Press TAB to move the cursor to the next Opens or Closes field you want to modify.
-
Repeat Steps a-c as needed.
-
-
-
Click
 Save.
Save.
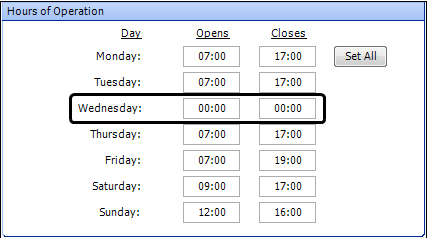
To indicate that the company is closed on a particular day, enter the default value (00:00) in the corresponding Opens and Closes fields. This illustration shows the company is closed on Wednesdays. There is no ![]() icon, which indicates that these values are recorded in the database for this company.
icon, which indicates that these values are recorded in the database for this company.
Using hours of operation when creating a new order
To apply company hours to a new order, follow these steps:
In Order Maintenance: Make entries on the Summary tab.
-
In the Shipper or Consignee field, enter the company ID.
-
In the Earliest Date or Arrival Date field, enter the date.
Note: You must manually change this date for the system to apply hours.
-
Press TAB. The system automatically populates the Earliest Date, Arrival Date, Departure Date, and Latest Date fields with the company’s opening and closing hours.
On the AllStops tab, follow the procedure above, entering the shipper and consignee company IDs in the Company ID field.
In the Trip Folder: Make entries on the Stops tab.
-
In the Company ID field for the shipper or consignee, enter the company ID.
-
In the Earliest Date or Arrival Date field, enter the date.
Note: You must manually change this date for the system to apply hours.
-
Press TAB. The system automatically populates the Earliest Date, Arrival Date, Departure Date, and Latest Date fields with the company’s opening and closing hours.
|
Setting up cascading dates and times
First available in: TMW Operations, Version 2019.2
This feature is activated using the DateTimeCascadingFeatureFlag General Info Table setting.
Due to customer needs for static dwell times between an asset’s arrival and departure, the system can determine whether to adjust the schedule after a change to arrival or departure.
The system can calculate the difference between the arrival and departure time. It will reclaim time to try to catch up if behind, using slack time within a layover stop or between stops. However, to do this requires time in excess of the protected amount.
If the system finds valid slack to use in the dwell time of a layover event, it will reclaim time in an attempt to catch up. The system will adjust arrival and departure times if there is remaining time cascade.
| This feature is specific to trips handled using Trip Folder. |
Activating the Date Time Cascading feature
The General Info Table DateTimeCascadingFeatureFlag must be set to Y to view the Date Time Configuration Maintenance menu option.
Setting up date time cascading configurations
Use the Configurations tab on the Date Time Cascading Configuration Maintenance window to add, edit, or remove date time cascading configurations.
To set up a configuration:
-
Go to Tools > Tools Maintenance > Date Time Cascading Configuration Maintenance.
The Date Time Cascading Configuration Maintenance window opens. -
On the Configurations tab, click Add.
A new row appears on the Configurations tab. -
Complete the following fields.
Required field: *
Field Definition Description *
Description included in the Configuration column on the Assignments tab in the Date Time Cascading Configuration Maintenance window.
Layover (hrs)
The amount of time protected from being used as slack time within a Layover Event.
Layover Event
Identifies which event code represents the Layover (hrs) for this configuration
Cascade Method
Choose which cascading method to use:
-
LegacyPassthrough - Use the previously existing method for calculating date time cascading
-
TimeAdjustmentRecovery - Use the date time cascading method that attempts to reclaim time for a trip.
Default
Indicates the default type of cascading method to use if no cascading method is selected on the Assignments tab.
Mileage Interface
Indicates which mileage bucket to use for cascading purposes. If this value is set to UNKNOWN, the default mileage bucket from the relevant section in the TTS50 will be used - for example, [MileageType]Operations=1.
Note: This setting will override the TMW Operations mileage bucket setting.
-
Setting up date time cascading assignments
You can assign specific Bill To companies from the Assignments tab, and select whether the Bill To company will use the LegacyPassthrough (previously existing) or TimeAdjustmentRecovery (attempts to reclaim time for a trip) methods.
To set up date time cascading Bill To assignments:
-
Go to Tools > Tools Maintenance > Date Time Cascading Configuration Maintenance.
The Date Time Cascading Configuration Maintenance window opens. -
Click the Assignments tab.
-
In the Configuration field, select the applicable configuration for each Bill To company.
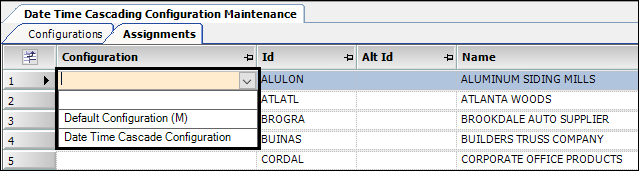
Note: Any Bill To companies that are not set to a configuration will use the configuration identified as the default on the Configurations tab.
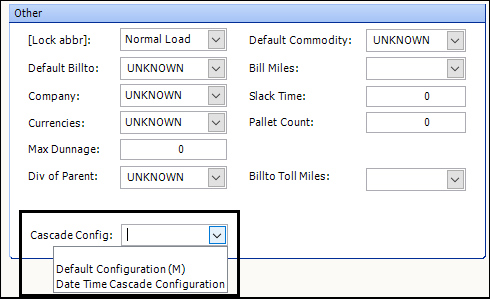
You can also set cascading configurations for each Bill To in the Company Profile window. This illustration shows the location of this option on the Company Profile window.