Consolidating orders using Load Builder
Load Builder allows you to consolidate up to 30 Available orders onto a single movement, or load. This feature is most helpful for clients that pick up multiple orders at a single location for delivery to one or more locations, such as automobile haulers.
When the feature is set up, you consolidate orders in the Consolidated Load Builder window. The layout of the window makes it easy to create a large number of consolidated loads quickly.
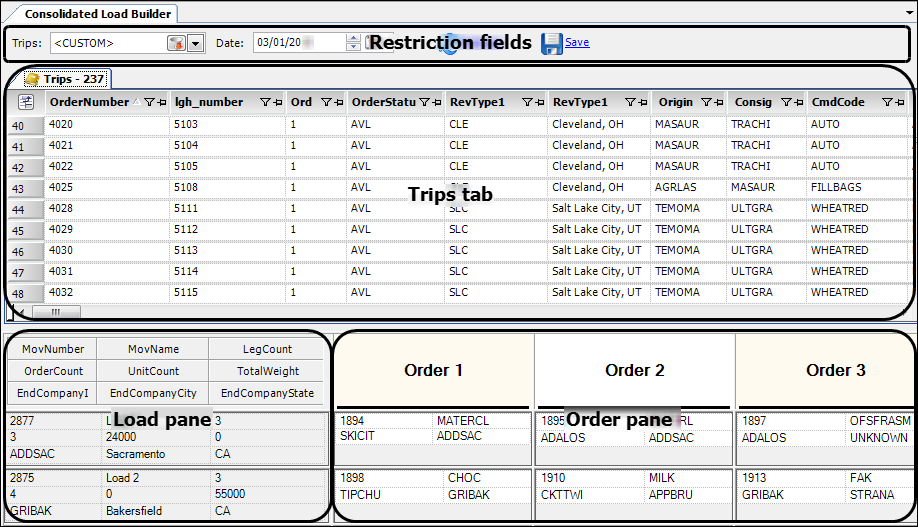
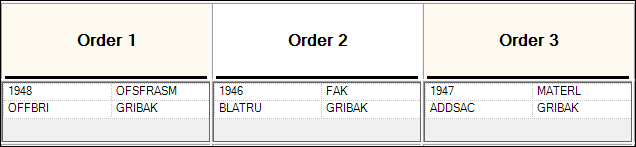
Available orders appear in the Trips tab at the top of the window. To create a load, you drag orders from this tab to cells in the Order pane in the lower-right area of the window. Each row of cells constitutes a single load.
Orders consolidated in Load Builder appear as a single consolidated trip in Trip Folder and Planning Worksheet as well as in Load Builder. All pickup events and delivery events are automatically grouped together.
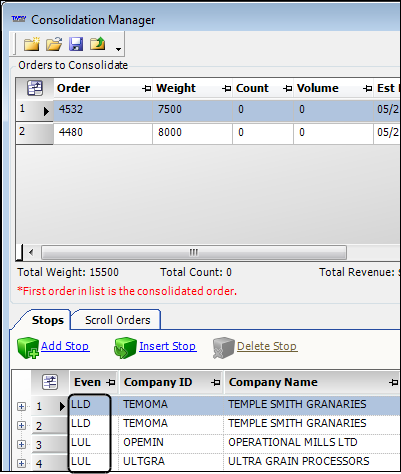
You can change the stop order or remove individual orders from saved loads using the Consolidation Manager and/or Remove Orders features. For more information, see Consolidating orders on a movement.
|
Restriction fields
The restriction fields are located at the top of the Load Builder window. These fields allow you to limit the types of orders retrieved in the Trips tab.
You can filter orders based on:
Trips tab
The Trips tab is located below the restriction fields in the upper half of Load Builder. It contains a data grid that lists orders matching the restrictions you set before retrieving. Double-clicking on an order in this tab opens it in Trip Folder.

| By default, the Trips grid displays planned and started orders in addition to available orders. However, the Load Builder can consolidate only those orders that have an Available status. You may want to filter the grid by the OrderStatus column and save the layout. For more information, see Filtering data in a grid. |
Load pane
The Load pane is located in the lower left area of Load Builder. After you drag and drop orders to the Order pane, this pane shows information about the resulting consolidation, or load.
The system administrator can use the Cell Designer to change the information shown in the Load pane, but the default information shown for each load includes the following.
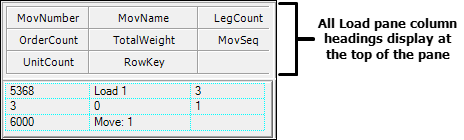
MovNumber |
MovName |
LegCount |
OrderCount |
TotalWeight |
MovSeq |
UnitCount |
RowKey |
Order pane
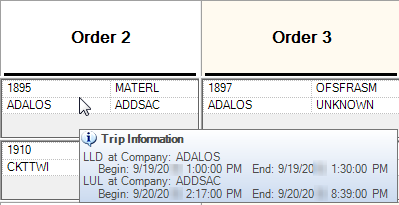
The Order pane is located in the lower right area of Load Builder. This pane allows you to collect individual orders for a single load. Each order is shown in its own cell group.
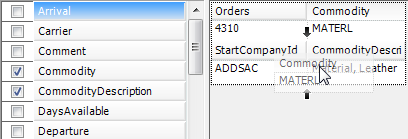
When you rest the mouse cursor over a cell group, data about that order appears in an information box.
The system administrator can use the Cell Designer to change the information that is shown in the Order pane, but the default information shown for each order includes the following.
LegType1 |
LegType2 |
LegType3 |
LegType4 |
Opening Load Builder
You use the Operations > Load Builder command to access the Consolidated Load Builder window. This command is available when you have [.NetOperations]EnableLoadBuilder=Y set in your TTS50.
Designing cell layouts for the Load and Order panes
For each load created in Load Builder, the system displays information in these two panes:
-
The Load pane
Displays data for the consolidated load -
The Order pane
Displays data for each order that is consolidated on the load
Each pane is made up of cells that contain load- and order-specific data.

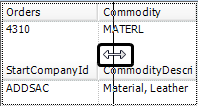
In this example, there are nine cells in the Load pane and four cells for each order in the Order pane. Descriptions of each Load pane cell appear in the grid at the top of the pane.
When you first open Load Builder, the Load pane and Order pane each use a default cell layout. However, you can modify the layout by selecting a different set of cells and/or a different data arrangement. You use a special configuration tool, Cell Designer, to modify cell layouts. Using Cell Designer, you can:
-
Add or remove cells
-
Resize or rearrange cells
-
Save the cell configuration for a particular user or group of users
|
To modify cell layouts, follow these steps:
-
In the Load Builder, click Refresh to populate the Trip tab.
-
Do one of the following:
-
To design an Order cells layout, right-click on a planned trip in the Order pane.
-
To design a Load cells layout, right-click anywhere in the Load pane.
A shortcut menu displays.

-
-
Click Cell Designer.
The Cell Designer window opens.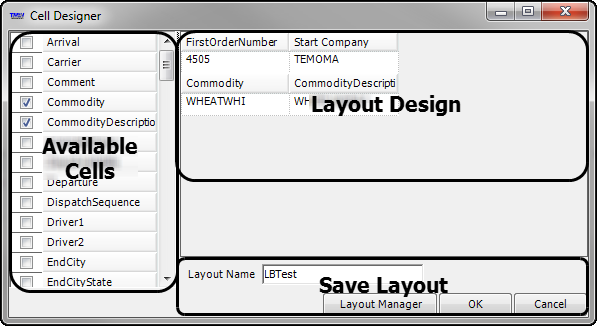
-
Use any of these tools to design your layout.
-
If you want, apply conditional formatting to any cell.
-
If you want, for the Order cells, change the labels displayed in the column header.
-
Right-click in the column heading you want to change.
A shortcut menu is shown. -
Select Column Header Name.
A text box showing the current column label is shown in a sub menu.
-
In the text box, change the label.
-
Click in a different location on the window.
The menu disappears and the label is changed.
-
-
In the Layout Name text box, enter a name for the new layout.
Note: This is a required field.
-
When finished, click OK.
If you decide not to save the changes after all, click Cancel instead.
Assigning a layout to a user or group of users
After designing a Load or Order cells layout, use this procedure to assign the layout to a user or group of users.
| You can only assign saved layouts. |
-
Do one of the following:
-
To assign an Order cells layout, right-click on a planned trip in the Order pane.
-
To assign a Load cells layout, right-click anywhere in the Load pane.
A shortcut menu displays.
-
-
Click Cell Designer.
The Cell Designer window opens. -
Click Layout Manager.
The Grid Layout Permissions window opens. -
Under Layout Name, select the layout you want to assign.
If users or user groups are already assigned, they are listed in the lower part of the window.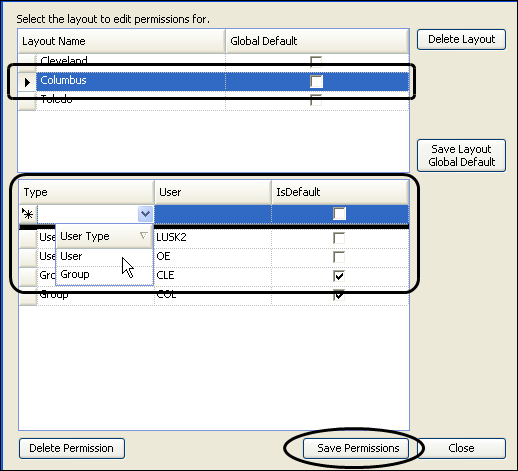
-
Under Type, click New, and select the assignment type as User or Group.
-
Under User, select the user or group name to assign.
-
If you want this layout to be the default layout for the user or group instead of the Global Default layout, select the checkbox under IsDefault.
-
Click Save Permissions.
-
When finished, click Close.
-
Close the Cell Designer window.
Adding cells
From the Available Cells section, do one of the following:
-
Select the checkbox to the left of each cell.It will appear in the Layout Design section.
-
Drag a cell to the desired location in the Layout Design section.
As you drag, the system displays a red box (as shown below) or black arrows to indicate where the cell would be positioned on the existing grid if you were to drop it.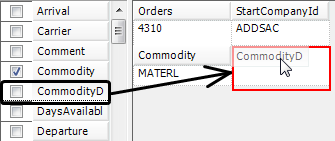
| The Load cells area is limited to 12 cells in a four-by-three grid.If you add more, they will not be displayed. |
Removing cells
Do one of the following:
-
From the Available Cells section, clear the checkboxes of those cells you do not want displayed.
-
From the Layout Design section, drag an unwanted cell to the Available Cells section.
The system displays a red box around the Available Cells section to indicate that you are returning the cell there.
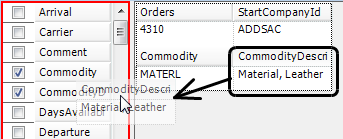
Rearranging cells
In the Layout Design section, move the cells to the desired locations.
As you drag, the system displays a red box or black arrows (as shown below) to indicate where the cell would be positioned on the existing grid if you were to drop it.
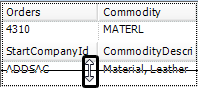
Resizing cells
In the Layout Design section, position the mouse over a grid line until the pointer turns into a double-headed arrow.Drag the grid line to the desired size.
-
Increase or decrease the row height:
-
Increase or decrease the column width:
Removing a layout assignment from a user or group of users
Use this procedure to delete a layout assignment from a user or group of users.
-
Do one of the following:
-
To remove an Order cells layout, right-click on a planned trip in the Order pane.
-
To remove a Load cells layout, right-click anywhere in the Load pane.
A shortcut menu displays.
-
-
Click Cell Designer.
The Cell Designer window opens. -
Click Layout Manager.
The Grid Layout Permissions window opens. -
Under Layout Name, select the layout to which the user or group is assigned.
Users or groups assigned to the selected layout are listed in the lower part of the window. -
Select the user or group for which you want to remove the assignment.
-
Click Delete Permission.
A confirmation message is shown.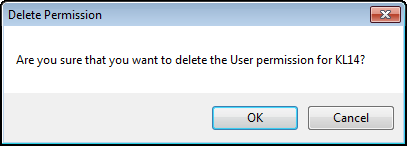
-
To delete the layout assignment, click OK.
If you decide not to delete the layout assignment, click Cancel instead. -
Click Save Permissions.
The permission changes are saved. -
When finished, click Close.
-
Close the Cell Designer window.
Modifying a layout
Use this procedure to change a saved layout.
-
Do one of the following:
-
To modify an Order cells layout, right-click on a planned trip in the Order pane.
-
To modify a Load cells layout, right-click anywhere in the Load pane.
A shortcut menu displays.
-
-
Click Cell Designer.
The Cell Designer window opens, showing the current layout. -
Change the displayed layout, following the steps above for designing the layout.
-
Do one of the following:
-
To apply your changes to the current layout, do not change the Layout Name field.
-
To save your changes to another existing layout, enter the exact name of that layout in the Layout Name field.
Note: The name you enter and the saved name for that layout must be identical. To check the spelling of the layout name, click Layout Manager and review the layout names in the Grid Layout Permissions window.
-
To save your changes as a new layout, enter a new layout name in the Layout Name field.
-
-
Click OK.
If you decide not to make the changes after all, click Cancel instead.
Deleting a layout
Use this procedure to remove a saved layout that you no longer need.
-
Do one of the following:
-
To delete an Order cells layout, right-click on a planned trip in the Order pane.
-
To delete a Load cells layout, right-click anywhere in the Load pane.
A shortcut menu displays.
-
-
Click Cell Designer.
The Cell Designer window opens. -
Click Layout Manager.
The Grid Layout Permissions window opens. -
Under Layout Name, select the layout to delete.
If users are already assigned, they are listed in the lower part of the window.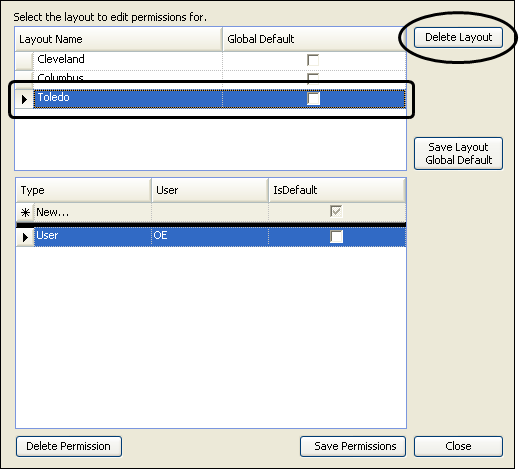
-
If users or groups are assigned, you must remove their assignment to the layout.
-
Click Delete Layout.
-
In the confirmation window, click OK.
If you decide not to delete the layout after all, click Cancel instead. -
Click Save Permissions.
The layout is removed from the list. -
Click Close.
Retrieving orders in Load Builder
Load Builder allows you to look up multiple available orders at one time and consolidate them to a load. Record retrieval occurs in the Trips tab in the upper portion of the window.
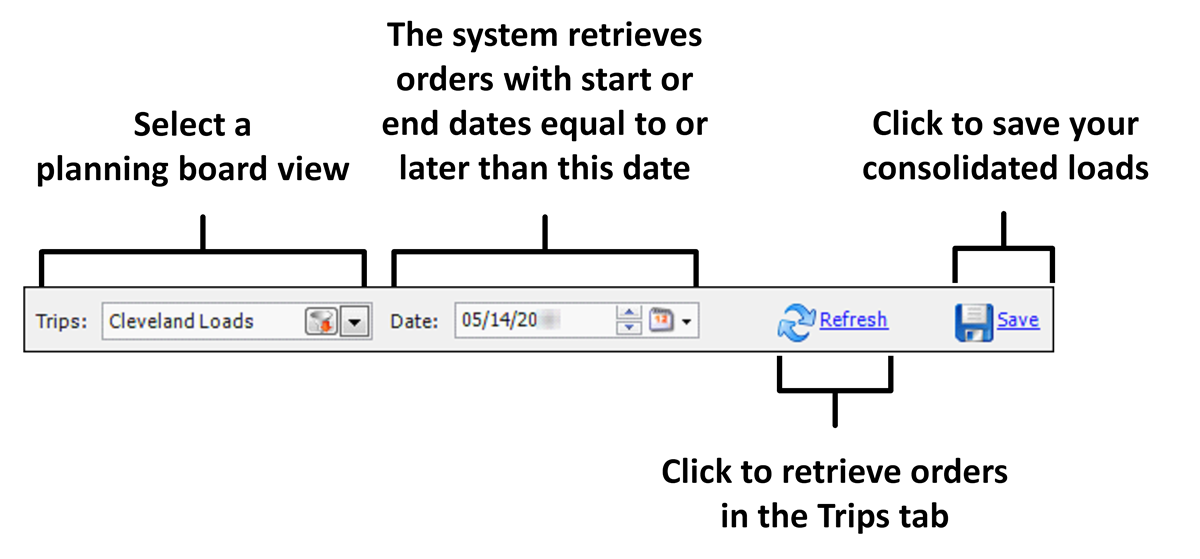
Restriction by views
The Trips field restricts records in the Trips tab. The options listed in the drop-down are called outbound views.
Because most dispatchers are responsible for specific load types, resources, and/or geographic areas, the listing of information in the Trips tab and Load pane can be customized using views. A view is a set of restrictions that serves as a filter to narrow down the number of records listed in a planning board grid.
Typically, a specific view is defined for each dispatcher or dispatch group. When individual dispatchers look up available orders, the system automatically displays the records that match the view assigned to their group, or that is assigned specifically to them.
Each view is assigned a user-defined name, which reflects the intended usage of that view. Frequently, views are set up for a company’s terminals. For example, if your company has terminals in Baltimore and Pittsburgh, you could set up a view named Baltimore and a view named Pittsburgh.
| System administrators set up the views used in planning boards. For more information on managing views, see Understanding board views. |
Restriction by date
The Date field restricts records in the Trips tab. The system will retrieve orders with earliest dates and/or latest dates that are the same as or later than the date in this field. By default, it displays the current date, but you can change the value if needed.
Retrieving orders
To retrieve available orders, follow these steps:
-
If you want, select a different Trips view in Load Builder.
Note: You can create temporary outbound views. For more information, see Temporarily modifying an outbound view.
-
If you want, change the date in the Date field. The system will retrieve orders with earliest and/or latest dates that are equal to or greater than this date.
-
Click Refresh.
The Trips tab displays the records that match your restrictions.
Consolidating orders in Load Builder
Using Load Builder, you can consolidate up to 30 Available orders in a single load. Each order is shown in its own cell in the Order pane.
-
In Load Builder, retrieve orders.
-
For each order, select it in the Trips tab, and then drag it to the load row in the Order pane.
Notes:
-
You can only consolidate orders with a status of Available (AVL).
-
Orders that you drag to the Order pane are removed from the Trips tab. However, the assignments are not saved until you click Save.
-
The currently selected order is highlighted in blue.
-
If you consolidate a split trip, the split will be removed.
-
-
If you decide not to consolidate the orders after all, drag them back to the Trips tab.
-
To save the load, click Save.
The system clears the Order pane and the consolidated load appears in the Trips tab under the number of the last order in the list.
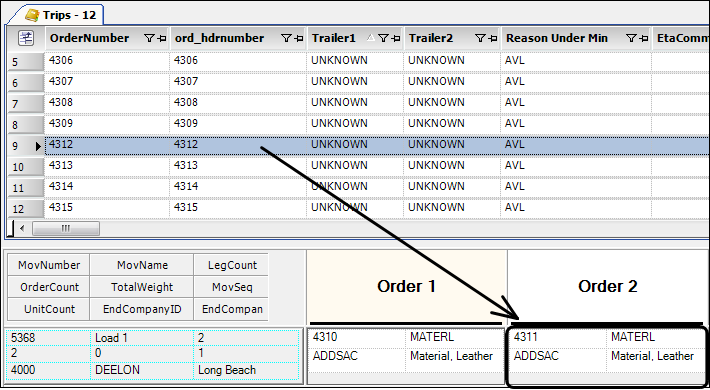
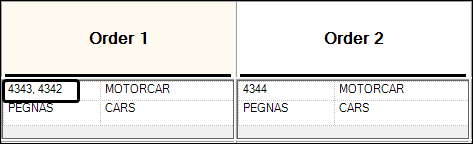
You can also add loads to already-consolidated loads. In this example, the Order cell layout displays the order numbers.
If you want to unconsolidate a consolidated load, select the load in the Trips tab and go to Edit > Consolidate/Unconsolidate > Remove All Orders From Movement. For more information, see Removing orders using the Remove All Orders commands.