Responding to credit checking warnings
When you save an order while credit checking is turned on, the system checks whether the order will exceed the Bill To’s credit limit. If the order does exceed the Bill To’s credit limit, the Credit Check window appears.
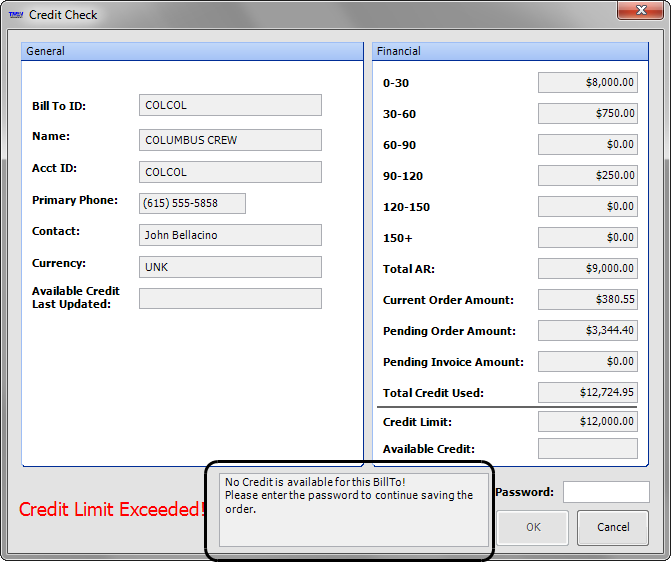
The window displays:
-
The Bill To’s credit information.
-
A message stating whether you can save the order (at the bottom of the window).
-
Depending on the option you have set in the
[Misc]AllowBkgIfCreditFailssetting in your TTS50, the system will display one or more command buttons and a password field.
This table lists the possible messages received when you try saving an order that exceeds the credit limit. The option set in the [Misc]AllowBkgIfCreditFails INI determines which buttons and messages display.
| Message | The INI Option set determines what message displays and how to handle the error. |
|---|---|
No Credit is available for this BillTo! This is a warning! |
When you have You will see this message.
Do one of the following:
|
No Credit is available for this BillTo! This is an Error. |
When you have You will see this message.
Do one of the following:
|
No Credit is available for this BillTo! This is an Error. |
Click Cancel to close the window. |
No Credit is available for this BillTo! |
When you have You will see this message.
Do one of the following:
|


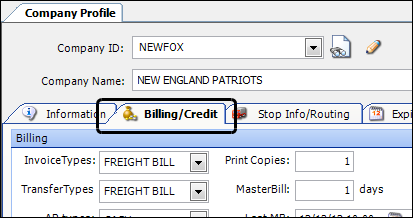
Entering a customer’s credit information
You use the Billing/Credit tab on a customer’s profile to enter the maximum credit you want to extend to that customer and to record the customer’s accounts receivable aging data.
| If you are licensed for the Microsoft Dynamics GP Integration module, the accounts receivable aging data fields can be updated automatically. |
If you are not using this accounting package, you can enter the information using a SQL statement.
Editing credit information field names
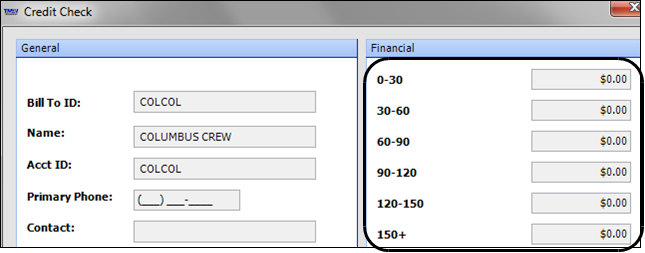
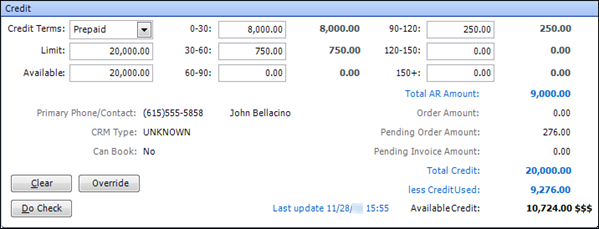
Two windows display a Bill To company’s accounts receivable aging information.
-
The Credit pane on the Billing/Credit tab of a company’s profile

-
The Financial section of the Credit Check window
You can use the default field names (0 - 30 days, 30 - 60, etc.), or you can set up field names that better fit your company’s business.
In the Edit User Definable Fields window, access the AgingPeriod1 label. In the Description field, enter the field name you want displayed for credit information. Save your changes and repeat the process for the remaining labels.
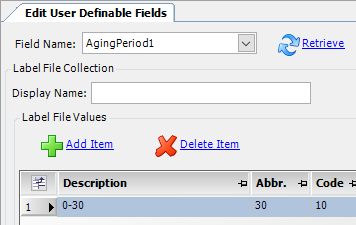
| Unlike most labels where you enter the display name in the Name field, you must enter the display names for the AgingPeriod1-6 labels in the Description field. For more information on working with labels, see Using the label file to customize fields. |
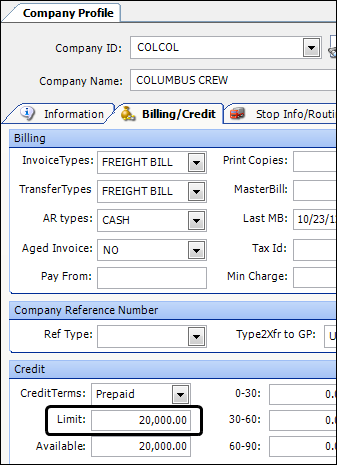
Entering a credit limit
The system tracks unbilled orders and outstanding invoices against the credit limit you record in the Bill To’s profile.
-
Retrieve the Bill To’s profile.
-
Go to Tools > Profile > Company Profile.
-
Enter the Bill To’s ID in the Company ID field and press TAB.
The company’s profile appears in the window.
-
-
Select the Billing/Credit tab.
-
In the Credit pane, enter the credit limit amount in the Limit field.
-
Save your entry.
Note: The Limit field relates to the cmp_creditlimit field in the company database table.
Manually entering aging information
If you are not using Microsoft Dynamics GP automated updates, you can still use the credit check feature. To populate the creditcheck table in your TMWSuite database manually, use the Billing/Credit tab in the Bill To company’s profile.
| You can use a SQL statement to perform the update. |
To manually enter credit data for the Bill To company:
-
Retrieve the desired Bill To company’s profile.
-
Go to Tools > Profile > Company Profile.
-
Enter the Bill To’s ID in the Company ID field and press TAB.
The company’s profile appears in the window.
-
-
Select the Billing/Credit tab.
-
In the Credit section, enter the appropriate amount for the aging period in the first field. Repeat for each aging period that is applicable for the Bill To.

Note: If you want to enter the total credit the customer started with, you can use the aging periods to show used credit. For example, if the credit limit for a company is $5,000, and they are currently at $3,000 available, you would enter $2,000 in the first aging period (0 - 30 days).
-
Click
 Save.
Save.Note: If you enter the credit information in error, you can use the Clear button to remove it. For more information, refer to Clearing credit check information.
Clearing credit check information
At times, you may want to delete credit information for a particular company.
-
Look up the profile for the Bill To company.
-
Go to Tools > Profile > Company Profile.
-
Enter the Bill To’s ID in the Company ID field and press TAB.
The company’s profile appears in the window.
-
-
Select the Billing/Credit tab.
-
Click Clear to clear the recorded credit information.
-
Click
Save.
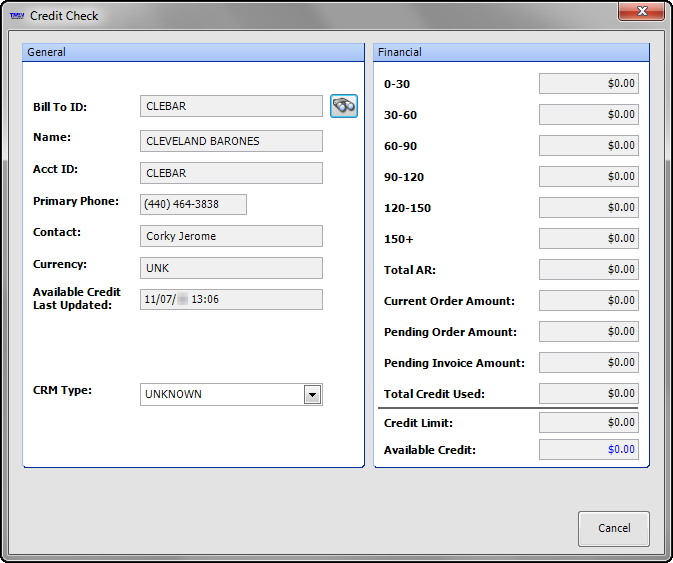
Accessing credit review information
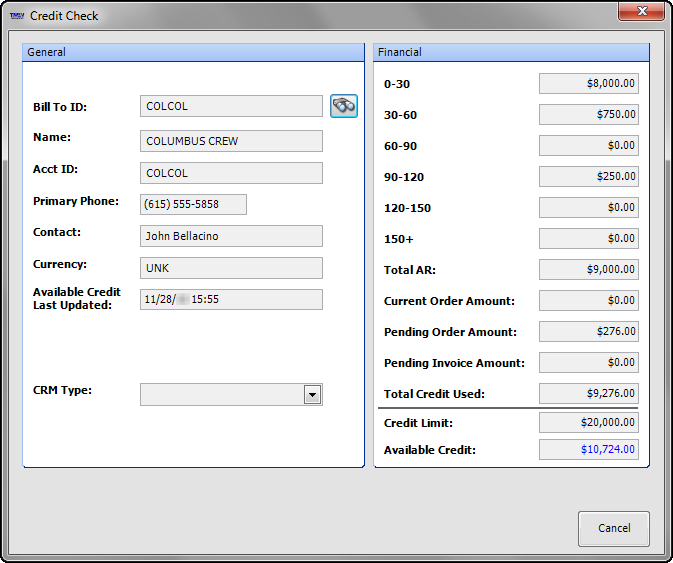
You can view a Bill To company’s credit information from Order Maintenance by clicking View > Credit Check.
Enter the company’s TMWSuite ID in the Bill To ID field, and press ENTER. The window displays the company’s credit information.
|
To look up information for a different Bill To, click |
Field definitions
| Field | Definition |
|---|---|
Bill To ID |
Bill To’s TMWSuite ID |
Name |
Bill To’s company name |
Acct ID |
Bill To’s alternate ID Note: The Bill To’s accounting ID should have been entered in the company profile. This field relates to the cmp_altid field in the TMWSuite company database. |
Primary Phone |
Bill To’s telephone number |
Contact |
Bill To’s contact person |
Currency |
Currency in which the Bill To transacts business |
Available Credit Last Updated |
System date when the credit information in the Credit Available field in the Bill To’s company profile was last updated - whether the update was entered manually, or automatically transferred from the accounting package |
CRM Type |
Applicable only if you have purchased TMW’s CRM Right product. You assign each of your companies to a category called a CRM type. Note: Options for this field are defined in the CRMType label in the Edit User Definable Fields window. |
0 - 30 |
Amount due from the current aging period |
30 - 60 |
Amount due from the previous aging period |
60 - 90 |
Amount due from the second aging period back |
90 - 120 |
Amount due from the third aging period back |
120 - 150 |
Amount due from the fourth aging period back |
150+ |
Amount due from the fifth aging period back, or longer |
Total AR |
Total of all the aging periods on the Credit Information window Note: This field is normally populated from your accounting system data. |
Current Order Amount |
If the order is prerated, the charge shows in this field. |
Pending Order Amount |
Charges for orders that have not yet been invoiced |
Pending Invoice Amount |
Charges for orders that have been invoiced |
Total Credit Used |
Sum of:
Note: Order and invoice statuses that are excluded from the credit check process are identified in the DispStatus and InvoiceStatus labels. For details, see Excluding orders and invoices with specific statuses from credit check calculations. |
Credit Limit |
Dollar amount of credit you have extended to the Bill To company Note: You enter the credit limit on the Billing/Credit tab in the Company Profile window. |
Available Credit |
Dollar amount of credit remaining to the company The system determines the available credit by subtracting the Total Credit Used value from the Credit Limit value. |
If no information is available for the selected Bill To, the Credit Check window shows zero dollar amounts.
Click Cancel to close the window.
Automating data transfer from your accounting system
Updated accounts receivable information can be transferred to TMWSuite if your accounting system supports it.
When your accounting system is Dynamics GP
If your accounting system is Dynamics GP, accounts receivable information for your Bill To companies can be automatically updated through the integration between TMWSuite and Dynamics GP. A SQL stored procedure can be applied to your TMWSuite database to have the system automatically update this field based on the data from Dynamics GP.
NOTE: For more information, contact TMWSuite’s Dynamics GP Support team.
Using a SQL statement to populate the creditcheck table
Your system administrator can write a SQL statement to enter the information. The relationship between the fields in the Credit Information window and the creditcheck table format is as follows:
Credit Information Window Field |
creditcheck Table |
|
cmp_id |
varchar |
|
AgingPeriod1 - Default label: 0-30 |
cmp_aging1 |
decimal |
AgingPeriod2 - Default label: 30-60 |
cmp_aging2 |
decimal |
AgingPeriod3 - Default label: 60-90 |
cmp_aging3 |
decimal |
AgingPeriod4 - Default label: 90-120 |
cmp_aging4 |
decimal |
AgingPeriod5 - Default label: 120-150 |
cmp_aging5 |
decimal |
AgingPeriod6 - Default label: 150+ |
cmp_aging6 |
decimal |
| In the creditcheck table, cmp_id is the primary key. Data entered in the cmp_id column should be a valid company ID in your TMWSuite database. The system adds the aging amounts together to determine if the credit limit has been exceeded. |
Combining the credit limits of a parent company and its sub companies
If you have set up parent and sub companies in your database, you can use the CreditCkAgingSummary General Info Table setting to combine the credit limits for a parent and its sub companies, rather than use the credit limit for an individual Bill To company.
| For information on setting a company’s credit limits, see Entering a credit limit. |
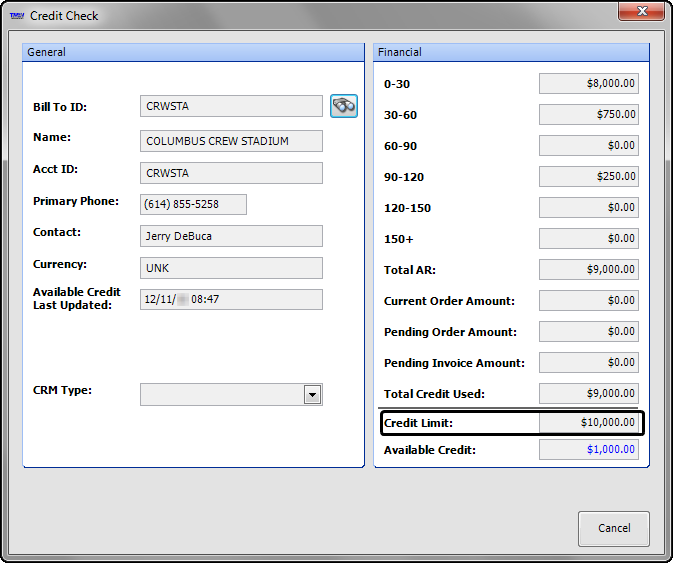
For example, suppose a Bill To company has a $10,000 credit limit. With CreditCkAgingSummary set to BILLTO, the system only uses the credit limit for that specific company when you perform a credit check.
However, suppose the parent company has a $20,000 credit limit. If you set CreditCkAgingSummary to BYMASTER, the system combines the credit limits for the Bill To company and its parent company, plus all other sub companies. In this example, that means a combined credit limit of $30,000.
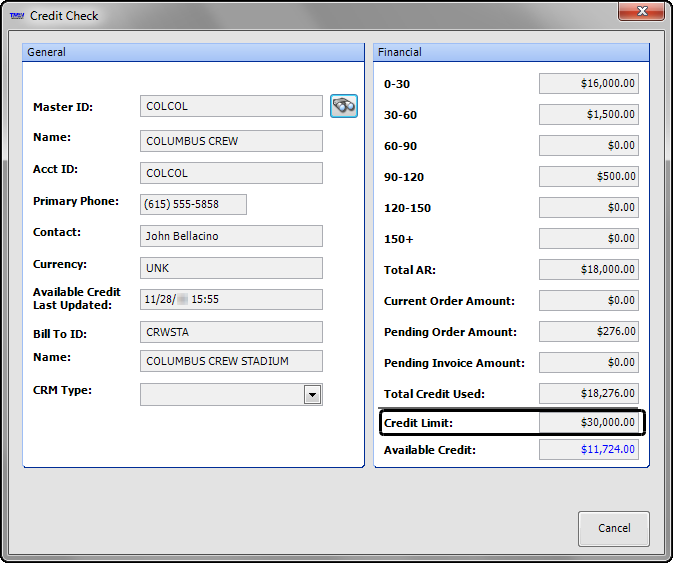
| Notice how, even though we entered the sub company’s ID in the Bill To ID field, the Credit Check window displays the parent company’s information. This is the case for all sub companies when you set CreditCkAgingSummary=BYMASTER. |
Excluding orders and invoices with specific statuses from credit check calculations
You can specify that the system ignore orders and invoices with certain statuses when it performs a credit check. The Exclude from CreditCheck Total checkbox has been added in the DispStatus and InvoiceStatus labels for this purpose.
| This feature exists only in the System Administration application. It does not exist in the Edit User Definable Fields window. |
In the DispStatus label, the Quote and Master system code options have the checkbox selected by default.
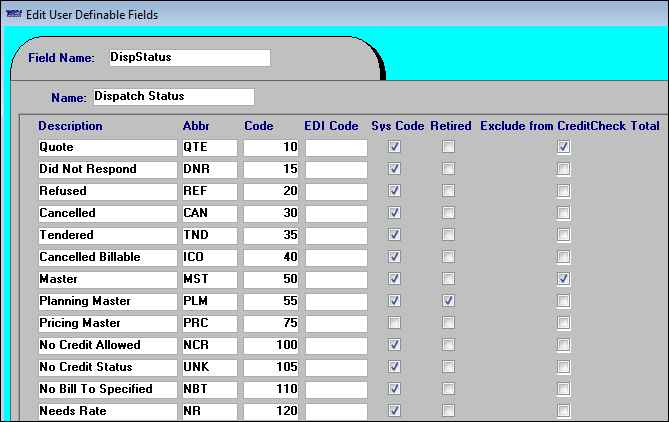
In the InvoiceStatus label, no options have the checkbox selected by default.
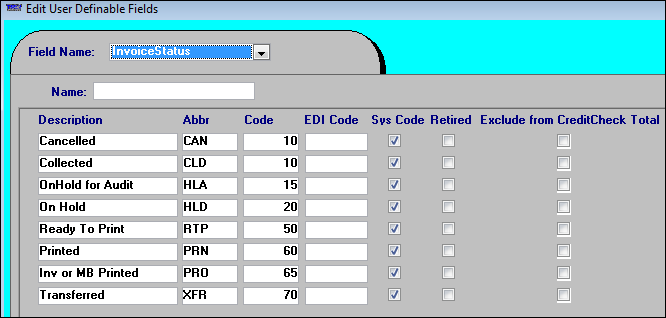
If you would like the system to exclude orders or invoices from the calculations it uses during the credit check process, you can select the checkbox for each of those statuses in the appropriate label files.
Setting orders to a non-dispatchable status when a credit check fails
When saving an order, the Credit Check feature compares the total of outstanding invoices against the credit limit set up in the Bill To company’s profile. The system alerts you if the customer has already exceeded their credit limit, or when the new order will put their balance over the limit.
You can set up the system so that it will allow orders that are over the credit limit to be saved with a non-dispatchable status. The setup includes:
-
Creating the non-dispatchable status as an option in the DispStatus label file.
-
Activating the functionality through an entry in the TTS50.
Adding the non-dispatchable status to the DispStatus label
You add and edit label file options in the Edit User Definable Fields window in TMWSuite System Administration.
In the DispStatus label file, add an entry for the non-dispatchable status. Make sure that you:
-
Enter a code of 200 or less in the Code field.
-
Select the Exclude from CreditCheck Total checkbox for your entry.
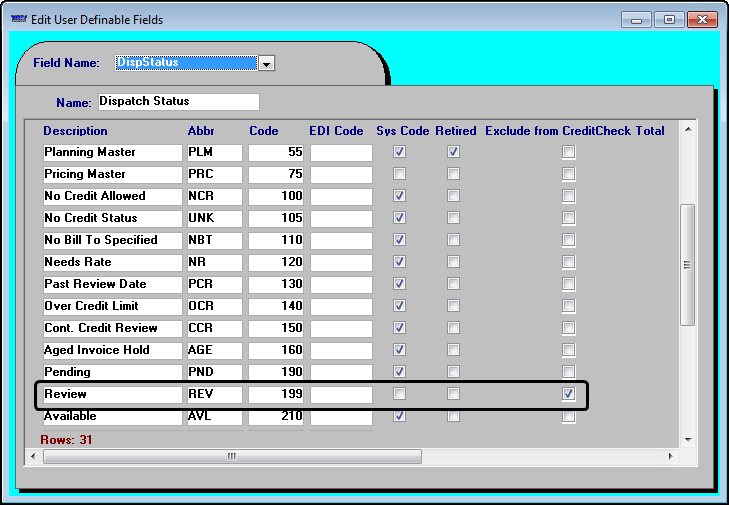
Save your entries before exiting the window.
Setting up the system to apply a non-dispatchable status to orders
Use [Misc]ForceOrderStatusWhenCreditCheckFails in your TTS50 to save an order with a non-dispatchable status when the Bill To company on the order fails a credit check.
Understanding how the non-dispatchable status is applied
When your system setup allows orders to be saved when the Bill To has already reached its credit limit, those orders will be assigned the specified non-dispatch status. To illustrate, we set up a status of Review to prevent dispatching such an order.
This illustration shows the non-dispatch status displayed in Order Maintenance’s Status field.

If you attempt to assign assets on the order in Order Maintenance, the system displays a warning.

The warning message will specify the abbreviation of the non-dispatch status you set up in the DispStatus label.
Making copied orders that exceed available credit non-dispatchable
If you are copying a pre-rated order (including its line haul and accessorial charges), the system will assign the non-dispatch status to order copies that exceed the Bill To company’s credit limit.
Once the system is set up to apply a non-dispatch status to orders when the Bill To fails a credit check, you must also:
-
Have credit information recorded in the Bill To’s profile.
Note: For information on recording a Bill To company’s credit information, see Automating data transfer from your accounting system and Manually entering aging information.
-
Select the Copy Rates and Copy Accessorials checkboxes in the Copy Order/Trip window.
Note: If you do not copy the charges on a pre-rated order, the system will not apply the non-dispatch status to any of the copied orders, even if the new orders will put the Bill To company over its credit limit.
When copying the line haul and accessorial charges on pre-rated orders, if the copied orders will exceed a Bill To’s credit limit, the system assigns the non-dispatch status specified by the ForceOrderStatusWhenCreditCheckFail setting to only those orders that actually exceed the Bill To’s credit limit.
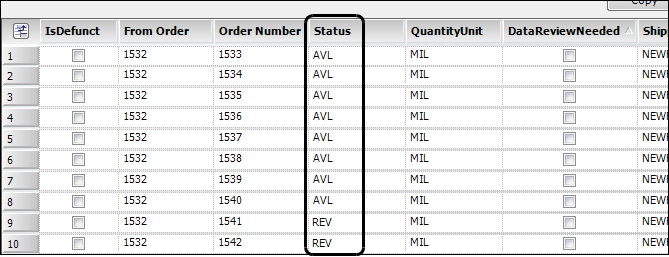
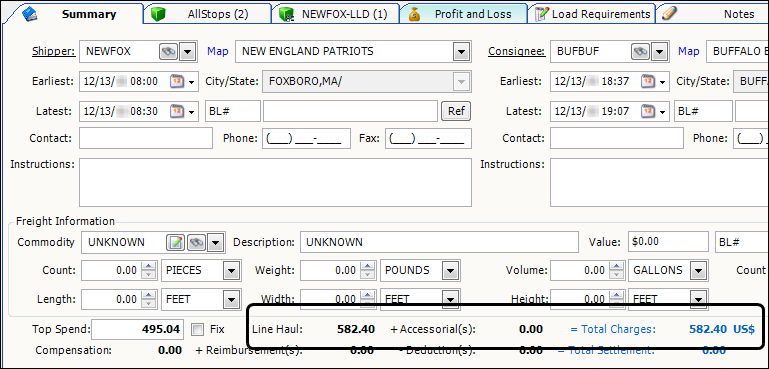
To illustrate, we started with order #1532. The Bill To on the order is company NEWFOX, who has a credit limit of $5,000. Note that the total charges on this pre-rated order are $582.40.
In the Copy Order/Trip window, we specify that the system is to make 10 copies of the order. We also have specified that the line haul and accessorial charges are to be copied.
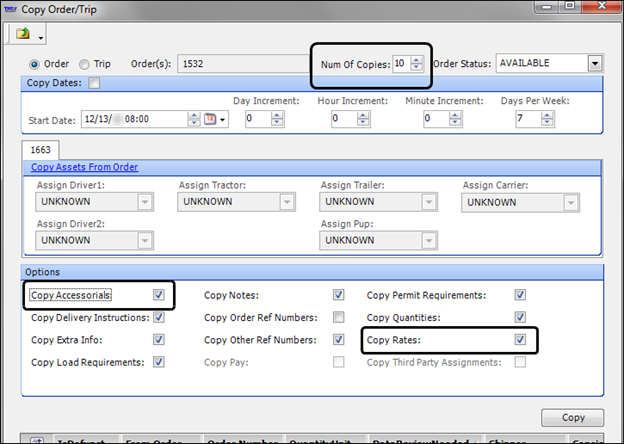
When you click Copy, the system tracks the available credit. When the credit limit has been exceeded, the system lists a status of Review for the orders that exceeded the limit. In our example, the first eight orders will have a status of Available because only $4,659.20 (8 x $582.40) of the company’s $5,000 available credit has been used. The last two orders will have a status of Review because the ninth order puts the balance over the company’s credit limit.