Working with expirations
Expirations for drivers, tractors, trailers, and carriers can be added, completed, and deleted on the Expirations tab. The Expirations tab can be accessed in two locations:
-
Driver/Asset Expirations window
-
Resource’s Profile tab
Overview of the Expirations tab
The Expirations tab in the Driver/Asset Expirations window enables you to add, delete, complete, and view expirations. The bottom section contains filters for specifying the status and date range of the expirations displayed in the grid.
Options for codes and priorities are set up in the label file, accessed in the Edit User Definable Fields window. For details on working with data grids, see Data entry grids.
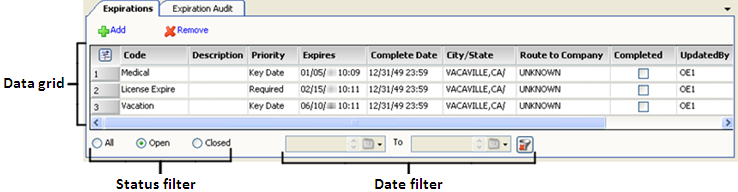
Data grid column descriptions
Code |
Brief explanation of the expiration |
Description |
Free-form message up to 95 characters |
Priority |
Priority codes rank the importance of the expiration. The default options are:
|
Expires |
Date the expiration goes into effect |
Complete Date |
Date the expiration is completed or expected to complete |
City/State |
If the expiration is a non-dispatch type, this field may contain the resource location. If the expiration is a dispatch type, this field will contain the location of the company listed in the Route to Company field. |
Route to Company |
The ID of the company where the resource will be located when the expiration is complete. Note: If the expiration is a dispatch type, there must be an entry in this field. The expiration cannot be saved when the field value is left as UNKNOWN. |
Completed |
This checkbox is used to mark the expiration as complete |
UpdatedBy |
ID of the employee who last entered/updated the expiration |
Updated On |
Date the expiration was entered/updated |
Filter descriptions
|
Display open and closed expirations for the period specified in the date fields. |
|
Display expirations that are not Completed. Selected by default. |
|
Display expirations that are Completed within the period specified in the date fields. |
|
Enter the beginning date for the period you wish to view. Note: Date fields become active when the All or Closed status is selected. |
|
Enter the end date for the period you wish to view. |
|
Change the status filter to Open and deactivate the date fields. |
Locating the Expirations tab in the Driver/Asset Expirations window
To access the Driver/Asset Expirations window, select Operations > Driver/Equipment Status, and then select a sub command:
-
Driver In/Out of Service
-
Tractor In/Out of Service
-
Trailer In/Out of Service
The Driver/Asset Expirations window opens.
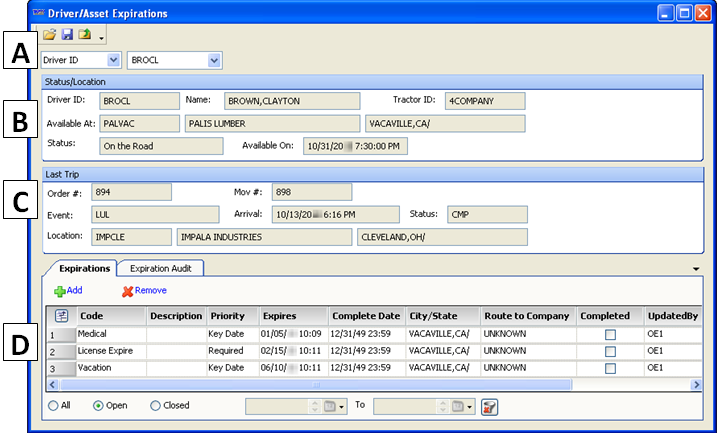
A |
In the lookup area, select the resource type and enter the ID of the resource for which you want to record, edit, or complete an expiration. |
B |
The Status/Location pane contains three rows of read-only fields that display the current status, location and availability information for the resource. The fields change based on the resource type.
|
C |
The Last Trip pane contains three rows of read-only fields with details from the resource’s last trip.
|
D |
The Expirations tab contains the data grid used to enter, complete, and update expirations. |
Locating the Expirations tab in the asset profile
If your login allows you to edit resource profiles, you can add, edit, and delete expirations on the Expirations tab in the resource’s profile.
To access the Expirations tab in a resource’s profile, follow these steps.
-
Go to Tools > Profiles and select a sub command:
-
Driver Profile
-
Tractor Profile
-
Trailer Profile
-
Carrier Profile
The Profile opens as a tab in the application window.
-
-
Select the Expirations tab.
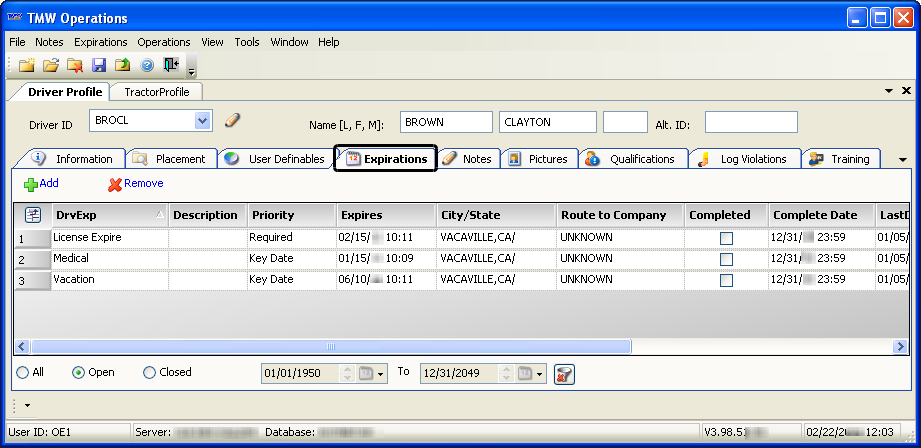
The grid on the Expirations tab can be configured to match the grid in the Expirations tab in the Driver/Asset Expirations window. The same columns are available and the procedure for adding, completing, and deleting expirations is the same.
Managing expirations
Expirations record out-of-service dates for drivers and equipment. Keeping expirations current will ensure that equipment and drivers are placed into service as soon as they are available. Dispatchers rely on accurate expirations to know when equipment and resources are available for assignment or if they become unavailable for any reason.
Adding an expiration
To add an expiration for a resource, follow these steps:
-
Do one of the following:
-
Look up the asset in the Driver/Asset Expirations window.
-
Go to Operations > Driver/Equipment Status and select the sub command for the resource type.
-
Enter the resource’s ID in the lookup area.
-
Click
 Open.
Open.
-
-
Access the asset’s profile
-
Go to Tools > Profiles and select the sub command for the resource type.
-
Enter the resource’s ID in the lookup area.
-
Click
Open. -
Select the Expirations tab.
-
-
-
Click
 Add.
Add.
A blank row is added below the last existing expiration. -
Make entries in these fields.
Required field: *
Code * |
Select the appropriate expiration type from the drop-down list. |
Description |
If you want, you can enter a free-form message up to 95 characters. |
Priority * |
Select the appropriate priority code to rank the importance of the expiration. The default options are:
|
Expires * |
Enter the date the expiration goes into effect. |
Completed |
Do not select this checkbox when adding a new expiration. It is used to mark the expiration as complete. |
Complete Date |
Enter the date the expiration is expected to be completed. |
Route to Company |
Enter the ID of the company where the resource will be located when the expiration is complete. |
City/State |
If you made an entry in the Location field, the system populates this field automatically. If no entry was made in the Location field, you can manually enter a city/state. Note: If you are entering a dispatch type expiration for a tractor, you must make an entry in the Location field or the City/State field. Dispatch type expirations have codes of 200 or greater. |
-
Click
 Save.
Save.
Deleting an expiration
If an unneeded expiration has been added for a resource, it can be deleted.
-
Do one of the following:
-
Look up the asset in the Driver/Asset Expirations window
-
Go to Operations > Driver/Equipment Status and select the sub command for the resource type.
-
Enter the resource’s ID in the lookup area.
-
Click
Open.
-
-
Access the asset’s profile
-
Go to Tools > Profiles and select the sub command for the resource type.
-
Enter the resource’s ID in the lookup area.
-
Click
Open. -
Select the Expirations tab.
-
-
-
In the grid at the bottom of the window, select the expiration you want to delete.
-
Click
 Remove.
A confirmation message opens.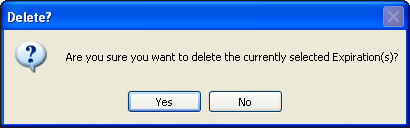
-
Click Yes to complete the deletion.
-
Click
Save.
Manually completing an expiration
When an expiration has been satisfied, you must mark it as done. Until you select the expiration’s Completed checkbox, it is still in effect.
| When a Priority 1 expiration has reached its effective date, the system will not allow the resource to be dispatched. |
Use this procedure to complete an expiration manually.
-
Do one of the following:
-
Look up the asset in the Driver/Asset Expirations window
-
Go to Operations > Driver/Equipment Status and select the sub command for the resource type.
-
Enter the resource’s ID in the lookup area.
-
Click
Open.
-
-
Access the asset’s profile
-
Go to Tools > Profiles and select the sub command for the resource type.
-
Enter the resource’s ID in the lookup area.
-
Click
Open. -
Select the Expirations tab.
-
-
-
Locate the expiration you need to complete.
-
Select the Completed checkbox.
The Complete Date field is automatically updated to the current date/time. -
Click
Save.
Viewing a resource’s completed expirations
By default, when expirations are completed, the system removes them from view. If you want, you can view completed expirations using the data filters in the lower left of the Expirations tab.
![]()
-
All
Displays open expirations and those that were marked as Completed within the date range specified by the date fields. -
Open (default)
Displays expirations that are not marked as Completed. -
Closed
Displays expirations that were marked as Completed within the date range specified by the date fields.
To view completed expirations, follow these steps:
-
Do one of the following:
-
Look up the asset in the Driver/Asset Expirations window
-
Go to Operations > Driver/Equipment Status and select the sub command for the resource type.
-
Enter the resource’s ID in the lookup area.
-
Click
Open.
-
-
Access the asset’s profile
-
Go to Tools > Profiles and select the sub command for the resource type.
-
Enter the resource’s ID in the lookup area.
-
Click
Open. -
Select the Expirations tab.
-
-
-
Select the All or Closed radio button.
The date fields become active. -
In the date fields, enter a range of completion dates for the expirations to be listed.
Notes:
-
When you retrieve only closed expirations, the system lists those that have end dates in the date range you specify.
-
If you select All, the date range affects only the listing of closed expirations; all open expirations are shown, regardless of their end dates.
-