Creating and editing routes
You create, look up, and edit routes in the Route Maintenance window.
| The illustration above shows only the basic fields. QuickDesigner was used to hide all custom fields. Your user interface may look different. For information about using QuickDesigner, see Toggling in and out of QuickDesigner mode. |
Creating a new route
Route templates created using Route Maintenance are saved in the system as master orders. To create a new route template, follow these steps:
-
Go to Tools > Route Scheduling > Route Maintenance.
-
Click
 New.
New. -
Enter route data in the Route information and schedule section.
Note: The first row of fields on the window are for lookup purposes only. They are not used to create a new route.
Required field: *
Field Definition Bill To *
ID of the company that will be billed for the orders
Effective/Expires
Date range the route is in effect
Frequency
Frequency with which the routes are run. The options include:
-
IR - Irregular
Route runs on no specific day or days. When this route is generated, the system creates order(s) for the current date.
Note: This is the default value for this field. When retrieving routes in the Route Generation window, you must select Include Irregular Routes for these routes to appear in the grid.
-
DA - Daily
Route runs every weekday (Monday through Friday). The appropriate Days of Week checkboxes are automatically selected.
-
DM - Certain days of the month
Route runs on specific days of the month (the 1st and the 15th, for example). Enter up to three days in the Days of Month fields.
-
DW - Certain days of the week
Route runs on certain days of the week (every Tuesday and Thursday, for example). Select the days using the Days of Week checkboxes.
-
MO - All days of the month
Route runs every day of the month.
-
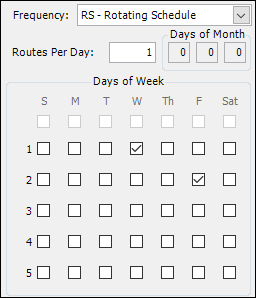
RS - Rotating Schedule
Route runs according to a pattern that you select. This pattern can extend up to five weeks. Use the Days of Week checkboxes to determine the pattern. In this illustration, a route is run on Wednesday of the first week and another route is run on Friday of the second week.
-
WK - All days of the week
Route runs every day of the week. All seven Days of Week checkboxes are automatically selected.
Routes Per Day
Number of orders that will be generated per day, as specified by the value in the Frequency field
Days of Month
Days of the month on which the routes are run. The top row of fields is active when the Frequency field is set to DM - Certain days of the month. The bottom five rows of fields are active when the Frequency field is set to RS - Rotating Schedule.
Days of Week
Days of the week on which the routes are run. These checkboxes are active when the Frequency field is set to DW - Certain days of the week.
Code *
Unique value that will identify this route. This is the value that will appear in the Route Code lookup field.
Notes:
-
If you enter a value that is already assigned to another active route, an error message appears.
-
Once you save the route, you cannot change this value.
Name *
Name of the route
Origin *
ID of the first company on the route
Destination *
ID of the last company on the route
Bill of Lading #
Reference number(s) for the route. Click Ref to add more numbers.
Master Order
The order ID of the route template
RevType1-4
Revenue classification(s) recorded for orders
Priority
Dispatch priority given to orders
Tractor
ID of the tractor assigned to orders. Use this field for simple routes that do not involve splits.
Carrier
ID of the carrier assigned to orders. Use this field for simple routes that do not involve splits.
Driver
ID of the primary driver assigned to orders. Use this field for simple routes that do not involve splits.
Driver 2
ID of the co-driver assigned to orders. Use this field for simple routes that do not involve splits.
Trailer
ID of the primary trailer assigned to orders. Use this field for simple routes that do not involve splits.
Trailer 2
ID of the secondary trailer assigned to orders. Use this field for simple routes that do not involve splits.
-
-
Click
 Save.
Save.
A warning message appears reminding you that the route template is a master order. Click OK to continue.
Using Oil Field Order Entry master orders to create routes
First available in TMW Operations 17.10
If you are using Fuel Dispatch and TMW Operations on a single database, you can create master orders in Oil Field Order Entry and copy them in Route Maintenance.
-
In Oil Field Order Entry, create and save the master order.
-
In the Route Maintenance window, click
New. -
In the Master Order field, enter the master order ID.
-
Press TAB.
The fields populate with the data you entered in the master order. -
In the Code field, enter a route code. You will use this code to look up the route in Route Maintenance.
-
In the Name field, enter a name for your route.
-
Make any other changes as desired.
-
Click
Save.
A warning message appears reminding you that the route template is a master order. Click OK to continue.
Creating routes that span over several days
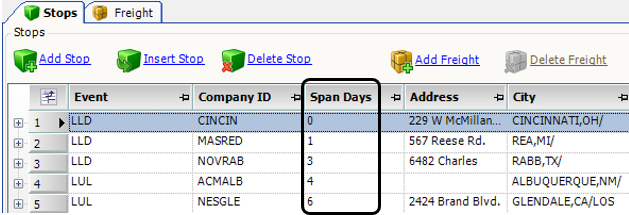
Use this procedure to create a route that spans over several days. Each time you generate orders from the route, the number of days between the first stop and each subsequent stop will reflect the number you specify in the Span Days column.
-
Add the Span Days column to the Stops grid.
-
For each stop after the first stop, enter the number of days that should pass between it and the first stop.
Note: Do not enter the number of days that pass between consecutive stops.
-
Click
Save.
A warning message appears reminding you that the route template is a master order. Click OK to continue.
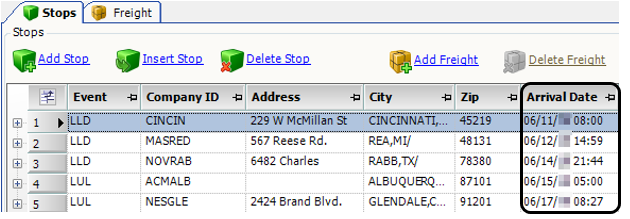
In this example, the earliest and latest dates for the live unload (LUL) is two days later than the earliest and latest dates for the live load.

This illustration displays the Trip Folder Stops grid for an order generated from this route.

In this example, the route contains several stops that span multiple days.
This illustration displays the Trip Folder Stops grid for an order generated from this route. Note the number of days between the first stop and each subsequent stop.
Looking up and editing an existing route
To look up and edit an existing route, follow these steps:
-
Go to Tools > Route Scheduling > Route Maintenance.
-
Enter lookup information in the fields provided.

Required field: *
Field Definition Bill To
Bill To company
Note: The values in the Route Code field will match the Bill To company.
Route Code *
Route code
Note: If there are multiple routes with the same route code, selecting any of them will display only the first route with that code. For this reason, we recommend using unique values for each route you create in Route Maintenance.
-
Press Enter.
The window displays the route information. -
Make changes as needed.
-
Click
Save.
Assigning resources to a route
You can assign a driver, tractor, trailer, and/or carrier to a route. When the route is generated, those resources will appear on every order. There are two ways of assigning resources:
-
Simple route assignment
For simple routes, use the resource fields in the upper portion of the Route Maintenance window.
-
Complex route assignment
For complex routes that involve split trips, you must use the resource fields in the Stops grid.
This option requires you to have
Yset in the String1 field of theAllowMasterAssignmentsGeneral Info Table setting.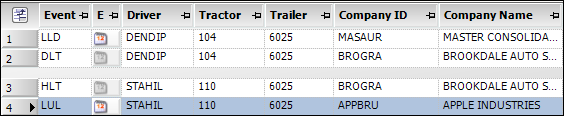
Splitting a route
If necessary, you can split routes using the following commands:
-
Park and Hook
-
Begin Empty
-
Return Empty
Use this procedure to split a route.
-
In the Route Maintenance window, create a new route or open an existing route.
-
Choose any of the following:
To save resource assignments with split trips, you must have Y set in the String1 field of the AllowMasterAssignments General Info Table setting. Resource information for split trips must be recorded in the resource fields in the Stops grid.
|
Split a trip using Park and Hook
-
Click
 Park and Hook.
The Park and Hook window opens. -
When you have completed your entries, click OK.
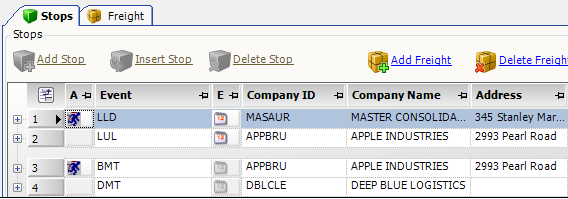
The Stops tab displays the split events.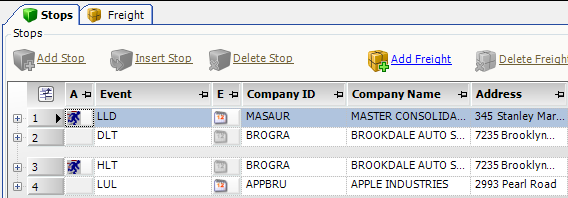
Insert Begin Empty events
-
Click
 Begin Empty.
The Begin Empty window opens. -
When you have completed your entries, click OK.
The Stops tab displays the BMT and DMT events.