Using the Turnpike Doubles feature
First available in TMW Operations: 14.40.125
A turnpike double is a tractor hauling two full sized trailers. Because of their length, these combinations are usually restricted to turnpikes or freeways. They allow truck fleets to haul the same amount of cargo with fewer trips. The tractor and two trailers are coupled (or uncoupled) at a designated location near a turnpike exchange, often referred to as a yard.
The Turnpike Doubles feature allows for easier dispatch of turnpike doubles. Here is an overview of how trailers could be dispatched when using the Turnpike Doubles feature:
-
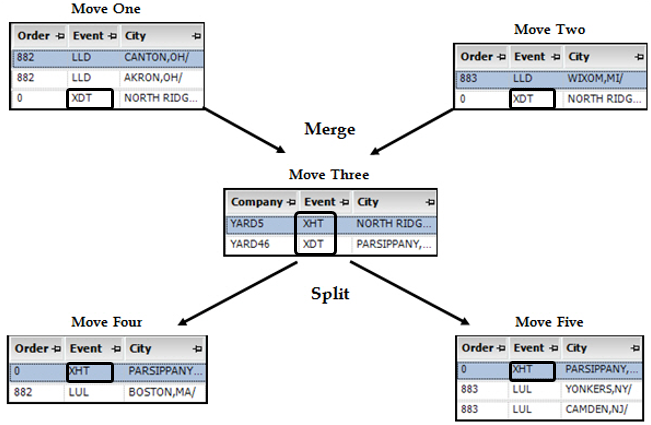
Movement One: Load trailer A at one or more stops, and drop the trailer in a turnpike yard.
-
Movement Two: Load trailer B at one or more stops, and drop the trailer in the same turnpike yard.
-
Movement Three: The turnpike tractor hooks both trailers, drives across the turnpike, and drops both trailers in a turnpike yard.
-
Movement Four: Hook trailer A to a new tractor, and make deliveries.
-
Movement Five: Hook trailer B to a new tractor, and make deliveries.
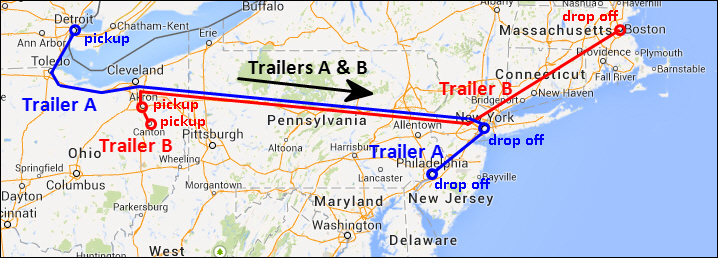
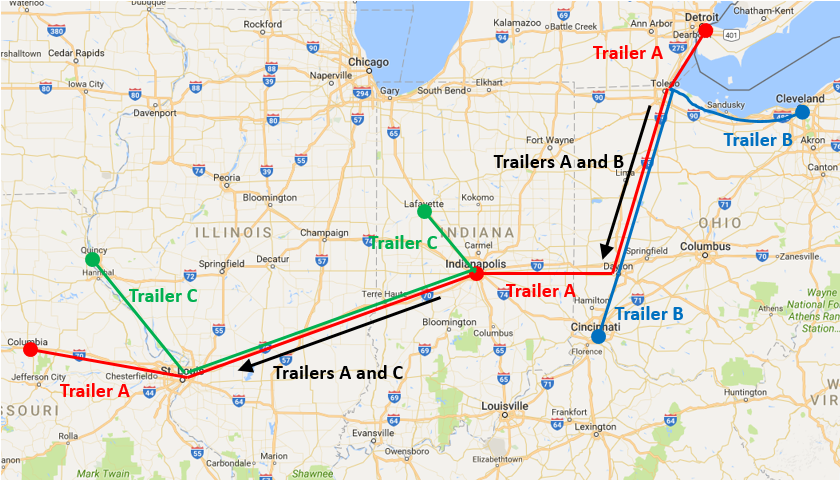
This illustration shows an example of how turnpike doubles could be used. The circles represent pickups and deliveries. Each color represents a trailer. The turnpike is represented by the portion of the route where the blue and red lines travel together.
| Although this example uses a different tractor for each movement, you can assign the same tractor to multiple movements. |
Turnpike Doubles uses additional event codes that begin with the letter "X":
-
XDT is used for dropping trailers in a turnpike yard.
-
XHT is used for hooking trailers in a turnpike yard.
Setting up yard locations
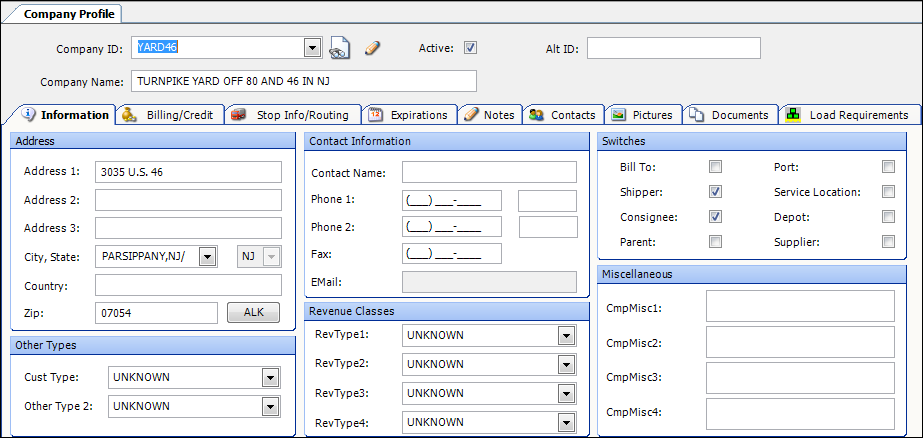
The location where the tractor and two trailers are coupled (or uncoupled) is referred to as a yard. A yard could be any physical location that is near a turnpike exchange and meets the requirements you have for working with turnpike doubles. However, to use that location with the Turnpike Doubles feature, you must create a company profile for the yard location. In the company profile you create for the yard, you must select the Shipper and Consignee checkboxes.
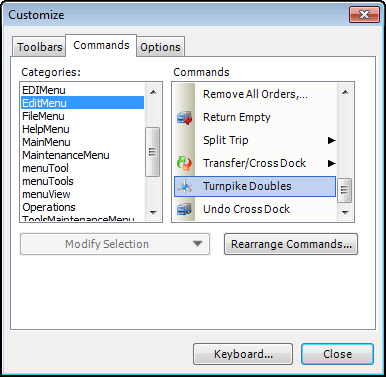
Adding the Turnpike Doubles command
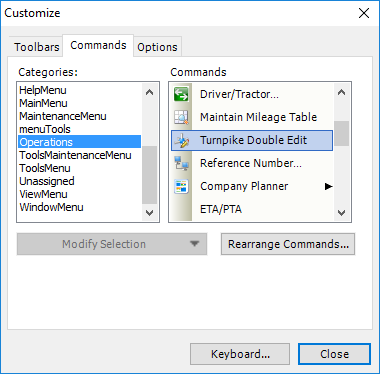
To use this feature you must add the Turnpike Doubles command to a menu or menu bar.
-
Go to Operations > Planning Worksheet.
-
Add the Turnpike Doubles command to a menu or menu bar.
For more information, see Adding existing commands to a menu.
-
Save this layout.
For more information, see Saving a menu layout with the window layout. -
Close and restart TMW Operations before attempting to use the Turnpike Doubles feature.
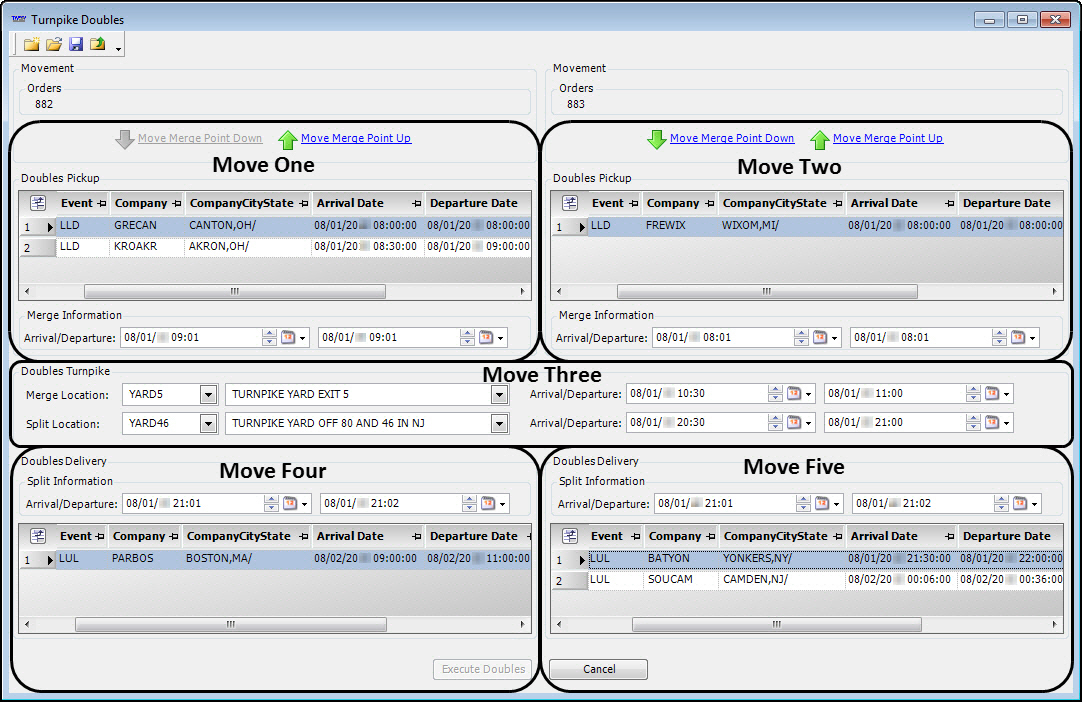
Overview of the Turnpike Doubles window
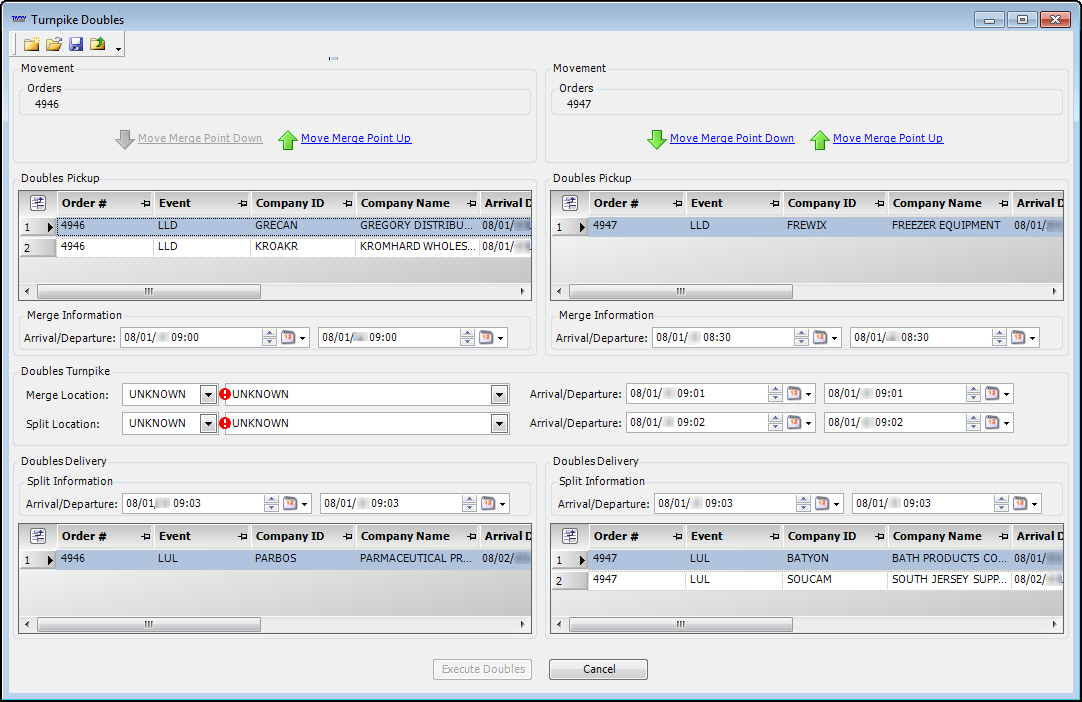
When you use the Turnpike Doubles feature to merge two trips, the system displays the Turnpike Doubles window with the orders separated into five movements. In this window, you can do the following:
-
Record arrival and departure times for all movements.
-
Record the turnpike yard locations for the merge and split.
-
Specify which stops fall before and after the merge point.
This section explains the window’s fields and links. For step-by-step information, see Merging orders for turnpike doubles.
Understanding the Move Merge Point links
When a trip has more than two stops, you can use the Move Merge Point Up and the Move Merge Point Down links at the top of the window to specify which stops fall before and after the merge point.
This illustration shows the stops before adjusting the merge point. Notice that two stops are listed above the merge point.
After clicking Move Merge Point Up, notice that the merge point now falls above the second stop. There are now two stops after the merge point. Also, notice that the Move Merge Point Up link is now unavailable because the merge point cannot be moved any higher.
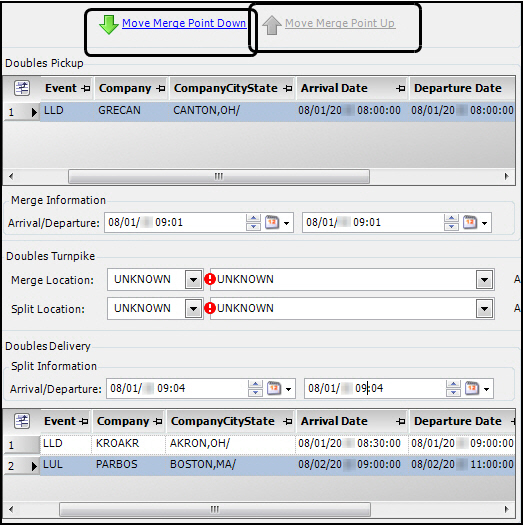
To move the merge point down, click Move Merge Point Down. Notice that there are now two stops above the merge point. Also, notice that the Move Merge Point Down link is now unavailable because the merge point cannot be moved any lower.
Field definitions for the Turnpike Doubles window
The following table contains field definitions for each of the five moves.
| Move Area | Field | Definition |
|---|---|---|
Move One |
Arrival/Departure |
The arrival and departure time at the merge location. This is for the tractor carrying the orders from Move One. Note: The system does not automatically calculate the driving time from the last pickup to the merge location. |
Move Two |
Arrival/Departure |
The arrival and departure time at the merge location. This is for the tractor carrying the orders from Move Two. Note: The system does not automatically calculate the driving time from the last pickup to the merge location. |
Move Three Note: This movement is on the turnpike. |
Merge Location |
Choose the ID of the yard at which the trailers from Moves One and Two will be dropped prior to the turnpike haul. |
Arrival/Departure |
The time the turnpike tractor arrives at the merge location, and then departs from the merge location. Note: This time must be later than the times recorded for both Move One and Move Two. |
|
Split Location |
Choose the ID of the yard at which the turnpike tractor will drop the trailers from Moves One and Two. |
|
Arrival/Departure |
The time the turnpike tractor arrives at the split location, and then departs from the split location. |
|
Move Four |
Arrival/Departure |
The first field is the arrival time of the Move Four tractor at the split. The Move Four tractor hooks the trailer from Move One (XHT). The second field is the departure time from the split location. Notes:
|
Move Five |
Arrival/Departure |
The first field is the arrival time of the Move Five tractor at the split. The Move Five tractor hooks the trailer from Move Two (XHT). The second field is the departure time from the split location. Notes:
|
|
You can customize all four grids in the Turnpike Doubles window. Your options include:
For more information, see Working with columns and Saving a new grid layout. |
Merging orders for turnpike doubles
Follow these steps to merge orders for turnpike doubles.
-
Go to Operations > Planning Worksheet.
-
Go to File > Retrieve Trips.
For more information, see Retrieving records. -
Select the two trips to be merged in the Available Trips grid.
Hold down the CTRL key while selecting.
-
Go to Edit > Turnpike Doubles.
The system displays the Turnpike Doubles window with the orders separated into five movements.Note: Dates and times are filled in, but may need to be edited.
-
Decide whether a stop should be before or after the turnpike move.
Use the Move Merge Point Up and Move Merge Point Down links to move the merge point above or below a stop. For more information, see Overview of the Turnpike Doubles window.Note: These links will only be active on an order with more than two stops.
-
Make the appropriate entries in all fields.
For field definitions, see Overview of the Turnpike Doubles window. -
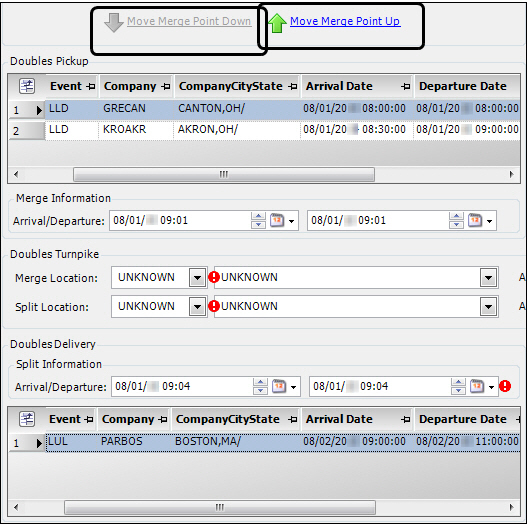
Verify there are no errors.
If there is an exclamation mark, then the time to the left is not correct and must be fixed.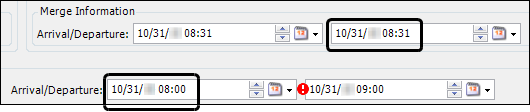
In the example above, the Arrival time of 8:00 is not after the last Departure time of 8:31. Also, you can hover your mouse over the exclamation point for an explanation.
-
Click Execute Doubles.
Note: If the button is grayed out, one of the following may have occurred:
-
A time conflict.
Make corrections in the fields to the left of exclamation marks. -
A setup issue.
If the button is grayed out, but there are no exclamation marks, there could be a setup issue. Try redoing the steps in the Adding the Turnpike Doubles command section. Be sure to save the layout, and then close and restart TMW Operations before using the feature.
-
-
Click OK on the Success window.
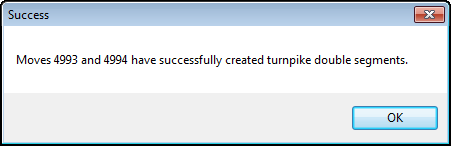
The two orders are separated into five movements.
Creating a new turnpike double from an existing turnpike double
You can create a new turnpike double using the XHT movement from an existing turnpike double. To do this, follow the steps above, selecting the XHT movement and the new order in the Planning Worksheet. The ending event in the XHT movement changes from LUL to XDT, indicating the start of the new turnpike double.
In the following illustration, Trailer A splits from Trailer B at Dayton and merges with Trailer C at Indianapolis.
Removing turnpike double movements
If you have dispatched two orders as a turnpike double by mistake, follow these instructions to remove the turnpike double movements.
-
Go to Operations > Trip Folder.
-
Open one of the orders that is on the turnpike double.
For more information, see Looking up an existing order. -
Select the XDT event.

-
Go to Edit > Delete Stop.
The Undo Turnpike double move window is displayed.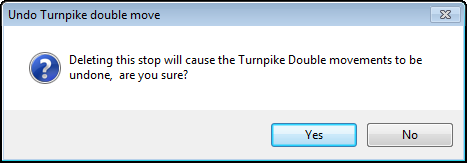
-
Click Yes on the Undo Turnpike double move window.
Note: This will delete the turnpike double movements from all orders linked to this movement.
-
Click
 Save.
Save.
Assigning assets for turnpike doubles
Follow these steps to assign assets to turnpike doubles in the Trip Folder.
| For information on assigning assets in the Turnpike Doubles Edit window, see Editing turnpike doubles in the Turnpike Doubles Edit window. |
-
Go to Operations > Trip Folder.
-
Retrieve one of the orders from the turnpike doubles movement.
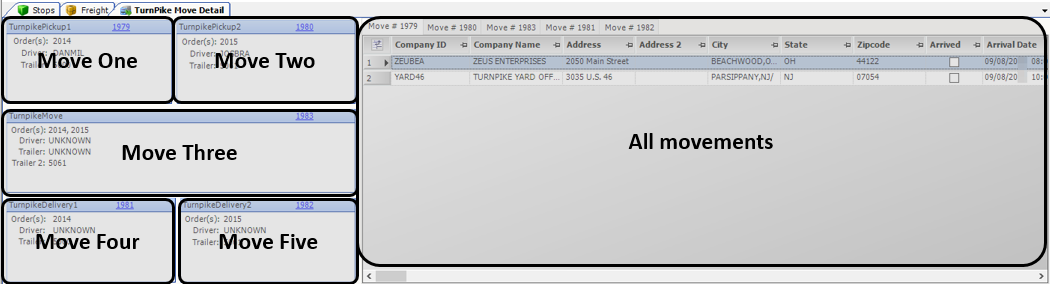
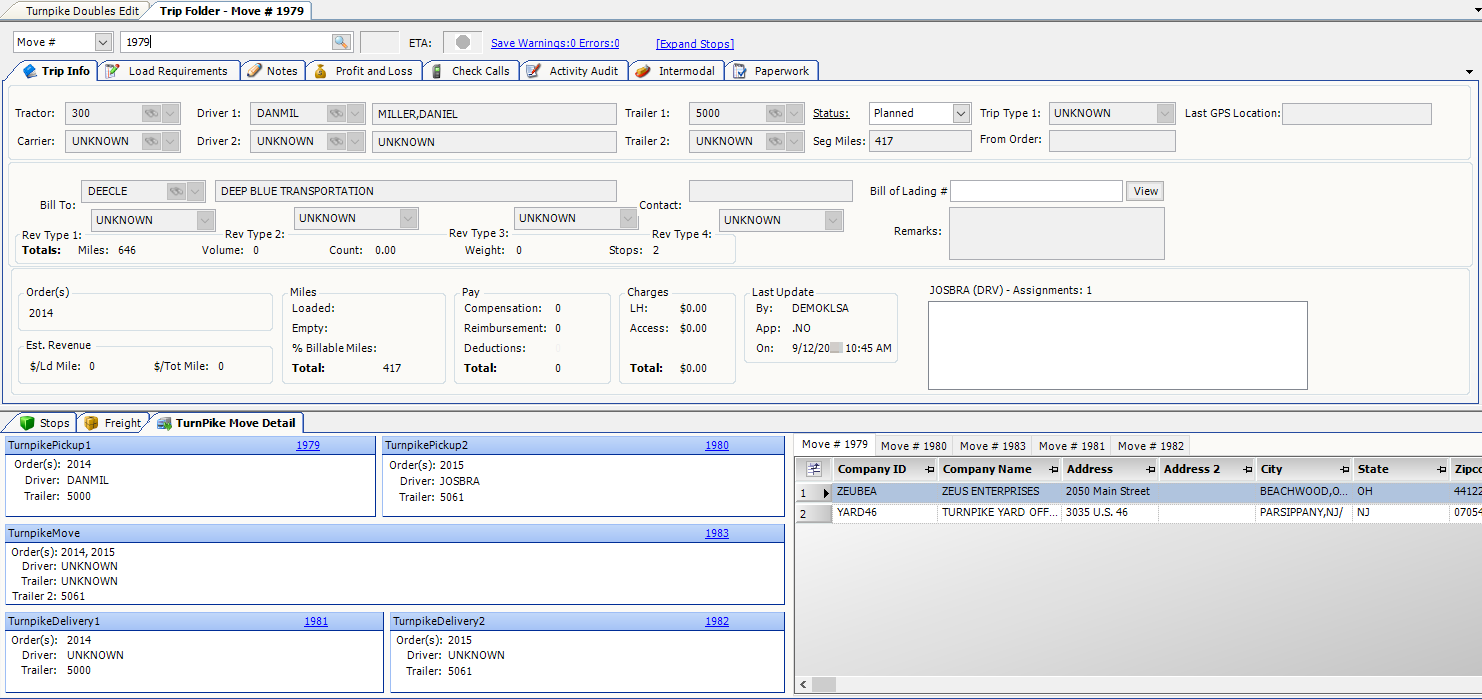
Notice that there is a TurnPike Move Detail tab on the lower portion of the Trip Folder.
-
Click the TurnPike Move Detail tab.
The tab contains sections for each individual move and a section displaying stop information for all moves.
-
Click the movement number in the appropriate section.
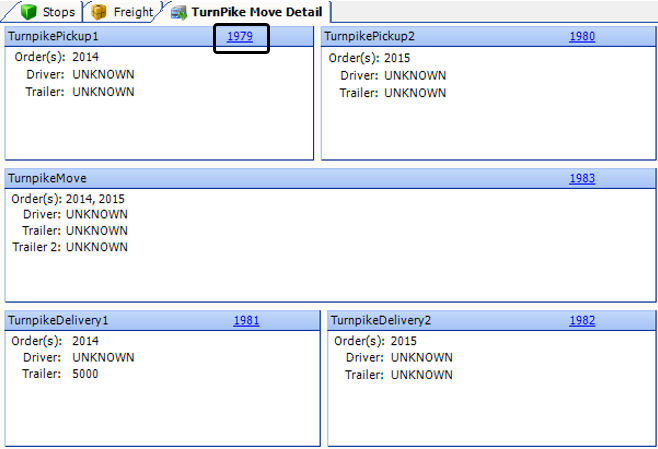
Note: You cannot assign assets in the All Movements section. This section is only for viewing the movements.
-
Notes:
-
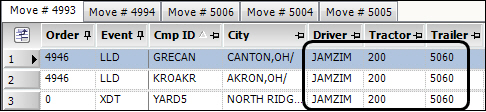
If assets were assigned before creating the turnpike double, they will remain on the first and second movements. You must assign assets to the third, fourth, and fifth movements.
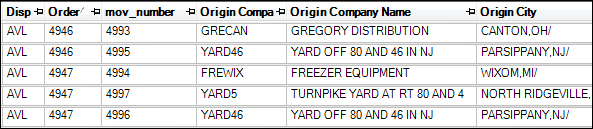
In this example, assets were assigned to both orders before the turnpike doubles command was executed. The following is the result:
-
Driver JAMZIM, tractor 200, and trailer 5060 were retained on the first movement (order 4946).
-
Driver NEISMI, tractor 201, and trailer 5003 were retained on the second movement (order 4947).

-
In the summary portion of the Turnpike Move Detail tab, only the trailer shows as having carried over to the third, fourth, and fifth movements.
Here is the summary portion of the screen:
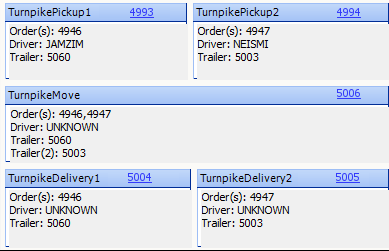
Below is the third movement. Trailer assignments carried over. Only the driver and tractor need to be assigned.

Below is the fourth movement. Trailer assignments carried over. Notice that the original driver and tractor IDs display on the LUL event. These values will be overwritten when you assign assets to the XHT event.

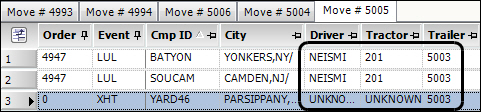
Below is the fifth movement. Trailer assignments carried over. Notice that the original driver and tractor IDs display on the LUL events. These values will be overwritten when you assign assets to the XHT event.
-
-
If the Trailer 1 or Trailer 2 field is read-only, you may need to change the
[Dispatch]TrailerOptionand[Dispatch]PupTrailerOptionsettings in your TTS50. -
If you assign an asset and change it later, the change will cascade to the other movements. For example, if you change the trailer assigned to move one, the system will assign the new trailer to moves three and four.
-
The system will check for time conflicts. Changing the time of one movement may require additional changes to subsequent movements. A save warning message will display when you attempt to save a trip that has a time conflict.
-
-
Click
Save. -
Repeat Steps 4 through 6 until all movements have assets assigned.
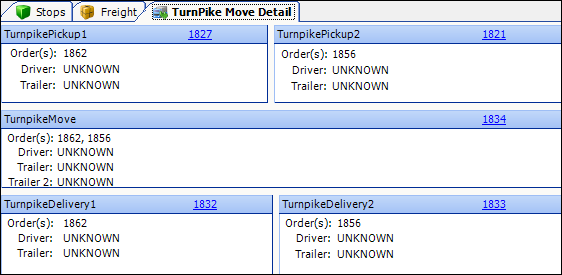
Editing the TurnPike Move Detail tab
The TurnPike Move Detail tab comes with a default layout. However, you can screen design the tab to display whichever fields you prefer. The default layout is shown below:
To add a new item to the layout, follow these steps:
-
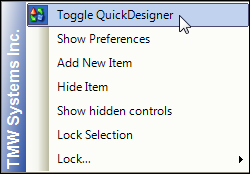
Right-click in the area you want to edit and select Toggle QuickDesigner.
-
Right-click in the area you want to edit and select Add New Item.
The Add New Item window opens.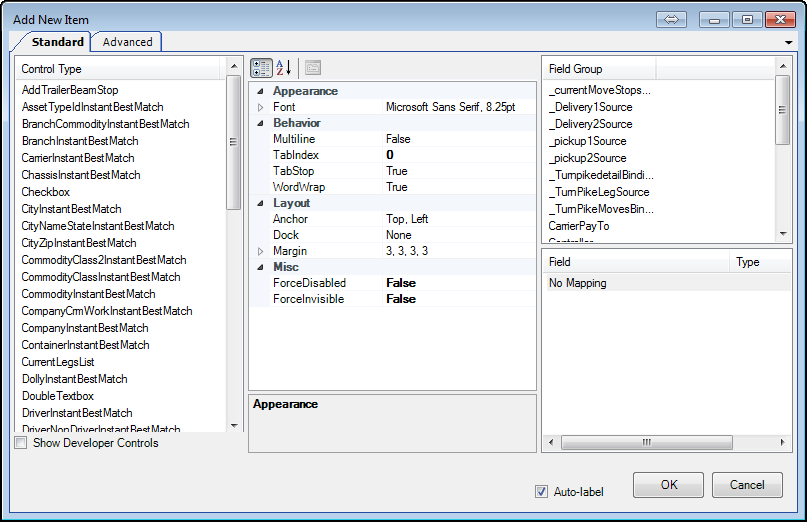
-
In the Field Group section, select the appropriate field group.
Note: Do not select a Control Type.
There are five field groups, each of which pulls information from one of the five moves.
Field Definition _pickup1Source
Fields for the pickup stops on the first order
_pickup2Source
Fields for the pickup stops on the second order
_TurnPikeLegSource
Fields for the turnpike move
_Delivery1Source
Fields for the delivery stops on the first order
_Delivery2Source
Fields for the delivery stops on the second order
-
In the Field section, select the appropriate field.
For example, to add the Tractor field to the TurnpikePickup1 area of the tab, do the following:
-
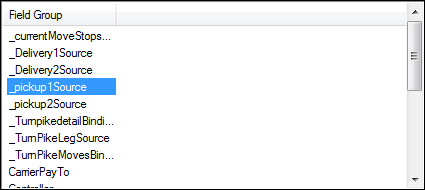
Select _pickup1Source as the field group.
-
Select Tractor as the field.
-
-
Click OK.
-
Repeat Steps 2-5 for each item that you want to add.
-
When you have finished making your changes, right-click in any of the edited areas and select Toggle QuickDesigner.
To hide items that are part of the default layout, follow these steps:
-
Right-click in the area you want to edit and select Toggle QuickDesigner.
-
Right-click on the item that you want to hide.
-
Select Hide Item.
Editing turnpike doubles in the Turnpike Doubles Edit window
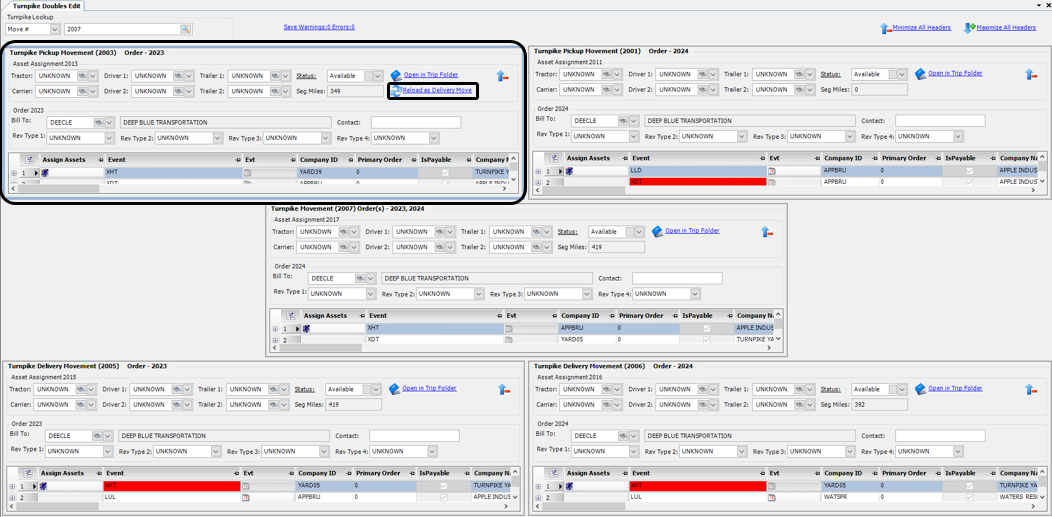
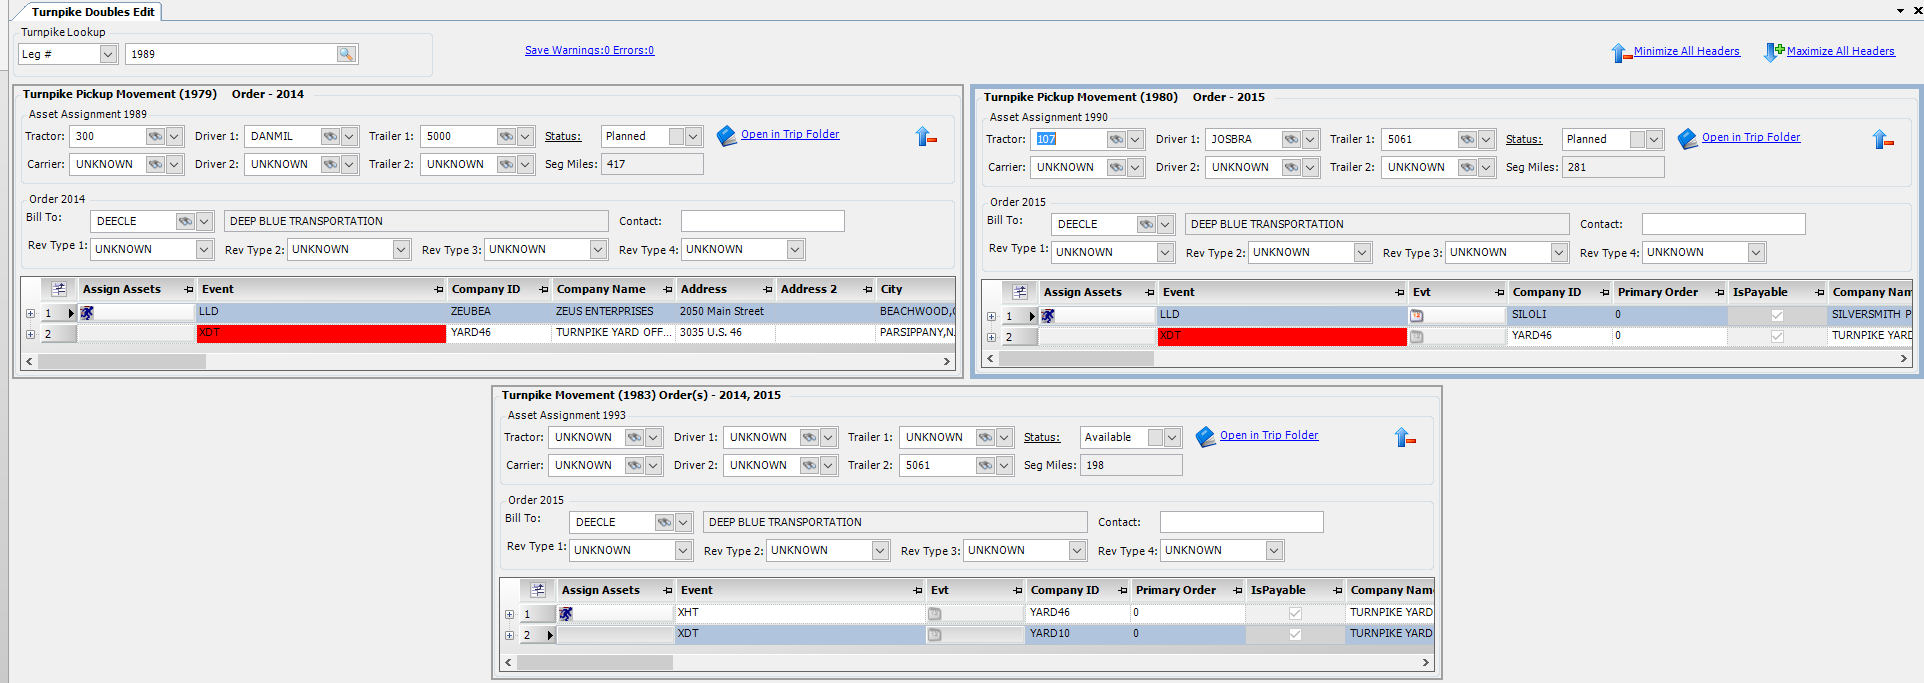
In the Turnpike Doubles Edit window, you can view and edit all moves that are part of a single turnpike double. It contains five Turnpike Movement sections, each representing a single move.
The Turnpike Doubles Edit window appears when you double-click on a turnpike move order from within the Planning Worksheet. If desired, you can also add the Turnpike Doubles Edit command to a menu or toolbar, following the instructions in Adding existing commands to a menu.
|
Use the fields in the Turnpike Lookup section to look up a turnpike move or order. If your entry does not correspond to a turnpike move or order, an error message displays.

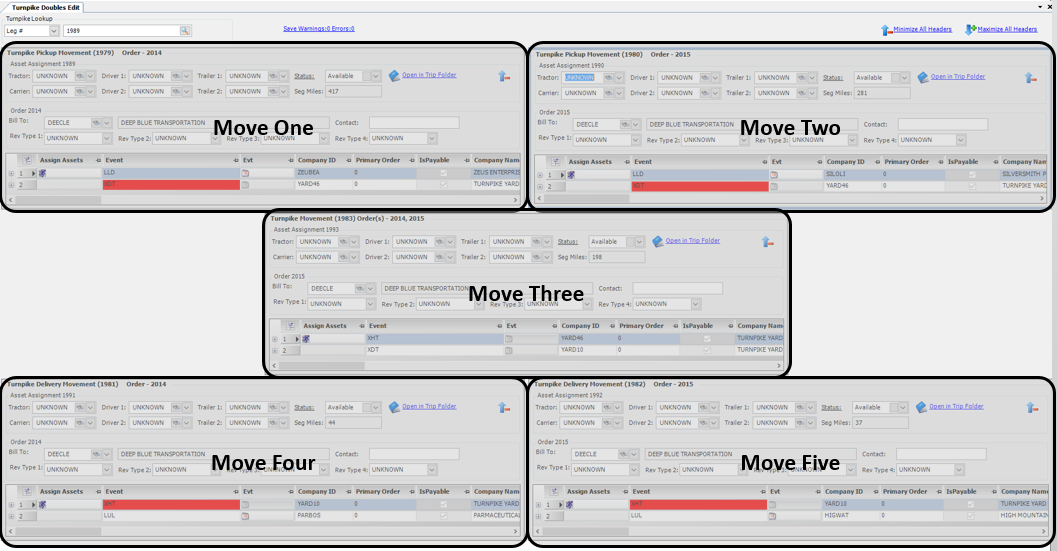
Each Turnpike Movement section contains asset assignment and order header fields as well as a Stops grid. A blue border indicates the active section. In this illustration, Move Two is active.
You can assign assets in the Asset Assignment section or via the Assign Driver/Equipment window. When assigning assets, only the trailer cascades through the turnpike double. Drivers, tractors, and carriers do not cascade past the move in which they are assigned.

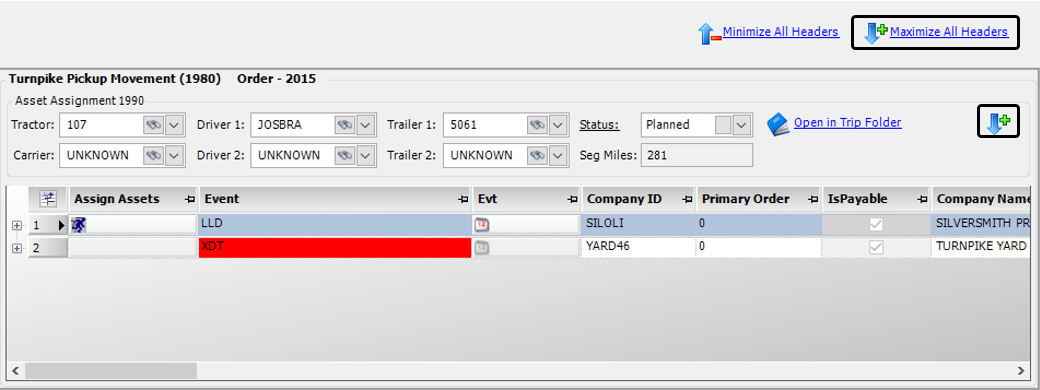
By default, the order header fields are displayed. To hide them for an individual section, click ![]() Hide Header in the section. To hide them for all sections, click Minimize All Headers.
Hide Header in the section. To hide them for all sections, click Minimize All Headers.
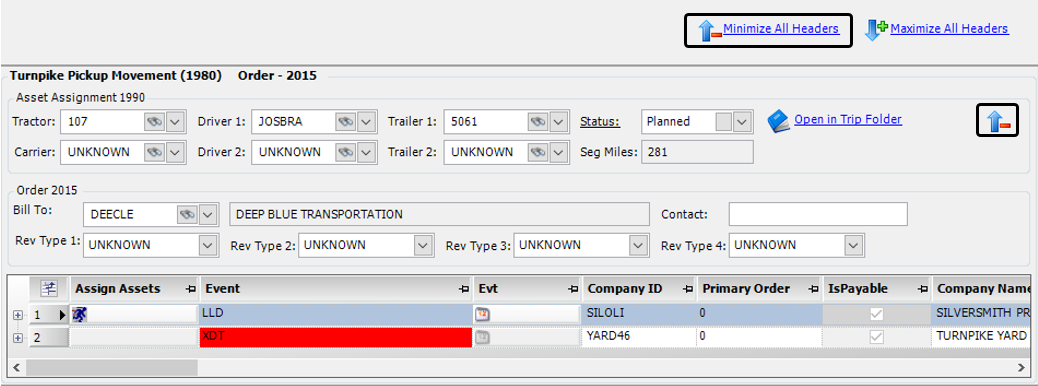
To show order fields for an individual section, click ![]() Show Header in that section. To show them for all sections, click Maximize All Headers.
Show Header in that section. To show them for all sections, click Maximize All Headers.
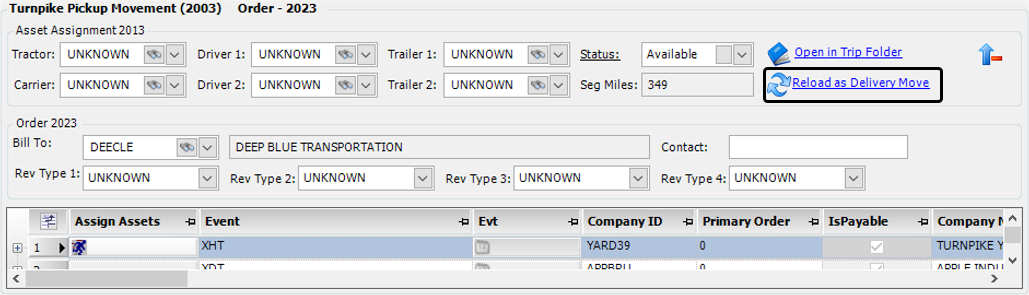
To view additional details about a move, click Open in Trip Folder.
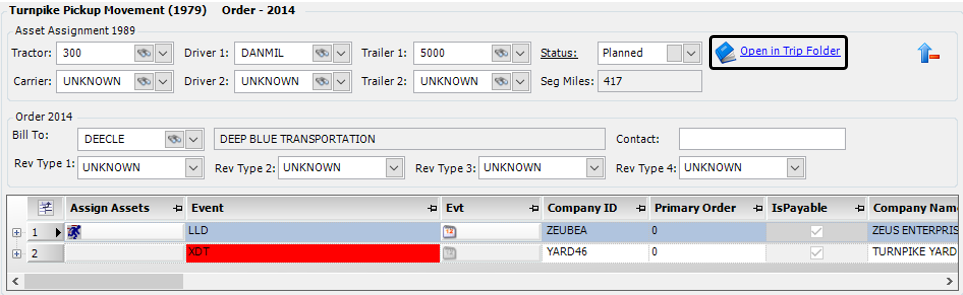
This opens a new instance of the Trip Folder with the TurnPike Move Detail tab visible. Changes made on this window will appear on the Turnpike Doubles Edit window. However, you must save your changes before you can make any additional edits on the Turnpike Doubles Edit window.
For multiple connected turnpike doubles, the Reload as Pickup Move and Reload as Delivery Move options allow you to switch between turnpike doubles.
In this illustration, the XHT movement of one turnpike double (Move Five) has been merged with another trip, creating a second turnpike double.
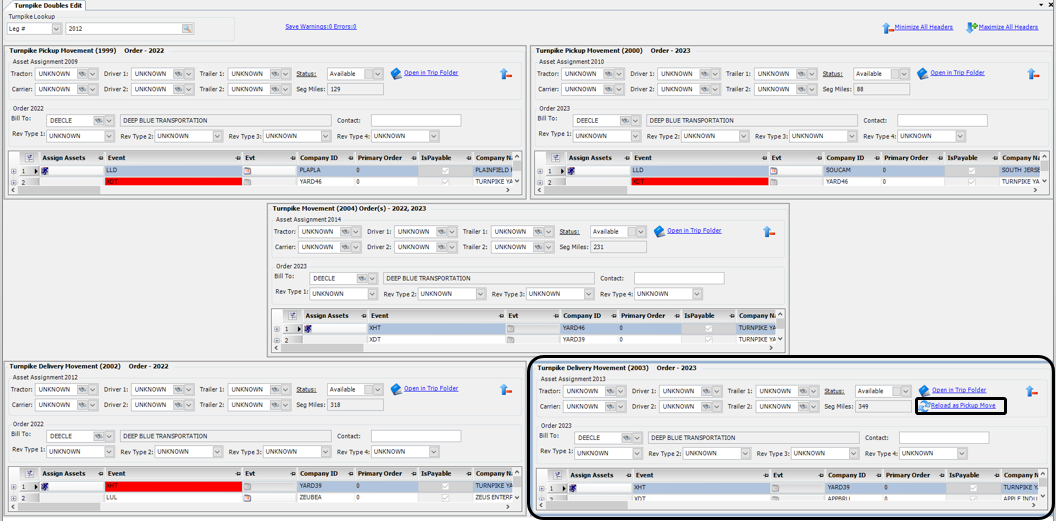
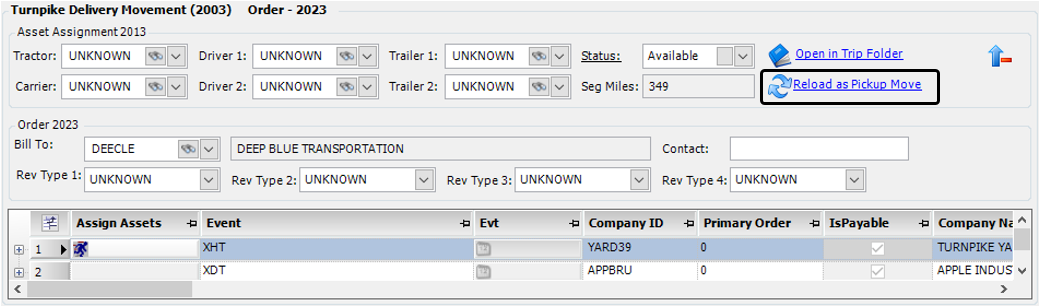
Clicking Reload as Pickup Move retrieves the second turnpike double. The same movement now appears as Move One. Clicking Reload as Delivery Move retrieves the first turnpike double.